Build Data Pipelines with Snowflake DCM Projects
Overview
In the Get Started with Snowflake DCM Projects guide, you learned the fundamentals of DCM Projects — how to define Snowflake infrastructure as code, use Jinja templating, and plan and deploy changes from Snowsight Workspaces.
In this guide, you'll take that a step further. You'll work with two separate DCM Projects that together build a complete data pipeline:
- DCM_Platform_Demo — Defines shared platform infrastructure: a database, raw staging tables, an ingestion stage and Task, warehouses, roles, and grants
- DCM_Pipeline_Demo — Defines a data transformation pipeline on top of the platform: silver-layer Dynamic Tables, gold-layer fact tables and views, and data quality expectations
By splitting platform infrastructure and data pipelines into separate projects, you get a clean separation of concerns. The Platform project can be owned by a platform team and deployed independently, while the Pipeline project can be owned by a data engineering team that builds transformations on top.
Note: DCM Projects is currently in Public Preview. See the DCM Projects documentation for the latest details.
Prerequisites
- A Snowflake account with ACCOUNTADMIN access (or a role with sufficient privileges)
- Familiarity with DCM Projects concepts (complete Get Started with Snowflake DCM Projects first)
What You'll Learn
- How to split infrastructure into multiple DCM Projects with different responsibilities
- How to define stage-based data ingestion with Tasks and CRON schedules
- How to build a medallion architecture (bronze/silver/gold layers) using Dynamic Tables defined as code
- How to use Jinja macros and loops to create per-team infrastructure (warehouses, roles, grants)
What You'll Need
- A Snowflake account with ACCOUNTADMIN access
- A Snowsight Workspace linked to the sample DCM Projects repository (created in Get Started with Snowflake DCM Projects)
What You'll Build
-
A fully deployed data platform and transformation pipeline consisting of:
- A shared raw database with 16 staging tables
- An ingestion stage and scheduled Task for loading CSV data
- Per-team warehouses, databases, roles, and grants
- A silver layer of Dynamic Tables that clean, filter, and transform raw data
- A gold layer of fact tables, views, and aggregate calculations
- Data quality expectations attached to gold-layer tables
Set Up Roles and Permissions
In this step, you'll create a dedicated admin role for managing DCM Projects and grant it the necessary privileges.
If you already have the workspace from Get Started with Snowflake DCM Projects, navigate to Quickstarts/DCM_Project_Quickstart_2 and open the setup.ipynb notebook. Otherwise, create a new workspace from the Git repository:
- In Snowsight, navigate to Workspaces.
- Click Create and select From Git repository.
- Enter the repository URL:
https://github.com/snowflake-labs/snowflake_dcm_projects - Select an API Integration for GitHub (create one if needed).
- Select Public repository and click Create.
Once the workspace is created, navigate to Quickstarts/DCM_Project_Quickstart_2 and open the setup.ipynb notebook. Connect it to a compute pool so you can run the setup commands step by step.
Create a DCM Developer Role
Run the following SQL in a Snowsight worksheet or in the setup notebook:
USE ROLE ACCOUNTADMIN;

CREATE ROLE IF NOT EXISTS dcm_developer;
SET user_name = (SELECT CURRENT_USER());
GRANT ROLE dcm_developer TO USER IDENTIFIER($user_name);
Grant Infrastructure Privileges
The DCM_DEVELOPER role needs privileges to create infrastructure objects through DCM deployments:
GRANT CREATE WAREHOUSE ON ACCOUNT TO ROLE dcm_developer;
GRANT CREATE ROLE ON ACCOUNT TO ROLE dcm_developer;
GRANT CREATE DATABASE ON ACCOUNT TO ROLE dcm_developer;
GRANT EXECUTE MANAGED TASK ON ACCOUNT TO ROLE dcm_developer;
GRANT EXECUTE TASK ON ACCOUNT TO ROLE dcm_developer;

GRANT MANAGE GRANTS ON ACCOUNT TO ROLE dcm_developer;
Grant Data Quality Privileges
To define and test data quality expectations, grant the following:
GRANT APPLICATION ROLE SNOWFLAKE.DATA_QUALITY_MONITORING_VIEWER TO ROLE dcm_developer;
GRANT APPLICATION ROLE SNOWFLAKE.DATA_QUALITY_MONITORING_ADMIN TO ROLE dcm_developer;
GRANT DATABASE ROLE SNOWFLAKE.DATA_METRIC_USER TO ROLE dcm_developer;
GRANT EXECUTE DATA METRIC FUNCTION ON ACCOUNT TO ROLE dcm_developer WITH GRANT OPTION;
Create a Warehouse (Optional)
If you don't have a warehouse available, create one. DCM commands are mostly metadata changes, so an X-Small warehouse is sufficient:
USE ROLE dcm_developer;

CREATE WAREHOUSE IF NOT EXISTS dcm_wh
WITH
    WAREHOUSE_SIZE = 'XSMALL'
    AUTO_SUSPEND = 300
    COMMENT = 'For Quickstart Demo of DCM Projects';
Explore the Platform Project
Before deploying anything, take a moment to explore the Platform project structure. Navigate to DCM_Platform_Demo in the file explorer.
Manifest
Open manifest.yml. The Platform manifest defines two targets (DEV and PROD) and includes several templating variables:
manifest_version: 2
type: DCM_PROJECT

default_target: DCM_DEV

targets:
  DCM_DEV:
    account_identifier: MYORG-MY_DEV_ACCOUNT
    project_name: DCM_DEMO.PROJECTS.DCM_PLATFORM_DEV
    project_owner: DCM_DEVELOPER
    templating_config: DEV

  DCM_PROD:
    account_identifier: MYORG-MY_PROD_ACCOUNT
    project_name: DCM_DEMO.PROJECTS.DCM_PLATFORM
    project_owner: DCM_PROD_DEPLOYER
    templating_config: PROD

templating:
  defaults:
    users:
      - "GITHUB_ACTIONS_SERVICE_USER"
    wh_size: "X-SMALL"

  configurations:
    DEV:
      env_suffix: "_DEV"
      users:
        - "GITHUB_ACTIONS_SERVICE_USER"
        - "INSERT_YOUR_USER"
      project_owner_role: "DCM_DEVELOPER"
      teams:
        - name: "Finance"
          raw_access: "READ"
        - name: "Marketing"
          raw_access: "READ"

    PROD:
      env_suffix: ""
      project_owner_role: "DCM_PROD_DEPLOYER"
      wh_size: "MEDIUM"
      teams:
        - name: "Marketing"
          raw_access: "READ"
        - name: "Finance"
          raw_access: "READ"
        - name: "HR"
          raw_access: "NONE"
        - name: "IT"
          raw_access: "WRITE"
        - name: "Sales"
          raw_access: "NONE"
        - name: "Research"
          raw_access: "NONE"
        - name: "Design"
          raw_access: "NONE"
A few things to notice:
teams— DEV has two teams (Finance and Marketing), while PROD has seven. Each team has araw_accessproperty that controls whether it getsREAD,WRITE, or no access to the shared raw tables. The Jinja loops in the definition files will create per-team infrastructure for each.users— Defined as a list. The DEV configuration includesINSERT_YOUR_USERas a placeholder for your own Snowflake username.wh_size— DEV uses X-Small warehouses (the default), PROD uses Medium.
Definition Files
The sources/definitions/ directory contains three SQL files:
| File | What It Defines |
|---|---|
raw.sql | Shared database (DCM_DEMO_2_DEV), RAW schema, and 16 staging tables with change tracking |
wh_roles_and_grants.sql | Per-team warehouses, databases, schemas, roles, and grants using Jinja loops |
ingest.sql | INGEST schema, a file format, a stage for CSV files, and a scheduled Task for loading data |
Raw Tables
Open raw.sql. This file defines a shared database and 16 staging tables for a financial trading dataset. Each table has CHANGE_TRACKING = TRUE and DATA_METRIC_SCHEDULE = 'TRIGGER_ON_CHANGES' enabled:
DEFINE DATABASE dcm_demo_2{{env_suffix}};
DEFINE SCHEMA dcm_demo_2{{env_suffix}}.raw;

DEFINE TABLE dcm_demo_2{{env_suffix}}.raw.account_stg (
    cdc_flag VARCHAR(1) COMMENT 'I OR U DENOTES INSERT OR UPDATE',
    cdc_dsn TIMESTAMP_NTZ(9) COMMENT 'DATABASE SEQUENCE NUMBER',
    ca_id NUMBER(38,0) COMMENT 'CUSTOMER ACCOUNT IDENTIFIER',
    ca_b_id NUMBER(38,0) COMMENT 'IDENTIFIER OF THE MANAGING BROKER',
    ca_c_id NUMBER(38,0) COMMENT 'OWNING CUSTOMER IDENTIFIER',
    ca_name VARCHAR(50) COMMENT 'NAME OF CUSTOMER ACCOUNT',
    ca_tax_st NUMBER(38,0) COMMENT '0, 1 OR 2 TAX STATUS OF THIS ACCOUNT',
    ca_st_id VARCHAR(4) COMMENT 'ACTV OR INAC CUSTOMER STATUS TYPE IDENTIFIER'
)
CHANGE_TRACKING = TRUE
DATA_METRIC_SCHEDULE = 'TRIGGER_ON_CHANGES';
The full file defines tables for accounts, cash transactions, customers, daily market data, dates, finwire records, holding history, HR data, industries, prospects, status types, tax rates, time dimensions, trades, trade history, and watch history.
Per-Team Infrastructure
Open wh_roles_and_grants.sql. This is where the Jinja {% for %} loop creates infrastructure for each team defined in the manifest:
{% for team in teams %}
    {% set team_name = team.name | upper %}
    DEFINE WAREHOUSE dcm_demo_2_{{team_name}}_wh{{env_suffix}}
        WITH WAREHOUSE_SIZE='{{wh_size}}'
        COMMENT = 'For DCM Demo Quickstart 2';
    DEFINE DATABASE dcm_demo_2_{{team_name}}{{env_suffix}};
    DEFINE SCHEMA dcm_demo_2_{{team_name}}{{env_suffix}}.projects;
    DEFINE SCHEMA dcm_demo_2_{{team_name}}{{env_suffix}}.analytics;

    {{ create_team_roles(team_name) }}

    {% if team.raw_access == 'READ' %}
        GRANT USAGE ON DATABASE dcm_demo_2{{env_suffix}} TO ROLE dcm_demo_2_{{team_name}}{{env_suffix}}_admin;
        GRANT USAGE ON SCHEMA dcm_demo_2{{env_suffix}}.raw TO ROLE dcm_demo_2_{{team_name}}{{env_suffix}}_admin;
        GRANT SELECT ON ALL TABLES IN SCHEMA dcm_demo_2{{env_suffix}}.raw TO ROLE dcm_demo_2_{{team_name}}{{env_suffix}}_admin;

    {% elif team.raw_access == 'WRITE' %}
        GRANT USAGE ON DATABASE dcm_demo_2{{env_suffix}} TO ROLE dcm_demo_2_{{team_name}}{{env_suffix}}_admin;
        GRANT USAGE ON SCHEMA dcm_demo_2{{env_suffix}}.raw TO ROLE dcm_demo_2_{{team_name}}{{env_suffix}}_admin;
        GRANT SELECT ON ALL TABLES IN SCHEMA dcm_demo_2{{env_suffix}}.raw TO ROLE dcm_demo_2_{{team_name}}{{env_suffix}}_admin;
        GRANT INSERT, UPDATE, DELETE ON ALL TABLES IN SCHEMA dcm_demo_2{{env_suffix}}.raw TO ROLE dcm_demo_2_{{team_name}}{{env_suffix}}_admin;
    {% endif %}

    {% if team_name == 'FINANCE' %}
        GRANT DATABASE ROLE SNOWFLAKE.DATA_METRIC_USER TO ROLE dcm_demo_2_{{team_name}}{{env_suffix}}_admin;
        GRANT EXECUTE DATA METRIC FUNCTION ON ACCOUNT TO ROLE dcm_demo_2_{{team_name}}{{env_suffix}}_admin;
    {% endif %}
{% endfor %}
For each team, this creates a dedicated warehouse, database, and schemas (PROJECTS and ANALYTICS). The raw_access property from the manifest controls how much access each team gets to the shared raw tables — READ grants SELECT, WRITE additionally grants INSERT, UPDATE, and DELETE, and NONE skips the grants entirely. The {% if team_name == 'FINANCE' %} conditional grants data quality privileges to the Finance team, which needs them for the Pipeline project's expectations.
Grants Macro
Open sources/macros/grants_macro.sql. This reusable macro creates a standard role hierarchy for each team:
{% macro create_team_roles(team) %}

    DEFINE ROLE dcm_demo_2_{{team}}{{env_suffix}}_admin;
    DEFINE ROLE dcm_demo_2_{{team}}{{env_suffix}}_usage;

    GRANT CREATE SCHEMA ON DATABASE dcm_demo_2_{{team}}{{env_suffix}}
        TO ROLE dcm_demo_2_{{team}}{{env_suffix}}_admin;
    GRANT USAGE ON WAREHOUSE dcm_demo_2_{{team}}_wh{{env_suffix}}
        TO ROLE dcm_demo_2_{{team}}{{env_suffix}}_usage;
    GRANT USAGE ON DATABASE dcm_demo_2_{{team}}{{env_suffix}}
        TO ROLE dcm_demo_2_{{team}}{{env_suffix}}_usage;
    GRANT USAGE ON SCHEMA dcm_demo_2_{{team}}{{env_suffix}}.projects
        TO ROLE dcm_demo_2_{{team}}{{env_suffix}}_usage;
    GRANT CREATE DCM PROJECT ON SCHEMA dcm_demo_2_{{team}}{{env_suffix}}.projects
        TO ROLE dcm_demo_2_{{team}}{{env_suffix}}_admin;

    GRANT ROLE dcm_demo_2_{{team}}{{env_suffix}}_usage TO ROLE dcm_demo_2_{{team}}{{env_suffix}}_admin;
    GRANT ROLE dcm_demo_2_{{team}}{{env_suffix}}_admin TO ROLE {{project_owner_role}};

    {% for user_name in users %}
        GRANT ROLE dcm_demo_2_{{team}}{{env_suffix}}_usage TO USER {{user_name}};
    {% endfor %}
{% endmacro %}
Each team gets an _admin role (with CREATE permissions) and a _usage role (with read access), following a standard role hierarchy pattern where usage rolls up into admin, and admin rolls up into the project owner. The {{env_suffix}} in the role names ensures DEV and PROD roles are distinct.
Ingestion
Open ingest.sql. This file defines the data ingestion infrastructure:
DEFINE SCHEMA dcm_demo_2{{env_suffix}}.ingest;

DEFINE STAGE dcm_demo_2{{env_suffix}}.ingest.dcm_sample_data
    DIRECTORY = ( ENABLE = TRUE )
    COMMENT = 'for csv files with sample data to demo DCM Pipeline project';

DEFINE FILE FORMAT dcm_demo_2{{env_suffix}}.ingest.csv_format
    TYPE = CSV
    COMPRESSION = NONE
    FIELD_OPTIONALLY_ENCLOSED_BY = '"'
    SKIP_HEADER = 1
    FIELD_DELIMITER = ','
    NULL_IF = ('NULL', 'null', '')
    EMPTY_FIELD_AS_NULL = TRUE;

DEFINE TASK dcm_demo_2{{env_suffix}}.ingest.load_new_data
SCHEDULE='USING CRON 15 8-18 * * MON-FRI CET'
COMMENT = 'loading sample data to demo DCM Pipeline project'
AS
BEGIN
    COPY INTO dcm_demo_2{{env_suffix}}.raw.date_stg
    FROM '@dcm_demo_2{{env_suffix}}.ingest.dcm_sample_data/DATE_STG.csv'
    FILE_FORMAT = dcm_demo_2{{env_suffix}}.ingest.csv_format
    ON_ERROR = CONTINUE;

    -- ... similar COPY INTO statements for all 16 staging tables ...

    CALL SYSTEM$SET_RETURN_VALUE('raw dataset loaded into all staging tables');
END;
One concept here that wasn't covered in Get Started with Snowflake DCM Projects is SCHEDULE with CRON — the Task is configured to run on a schedule (every hour from 8 AM to 6 PM, Monday through Friday). In production, this would automatically ingest new data on a recurring basis. The file format and stage are defined as regular DCM objects that the Task references.
Deploy the Platform Project
Now that you've explored the Platform project files, create the DCM Project object and deploy it.
Create the DCM Project Object
Run the following in the setup notebook or in a Snowsight worksheet:
USE ROLE dcm_developer;

CREATE DATABASE IF NOT EXISTS dcm_demo;
CREATE SCHEMA IF NOT EXISTS dcm_demo.projects;

CREATE DCM PROJECT IF NOT EXISTS dcm_demo.projects.dcm_platform_dev
    COMMENT = 'for DCM Platform Demo - Quickstart 2';
The Platform project object lives in dcm_demo.projects. Later, you'll create the Pipeline project object in the Finance team's database instead — demonstrating how teams can own their own projects independently.
Plan the Deployment
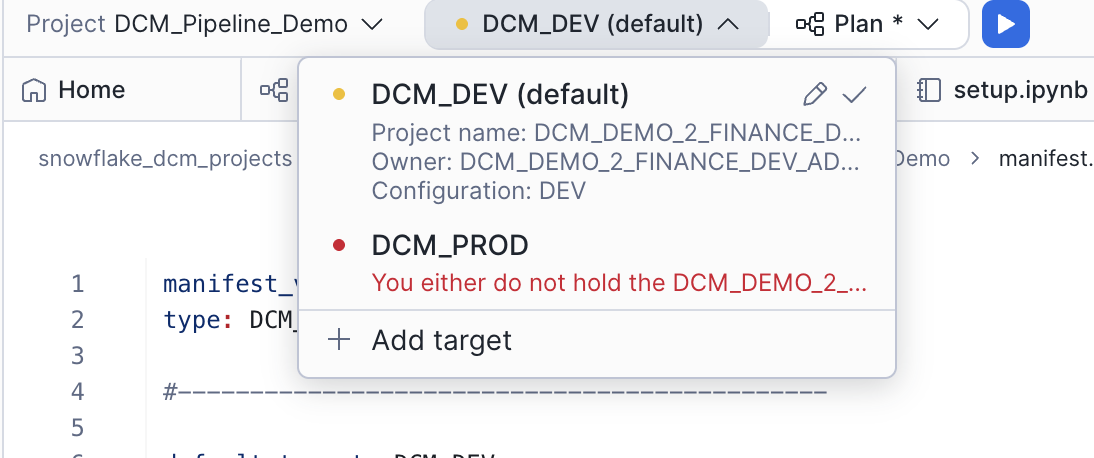
- In the DCM control panel above the workspace tabs, select the project DCM_Platform_Demo.
- The
DCM_DEVtarget should already be selected (it's the default in the manifest). - Click on the target profile to verify it uses
DCM_PLATFORM_DEVand theDEVtemplating configuration. - In the manifest file, update the default value for
usersto include your own Snowflake username (e.g.,['MY_USERNAME']).

Click the play button to the right of Plan and wait for the definitions to render, compile, and dry-run.

Since none of the defined objects exist yet, the plan will show only CREATE statements. You should see planned operations for:
- 1 shared database (
DCM_DEMO_2_DEV) with a RAW schema and 16 staging tables - 2 team-specific databases (
DCM_DEMO_2_FINANCE_DEVandDCM_DEMO_2_MARKETING_DEV) with PROJECTS and ANALYTICS schemas - 2 warehouses (
DCM_DEMO_2_FINANCE_WH_DEVandDCM_DEMO_2_MARKETING_WH_DEV) - Roles and grants for the Finance and Marketing teams
- An INGEST schema with a stage and a scheduled Task
Deploy
- In the top-right corner of the Plan results tab, click Deploy.
- Optionally, add a Deployment alias (e.g., "Initial platform deployment").
- DCM will create all objects and attach grants using the owner role of the project object.
Alternatively, you can deploy from SQL using the EXECUTE DCM PROJECT command. Make sure you are using the DCM_DEVELOPER role, and replace YOUR_USERNAME with your Snowflake username:
USE ROLE dcm_developer;

EXECUTE DCM PROJECT dcm_demo.projects.dcm_platform_dev DEPLOY
    USING CONFIGURATION DEV (users => ['YOUR_USERNAME'])
    FROM 'snow://workspace/USER$.PUBLIC."snowflake_dcm_projects"/versions/live/Quickstarts/DCM_Project_Quickstart_2/DCM_Platform_Demo';
Once the deployment completes, refresh the Database Explorer. You should see DCM_DEMO_2_DEV (the shared raw database), DCM_DEMO_2_FINANCE_DEV (the Finance team's database), and DCM_DEMO_2_MARKETING_DEV (the Marketing team's database).
Load Sample Data
The Platform deployment created the table structures, the ingestion stage, and the load Task — but the tables are empty. In this step, you'll upload sample CSV files to the stage and trigger the Task to load data into the raw tables.
Copy CSV Files to the Stage
The sample_data/ folder in the workspace contains 17 CSV files. Copy them to the ingestion stage using the COPY FILES command in the setup notebook:
COPY FILES INTO
    @dcm_demo_2_dev.ingest.dcm_sample_data
FROM
    'snow://workspace/USER$.PUBLIC."snowflake_dcm_projects"/versions/live/Quickstarts/DCM_Project_Quickstart_2/sample_data'
DETAILED_OUTPUT = TRUE;
This command copies all files from the workspace's sample_data directory directly into the stage in a single operation.
Trigger the Load Task
Manually execute the load Task to load the staged data into the raw tables:
EXECUTE TASK dcm_demo_2_dev.ingest.load_new_data;
Verify the Data
Check that data has been loaded into the raw tables:
SELECT COUNT(*) FROM dcm_demo_2_dev.raw.customer_stg;
SELECT COUNT(*) FROM dcm_demo_2_dev.raw.trade_stg;
SELECT COUNT(*) FROM dcm_demo_2_dev.raw.dailymarket_stg;
You should see rows in each table. The exact counts depend on the sample data files.
Explore the Pipeline Project
With the Platform infrastructure deployed and data loaded, you can now explore the Pipeline project. Navigate to DCM_Pipeline_Demo in the file explorer.
Manifest
Open manifest.yml. The Pipeline manifest is simpler than the Platform's — it only needs env_suffix and users:
manifest_version: 2
type: DCM_PROJECT

default_target: DCM_DEV

targets:
  DCM_DEV:
    account_identifier: MYORG-MY_DEV_ACCOUNT
    project_name: DCM_DEMO_2_FINANCE_DEV.PROJECTS.FINANCE_PIPELINE
    project_owner: DCM_DEMO_2_FINANCE_DEV_ADMIN
    templating_config: DEV

  DCM_PROD:
    account_identifier: MYORG-MY_PROD_ACCOUNT
    project_name: DCM_DEMO_2_FINANCE.PROJECTS.FINANCE_PIPELINE
    project_owner: DCM_DEMO_2_FINANCE_ADMIN
    templating_config: PROD

templating:
  defaults:
    users:
      - "GITHUB_ACTIONS_SERVICE_USER"

  configurations:
    DEV:
      env_suffix: "_DEV"
      users:
        - "GITHUB_ACTIONS_SERVICE_USER"
        - "INSERT_YOUR_USER"

    PROD:
      env_suffix: ""
Notice that the Pipeline project lives in the Finance team's database (DCM_DEMO_2_FINANCE_DEV.PROJECTS) rather than the shared DCM_DEMO.PROJECTS where the Platform project lives. It's also owned by DCM_DEMO_2_FINANCE_DEV_ADMIN — the team-specific admin role created by the Platform deployment. This means the Finance team can independently manage their own pipeline project without needing account-level privileges.
Definition Files
The sources/definitions/ directory contains three SQL files that implement a medallion architecture:
| File | What It Defines |
|---|---|
silver_layer.sql | SILVER schema and 11 Dynamic Tables that clean, filter, and transform raw data |
gold_layer.sql | GOLD schema with aggregate fact tables, views, and calculations |
expectations.sql | Data quality expectations using Data Metric Functions on gold-layer tables |
Silver Layer
Open silver_layer.sql. This file defines the SILVER schema inside the Finance team's database and creates Dynamic Tables that transform the raw staging data:
DEFINE SCHEMA dcm_demo_2_finance{{env_suffix}}.silver;

DEFINE DYNAMIC TABLE dcm_demo_2_finance{{env_suffix}}.silver.finwire_cmp_stg
TARGET_LAG='DOWNSTREAM'
WAREHOUSE='dcm_demo_2_finance_wh{{env_suffix}}'
DATA_METRIC_SCHEDULE = 'TRIGGER_ON_CHANGES'
AS
SELECT
    TO_TIMESTAMP_NTZ(pts,'YYYYMMDD-HH24MISS') AS pts,
    rec_type,
    company_name,
    cik,
    status,
    industry_id,
    sp_rating,
    TRY_TO_DATE(founding_date) AS founding_date,
    addr_line1,
    addr_line2,
    postal_code,
    city,
    state_province,
    country,
    ceo_name,
    description
FROM dcm_demo_2{{env_suffix}}.raw.finwire_stg
WHERE rec_type = 'CMP';
This is a key cross-project pattern: the Dynamic Table in the Pipeline project reads from dcm_demo_2{{env_suffix}}.raw.finwire_stg, a table created by the Platform project. The Finance team's admin role was granted SELECT access to the raw schema during the Platform deployment, making this cross-project dependency work.
The silver layer includes several types of transformations:
- Filtering and type casting —
finwire_cmp_stg,finwire_fin_stg, andfinwire_sec_stgsplit a single raw finwire table into company, financial, and security records - SCD2 (slowly changing dimension) patterns —
finwire_cmp_odsandfinwire_sec_cik_odsuseLEAD()window functions to track historical changes with start and end dates - Sparse value fill-forward —
customer_odsandaccount_odsuseLAG() IGNORE NULLSto carry forward non-null values from prior CDC records - Dimension and fact tables —
dim_trade,dim_account,dim_date, and others join and reshape data for the gold layer
All Dynamic Tables use TARGET_LAG='DOWNSTREAM', meaning they refresh only when a downstream table needs them — keeping compute costs low.
Gold Layer
Open gold_layer.sql. This file defines the gold schema with aggregate fact tables and views:
DEFINE SCHEMA dcm_demo_2_finance{{env_suffix}}.gold;

DEFINE DYNAMIC TABLE dcm_demo_2_finance{{env_suffix}}.gold.fact_market_history
TARGET_LAG='2 hours'
WAREHOUSE='dcm_demo_2_finance_wh{{env_suffix}}'
DATA_METRIC_SCHEDULE = 'TRIGGER_ON_CHANGES'
AS
SELECT
    fmht.sk_security_id,
    fmht.sk_company_id,
    fmht.sk_date_id,
    fmht.yield,
    fmht.close_price,
    fmht.day_high,
    fmht.day_low,
    fmht.volume,
    COALESCE(fmht.close_price / dfrye.roll_year_eps, 0) AS pe_ratio,
    fmhchl.fifty_two_week_high,
    fmhchl.sk_fifty_two_week_high_date,
    fmhchl.fifty_two_week_low,
    fmhchl.sk_fifty_two_week_low_date
FROM dcm_demo_2_finance{{env_suffix}}.silver.fact_market_history_trans fmht
LEFT OUTER JOIN dcm_demo_2_finance{{env_suffix}}.silver.dim_financial_roll_year_eps dfrye
    ON fmht.sk_company_id = dfrye.sk_company_id
    AND YEAR(TO_DATE(fmht.sk_date_id::STRING, 'YYYYMMDD')) || QUARTER(TO_DATE(fmht.sk_date_id::STRING, 'YYYYMMDD')) = dfrye.year_qtr
INNER JOIN dcm_demo_2_finance{{env_suffix}}.silver.fact_market_history_calc_high_low fmhchl
    ON fmht.sk_security_id = fmhchl.sk_security_id
    AND fmht.sk_date_id = fmhchl.sk_date_id;
Notice that fact_market_history uses TARGET_LAG='2 hours' — unlike the silver-layer tables that use DOWNSTREAM, this gold-layer table refreshes on a fixed schedule. This is common for aggregate tables that serve dashboards.
The gold layer also includes:
fact_holdings— A view (not a Dynamic Table) that joins raw holding history with the silver-layer trade dimensionfact_prospect— A Dynamic Table that unions prospect data with customer designations and builds a marketing nameplatefact_cash_balances— A Dynamic Table that calculates running cash balances per account using window functions
Data Quality Expectations
Open expectations.sql. This file attaches Data Metric Functions to the gold-layer prospect table:
ATTACH DATA METRIC FUNCTION SNOWFLAKE.CORE.NULL_COUNT
    TO TABLE dcm_demo_2_finance{{env_suffix}}.gold.fact_prospect
        ON (agency_id)
        EXPECTATION no_missing_id (VALUE = 0);

ATTACH DATA METRIC FUNCTION SNOWFLAKE.CORE.MAX
    TO TABLE dcm_demo_2_finance{{env_suffix}}.gold.fact_prospect
        ON (age)
        EXPECTATION no_dead_prospects (VALUE < 120);

ATTACH DATA METRIC FUNCTION SNOWFLAKE.CORE.MIN
    TO TABLE dcm_demo_2_finance{{env_suffix}}.gold.fact_prospect
        ON (age)
        EXPECTATION no_kids (VALUE > 18);
These expectations enforce three data quality rules on the fact_prospect table:
no_missing_id— Theagency_idcolumn must have zero nullsno_dead_prospects— The maximum age must be less than 120no_kids— The minimum age must be greater than 18
Because the table has DATA_METRIC_SCHEDULE = 'TRIGGER_ON_CHANGES', these expectations are automatically evaluated whenever the data changes.
Deploy the Pipeline Project
With the Platform deployed and data loaded, you can now deploy the Pipeline project to build the transformation layers.
Create the DCM Project Object
The Pipeline project lives in the Finance team's database, which was created by the Platform deployment. Use the Finance team's admin role to create it:
USE ROLE dcm_demo_2_finance_dev_admin;

CREATE DCM PROJECT IF NOT EXISTS dcm_demo_2_finance_dev.projects.finance_pipeline
    COMMENT = 'for DCM Pipeline Demo - Quickstart 2';
Plan the Deployment
- In the DCM control panel, select the project DCM_Pipeline_Demo.
- Verify the
DCM_DEVtarget is selected and it points toFINANCE_PIPELINE. - In the manifest file, update the default value for
usersto include your own Snowflake username (e.g.,['MY_USERNAME']).
Click Plan and wait for the definitions to render, compile, and dry-run.

The plan should show CREATE statements for:
- 2 schemas (
SILVERandGOLD) inDCM_DEMO_2_FINANCE_DEV - 11 Dynamic Tables in the silver layer
- 4 Dynamic Tables and 1 view in the gold layer
- 3 data quality expectations attached to
FACT_PROSPECT
Deploy
- Click Deploy in the top-right corner of the Plan results.
- Add a deployment alias (e.g., "Initial pipeline deployment").
Alternatively, you can deploy from SQL using the EXECUTE DCM PROJECT command. Make sure you are using the DCM_DEMO_2_FINANCE_DEV_ADMIN role, and replace YOUR_USERNAME with your Snowflake username:
USE ROLE dcm_demo_2_finance_dev_admin;

EXECUTE DCM PROJECT dcm_demo_2_finance_dev.projects.finance_pipeline DEPLOY
    USING CONFIGURATION DEV (users => ['YOUR_USERNAME'])
    FROM 'snow://workspace/USER$.PUBLIC."snowflake_dcm_projects"/versions/live/Quickstarts/DCM_Project_Quickstart_2/DCM_Pipeline_Demo';
Once the deployment completes, refresh the Database Explorer. You should see the SILVER and GOLD schemas inside DCM_DEMO_2_FINANCE_DEV, each populated with Dynamic Tables and views.
Note: By default, Dynamic Tables refresh immediately on creation. If the raw tables already contain data (from the load Task in the previous step), the deployment will take longer because each Dynamic Table performs its initial refresh during the deploy. With the sample datasets in this guide, the extra time is minimal — but in production scenarios with large datasets, be intentional about this behavior to avoid long-running deployments.
Query the Results
With both projects deployed and data loaded, the Dynamic Tables will begin refreshing. You can query the gold-layer tables to verify the end-to-end pipeline is working.
Query Fact Tables
SELECT * FROM dcm_demo_2_finance_dev.gold.fact_market_history LIMIT 10;
SELECT * FROM dcm_demo_2_finance_dev.gold.fact_prospect LIMIT 10;
SELECT * FROM dcm_demo_2_finance_dev.gold.fact_cash_balances LIMIT 10;
SELECT * FROM dcm_demo_2_finance_dev.gold.fact_holdings LIMIT 10;
Check Data Quality Expectations
You can verify the data quality expectations by querying the Data Metric Function results:
SELECT *
FROM TABLE(dcm_demo_2_finance_dev.INFORMATION_SCHEMA.DATA_METRIC_FUNCTION_REFERENCES(
    REF_ENTITY_NAME => 'dcm_demo_2_finance_dev.gold.fact_prospect',
    REF_ENTITY_DOMAIN => 'TABLE'
));
This shows all attached expectations and their current status. The no_missing_id, no_dead_prospects, and no_kids expectations should all be passing if the sample data is clean.
Cleanup
To clean up all objects created in this guide, run the following:
USE ROLE dcm_developer;

-- Drop deployed infrastructure from the Pipeline project (inside Finance DB)
DROP DCM PROJECT IF EXISTS dcm_demo_2_finance_dev.projects.finance_pipeline;

-- Drop deployed infrastructure from the Platform project
DROP DATABASE IF EXISTS dcm_demo_2_finance_dev;
DROP DATABASE IF EXISTS dcm_demo_2_marketing_dev;
DROP DATABASE IF EXISTS dcm_demo_2_dev;
DROP WAREHOUSE IF EXISTS dcm_demo_2_finance_wh_dev;
DROP WAREHOUSE IF EXISTS dcm_demo_2_marketing_wh_dev;

-- Drop roles created by the deployments
DROP ROLE IF EXISTS dcm_demo_2_finance_dev_admin;
DROP ROLE IF EXISTS dcm_demo_2_finance_dev_usage;
DROP ROLE IF EXISTS dcm_demo_2_marketing_dev_admin;
DROP ROLE IF EXISTS dcm_demo_2_marketing_dev_usage;

-- Drop DCM Platform Project object
USE ROLE ACCOUNTADMIN;
DROP DCM PROJECT IF EXISTS dcm_demo.projects.dcm_platform_dev;
DROP SCHEMA IF EXISTS dcm_demo.projects;
DROP DATABASE IF EXISTS dcm_demo;

-- Drop the DCM Developer role and warehouse (optional)
DROP ROLE IF EXISTS dcm_developer;
DROP WAREHOUSE IF EXISTS dcm_wh;
Conclusion and Resources
In this guide, you learned how to:
- Split infrastructure across multiple DCM Projects — separating platform infrastructure from data transformation pipelines for cleaner ownership and independent deployment
- Define stage-based data ingestion using a stage, a file format, and a CRON-scheduled Task
- Build a medallion architecture as code with silver-layer Dynamic Tables for cleaning and transformation, and gold-layer fact tables for aggregation
- Use Jinja macros and loops to create per-team infrastructure (warehouses, databases, roles, grants) from a single set of definition files
- Attach data quality expectations to gold-layer tables using Data Metric Functions
- Deploy projects sequentially where one project's output becomes another project's input
Related Resources
This content is provided as is, and is not maintained on an ongoing basis. It may be out of date with current Snowflake instances