Create Declarative Data Pipelines with Dynamic Tables
Overview
Dynamic Tables in Snowflake provide a declarative approach to building data pipelines. Instead of writing complex orchestration logic with stored procedures or external tools, you simply define the desired transformation using SQL, and Snowflake automatically handles the refresh scheduling and dependency management.
In this hands-on lab, you will build a complete data pipeline that transforms raw customer and order data into analytics-ready fact tables. You'll learn how Dynamic Tables automatically detect dependencies, chain together into pipelines, and provide built-in monitoring capabilities.
What You'll Learn
- How to create Dynamic Tables with transformations including column renaming and JSON unpacking
- How to chain Dynamic Tables together to build multi-stage pipelines
- How to visualize your pipeline using the DAG (Directed Acyclic Graph) view
- How to monitor pipeline health and refresh history
- How to implement data quality checks within Dynamic Tables
What You'll Build
A complete data pipeline consisting of:
- Two staging Dynamic Tables (
STG_CUSTOMERS_DTandSTG_ORDERS_DT) that transform raw data - One fact Dynamic Table (
FCT_CUSTOMER_ORDERS_DT) that joins the staging tables - Pipeline monitoring and data quality enforcement
Prerequisites
- Basic understanding of SQL
- Familiarity with data warehousing concepts
- Access to a Snowflake account with the ACCOUNTADMIN role in a region where you have access to the supported models. Otherwise, you will need to enable cross-region inference.
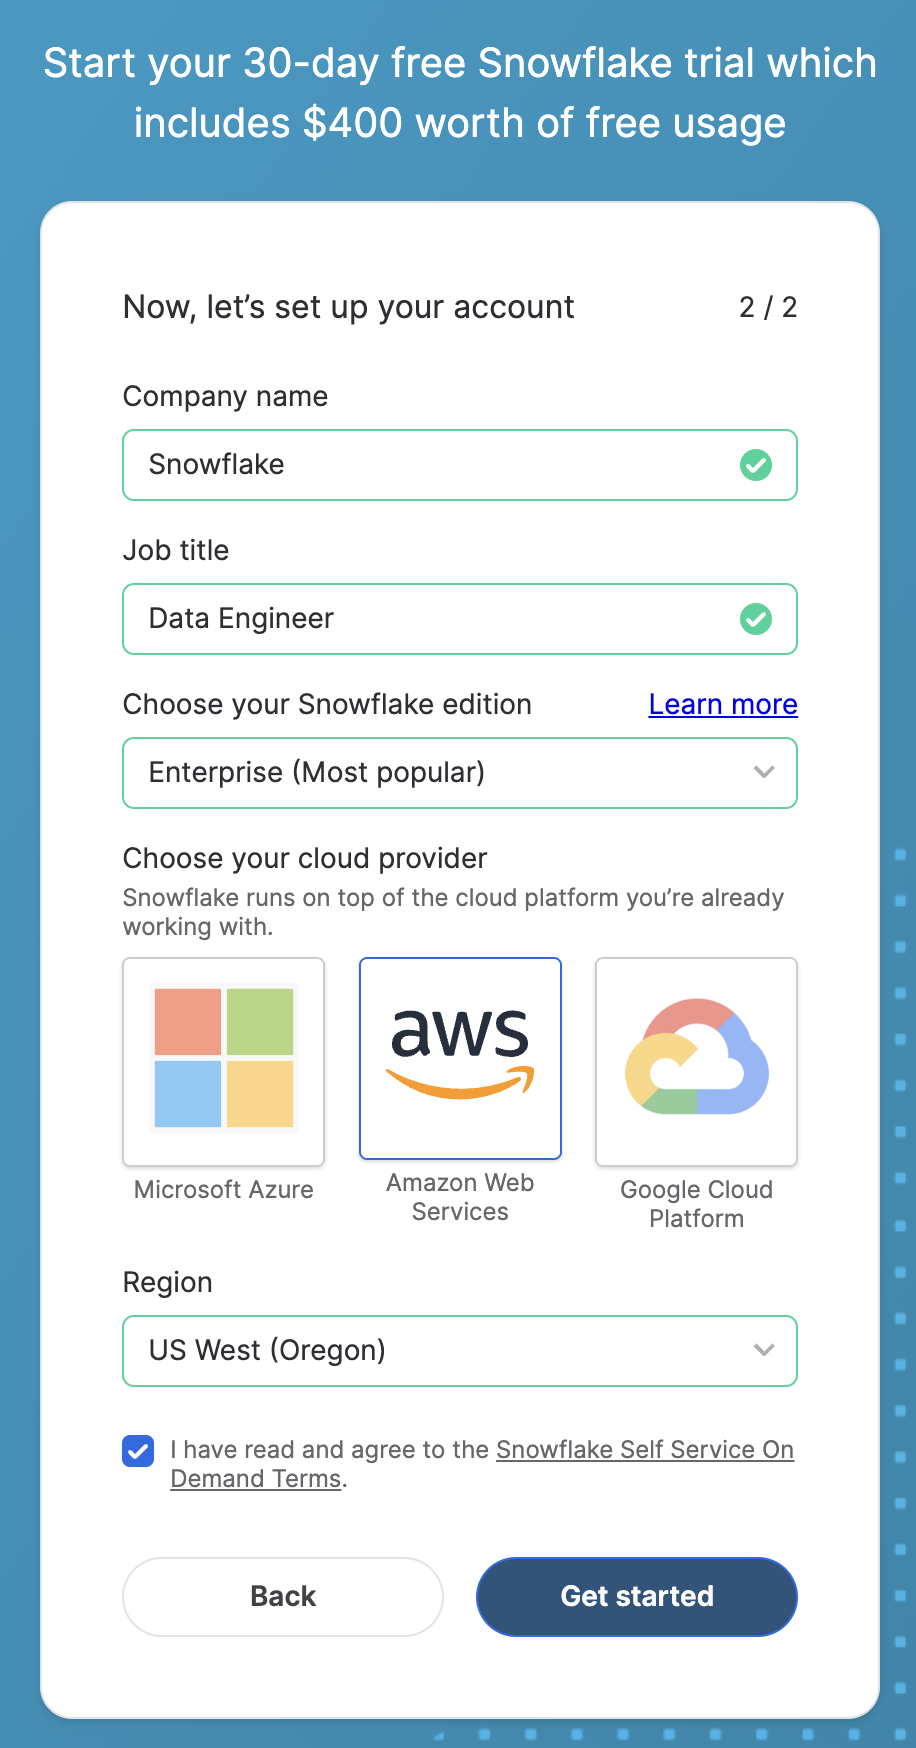
Open a Snowflake Trial Account
To complete this lab, you'll need a Snowflake account. A free Snowflake trial account will work just fine. To open one:
-
Navigate to https://signup.snowflake.com/
-
Start the account creation by completing the first page of the form on the page
-
On the next section of the form, be sure to set the Snowflake edition to "Enterprise (Most popular")
-
Select "AWS – Amazon Web Services" as the cloud provider
-
Select "US West (Oregon)" as the region
-
Complete the rest of the form and click "Get started"
Setup
The setup script automates the creation of warehouses, databases, and sample data.
- In Snowsight, create a SQL worksheet and copy setup.sql to execute all statements in order from top to bottom.
The complete setup script creates:
- A warehouse (
COMPUTE_WH) for compute operations - Two databases:
RAW_DBfor raw data andANALYTICS_DBfor transformed models - Three User Defined Table Functions (UDTFs) to generate mock data
- Three tables:
CUSTOMERS,PRODUCTS, andORDERS
Create Staging Tables
In this section, you'll create Dynamic Tables that transform raw data into a cleaner staging format.
Exploring the Customers Table
- Click on "+ Add new" and select "SQL File" and name it
create-dt.sql - Run the following commands to examine the structure and data in the customers table. The goal is to identify columns for light transformations like renaming and type casting:
use role accountadmin;
use warehouse compute_wh;
use database analytics_db;
desc table raw_db.public.customers;
select * from raw_db.public.customers;
Create the Customers Dynamic Table
Create a Dynamic Table with column renaming and type casting:
create or replace dynamic table stg_customers_dt
    target_lag=downstream
    warehouse=compute_wh
    as select
        custid as customer_id,
        cname as customer_name,
        cast(spendlimit as float) as spend_limit
    from raw_db.public.customers;
Explore the Orders Table
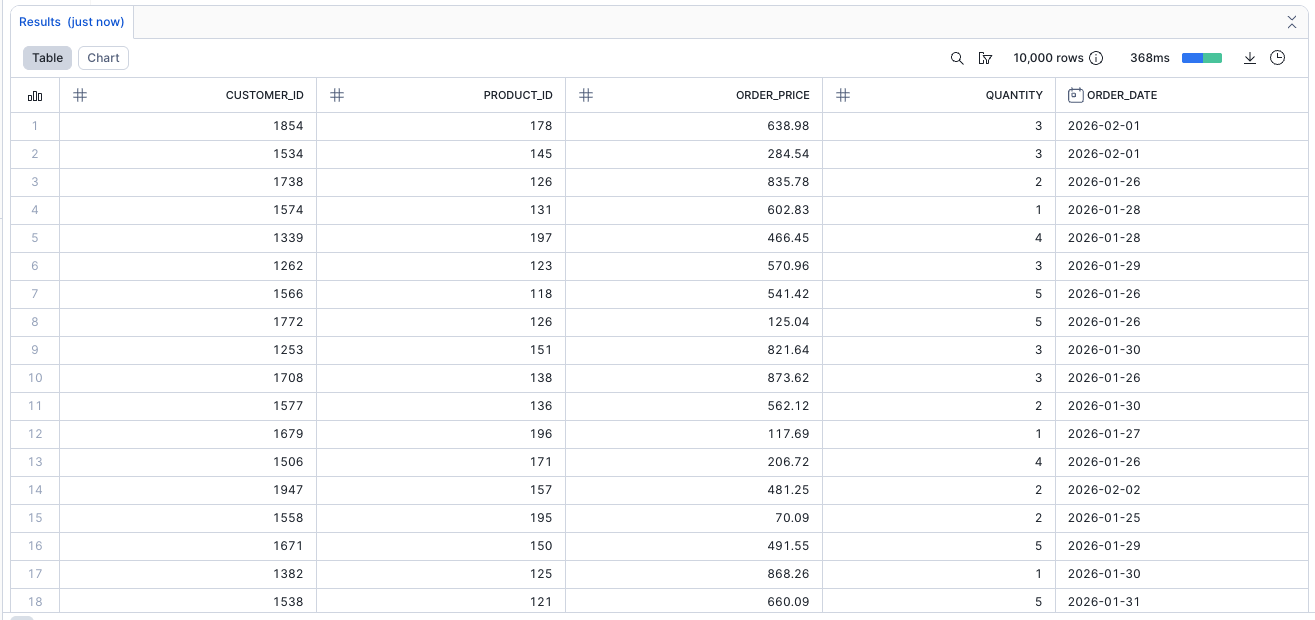
Examine the orders table structure. Run the following commands in full:
desc table raw_db.public.orders;
select * from raw_db.public.orders;
Notice that the PURCHASE column contains JSON data. You'll extract these values into separate columns.
Create the Orders Dynamic Table
Create a Dynamic Table that unpacks the JSON data:
create or replace dynamic table stg_orders_dt
   target_lag=downstream
   warehouse=compute_wh
   as select
       custid as customer_id,
       purchase:"prodid"::number(5) as product_id,
       purchase:"purchase_amount"::float(10) as order_price,
       purchase:"quantity"::number(5) as quantity,
       purchase:"purchase_date"::date as order_date
   from raw_db.public.orders;
Verify the Dynamic Tables
Query the new Dynamic Tables to see the transformed data:
select * from analytics_db.public.stg_customers_dt;
select * from analytics_db.public.stg_orders_dt;
View all Dynamic Tables and check the TARGET_LAG setting:
show dynamic tables;
The TARGET_LAG is set to DOWNSTREAM, meaning these tables refresh whenever a downstream table changes.

Chain Dynamic Tables
Now you'll create a fact table that joins the staging Dynamic Tables together.
Set Up Your SQL File
- Click on "+ Add new" and select "SQL File" and name it
chaining-dt.sql - Run the following commands:
use role accountadmin;
use warehouse compute_wh;
use database analytics_db;
select * from analytics_db.public.stg_customers_dt;
select * from analytics_db.public.stg_orders_dt;
Create the Fact Dynamic Table
Create a fact Dynamic Table that joins customer and order data:
create or replace dynamic table fct_customer_orders_dt
    target_lag=downstream
    warehouse=compute_wh
    as select
        c.customer_id,
        c.customer_name,
        o.product_id,
        o.order_price,
        o.quantity,
        o.order_date
    from stg_customers_dt c
    left join stg_orders_dt o
        on c.customer_id = o.customer_id;
By simply referencing the upstream Dynamic Tables by name, Snowflake automatically discovers the dependencies.
To query the new Face Model Dynamic Table, use the folloiwng command to confirm that it has been created:
select * from analytics_db.public.fct_customer_orders_dt;
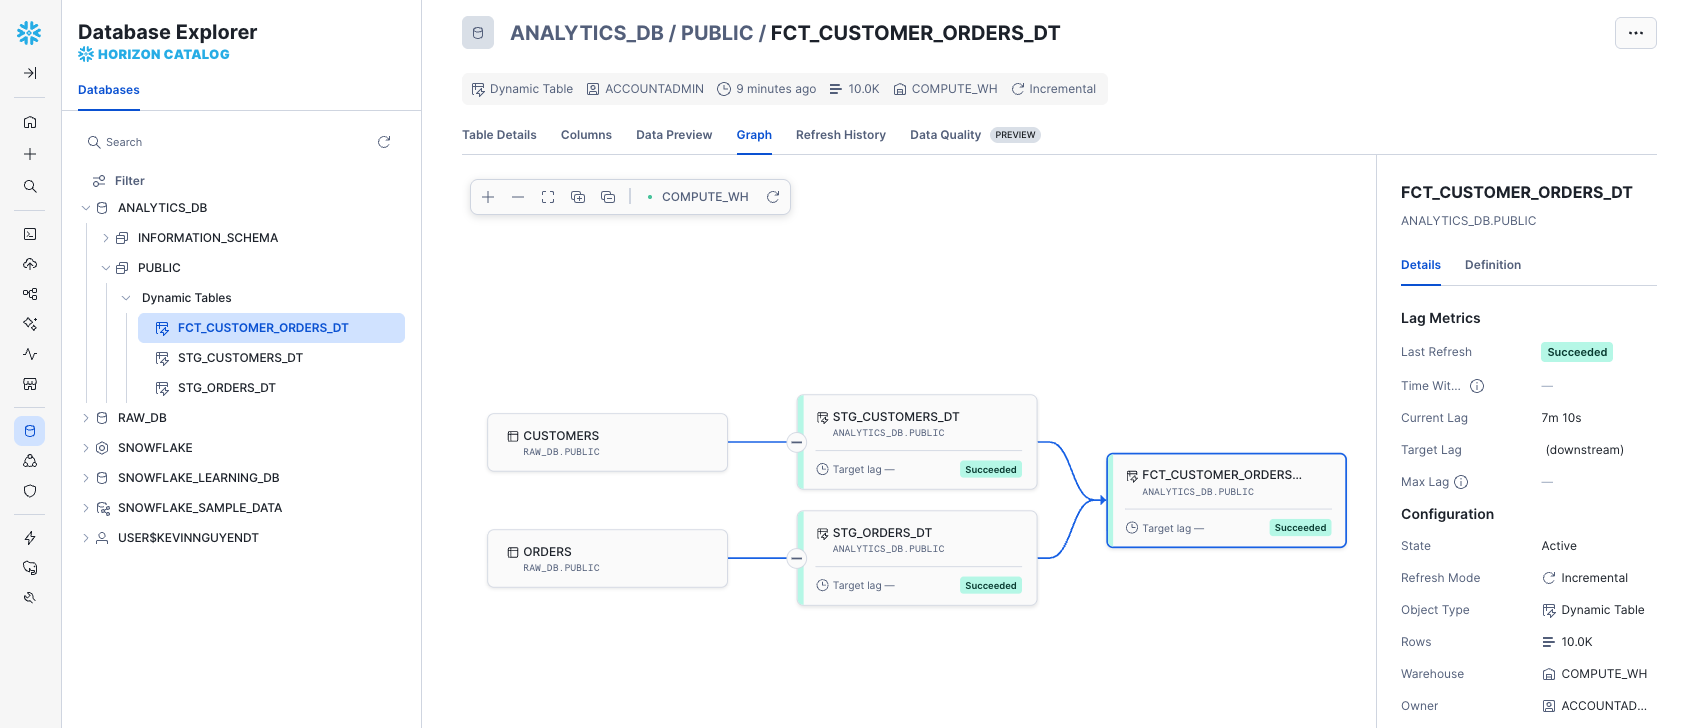
Visualize the Pipeline
- Navigate to
Database Explorer>ANALYTICS_DB>PUBLIC>Dynamic Tables>FCT_CUSTOMER_ORDERS_DT - Click on "Graph"
You should see a visual DAG (Directed Acyclic Graph) showing the pipeline flow: Raw Tables → Staging Dynamic Tables → Fact Dynamic Table
Monitor the Pipeline
Learn how to monitor your Dynamic Tables pipeline for health, performance, and data quality.
Set Up Your SQL File
- Click on "+ Add new" and select "SQL File" and name it
pipeline.sql - Run the following command to display all the Dynamic Tables created:
use role accountadmin;
use warehouse compute_wh;
use database analytics_db;
show dynamic tables;
Note that all target_lag are set to DOWNSTREAM.
Adjust Refresh Frequency
To adjust the freshness (target_lag) for STG_ORDERS_DT, use the following code. Any downstream tables will automatically adjust to the new cadence, since they update whenever changes occur upstream.
alter dynamic table stg_orders_dt set target_lag = '5 minutes';
Verify the change. Results should have the Dynamic Table's new TARGET_LAG set to 5 minutes:
show dynamic tables;

Monitor Refresh History
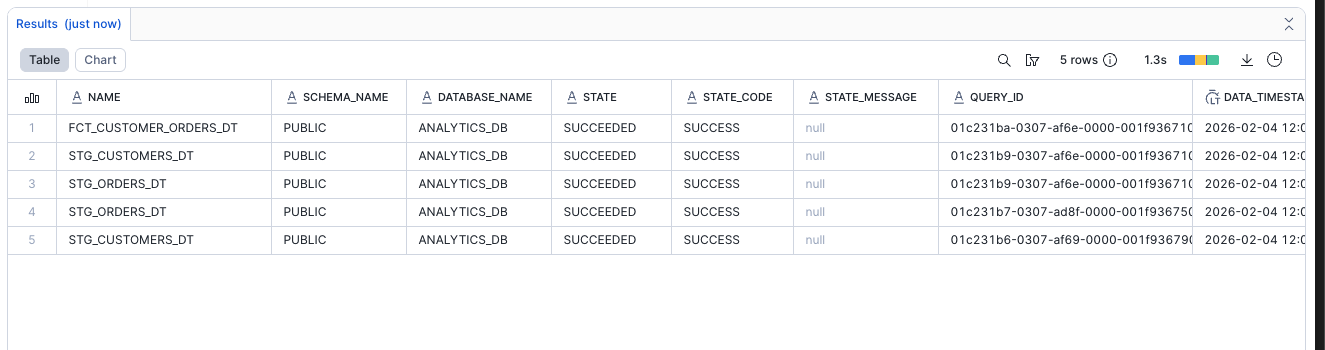
To inspect the history of refreshes, showing execution times, data changes, and potential errors:
select * from table(information_schema.dynamic_table_refresh_history());
This is your built-in observability tool for pipeline monitoring.
Implement Data Quality
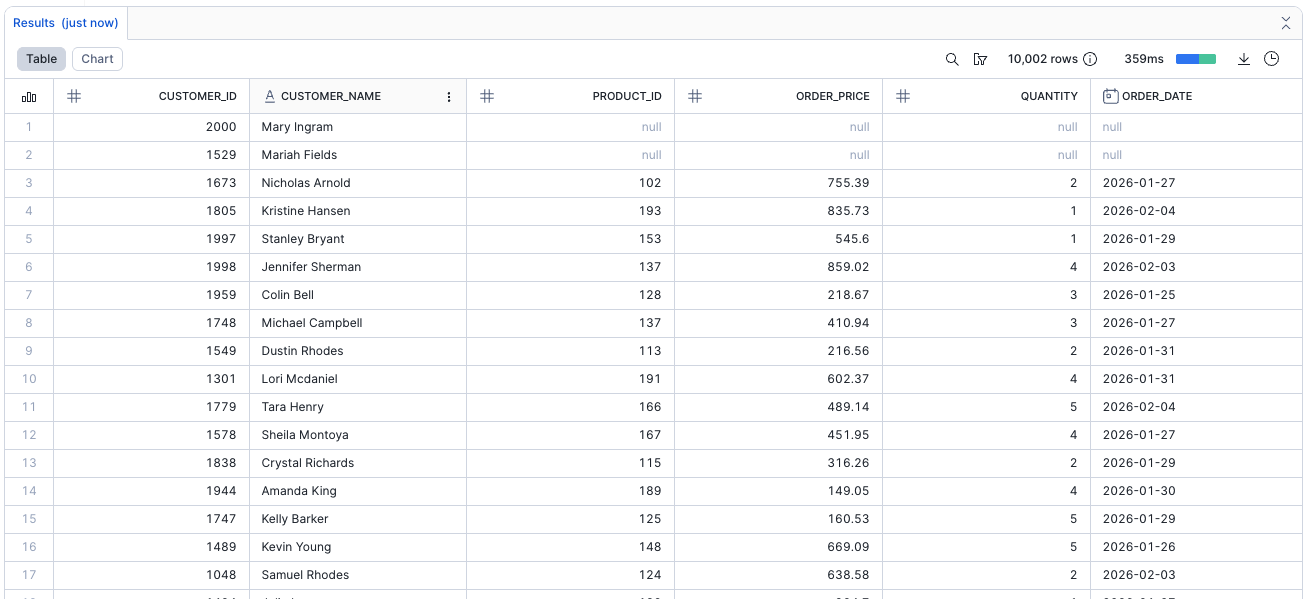
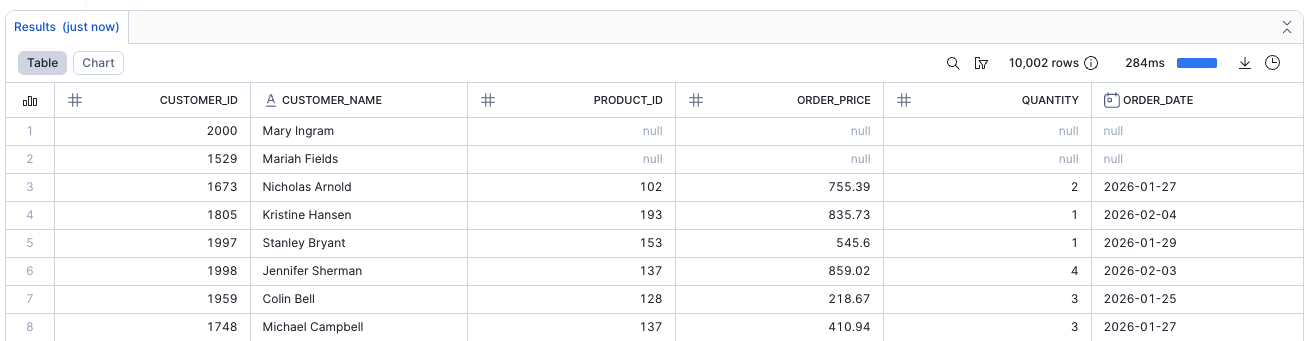
Query the fact table and check for potential issues like null orders:
select * from analytics_db.public.fct_customer_orders_dt;
If you see null values for PRODUCT_ID, this indicates customers without purchases.
Add a data quality filter to remove null orders:
create or replace dynamic table fct_customer_orders_dt
    target_lag=downstream
    warehouse=compute_wh
    as select
        c.customer_id,
        c.customer_name,
        o.product_id,
        o.order_price,
        o.quantity,
        o.order_date
    from stg_customers_dt c
    left join stg_orders_dt o
        on c.customer_id = o.customer_id
    where o.product_id is not null;
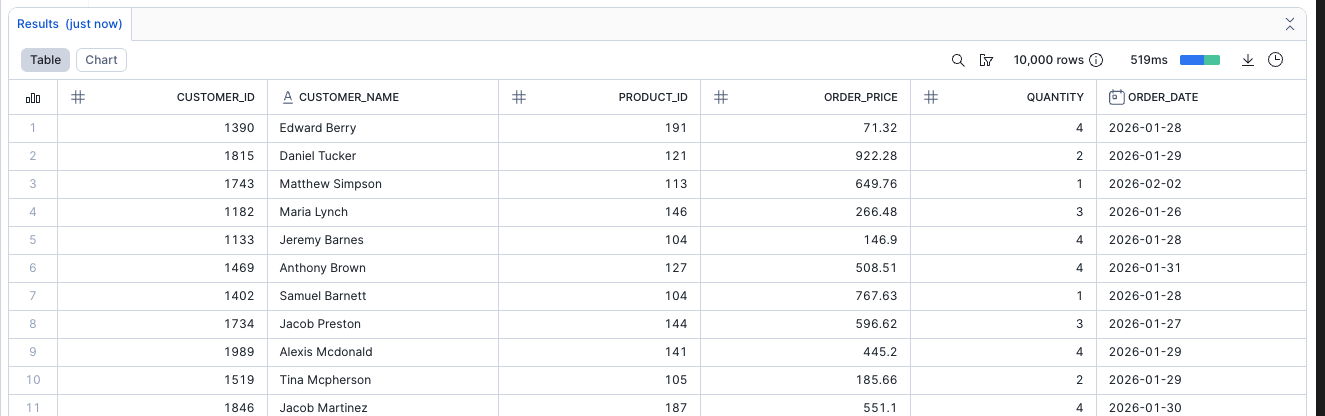
Verify the data quality enforcement:
select * from analytics_db.public.fct_customer_orders_dt;
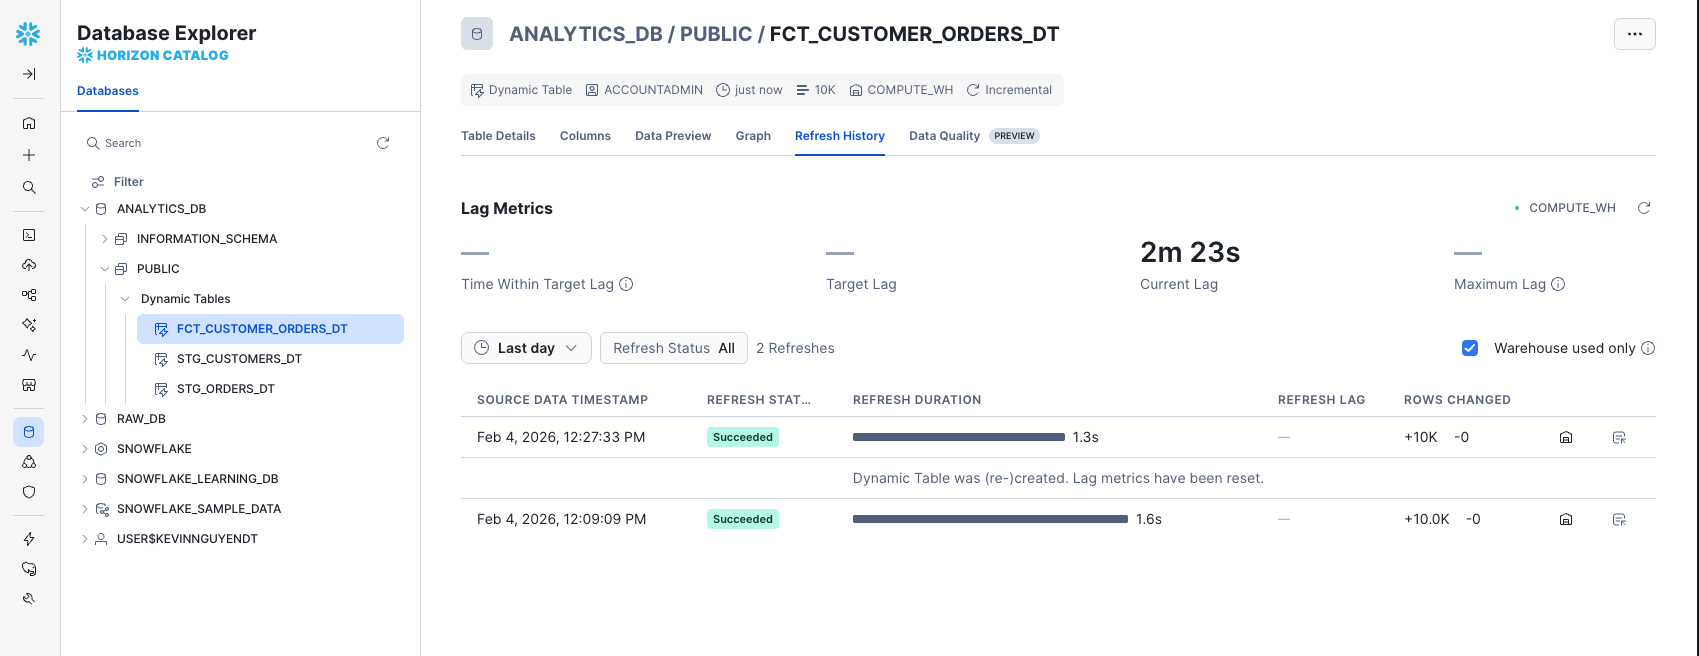
Use Snowsight for Management
- Navigate to
Database Explorer>ANALYTICS_DB>PUBLIC>Dynamic Tables>FCT_CUSTOMER_ORDERS_DT - Click on "Refresh History" to see a table showing when the Dynamic Table was refreshed and the status of each refresh
Conclusion And Resources
Congratulations! You've successfully built a declarative data pipeline using Snowflake Dynamic Tables. You created staging tables with transformations, chained them into a fact table, visualized the pipeline as a DAG, and implemented monitoring and data quality checks.
What You Learned
- How to create Dynamic Tables with
target_lag=downstreamfor automatic dependency management - How to transform data including column renaming, type casting, and JSON unpacking
- How to chain Dynamic Tables together by simply referencing upstream tables
- How to visualize your pipeline using the DAG graph view
- How to monitor refresh history and pipeline health using
information_schema.dynamic_table_refresh_history() - How to implement data quality filters within Dynamic Table definitions
- How to adjust refresh frequency using
ALTER DYNAMIC TABLE ... SET TARGET_LAG
Related Resources
Documentation:
Guides:
This content is provided as is, and is not maintained on an ongoing basis. It may be out of date with current Snowflake instances