Build Routing Solution in Snowflake with Cortex Code
🚀 Build. Customize. Optimize. Use natural language to deploy a complete route optimization solution in Snowflake - no code, no external APIs, just results.
Overview
Build a complete route optimization platform in minutes using just natural language commands.
This solution builds an Open Route Service Native App directly in your Snowflake account using Cortex Code - Snowflake's AI-powered CLI. No complex setup, no external APIs, no data leaving Snowflake.
What You'll Build
🔧 OpenRouteService Native App - A self-contained routing engine running in Snowpark Container Services with SQL-callable functions.
📍 Four Powerful Routing Functions:
- Directions - Calculate optimal routes between multiple waypoints
- Optimization - Match delivery jobs to vehicles based on time windows, capacity, and skills
- Isochrones - Generate catchment polygons showing reachable areas within a given drive time
- Time-Distance Matrix - Calculate travel time and distance matrices between multiple locations
📐 GeoFunctions — Each routing function also has a _GEO variant (e.g. DIRECTIONS_GEO, ISOCHRONES_GEO, OPTIMIZATION_GEO) that wraps the base function and returns the route/polygon geometry as a native Snowflake GEOGRAPHY column — ready for geospatial analysis with ST_LENGTH, ST_AREA, ST_WITHIN, and more.
🗺️ Any Location - Customize to Paris, London, New York, or anywhere in the world with downloadable OpenStreetMap data.
🧪 Function Tester - An interactive Streamlit app to test the routing functions with sample addresses.
Why This Matters
| Traditional Approach | This Solution |
|---|---|
| External API dependencies | Self-contained Native App |
| Data leaves your environment | Everything stays in Snowflake |
| Complex integration work | Deploy with natural language commands |
| Pay-per-call API limits | Unlimited calls, you control compute |
| Hours of setup | Minutes to deploy |
Prerequisites
This is what you will need:
-
ACCOUNTADMIN access to your Snowflake account
NOTE: This is enabled by default with the exception of Free Trials where you would need to contact your snowflake representative to activate it.
-
External Access Integration Activated - Required to download map files from provider account
-
Cortex Code CLI installed and configured
- Installation: See the Cortex Code documentation for setup instructions
- Add to your PATH:
export PATH="$HOME/.local/bin:$PATH"(add to~/.zshrcor~/.bashrc) - Verify:
cortex --version
-
Container Runtime - One of the following:
- Podman (recommended):
brew install podman(macOS) - Docker Desktop
- Podman (recommended):
-
VSCode recommended for running Cortex Code commands
Route Planning And Optimization Architecture
The architecture below shows the solution which uses a native app and container services to power sophisticated routing and optimisation functions.
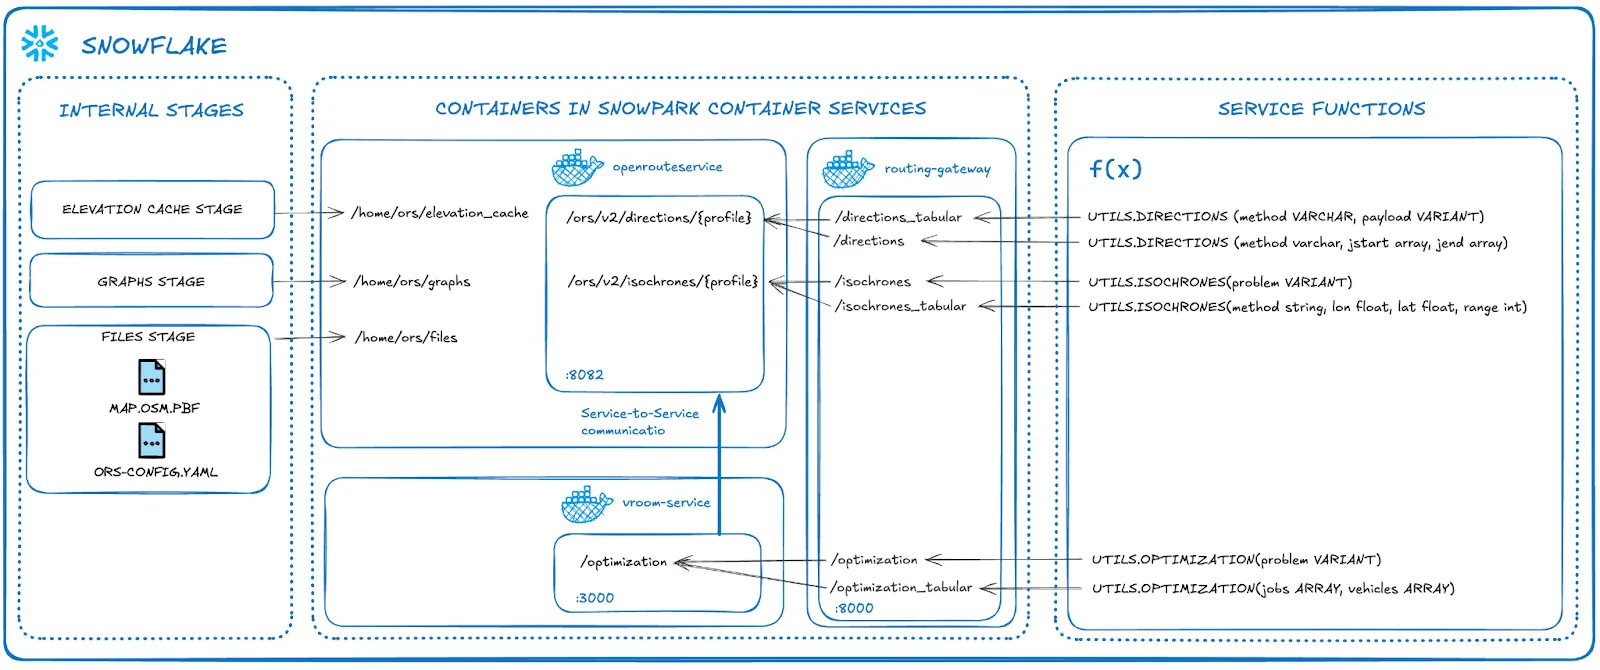
This is a self-contained service which is managed by you. There are no API calls outside of Snowflake and no API limitations. This solution uses a small high-memory pool (HIGHMEM_X64_S) which is capable of running unlimited service calls within San Francisco (the default map). If you wish to use a larger map such as Europe or the World, you can increase the size of the compute.
What You'll Learn
- Build a Snowflake Native App using Cortex Code AI-powered CLI with natural language commands
- Use Snowpark Container Services to run OpenRouteService as a self-managed routing engine
- Understand Geospatial data in Snowflake and how it integrates with routing functions
- Work with 4 routing functions deployed via the Native App:
- Directions - Simple and multi-waypoint routing based on road network and vehicle profile
- Optimization - Route optimization matching demands with vehicle availability
- Isochrones - Catchment area analysis based on travel time
- Time-Distance Matrix - Calculate travel time and distance matrices between multiple locations
- Call all routing functions directly via SQL — including concrete query examples you can run immediately
- Customize map regions and vehicle profiles for your specific use case
Build the Routing Solution
Use Cortex Code, Snowflake's AI-powered CLI, to deploy the Native App using natural language commands and automated skills.
Setup Cortex Code
-
Clone the repository:
git clone https://github.com/Snowflake-Labs/sfguide-create-a-route-optimisation-and-vehicle-route-plan-simulator
cd sfguide-create-a-route-optimisation-and-vehicle-route-plan-simulator
Without Git: Download the ZIP from the repository and extract it, then navigate to the folder in VS Code
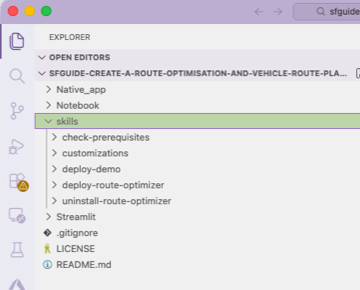
After cloning, open the folder in VS Code. You should see the following structure in your Explorer:
-
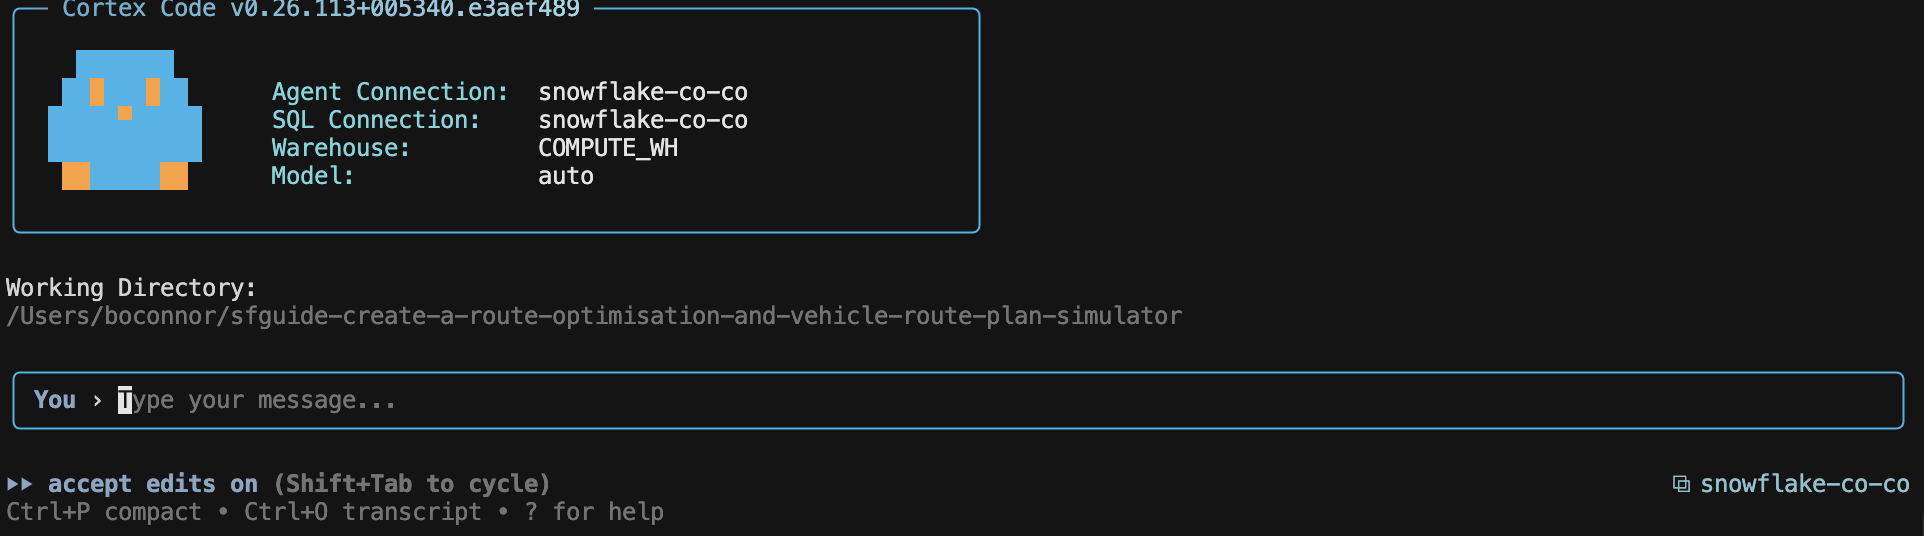
Launch Cortex Code CLI in the VS Code terminal:
cortex -
Connect to Snowflake - Cortex Code will prompt you to select or create a connection. once a connection has ben created using one of the authentication methods, you will now be able to start cortex code in the terminal by using the cortex command which will give you a similar screen as below.
Understanding Cortex Code Skills
Before running any commands, it's helpful to understand what skills are and how they power this solution.
What are Skills?
Skills are structured specifications that instruct Cortex Code how to perform a procedure. Think of them as detailed recipes - they define the exact steps, parameters, and verification checks needed to accomplish a task. Each skill is a markdown file that describes:
- What the skill does - A clear description of the outcome
- Step-by-step instructions - The exact sequence of actions to perform
- Stopping points - Where to pause for user input or verification
- Success criteria - How to verify the task completed correctly
Benefits of Using Skills
| Benefit | Description |
|---|---|
| Consistency | Skills ensure the same steps are followed every time, reducing human error |
| Reusability | Once created, skills can be shared and reused across projects and teams |
| Transparency | You can read the skill file to understand exactly what will happen before running it |
| Customizability | Skills can be modified to fit your specific requirements |
| AI-Assisted Creation | Cortex Code can help you create new skills from natural language descriptions |
How This Solution Uses Skills
This repository demonstrates how skills can manage the complete lifecycle of an end-to-end Snowflake analytical solution - from installation through customization to uninstallation. There are multiple pre-built skills in the .cortex/skills/skill_name/SKILL.md:
| Stage | Skills | What They Do |
|---|---|---|
| 📦 Build | build-routing-solution | Deploy Routing Solution based on Native App and container services |
| ⚙️ Customize | customize-main | Route customization requests (location and routing profiles) |
↳ customize-main/location | Change the geographic region (sub-skill, do not invoke separately) | |
↳ customize-main/routing-profiles | Enable/disable vehicle routing profiles (sub-skill, do not invoke separately) | |
↳ customize-main/read-ors-configuration | Read current ORS configuration (sub-skill, do not invoke separately) |
To run any skill, simply tell Cortex Code:
$<skill-name>
For example:
$build-routing-solution
Cortex Code reads the skill's markdown file and executes each step, asking for input when needed and verifying success before moving on.
TIP: Want to see what a skill does before running it? Open the skill's
.mdfile in the.cortex/skills/skill_name/folder to review the exact steps.
Verify Prerequisites (Optional)
Run the prerequisites check skill to ensure all dependencies are installed:
$prerequisites-build-routing-solution
Build the Routing Solution
Simply type the following command in Cortex Code:
$build-routing-solution
Cortex Code will automatically:
- Create the required database, stages, and image repository
- Upload configuration files
- Detect your container runtime (Docker or Podman)
- Build and push all 4 container images
- Deploy the Native App
The skill will guide you through any required steps, including:
- Selecting your preferred container runtime if both are available
- Authenticating with the Snowflake image registry
- Monitoring the build progress
The skill uses interactive prompting to gather required information:
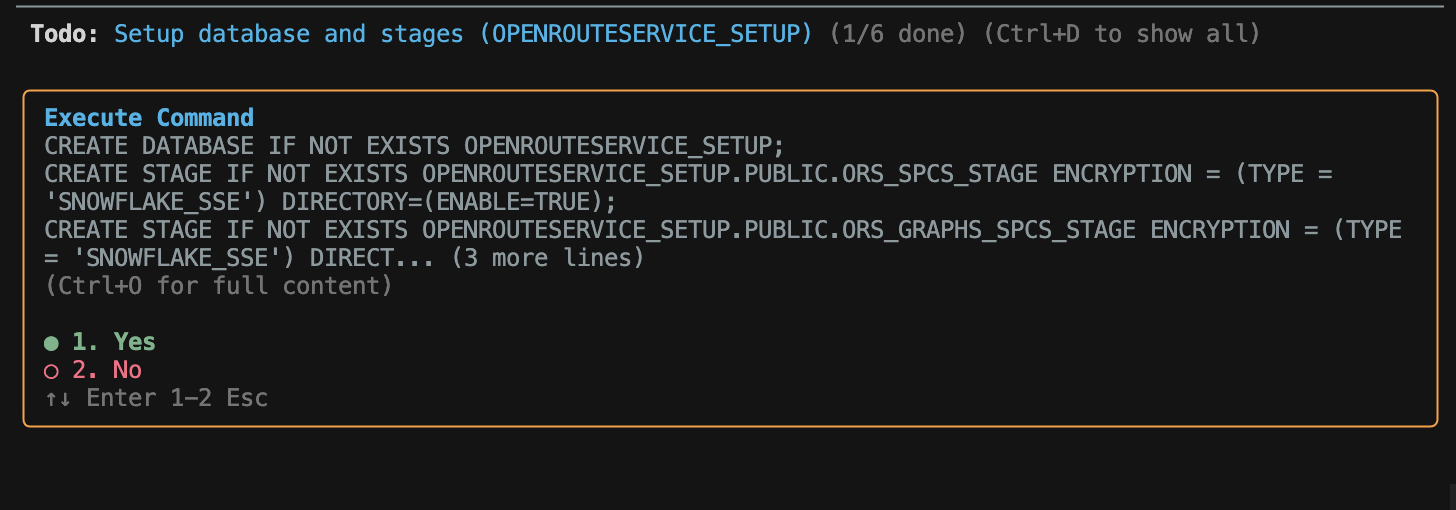
TIP: Use your keyboard arrow keys to toggle through the options, then press Enter to confirm your selection.
What gets installed:
| Component | Name | Description |
|---|---|---|
| Database | OPENROUTESERVICE_SETUP | Setup database with stages and image repository |
| Stage | ORS_SPCS_STAGE | Configuration files and map data |
| Stage | ORS_GRAPHS_SPCS_STAGE | Generated routing graphs |
| Stage | ORS_ELEVATION_CACHE_SPCS_STAGE | Elevation data cache |
| Image Repository | IMAGE_REPOSITORY | Container images for services |
| Application Package | OPENROUTESERVICE_NATIVE_APP_PKG | Native App package |
| Application | OPENROUTESERVICE_NATIVE_APP | Deployed Native App with routing functions |
Simply confirm each prompt as the skill progresses. The skill handles all the complex setup automatically - creating databases, uploading files, building containers, and deploying the Native App.
Once complete, you'll see a success message with a direct link to your app:

Activate the App
Once deployment completes, Cortex Code will provide a link to your app. You need to:
- Navigate to Data Products > Apps > OPENROUTESERVICE_NATIVE_APP in Snowsight
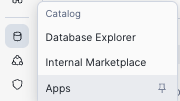
- Click on the OPENROUTESERVICE_NATIVE_APP to open it
- Grant the required privileges and review external access
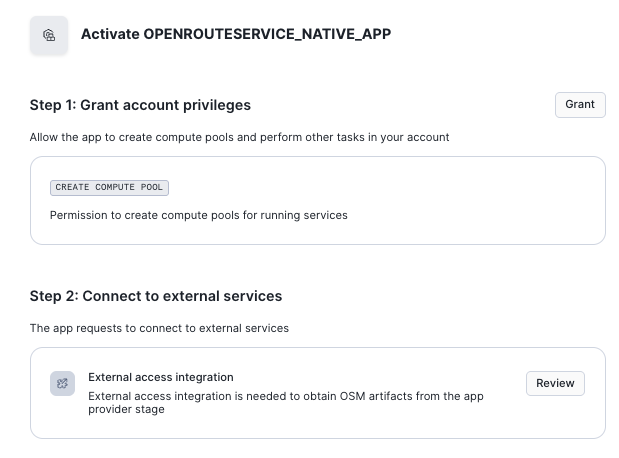
The app requires these permissions to function:
- CREATE COMPUTE POOL: Allows the app to create compute pools for running the OpenRouteService containers via Snowpark Container Services
- External access integration: Required to download OpenStreetMap (OSM) data files from external sources during the initial setup
Click Grant for Step 1. For Step 2, click Review to see the external endpoints, then click Connect to allow the connection.
- Once all privileges are granted, click Activate and wait a few minutes for the routing functions to install and the graphs to build
NOTE: The activation time depends on your configuration:
- Map size: Larger country or state maps take longer than city maps
- Vehicle profiles: Each enabled profile (driving-car, cycling, walking, etc.) generates its own routing graph
- Resource scaling: The compute pool size affects build speed
The combination of map size and vehicle options determines the total number of graphs to build. A city map with 2 profiles will complete quickly, while a country map with 5+ profiles will take significantly longer.
Once activated, you'll see a Launch app button appear. Click it to open the Service Manager.
Service Manager
The Launch app button takes you to the Service Manager dashboard, which displays the status of each of the four services running:
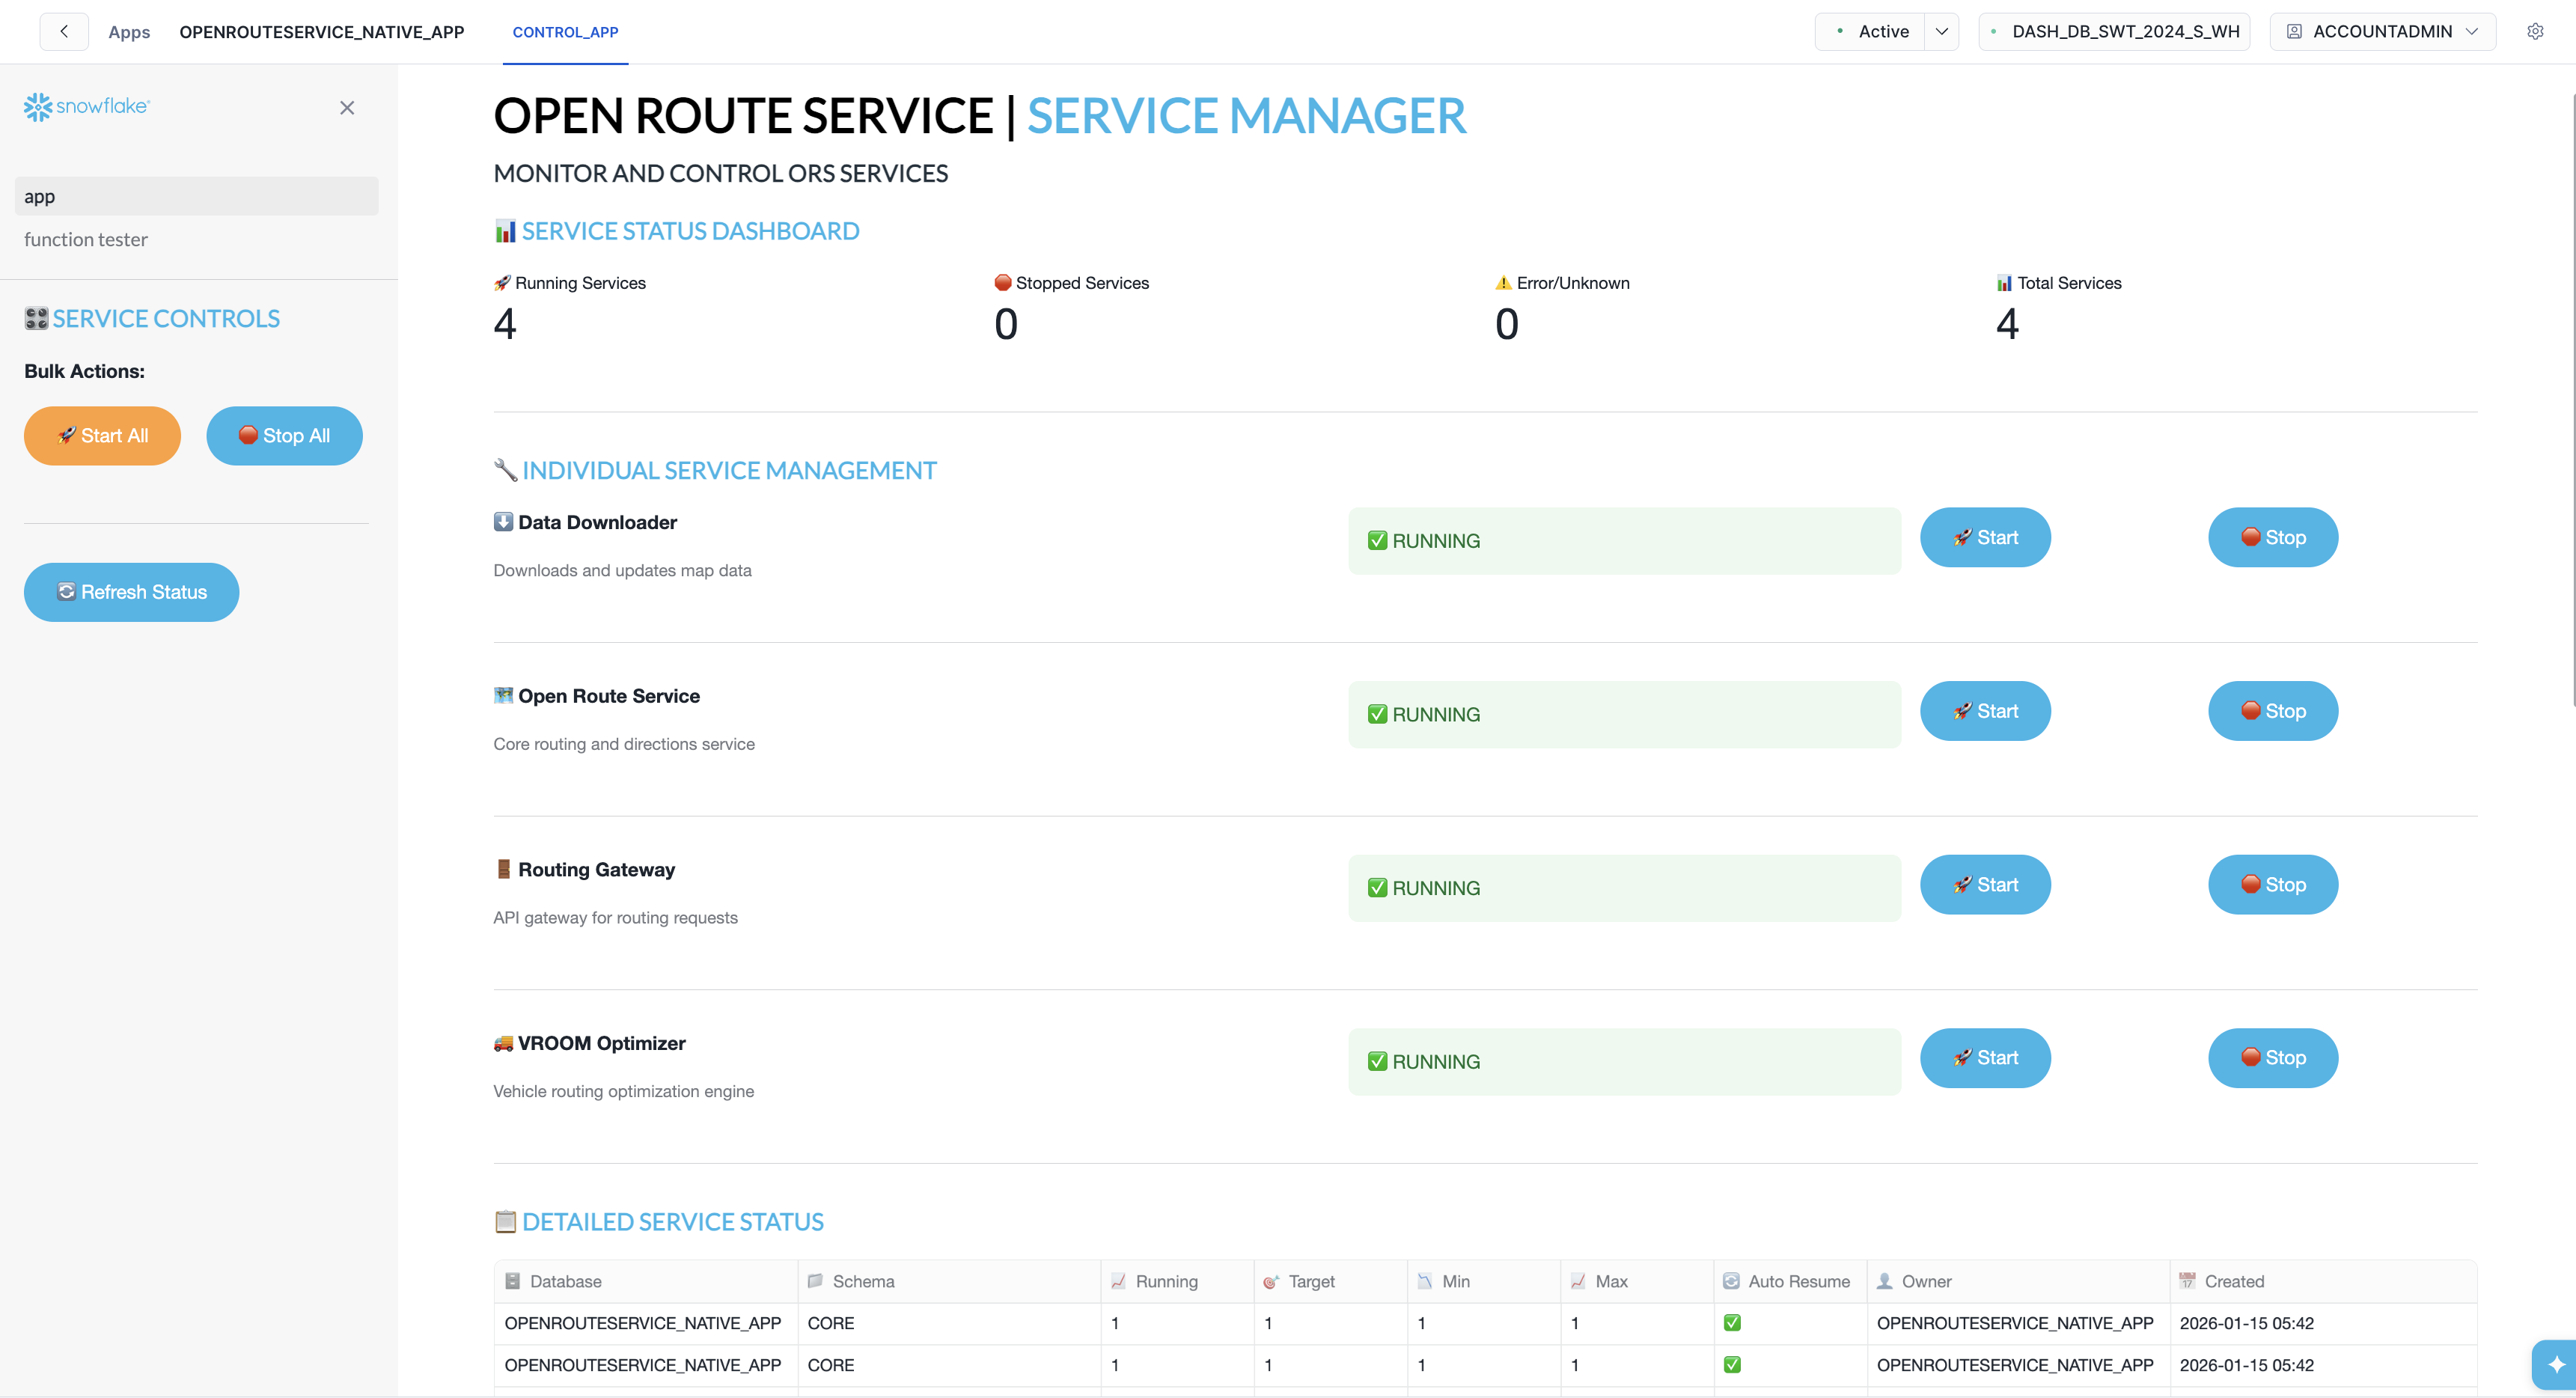
The Service Manager shows:
- Service Status Dashboard - Overview of all running, stopped, and error states
- Individual Service Management - Start/Stop controls for each service:
- Data Downloader - Downloads and updates map data
- Open Route Service - Core routing and directions engine
- Routing Gateway - API gateway for routing requests
- VROOM Service - Route optimization engine
Use the Start All / Stop All buttons for bulk operations, or manage services individually. Click Refresh Status to update the dashboard.
TIP: All 4 services should show ✅ RUNNING status before using the routing functions.
ORS Configuration
The Native App is configured via the ors-config.yml file which controls:
Map Source File
ors:
  engine:
    profile_default:
      build:
        source_file: /home/ors/files/SanFrancisco.osm.pbf
The default deployment uses San Francisco. When you customize the map region, this path is updated automatically.
Routing Profiles
The configuration defines which routing profiles are available for routing:
| Profile | Description | Default |
|---|---|---|
driving-car | Standard passenger vehicle | ✅ Enabled |
driving-hgv | Heavy goods vehicle (trucks) | ✅ Enabled |
cycling-road | Road bicycle | ❌ Disabled |
cycling-regular | Regular bicycle | ❌ Disabled |
cycling-mountain | Mountain bicycle | ❌ Disabled |
cycling-electric | Electric bicycle | ✅ Enabled |
foot-walking | Pedestrian walking | ❌ Disabled |
foot-hiking | Hiking trails | ❌ Disabled |
wheelchair | Wheelchair accessible | ❌ Disabled |
NOTE: Enabling more profiles increases graph build time and compute resource usage. The default configuration covers most delivery and logistics use cases.
Optimization Limits
The config also controls route optimization capacity:
    matrix:
      maximum_visited_nodes: 100000000
      maximum_routes: 250000
These settings support complex route optimizations with many vehicles and delivery points.
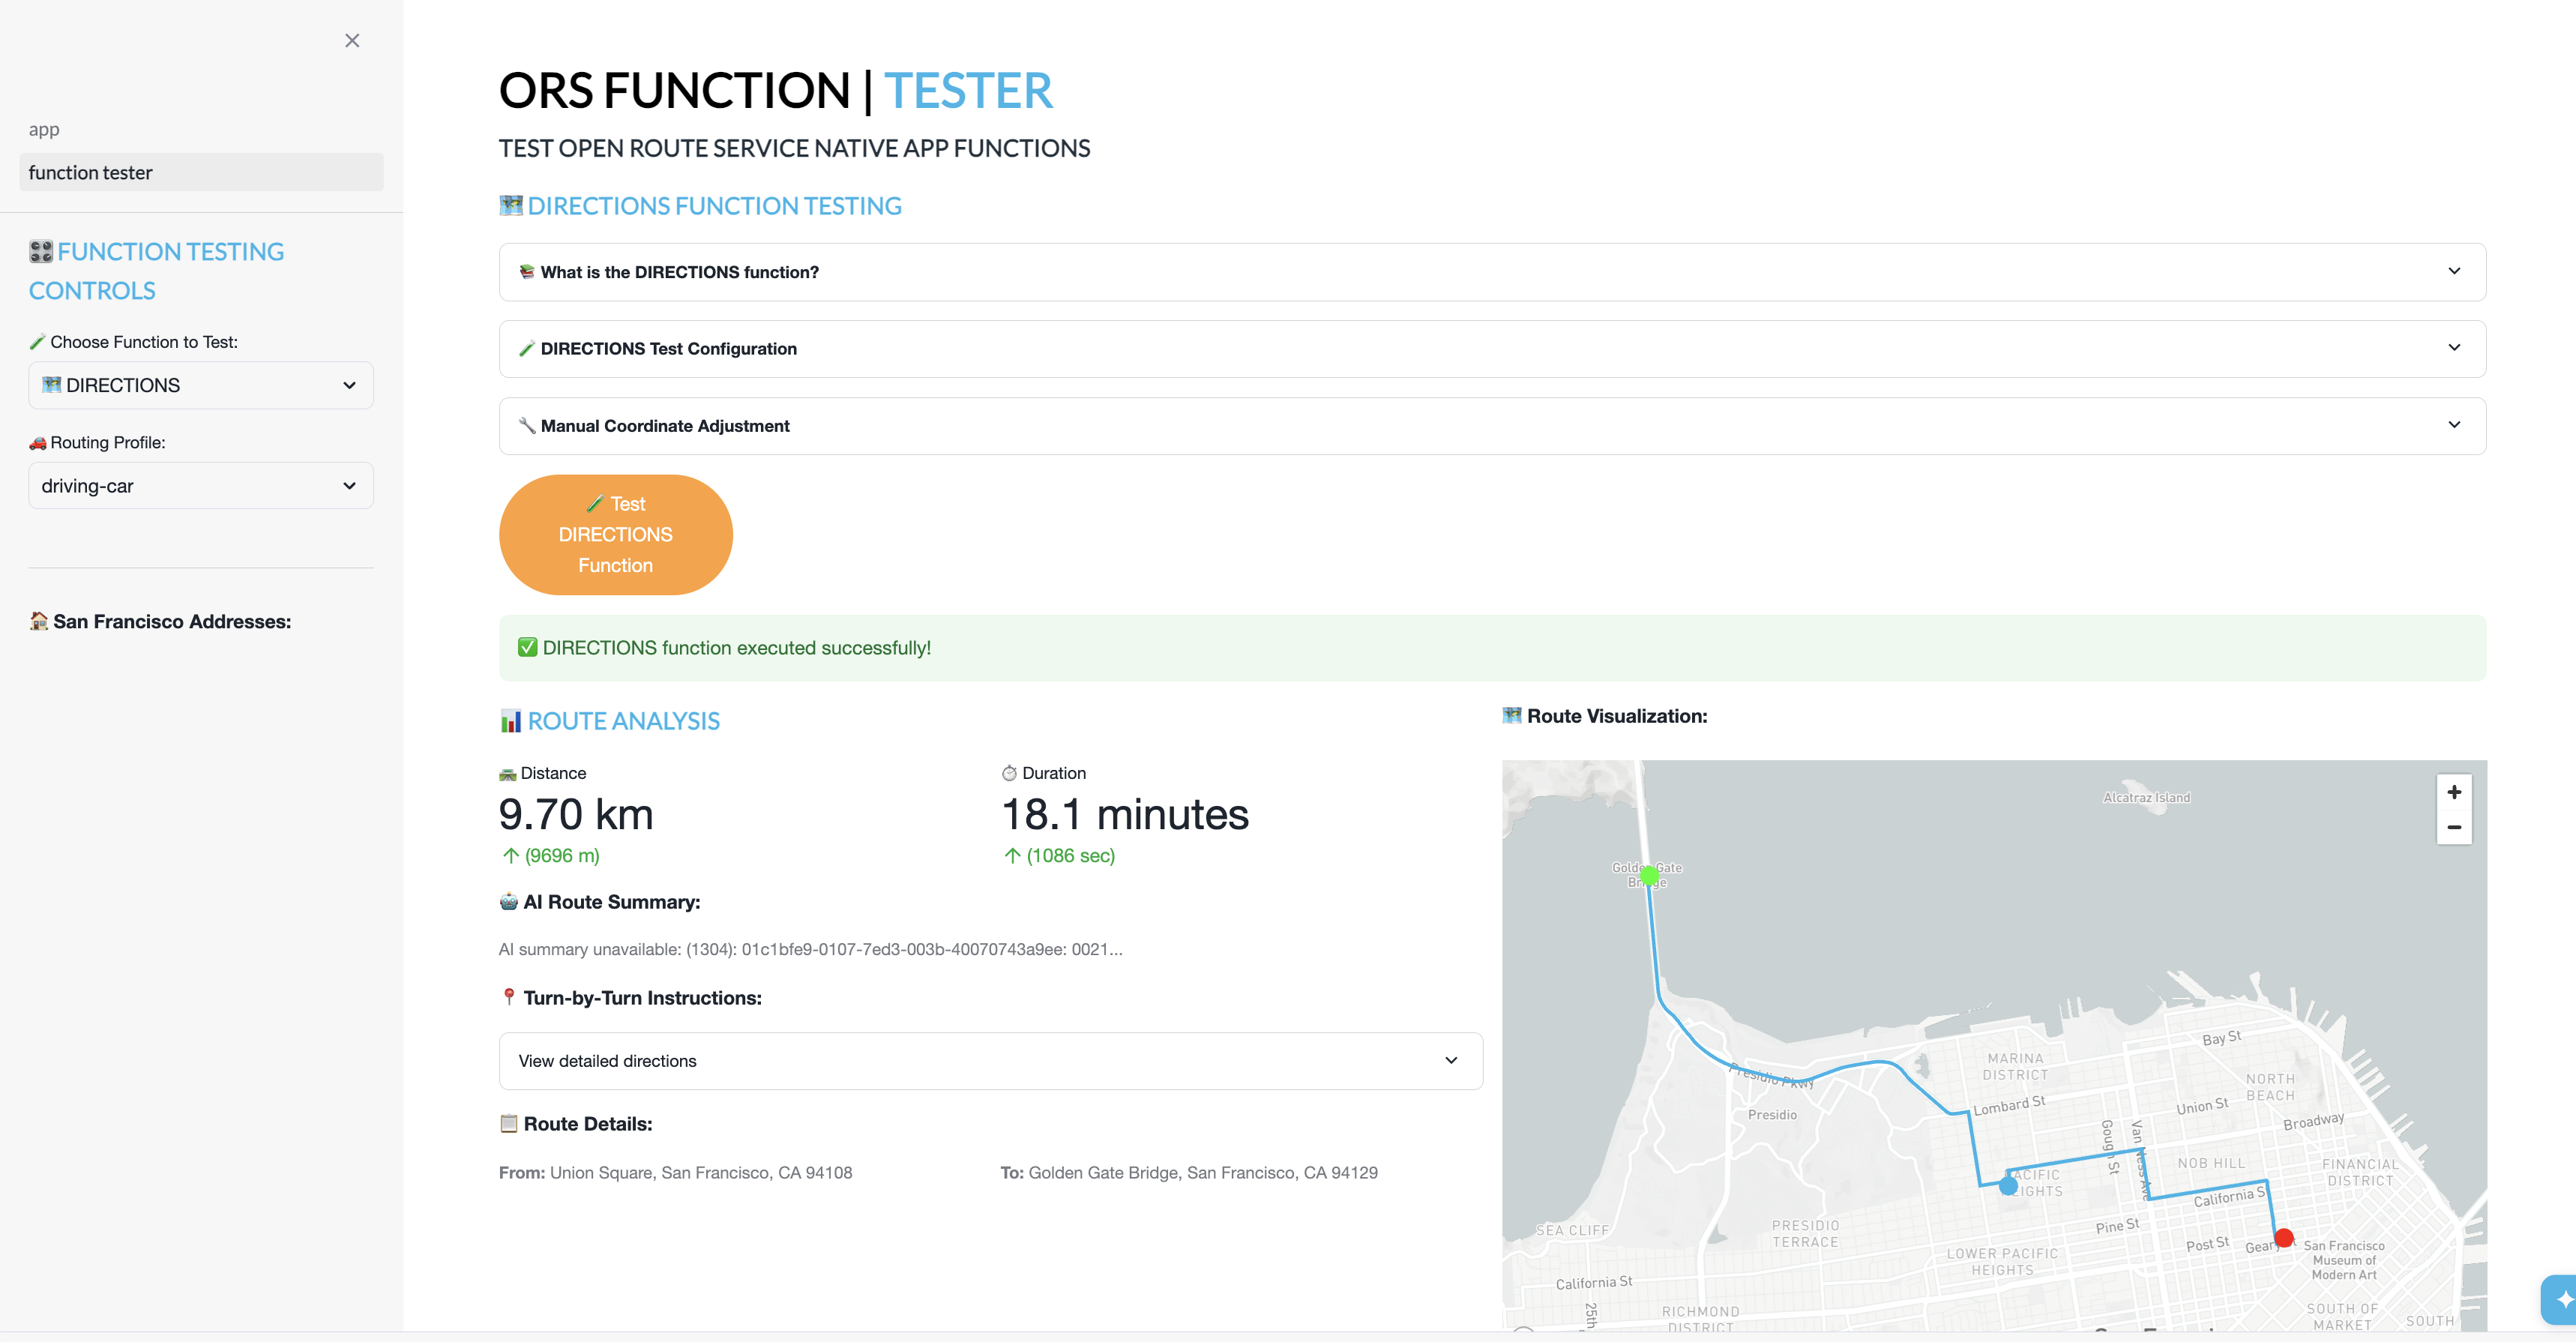
Function Tester
The Native App includes a built-in Function Tester Streamlit application for testing the routing functions interactively.
To access the Function Tester:
- Open Data Products > Apps > OPENROUTESERVICE_NATIVE_APP in Snowsight
- Navigate to the Function Tester page in the app
The Function Tester allows you to test all four routing functions:
🗺️ DIRECTIONS
- Select start and end locations from preset addresses
- Choose a routing profile (car, truck, bicycle)
- View the calculated route on an interactive map
- See step-by-step directions and distance/duration
🚚 OPTIMIZATION
- Configure multiple vehicles with different:
- Time windows (start/end hours)
- Capacity limits
- Skill sets (refrigeration, hazardous goods, etc.)
- Add delivery jobs with:
- Locations
- Time windows
- Required skills
- Run the optimization to see assigned routes per vehicle
- View detailed itinerary for each vehicle
⏰ ISOCHRONES
- Select a center point location
- Choose travel time in minutes
- Generate a catchment polygon showing how far you can travel
- Useful for delivery zone planning and coverage analysis
🗺️ TIME-DISTANCE MATRIX
- Calculate travel time and distance matrices between multiple locations
TIP: The Function Tester comes pre-configured with San Francisco addresses and default vehicle profiles (car, HGV, electric bicycle). When you customize the deployment, the Function Tester is automatically updated with region-specific addresses and your enabled vehicle profiles.
SQL Function Reference
All routing functions are deployed as SQL functions inside the Native App and can be called directly from any Snowflake worksheet, notebook, or application. The functions live under OPENROUTESERVICE_NATIVE_APP.CORE.
Function Overview
| Function | Signature | Returns | Description |
|---|---|---|---|
DIRECTIONS | (method VARCHAR, jstart ARRAY, jend ARRAY) | VARIANT | Point-to-point directions |
DIRECTIONS | (method VARCHAR, locations VARIANT) | VARIANT | Multi-waypoint directions |
ISOCHRONES | (method TEXT, lon FLOAT, lat FLOAT, range INT) | VARIANT | Catchment area polygon |
OPTIMIZATION | (jobs ARRAY, vehicles ARRAY, matrices ARRAY) | VARIANT | Route optimization (tabular) |
OPTIMIZATION | (challenge VARIANT) | VARIANT | Route optimization (raw) |
MATRIX | (method VARCHAR, locations ARRAY) | VARIANT | Time-distance matrix (tabular) |
MATRIX | (method VARCHAR, options VARIANT) | VARIANT | Time-distance matrix (raw) |
ORS_STATUS | () | VARIANT | Service health and graph info |
DIRECTIONS_GEO | (method VARCHAR, jstart ARRAY, jend ARRAY) | TABLE(RESPONSE, GEOJSON, DISTANCE, DURATION) | Directions with GEOGRAPHY |
DIRECTIONS_GEO | (method VARCHAR, locations VARIANT) | TABLE(RESPONSE, GEOJSON, DISTANCE, DURATION) | Multi-waypoint with GEOGRAPHY |
ISOCHRONES_GEO | (method TEXT, lon FLOAT, lat FLOAT, range INT) | TABLE(RESPONSE, GEOJSON) | Isochrone with GEOGRAPHY |
OPTIMIZATION_GEO | (jobs ARRAY, vehicles ARRAY, matrices ARRAY) | TABLE(RESPONSE, GEOJSON, VEHICLE, DURATION, STEPS) | Optimization with GEOGRAPHY |
OPTIMIZATION_GEO | (challenge VARIANT) | TABLE(RESPONSE, GEOJSON, VEHICLE, DURATION, STEPS) | Optimization (raw) with GEOGRAPHY |
Base Functions — SQL Examples
Directions: Point-to-Point
Calculate a driving route between two coordinates (longitude, latitude):
SELECT OPENROUTESERVICE_NATIVE_APP.CORE.DIRECTIONS(
    'driving-car',
    [-122.4194, 37.7749],   -- start: [lon, lat]
    [-122.4783, 37.8199]    -- end:   [lon, lat]
) AS route;
Directions: Multi-Waypoint
Route through multiple stops by passing a locations object:
SELECT OPENROUTESERVICE_NATIVE_APP.CORE.DIRECTIONS(
    'driving-car',
    OBJECT_CONSTRUCT('coordinates',
        ARRAY_CONSTRUCT(
            ARRAY_CONSTRUCT(-122.4194, 37.7749),   -- stop 1
            ARRAY_CONSTRUCT(-122.4078, 37.7941),   -- stop 2
            ARRAY_CONSTRUCT(-122.4783, 37.8199)    -- stop 3
        )
    )
) AS route;
Isochrones
Generate a polygon showing the area reachable within 10 minutes of driving:
SELECT OPENROUTESERVICE_NATIVE_APP.CORE.ISOCHRONES(
    'driving-car',
    -122.4194,   -- longitude
    37.7749,     -- latitude
    10           -- range in minutes
) AS isochrone;
Optimization: Tabular
Match delivery jobs to vehicles using arrays of jobs and vehicles:
SELECT OPENROUTESERVICE_NATIVE_APP.CORE.OPTIMIZATION(
    -- jobs: array of delivery tasks
    [
        {'id': 1, 'location': [-122.4194, 37.7749], 'service': 300},
        {'id': 2, 'location': [-122.4078, 37.7941], 'service': 300},
        {'id': 3, 'location': [-122.4350, 37.7609], 'service': 300}
    ],
    -- vehicles: array of available vehicles
    [
        {'id': 1, 'profile': 'driving-car', 'start': [-122.4177, 37.8080], 'end': [-122.4177, 37.8080], 'capacity': [4], 'time_window': [28800, 43200]},
        {'id': 2, 'profile': 'driving-car', 'start': [-122.3950, 37.7785], 'end': [-122.3950, 37.7785], 'capacity': [4], 'time_window': [28800, 43200]}
    ],
    -- matrices (optional, empty array uses ORS to calculate)
    []
) AS optimized_routes;
Optimization: Raw Variant
Pass a full VROOM-compatible JSON challenge:
SELECT OPENROUTESERVICE_NATIVE_APP.CORE.OPTIMIZATION(
    PARSE_JSON('{
        "jobs": [
            {"id": 1, "location": [-122.4194, 37.7749], "service": 300},
            {"id": 2, "location": [-122.4078, 37.7941], "service": 300}
        ],
        "vehicles": [
            {"id": 1, "profile": "driving-car", "start": [-122.4177, 37.8080], "end": [-122.4177, 37.8080], "capacity": [4]}
        ]
    }')
) AS optimized_routes;
Matrix: Tabular
Calculate the time and distance matrix between multiple locations:
SELECT OPENROUTESERVICE_NATIVE_APP.CORE.MATRIX(
    'driving-car',
    ARRAY_CONSTRUCT(
        ARRAY_CONSTRUCT(-122.4194, 37.7749),
        ARRAY_CONSTRUCT(-122.4078, 37.7941),
        ARRAY_CONSTRUCT(-122.4783, 37.8199)
    )
) AS matrix;
Matrix: Raw Variant
Pass full matrix options for advanced control (sources, destinations, metrics):
SELECT OPENROUTESERVICE_NATIVE_APP.CORE.MATRIX(
    'driving-car',
    PARSE_JSON('{
        "locations": [[-122.4194, 37.7749], [-122.4078, 37.7941], [-122.4783, 37.8199]],
        "metrics": ["distance", "duration"],
        "resolve_locations": true,
        "sources": [0],
        "destinations": [1, 2]
    }')
) AS matrix;
GeoFunctions — Native GEOGRAPHY Output
The _GEO functions are SQL wrappers around the base functions above. All they do is:
- Call the base function (e.g.
DIRECTIONS) - Use
TO_GEOGRAPHY()to parse the GeoJSON geometry from the VARIANT response into a native SnowflakeGEOGRAPHYcolumn - Extract key summary fields (distance, duration, vehicle ID, etc.) into their own columns
Why this matters: The base functions return a single VARIANT column where the route geometry is buried inside response:features[0]:geometry. The GeoFunctions extract that geometry into a dedicated GEOJSON GEOGRAPHY column for user convenience.
DIRECTIONS_GEO: Point-to-Point
SELECT * FROM TABLE(OPENROUTESERVICE_NATIVE_APP.CORE.DIRECTIONS_GEO(
    'driving-car',
    [-122.4194, 37.7749],
    [-122.4783, 37.8199]
));
-- Returns: RESPONSE (variant), GEOJSON (geography), DISTANCE (float, meters), DURATION (float, seconds)
DIRECTIONS_GEO: Multi-Waypoint
SELECT * FROM TABLE(OPENROUTESERVICE_NATIVE_APP.CORE.DIRECTIONS_GEO(
    'driving-car',
    OBJECT_CONSTRUCT('coordinates',
        ARRAY_CONSTRUCT(
            ARRAY_CONSTRUCT(-122.4194, 37.7749),
            ARRAY_CONSTRUCT(-122.4078, 37.7941),
            ARRAY_CONSTRUCT(-122.4783, 37.8199)
        )
    )
));
-- Returns: RESPONSE (variant), GEOJSON (geography), DISTANCE (float, meters), DURATION (float, seconds)
ISOCHRONES_GEO
SELECT * FROM TABLE(OPENROUTESERVICE_NATIVE_APP.CORE.ISOCHRONES_GEO(
    'driving-car',
    -122.4194,
    37.7749,
    10
));
-- Returns: RESPONSE (variant), GEOJSON (geography)
OPTIMIZATION_GEO: Tabular
Returns one row per vehicle route with the route geometry as a GEOGRAPHY LineString:
SELECT * FROM TABLE(OPENROUTESERVICE_NATIVE_APP.CORE.OPTIMIZATION_GEO(
    [
        {'id': 1, 'location': [-122.4194, 37.7749], 'service': 300},
        {'id': 2, 'location': [-122.4078, 37.7941], 'service': 300},
        {'id': 3, 'location': [-122.4350, 37.7609], 'service': 300}
    ],
    [
        {'id': 1, 'profile': 'driving-car', 'start': [-122.4177, 37.8080], 'end': [-122.4177, 37.8080], 'capacity': [4], 'time_window': [28800, 43200]},
        {'id': 2, 'profile': 'driving-car', 'start': [-122.3950, 37.7785], 'end': [-122.3950, 37.7785], 'capacity': [4], 'time_window': [28800, 43200]}
    ],
    []
));
-- Returns: RESPONSE (variant), GEOJSON (geography), VEHICLE (int), DURATION (int), STEPS (variant)
OPTIMIZATION_GEO: Raw Variant
SELECT * FROM TABLE(OPENROUTESERVICE_NATIVE_APP.CORE.OPTIMIZATION_GEO(
    PARSE_JSON('{
        "jobs": [
            {"id": 1, "location": [-122.4194, 37.7749], "service": 300},
            {"id": 2, "location": [-122.4078, 37.7941], "service": 300}
        ],
        "vehicles": [
            {"id": 1, "profile": "driving-car", "start": [-122.4177, 37.8080], "end": [-122.4177, 37.8080], "capacity": [4]}
        ]
    }')
));
-- Returns: RESPONSE (variant), GEOJSON (geography), VEHICLE (int), DURATION (int), STEPS (variant)
Geospatial Integration Patterns
Once you have GEOGRAPHY columns from the Geofunctions, you can chain them with Snowflake's built-in geospatial functions:
Route length in kilometers:
SELECT
    ST_LENGTH(GEOJSON) / 1000 AS route_length_km,
    DISTANCE / 1000 AS ors_distance_km,
    DURATION / 60 AS duration_minutes
FROM TABLE(OPENROUTESERVICE_NATIVE_APP.CORE.DIRECTIONS_GEO(
    'driving-car', [-122.4194, 37.7749], [-122.4783, 37.8199]
));
Isochrone area in square kilometers:
SELECT
    ST_AREA(GEOJSON) / 1000000 AS catchment_area_sq_km
FROM TABLE(OPENROUTESERVICE_NATIVE_APP.CORE.ISOCHRONES_GEO(
    'driving-car', -122.4194, 37.7749, 15
));
Check if a point falls within an isochrone:
SELECT
    ST_WITHIN(
        ST_MAKEPOINT(-122.4078, 37.7941),
        GEOJSON
    ) AS is_reachable
FROM TABLE(OPENROUTESERVICE_NATIVE_APP.CORE.ISOCHRONES_GEO(
    'driving-car', -122.4194, 37.7749, 10
));
Customize Your Deployment
The default deployment uses San Francisco with standard routing profiles. You can customize two key areas for the ORS Native App:
| Customization | Default | Example Custom |
|---|---|---|
| 🗺️ Map Region | San Francisco | Paris, London, Tokyo, etc. |
| 🚚 Routing Profiles | Car, HGV, Electric Bicycle | Add walking, wheelchair, road bicycle |
NOTE: This step is optional. If you skip customization, the Native App will use the San Francisco defaults.
ORS Customization Skills
.cortex/skills/customize-main/
├── location.md           ← Customize map
└── routing-profiles.md   ← Customize routing profile
...
To customize, run:
$customize-main
How the Customization Works
The main $customize-main skill orchestrates the process by asking two questions, then runs only the relevant sub-skills:
-
"Do you want to customize the LOCATION (map region)?"
- If YES → Runs
$customize-main/location` - If NO → Skips map download entirely
- If YES → Runs
-
"Do you want to customize ROUTING PROFILES (vehicle types)?"
- If YES → Runs
$customize-main/routing-profiles - If NO → Keeps default profiles (car, HGV, electric bicycle)
- If YES → Runs
Example: Customizing to Paris
Let's try changing the location to Paris. In Cortex Code, simply type:
$customize-main
then select location: Paris as part of the workflow.
Cortex Code will find the appropriate skill and guide you through the process:
Step 1: Location Change
- Cortex Code downloads the Paris (or Île-de-France) map from Geofabrik
- Uploads the OpenStreetMap data to Snowflake
- Updates
ors-config.ymlwith the new map path
Step 2: Routing Profiles
- Choose which routing profiles to enable for Paris:
driving-car- Standard passenger vehicle ✅driving-hgv- Heavy goods vehicle (trucks) ✅cycling-electric- Electric bicycles ✅foot-walking- Pedestrian (optional)wheelchair- Wheelchair accessible (optional)
Step 3: Function Tester Update
- Updates Function Tester with Paris addresses
- Updates available vehicle profiles dropdown to match your configuration
Step 4: Build Graphs
- Services restart to update routing graphs for Paris
- Changes are applied directly to your local files
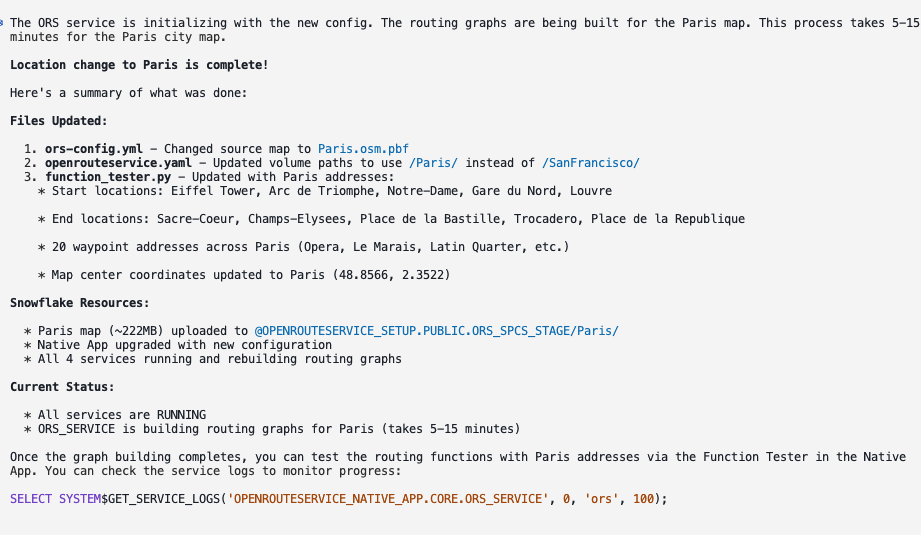
Once the customization completes, Cortex Code shows a summary of everything that was updated:
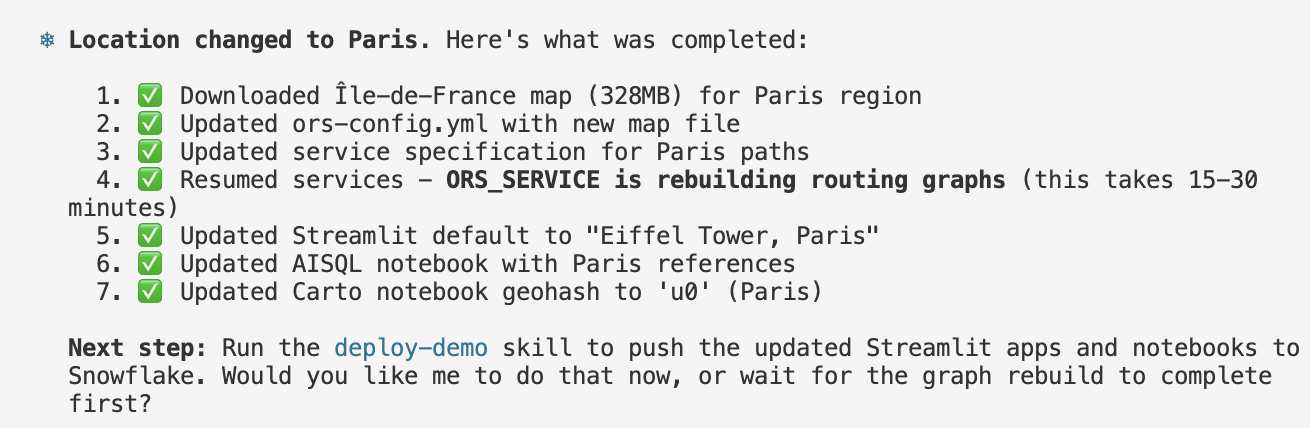
The summary confirms:
- ✅ Map downloaded - The Île-de-France map for the Paris region
- ✅ Config updated -
ors-config.ymlnow points to the new map file - ✅ Service spec updated - Volume paths configured for Paris
- ✅ Services resumed - ORS_SERVICE is rebuilding routing graphs (this takes 15-30 minutes depending on map size)
- ✅ Streamlit updated - Default location changed to "Eiffel Tower, Paris"
⏳ Wait for Services to Restart
After the map is uploaded (if location was changed) or profiles were modified (if vehicles were changed), the services need to update the routing graphs. You can monitor progress in the Service Manager:
- Navigate to Data Products > Apps > OPENROUTESERVICE_NATIVE_APP
- Check the Service Manager - all 4 services should show ✅ RUNNING
- The Open Route Service will take the longest as it builds the graph files
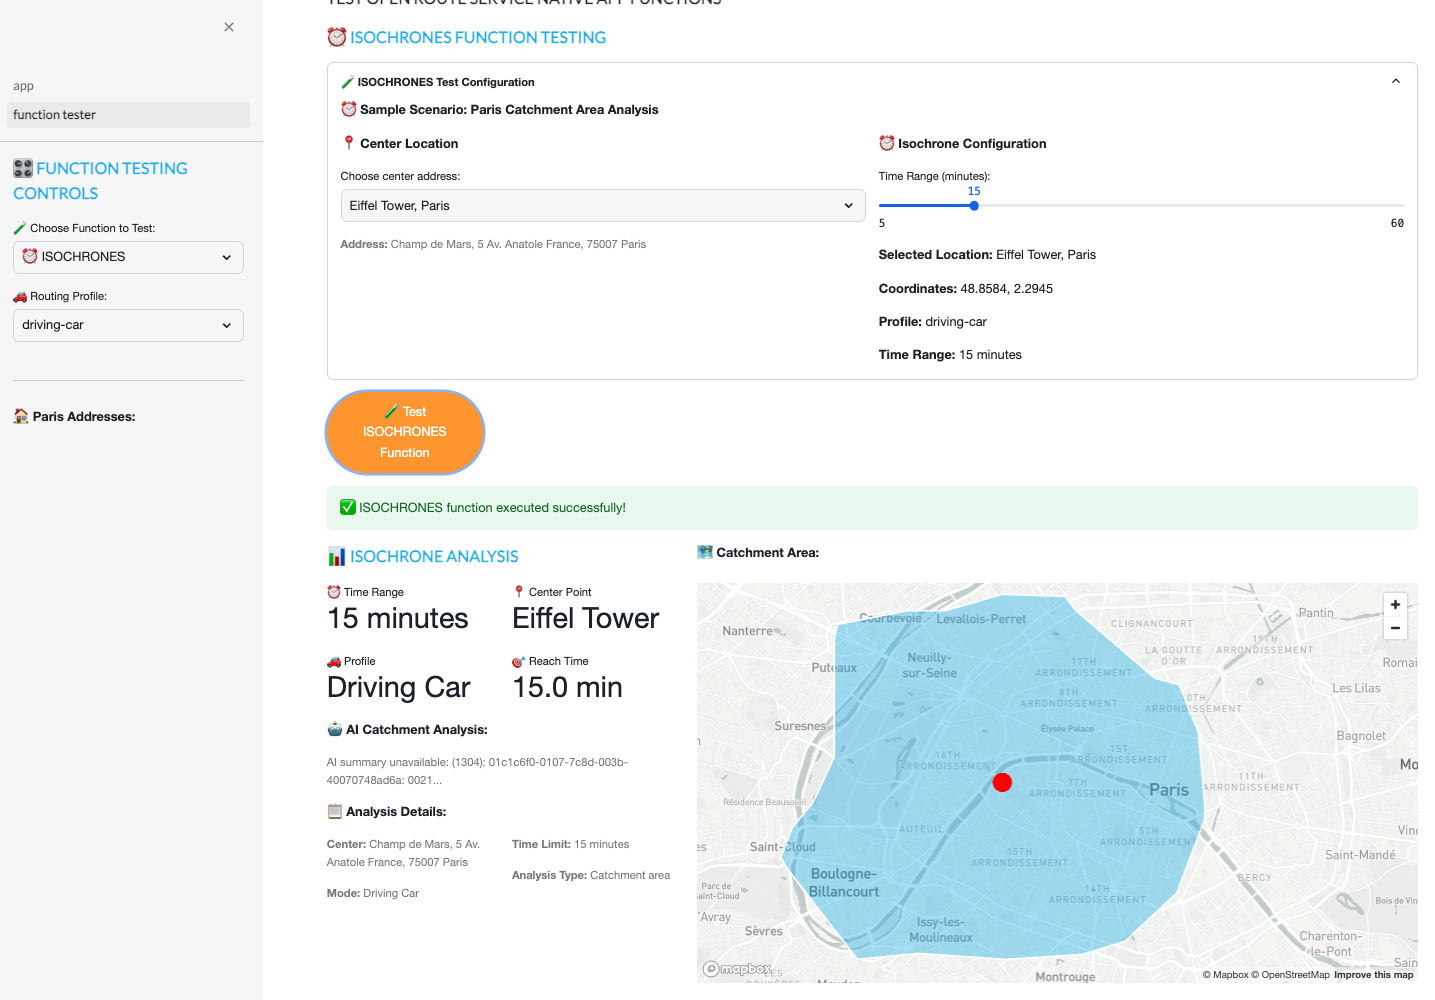
Once services are running, the Function Tester will show Paris addresses instead of San Francisco!
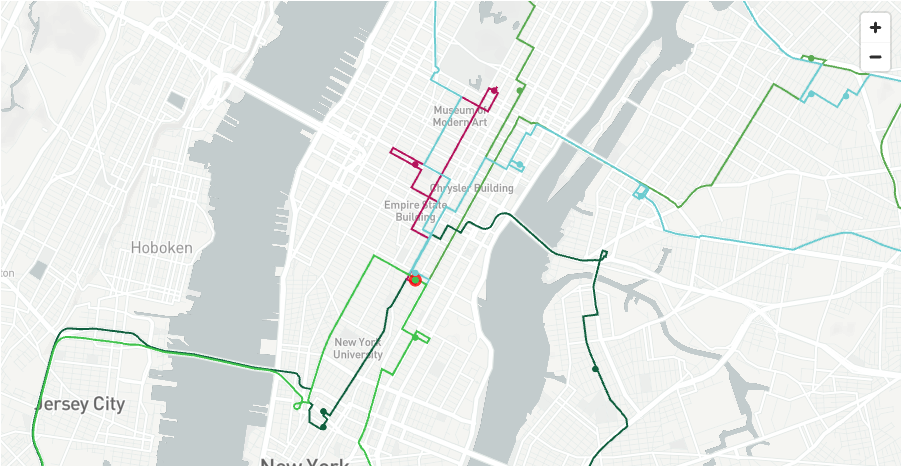
You can now test the routing functions with Paris addresses. Here's an example of testing the ISOCHRONES function to calculate a 15-minute driving catchment area from the Eiffel Tower:
TIP: If you only want to enable additional vehicle profiles (and keep San Francisco), answer NO to location. This skips map download entirely - making it much faster!
Map Download & Resource Scaling (Location Changes Only)
If you selected YES to location customization, the skill downloads OpenStreetMap data from Geofabrik or BBBike. The bigger the map file, the longer it takes to:
- Download the OSM data from the source
- Upload to the Snowflake stage
- Generate graph files for route calculations
| Map Size | Example Regions | Download Time | Graph Build Time |
|---|---|---|---|
| < 100MB | San Francisco, Zurich | Minutes | 5-15 minutes |
| 100MB - 1GB | New York State, Switzerland | 10-30 minutes | 30-60 minutes |
| 1-5GB | Germany, France, California | 30-60 minutes | 1-3 hours |
| > 5GB | Great Britain, entire countries | 1-2 hours | 3-8+ hours |
IMPORTANT: For country-wide or large region maps, graph generation can take several hours. The services will show as "running" while building graphs in the background.
Automatic Compute Scaling
Cortex Code will detect the map size after download and offer to resize the compute pool to speed up graph generation:
| Map Size | Suggested Compute | Auto-Suspend Extension |
|---|---|---|
| < 1GB | CPU_X64_S (default) | 1 hour |
| 1-5GB | HIGHMEM_X64_M | 8 hours |
| > 5GB | HIGHMEM_X64_M | 24 hours |
When prompted, you can accept the scaling recommendation to ensure graphs are computed as quickly as possible. The extended auto-suspend time prevents the service from shutting down mid-build.
TIP: For quickest results, use the smallest map that covers your use case. A city-level map (e.g., New York) builds much faster than a country map (e.g., USA).
Routing Profile Configuration
The skill presents available routing profiles and lets you enable/disable them:
| Profile | Category | Description |
|---|---|---|
driving-car | Driving | Standard passenger vehicle |
driving-hgv | Driving | Heavy goods vehicles (trucks) |
cycling-regular | Cycling | Standard bicycles |
cycling-road | Cycling | Road bicycles |
cycling-mountain | Cycling | Mountain bicycles |
cycling-electric | Cycling | Electric bicycles |
foot-walking | Foot | Pedestrian walking |
foot-hiking | Foot | Hiking trails |
wheelchair | Wheelchair | Wheelchair accessible routes |
NOTE: Enabling more profiles increases graph build time. The default (driving-car, driving-hgv, cycling-electric) covers most logistics use cases.
Function Tester Customization
The skill automatically updates the Function Tester Streamlit with:
Region-specific sample addresses:
- Start locations (5 landmarks/city centers)
- End locations (5 different destinations)
- Waypoints (20 locations across the region)
Vehicle profiles dropdown:
- Updated to show only your enabled profiles
- Matches the profiles configured in
ors-config.yml
This ensures test addresses are valid for your map region and vehicle options match your configuration.
TIP: Customizations modify your local files directly. If you want to preserve the original San Francisco configuration, make a backup before customizing.
Once your services are running with the new map (or if you skipped customization), you're ready to deploy the demo!
Next Steps
🎉 Congratulations! Your Routing Solution is now installed and configured.
To deploy the Route Optimization demo with real-world POI data and interactive notebooks, continue to the next quickstart: 👉 Deploy Route Optimization Demo
The demo quickstart will:
- Acquire the Carto Overture Maps Places dataset with 50+ million POIs worldwide
- Deploy interactive AISQL notebooks to explore routing functions
- Create the Route Optimization Simulator Streamlit app
All demo content will use your configured map region (San Francisco by default, or your customized region like Paris).
Uninstall the Route Optimizer
Cortex Code makes uninstallation simple with natural language commands.
Uninstall demo
To remove the Snowflake objects installed as part of the demo you can type in Cortex Code CLI:
uninstall all Snowflake objects created as part of skill $build-routing-solution
This will:
- Remove the Native App (
OPENROUTESERVICE_NATIVE_APP) - Drop the Application Package (
OPENROUTESERVICE_NATIVE_APP_PKG) - Delete the setup database (
OPENROUTESERVICE_SETUP) including all stages and image repository - Optionally remove local container images
Conclusion and Resources
Conclusion
You've just deployed a self-contained routing solution in Snowflake using natural language commands - no complex configuration files, no external API dependencies, and no data leaving your Snowflake environment.
This solution demonstrates the power of combining:
- Cortex Code - AI-powered CLI that turns natural language into automated workflows
- Snowpark Container Services - Running OpenRouteService as a self-managed Native App
- Native App Functions - SQL-callable routing functions for directions, optimization, isochrones, and time-distance matrix
The key advantage of this approach is flexibility without complexity. Want to switch from San Francisco to Paris? Just run the location customization skill. Need to add walking or cycling routes? Enable additional routing profiles. The skill-based approach means you only run the steps you need.
What You Learned
-
Deploy Native Apps with Cortex Code - Use natural language skills to automate complex Snowflake deployments including container services, stages, and compute pools
-
Self-Managed Route Optimization - Run OpenRouteService entirely within Snowflake with no external API calls, giving you unlimited routing requests and complete data privacy
-
Flexible Customization - Use skills to customize location (any city in the world) and vehicle types (car, HGV, bicycle, walking)
-
Four Routing Functions:
- Directions - Point-to-point and multi-waypoint routing
- Optimization - Match delivery jobs to vehicles based on time windows, capacity, and skills
- Isochrones - Generate catchment polygons showing reachable areas
- Time-Distance Matrix - Calculate travel time and distance matrices between multiple locations
-
GeoFunctions for Geospatial Analysis - Use
_GEOvariants (DIRECTIONS_GEO,ISOCHRONES_GEO,OPTIMIZATION_GEO) that wrap the base functions and return nativeGEOGRAPHYcolumns — no manual JSON parsing needed
Next Steps
Deploy the demo to see the routing functions in action with real-world POI data:
Related Resources
Source code
Related Quickstarts
- Deploy Route Optimization Demo - Build a visual route optimization simulator
- Retail Catchment Analysis with Overture Maps - Build an interactive retail catchment analysis tool using real-world POI data - powered by OpenRouteService in Snowflake
- Deploy Fleet Intelligence Solution for Taxis - Track and analyze taxi fleet operations
- Deploy Snowflake Intelligence Routing Agent - Build an AI-powered route planning assistant that understands natural language locations - powered by OpenRouteService and Snowflake Intelligence
OpenRouteService Resources
- OpenRouteService Official Website - Documentation, API reference, and community resources
- OpenRouteService on GitHub - Source code and technical documentation
- VROOM Project - Vehicle Routing Open-source Optimization Machine powering route optimization
Cortex Code
- Cortex Code - Snowflake's AI-powered CLI and agentic interface
- Snowflake Native Apps - Build and distribute applications within Snowflake
Map Data Sources
- Geofabrik Downloads - Country and region OpenStreetMap extracts
- BBBike Extracts - City-specific OpenStreetMap extracts for faster processing
This content is provided as is, and is not maintained on an ongoing basis. It may be out of date with current Snowflake instances