Set Up Near Real-Time Oracle CDC to Snowflake Using Openflow
Overview
Organizations running mission-critical workloads on Oracle databases face a common challenge: how to make transactional data available for analytics and AI in near real time without impacting source system performance. Traditional batch ETL processes introduce hours or even days of latency, making real-time analytics and AI applications difficult to implement.
Change Data Capture (CDC) solves this by capturing only the data that has changed — inserts, updates, and deletes — directly from the database's transaction logs, rather than repeatedly scanning entire tables. This approach is lightweight, low-latency, and non-intrusive to the source system.
The Snowflake Openflow Connector for Oracle brings CDC natively into Snowflake.
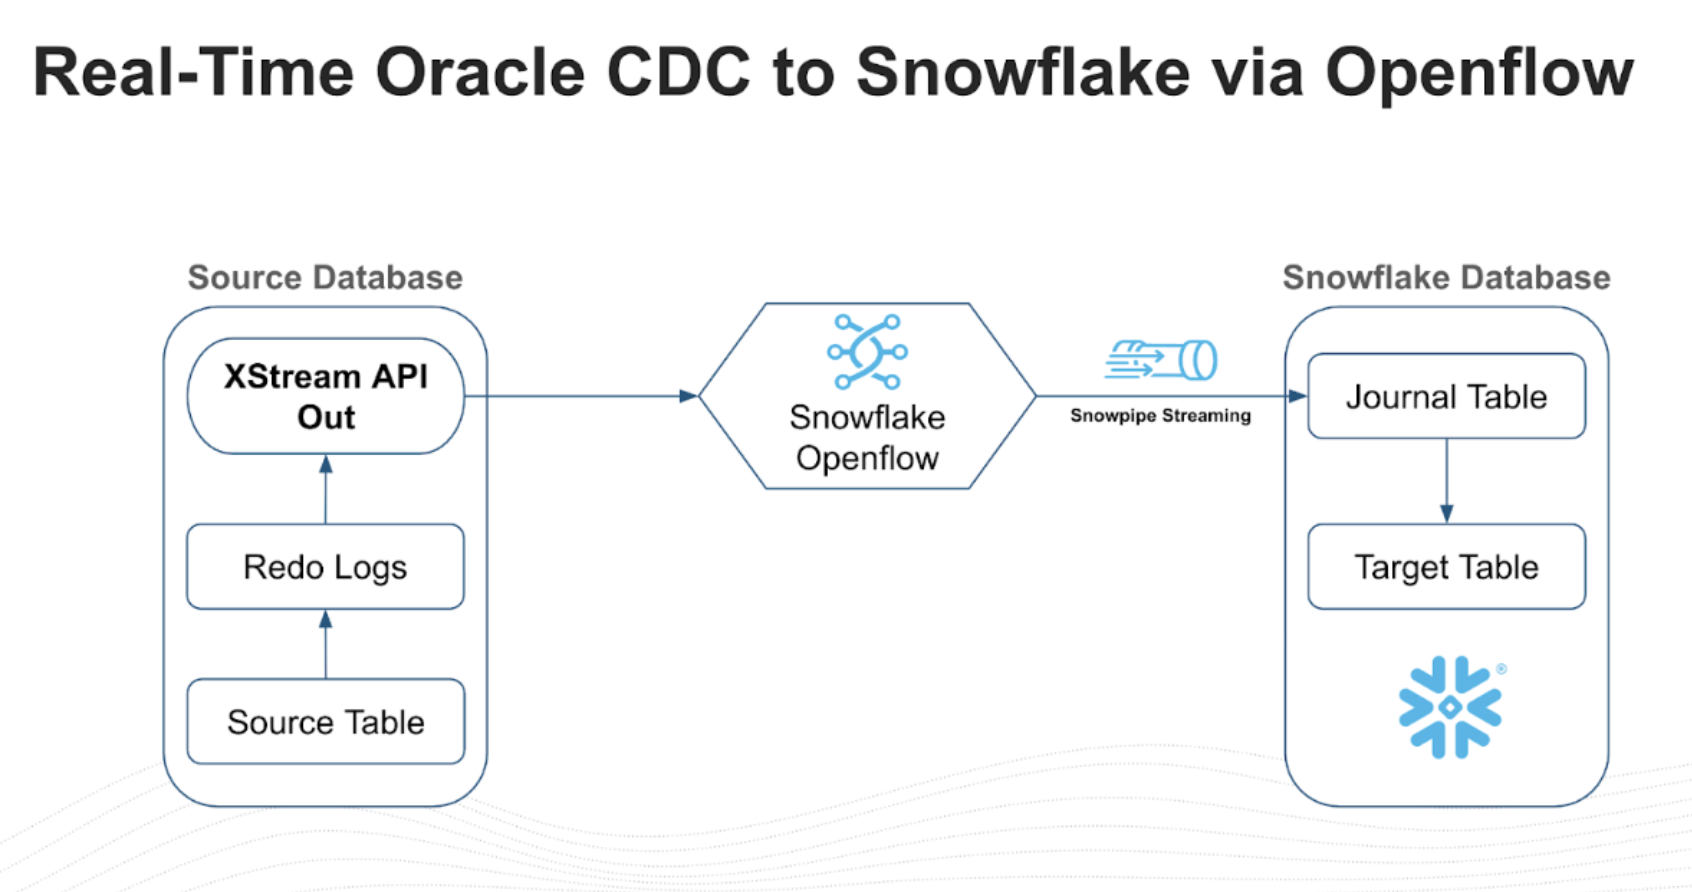
Built on Oracle's XStream API and Snowflake's Openflow framework, the connector streams committed changes from Oracle redo logs into Snowflake target tables using Snowpipe Streaming, delivering end-to-end latency in seconds.
This guide walks you through the complete setup process, from configuring the Oracle database for XStream to deploying the Openflow connector in Snowflake.
What is Change Data Capture (CDC)?
Change Data Capture is a design pattern that identifies and tracks changes made to data in a source database so that downstream systems can act on those changes. Instead of performing full table scans or scheduled bulk loads, CDC reads the database's transaction log to detect row-level inserts, updates, and deletes as they are committed.
| CDC Approach | How It Works | Trade-offs |
|---|---|---|
| Log-based | Reads the database transaction/redo logs | Lowest latency, minimal source impact, captures all changes |
| Trigger-based | Database triggers fire on DML events | Adds overhead to every write operation |
| Query-based | Polls tables using timestamps or version columns | Misses deletes, adds query load to source |
The Openflow Connector for Oracle uses log-based CDC via Oracle's XStream API, which shares the same underlying technology as Oracle GoldenGate. This is the most efficient approach because it reads committed transactions directly from the redo logs without adding any load to the source database's query engine.
What is Snowflake Openflow?
Snowflake Openflow is an open, extensible, managed data integration service built on Apache NiFi. It runs natively on Snowpark Container Services (SPCS) and provides curated connectors for streaming data from various sources into Snowflake.
For Oracle CDC, Openflow provides a zero-footprint, agentless architecture — there are no agents to install, manage, or patch on Oracle servers. The setup on the Oracle side is accomplished by a DBA running standard SQL commands, and from there, all integration is controlled within Snowflake.
What You'll Learn
- How to configure Oracle Database for XStream-based CDC
- How to create XStream users, privileges, and outbound servers
- How to set up an Openflow deployment in Snowflake
- How to configure and start the Oracle CDC connector
- How to verify and monitor the replication pipeline
What You'll Build
By the end of this guide, you'll have a working near real-time CDC pipeline that streams changes from Oracle Database into Snowflake using Openflow.
Prerequisites
- A Snowflake account in an AWS or Azure commercial region
- An Oracle Database (12c R2, 18c, 19c, 21c, 23ai, or 26ai) with SYSDBA access
- Network connectivity between Snowflake (SPCS) and the Oracle database
- Snowflake
ACCOUNTADMINor a role with Openflow admin privileges - All Oracle source tables must have a primary key — tables without primary keys will silently fail to replicate
- Each Openflow runtime supports one connector only — if you need multiple connectors, create a separate runtime for each
Architecture
The Openflow Connector reads logical change records (LCRs) directly from the XStream outbound server queue in near real time. These change events are processed through the Openflow runtime as FlowFiles and loaded into Snowflake target tables using Snowpipe Streaming, delivering low-latency replication with minimal impact on the source database.
| Component | Description |
|---|---|
| Oracle Redo Logs | Transaction logs that record every committed change in the database |
| XStream Outbound Server | Reads redo logs and exposes changes as logical change records (LCRs) |
| Openflow Runtime | Apache NiFi-based service running on Snowpark Container Services that consumes LCRs |
| Snowpipe Streaming | Low-latency ingestion API that loads change events into Snowflake target tables |
Journal Table and Merge Pattern
The connector uses a two-stage landing pattern. Change events are first written to a journal table — an append-only staging table that records every insert, update, and delete operation with metadata such as operation type and timestamp. A scheduled merge task then applies those changes to the final target table, collapsing multiple operations on the same row into the latest state.
This separation ensures that no change events are lost during ingestion and that the target table always reflects a consistent, deduplicated view of the source. The merge runs on a configurable schedule — the default interval is typically sufficient for near real-time use cases, but you can adjust it in the connector settings to balance freshness against compute cost.
Supported Environments
The connector supports Oracle Database versions 12c R2 (12.2), 18c, 19c, 21c, 23ai, and 26ai in the following environments:
| Status | Environment |
|---|---|
| Supported | On-premises |
| Supported | Oracle Exadata |
| Supported | OCI VM / Bare Metal |
| Supported | AWS RDS Custom for Oracle |
| Supported | AWS RDS Standard Single-tenant |
| Not Supported | AWS RDS Standard Multi-tenant |
| Not Supported | Oracle Autonomous Database (ATP / ADW) |
| Not Supported | Oracle SaaS (Fusion, NetSuite) |
Note: XStream requires SYSDBA-level access and control over redo log configuration. Environments that restrict DBA privileges or do not expose redo logs (multi-tenant RDS, Autonomous, SaaS) are not compatible.
For unique requirements, the replication flow is built on the flexible Openflow framework. Teams can open the Apache NiFi canvas to expand pipelines — for example, enriching data with lookups or masking sensitive PII before it reaches Snowflake.
Accept Oracle Connector Terms (ORGADMIN)
Before the Oracle connector is visible in the Openflow connector catalog, an organization administrator must accept the Oracle Connector commercial terms. This is a one-time step that is unique to the Oracle connector and is a prerequisite for every deployment.
Steps
- Sign in to Snowsight with a user that has the
ORGADMINrole - Switch to the
ORGADMINrole using the role selector - Navigate to Admin > Terms
- Locate the Openflow Connector for Oracle terms entry
- Review and accept the commercial terms
Important: If the Oracle connector does not appear in the Openflow connector catalog when you reach the connector deployment step, it is almost certainly because this step was skipped. The connector will remain hidden until the ORGADMIN accepts the terms.
Note: If you do not have access to the
ORGADMINrole, contact your Snowflake organization administrator to complete this step.
Choose Your Licensing Model
The Oracle connector offers two licensing models. You must select a model during the ORGADMIN terms acceptance step — this choice affects cost structure and contractual obligations.
| Model | Who It's For | Connector Fee | Trial | Commitment |
|---|---|---|---|---|
| Embedded | Customers without an existing Oracle GoldenGate or XStream license | $110 per core per month | 60-day free trial | Auto-converts to a non-cancelable 36-month commitment on Day 61 |
| Independent (BYOL) | Customers with an existing Oracle GoldenGate or XStream license | $0 | N/A | None beyond existing Oracle license |
Warning: The Embedded license 60-day trial automatically converts to a 36-month non-cancelable commitment if not cancelled before Day 61. Ensure you have internal approval before the trial expires.
For full licensing details, refer to the Openflow Connector for Oracle documentation.
Setup Oracle Config
Enable ARCHIVELOG Mode
Connect to Oracle as SYSDBA and verify that the database is in ARCHIVELOG mode. XStream requires this to read the redo logs.
sqlplus -L / as sysdba

SELECT log_mode FROM v$database;
If the database is not in ARCHIVELOG mode, enable it:
SHUTDOWN IMMEDIATE;
STARTUP MOUNT;
ALTER DATABASE ARCHIVELOG;
ALTER DATABASE OPEN;

SELECT log_mode FROM v$database;
Note: Enabling
ARCHIVELOGmode requires a database restart. Plan accordingly for production systems.
Enable GoldenGate Replication
XStream requires GoldenGate replication to be enabled:
ALTER SYSTEM SET enable_goldengate_replication=TRUE SCOPE=BOTH;
Set Streams Pool Size
Set an explicit memory allocation for the Streams pool to isolate XStream memory from the Buffer Cache. Without this, XStream dynamically borrows from the shared pool and can starve the Buffer Cache under load, risking instance instability.
ALTER SYSTEM SET STREAMS_POOL_SIZE = 2560M;
Important: This is critical for production databases. The
STREAMS_POOL_SIZEparameter reserves a dedicated memory region for XStream capture and apply processes. The 2560 MB value is a recommended starting point — adjust based on the number of schemas, transaction volume, and available SGA memory. Monitor usage withSELECT * FROM V$SGASTAT WHERE pool = 'streams pool';.
Enable Supplemental Logging
Switch to the root container and enable supplemental logging for all columns:
ALTER SESSION SET CONTAINER = CDB$ROOT;
ALTER DATABASE ADD SUPPLEMENTAL LOG DATA (ALL) COLUMNS;
Production Recommendation: Database-wide supplemental logging captures all columns on every table, which increases redo log volume. For production systems, consider enabling supplemental logging only on the specific tables you plan to replicate:
ALTER TABLE schema_name.table_name ADD SUPPLEMENTAL LOG DATA (ALL) COLUMNS;This reduces redo generation overhead on tables that are not part of the replication scope.
Create XStream Tablespaces
Create tablespaces in both the root container and the pluggable database for the XStream administrator:
CREATE TABLESPACE xstream_adm_tbs
  DATAFILE '/opt/oracle/oradata/FREE/xstream_adm_tbs.dbf'
  SIZE 25M REUSE AUTOEXTEND ON MAXSIZE UNLIMITED;

ALTER SESSION SET CONTAINER = FREEPDB1;

CREATE TABLESPACE xstream_adm_tbs
  DATAFILE '/opt/oracle/oradata/FREE/FREEPDB1/xstream_adm_tbs.dbf'
  SIZE 25M REUSE AUTOEXTEND ON MAXSIZE UNLIMITED;

ALTER SESSION SET CONTAINER = CDB$ROOT;
Note: Replace
FREEPDB1and file paths with your actual PDB name and Oracle data directory.
Create XStream Administrator
Create a common user (prefixed with c##) that will administer XStream:
CREATE USER c##xstreamadmin IDENTIFIED BY "XStreamAdmin123!"
  DEFAULT TABLESPACE xstream_adm_tbs
  QUOTA UNLIMITED ON xstream_adm_tbs
  CONTAINER=ALL;
Grant the required privileges:
GRANT CREATE SESSION, SET CONTAINER, EXECUTE ANY PROCEDURE, LOGMINING
  TO c##xstreamadmin CONTAINER=ALL;

GRANT SELECT ANY TABLE TO c##xstreamadmin CONTAINER=ALL;
GRANT FLASHBACK ANY TABLE TO c##xstreamadmin CONTAINER=ALL;
GRANT SELECT ANY TRANSACTION TO c##xstreamadmin CONTAINER=ALL;
Grant XStream admin privileges. The correct approach depends on your Oracle version:
Oracle 23ai / 26ai:
GRANT XSTREAM_CAPTURE TO c##xstreamadmin CONTAINER=ALL;
GRANT XSTREAM_ADMIN TO c##xstreamadmin CONTAINER=ALL;
Oracle 19c / 21c:
The XSTREAM_CAPTURE and XSTREAM_ADMIN roles do not exist on 19c and 21c. Using GRANT XSTREAM_CAPTURE on these versions will silently fail. Use the DBMS_XSTREAM_AUTH package instead:
BEGIN
  DBMS_XSTREAM_AUTH.GRANT_ADMIN_PRIVILEGE(
    grantee                => 'c##xstreamadmin',
    privilege_type         => 'CAPTURE',
    grant_select_privileges => TRUE,
    container              => 'ALL'
  );
END;
/
Important: The majority of production Oracle deployments run 19c or 21c. If you use the 23ai-style
GRANT XSTREAM_CAPTUREon these versions, the grant silently fails and the XStream outbound server will not start. Verify your Oracle version withSELECT * FROM v$version;before proceeding.
Create XStream Connect User
Create the user that the Openflow connector will use to connect:
CREATE USER c##connectuser IDENTIFIED BY "ConnectUser123!"
  CONTAINER=ALL;

GRANT CREATE SESSION, SELECT_CATALOG_ROLE TO c##connectuser CONTAINER=ALL;
GRANT SELECT ANY TABLE TO c##connectuser CONTAINER=ALL;
GRANT LOCK ANY TABLE TO c##connectuser CONTAINER=ALL;
GRANT SELECT ANY DICTIONARY TO c##connectuser CONTAINER=ALL;
Create XStream Outbound Server
Create an XStream outbound server that captures changes from the schemas you want to replicate:
SET SERVEROUTPUT ON;

DECLARE
    tables  DBMS_UTILITY.UNCL_ARRAY;
    schemas DBMS_UTILITY.UNCL_ARRAY;
BEGIN
    tables(1)  := NULL;
    schemas(1) := 'HR';
    schemas(2) := 'CO';

    DBMS_XSTREAM_ADM.CREATE_OUTBOUND(
        server_name           => 'XOUT1',
        table_names           => tables,
        schema_names          => schemas,
        source_container_name => 'FREEPDB1',
        include_ddl           => TRUE
    );
END;
/
Note: Replace
HRandCOwith the schemas you want to replicate.
Assign Connect User to the Outbound Server
BEGIN
    DBMS_XSTREAM_ADM.ALTER_OUTBOUND(
        server_name  => 'XOUT1',
        connect_user => 'c##connectuser');
END;
/
Verify Oracle Configuration
Run the following queries to confirm the Oracle database is correctly configured:
SELECT server_name, status, connect_user, capture_user
FROM dba_xstream_outbound;

SELECT supplemental_log_data_min, supplemental_log_data_pk, supplemental_log_data_all
FROM v$database;

SELECT con_id, username, account_status
FROM cdb_users
WHERE username IN ('C##XSTREAMADMIN', 'C##CONNECTUSER')
ORDER BY con_id;

SELECT name, value FROM v$parameter
WHERE name = 'enable_goldengate_replication';

SELECT CAPTURE_NAME, STATE, TOTAL_MESSAGES_CAPTURED, TOTAL_MESSAGES_ENQUEUED
FROM V$XSTREAM_CAPTURE;
| Check | Expected Value |
|---|---|
Outbound server status | ENABLED or ATTACHED |
supplemental_log_data_all | YES |
User account_status | OPEN |
enable_goldengate_replication | TRUE |
Connection Parameters
Record these values for use when configuring the Openflow connector:
| Parameter | Value |
|---|---|
| Host | <InstancePublicIp> or <InstancePrivateIp> |
| Port | 1521 |
| Service | FREEPDB1 |
| Username | c##connectuser |
| Password | ConnectUser123! |
| XStream Server | XOUT1 |
Tip: The XStream outbound server URL requires the Oracle SID, not the
GLOBAL_DB_NAME. If yourGLOBAL_DB_NAMEincludes a domain suffix (e.g.,ORCL.WORLD), strip the domain and use only the SID portion (e.g.,ORCL). The connection will fail if the domain suffix is included.
Set Up Openflow in Snowflake
Create the Openflow Admin Role
USE ROLE ACCOUNTADMIN;

CREATE ROLE IF NOT EXISTS OPENFLOW_ADMIN;
GRANT ROLE OPENFLOW_ADMIN TO USER <OPENFLOW_USER>;

GRANT CREATE OPENFLOW DATA PLANE INTEGRATION ON ACCOUNT TO ROLE OPENFLOW_ADMIN;
GRANT CREATE OPENFLOW RUNTIME INTEGRATION ON ACCOUNT TO ROLE OPENFLOW_ADMIN;
GRANT CREATE COMPUTE POOL ON ACCOUNT TO ROLE OPENFLOW_ADMIN;
Note: Users with a default role of
ACCOUNTADMINcannot log in to Openflow runtimes. Set a different default role for Openflow users.
Create an Openflow Deployment
Navigate to Snowsight > Ingestion > Openflow and create a new Openflow - Snowflake Deployment. This provisions the Openflow infrastructure on Snowpark Container Services (SPCS).
Alternative — BYOC Deployment: Enterprise customers who need to run Openflow in their own cloud environment can use a Bring Your Own Cloud (BYOC) deployment instead of SPCS. BYOC requires Openflow version 0.55.0 or later. This guide covers the SPCS deployment model; for BYOC setup, refer to the Openflow documentation.
After creating the deployment, you must:
- Create a Snowflake role for the connector (see next section)
- Create a runtime within the deployment — this is where your data flows execute
- Configure allowed domains so the runtime can reach your Oracle host
For detailed deployment steps, refer to the Set up Openflow - Snowflake Deployment documentation.
Important — Runtime Sizing: The Oracle connector requires a Medium runtime at minimum. Small runtimes do not have sufficient resources and will fail. Multi-node runtimes are also not supported — set both minimum and maximum nodes to 1. Do not enable auto-scaling.
Create a Snowflake Role for the Connector
CREATE ROLE IF NOT EXISTS openflow_oracle_role;

GRANT USAGE ON DATABASE <destination_database> TO ROLE openflow_oracle_role;
GRANT CREATE SCHEMA ON DATABASE <destination_database> TO ROLE openflow_oracle_role;
GRANT USAGE ON WAREHOUSE <warehouse_name> TO ROLE openflow_oracle_role;
Note: The connector automatically creates target schemas and tables at runtime. Database-level
CREATE SCHEMAis required — schema-level grants alone will cause permission errors because the schemas do not exist yet when the connector starts.
Configure Network Access
Create a network rule to allow the Openflow runtime to reach the Oracle database:
CREATE OR REPLACE NETWORK RULE oracle_network_rule
  MODE = EGRESS
  TYPE = HOST_PORT
  VALUE_LIST = ('<oracle_host>:1521');
Create External Access Integration
A network rule alone is not sufficient — SPCS requires an External Access Integration (EAI) to allow outbound traffic. Create the EAI and attach the network rule:
CREATE OR REPLACE EXTERNAL ACCESS INTEGRATION oracle_eai
  ALLOWED_NETWORK_RULES = (oracle_network_rule)
  ENABLED = TRUE;
Grant the Openflow admin role permission to use the integration:
GRANT USAGE ON INTEGRATION oracle_eai TO ROLE OPENFLOW_ADMIN;
Note: Attach this EAI to your Openflow runtime when creating or updating the runtime configuration. Without it, the connector will fail to connect to the Oracle host at runtime. See Create runtime for details on configuring external access integrations for an Openflow runtime.
Configure the Oracle Connector
Open the Openflow UI
Navigate to Snowsight > Ingestion > Openflow, select your deployment, and open the Openflow runtime UI.
Deploy the Connector
- On the Openflow overview page, in the Featured connectors section, select View more connectors
- Find Openflow Connector for Oracle and select Add to runtime
- In the Select runtime dialog, choose your runtime from the Available runtimes drop-down and click Add
Configure the Connection
Provide the Oracle Source Parameters recorded during the verification step. The connector requires two JDBC URLs — a thin-driver URL for snapshot reads and an OCI-driver URL for the XStream CDC stream:
| Parameter | Value |
|---|---|
| Oracle Connection URL | jdbc:oracle:thin:@<oracle_host_ip_or_dns>:1521/FREEPDB1 |
| XStream Out Server URL | jdbc:oracle:oci:@<oracle_host_ip_or_dns>:1521/FREEPDB1 |
| Oracle Username | c##connectuser |
| Oracle Password | ConnectUser123! |
| XStream Out Server Name | XOUT1 |
Important: The Oracle Connection URL uses the thin JDBC driver (
jdbc:oracle:thin:@) and is used for snapshot operations. The XStream Out Server URL uses the OCI JDBC driver (jdbc:oracle:oci:@) and is used for the CDC stream. Both are required — omitting the XStream Out Server URL will cause errors once the snapshot phase completes and incremental replication begins.
Configure the Replication Scope
Select which schemas and tables to replicate:
- Schemas:
HR,CO(or whichever schemas you configured in the XStream outbound server) - Tables: Select specific tables or replicate all tables within the selected schemas
Tip: Snowflake target tables in the connector ingestion parameters must be specified as three-part fully qualified names:
DATABASE.SCHEMA.TABLE. Two-part names (e.g.,SCHEMA.TABLE) will cause errors.
Configure the Snowflake Target
| Parameter | Value |
|---|---|
| Target Database | <your_target_database> |
| Target Schema | <your_target_schema> |
| Table Naming | Match source table names (default) |
Verify Configuration Before Starting
Before enabling the connector, run Verify Config on the controller services and processors to catch configuration errors early:
- In the Openflow UI, right-click each controller service (e.g., the Oracle connection pool) and select Verify Config
- Right-click each processor in the flow and select Verify Config
- Resolve any reported errors — common issues include bad credentials, unreachable Oracle host, incorrect XStream server name, or missing EAI configuration
Tip: Fixing issues at this stage is far easier than debugging a failed flow at runtime. Verify Config validates connectivity and credentials without starting data movement.
Start the Connector
- Enable the connector in the Openflow UI
- The connector performs an initial snapshot (full load) of the selected tables
- After the snapshot completes, the connector switches to CDC mode and streams ongoing changes
Verify and Monitor
Verify Data in Snowflake
SHOW TABLES IN SCHEMA <target_db>.<target_schema>;

SELECT * FROM <target_db>.<target_schema>.<table_name> LIMIT 10;

SELECT COUNT(*) FROM <target_db>.<target_schema>.<table_name>;
Test CDC Replication
On the Oracle source, insert a test row and verify it appears in Snowflake:
-- On Oracle
INSERT INTO hr.employees (employee_id, first_name, last_name, email)
VALUES (9999, 'Test', 'User', '[email protected]');
COMMIT;
-- On Snowflake (should appear within seconds)
SELECT * FROM <target_db>.<target_schema>.employees
WHERE employee_id = 9999;
Note: Deletes in Oracle are replicated as soft deletes in Snowflake. The row remains in the target table with the metadata column
_SNOWFLAKE_DELETEDset toTRUErather than being physically removed.
Monitor the Pipeline
Use the Openflow UI to check connector status, throughput, and error counts. On the Oracle side, verify the capture process:
SELECT CAPTURE_NAME, STATE, TOTAL_MESSAGES_CAPTURED, TOTAL_MESSAGES_ENQUEUED
FROM V$XSTREAM_CAPTURE;

SELECT server_name, status, connect_user, capture_user
FROM dba_xstream_outbound;
Troubleshooting
XStream Outbound Server Not Running
SELECT server_name, status FROM dba_xstream_outbound;

BEGIN
    DBMS_XSTREAM_ADM.ALTER_OUTBOUND(
        server_name => 'XOUT1',
        status      => 'ENABLED'
    );
END;
/
Capture Process Not Starting
SELECT capture_name, status FROM dba_capture;

BEGIN
    DBMS_CAPTURE_ADM.START_CAPTURE('XSTREAM_CAPTURE');
END;
/
Supplemental Logging Issues
SELECT supplemental_log_data_min, supplemental_log_data_pk, supplemental_log_data_all
FROM v$database;

ALTER DATABASE ADD SUPPLEMENTAL LOG DATA;
ALTER DATABASE ADD SUPPLEMENTAL LOG DATA (ALL) COLUMNS;
ALTER DATABASE ADD SUPPLEMENTAL LOG DATA (PRIMARY KEY) COLUMNS;
Network Connectivity
- Ensure the Oracle host and port (1521) are accessible from the Snowflake SPCS compute pool
- Verify the external access integration and network rules are correctly configured
- Test connectivity using the Openflow UI's connection test feature
Cleanup
Caution: The commands below permanently remove the XStream configuration, users, and supplemental logging. Before proceeding:
- Stop the Openflow connector in the Openflow UI first. Dropping the outbound server while the connector is running will cause unrecoverable errors and may require a full re-snapshot.
- Verify licensing implications. If you are using the Embedded licensing model, dropping and re-creating the XStream outbound server may require re-provisioning the Oracle license at additional cost.
- Confirm no other applications depend on the XStream outbound server, supplemental logging, or GoldenGate replication settings before disabling them.
To remove the XStream configuration from Oracle:
BEGIN
    DBMS_XSTREAM_ADM.DROP_OUTBOUND('XOUT1');
END;
/

DROP USER c##xstreamadmin CASCADE;
DROP USER c##connectuser CASCADE;

ALTER DATABASE DROP SUPPLEMENTAL LOG DATA (ALL) COLUMNS;

ALTER SYSTEM SET enable_goldengate_replication=FALSE SCOPE=BOTH;
Tips for Production
For production deployments, consider the following DBA best practices:
Check I/O Headroom
XStream capture reads redo logs continuously. Before enabling CDC on a busy database, verify that the storage subsystem has sufficient I/O headroom to handle the additional sequential read load. Monitor with V$IOSTAT_FILE and your OS-level I/O metrics.
Resize Redo Logs
Default redo log sizes (50–200 MB) cause frequent log switches under CDC workloads, which increases checkpoint overhead. Resize redo logs to 4–8 GB to reduce switch frequency:
-- Check current redo log sizes
SELECT group#, bytes/1024/1024 AS size_mb, status FROM v$log;
Consult Oracle documentation for the redo log resize procedure, as it requires cycling log groups.
Monitor V$XSTREAM_CAPTURE
Regularly monitor the capture process to detect lag or bottlenecks:
SELECT CAPTURE_NAME, STATE, TOTAL_MESSAGES_CAPTURED,
       TOTAL_MESSAGES_ENQUEUED, CAPTURE_MESSAGE_CREATE_TIME,
       ENQUEUE_MESSAGE_CREATE_TIME
FROM V$XSTREAM_CAPTURE;
A growing gap between CAPTURE_MESSAGE_CREATE_TIME and ENQUEUE_MESSAGE_CREATE_TIME indicates the capture process is falling behind.
Consider Downstream Capture for Extreme Scale
For very high-throughput databases where the redo read overhead is a concern, Oracle supports downstream capture — mining redo logs on a separate server rather than the production instance. This offloads all CDC processing from the primary database at the cost of additional infrastructure.
Conclusion And Resources
Congratulations! You've successfully set up a near real-time CDC pipeline from Oracle Database to Snowflake using the Openflow Connector for Oracle. Changes made in your Oracle source are now captured via XStream and streamed into Snowflake within seconds.
What You Learned
- Oracle XStream configuration - Enabling ARCHIVELOG mode, GoldenGate replication, supplemental logging, and creating XStream users and outbound servers
- Openflow deployment - Setting up the Openflow runtime in Snowflake on Snowpark Container Services
- Connector configuration - Connecting the Oracle CDC connector to the XStream outbound server and configuring replication scope
- Verification and monitoring - Validating data replication and monitoring pipeline health
Related Resources
Snowflake Documentation:
Video:
GitHub:
- Oracle Free 23ai Snowflake Openflow Setup - Oracle XStream setup script and configuration reference
This content is provided as is, and is not maintained on an ongoing basis. It may be out of date with current Snowflake instances