Intro to Data Engineering using Python in Snowflake
Overview
Through this quickstart, you will learn how to build your first data engineering pipeline using Snowflake notebooks.
What you’ll learn
- How to install and configure the Snowpark pandas library
- How to use Snowpark pandas to transform and analyze datasets using the power of Snowflake
- How to use Snowpark Python to transform and aggregate data
Data Engineering in Snowflake Overview
What is Snowpark?
Snowpark is the set of libraries and code execution environments that run Python and other programming languages next to your data in Snowflake. Snowpark can be used to build data pipelines, ML models, apps, and other data processing tasks.

What is pandas on Snowflake?
pandas on Snowflake lets you run your pandas code in a distributed manner scalably and securely directly on your data in Snowflake. Just by changing the import statement and a few lines of code, you can get the same pandas-native experience you know and love with the scalability and security benefits of Snowflake.
Why use pandas on Snowflake?
pandas is the go-to data processing library for millions worldwide, including countless Snowflake users. However, pandas was never built to handle data at the scale organizations are operating today. Running pandas code requires transferring and loading all of the data into a single in-memory process. It becomes unwieldy on moderate-to-large data sets and breaks down completely on data sets that grow beyond what a single node can handle. With pandas on Snowflake, you can run the same pandas code, but with all the pandas processing pushed down to run in a distributed fashion in Snowflake. Your data never leaves Snowflake, and your pandas workflows can process much more efficiently using the Snowflake elastic engine. This brings the power of Snowflake to pandas developers everywhere.
What You'll Build
-
Build a Python data pipeline with Snowflake Notebooks
-
Aggregate and transform data to create new features with pandas on Snowflake
-
Transform and analyze data using Snowpark Python
-
Create a Serverless Task to schedule the transformation
Pre-requisites
- A Snowflake account. If you do not have a Snowflake account, you can register for a free trial account.
Setup
This section covers the Snowflake objects creation and other setup needed to run this quickstart successfully.
- Login to your Snowflake free trial account.
- On the left pane, under
Horizon Catalogsection, avigate toCatalog. Click onDatabase Explorertab. Click on+Databasebutton on top right and create a database and call itAVALANCHE_DB. - Click on
avalanche_dbdatabase. On the top right, click on+Schemabutton to create a new schema underavalanche_db. Call itAVALANCHE_SCHEMA. - On the left pane, under
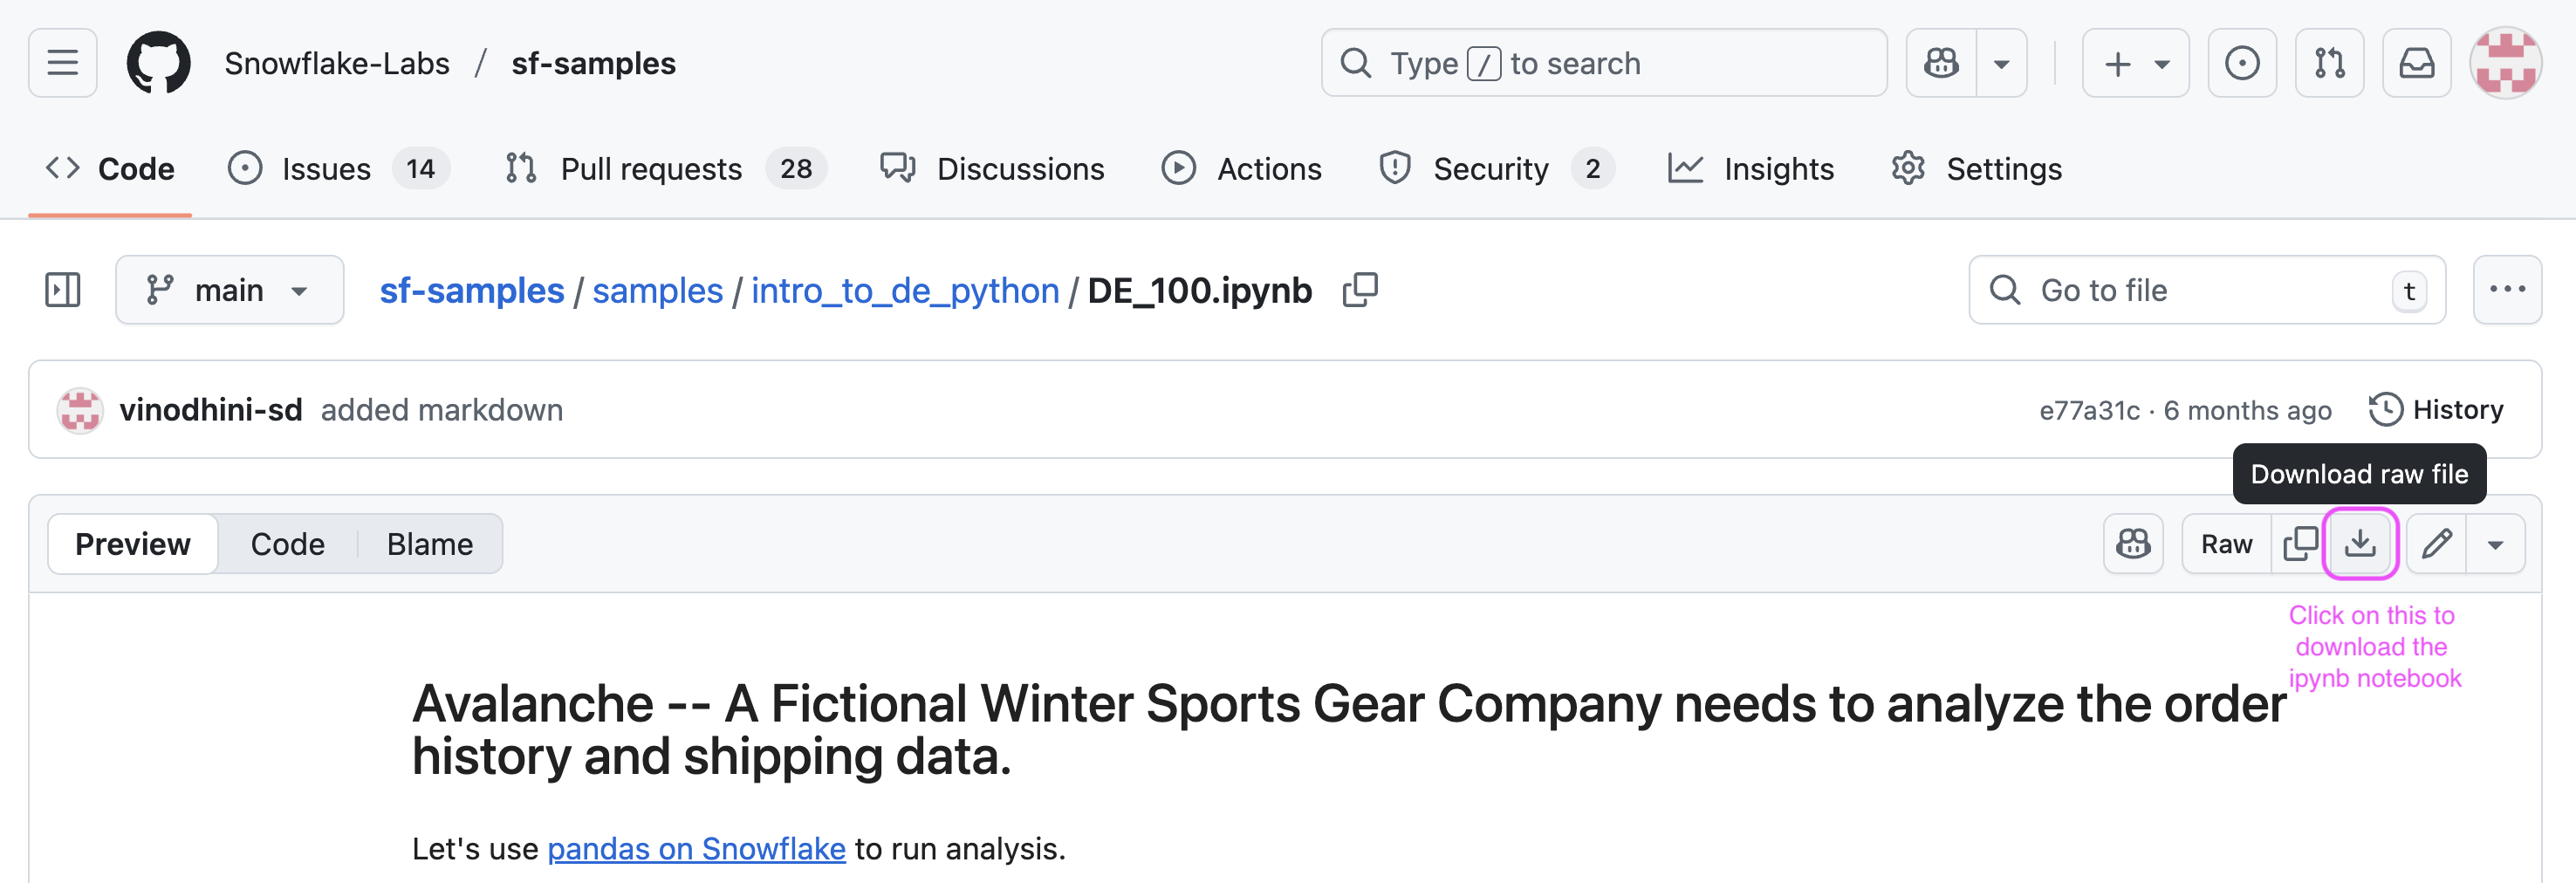
Managesection, selectComputeand click onwarehouses. Create a new warehouse. Name itDE_XS. Select type asStandard(Gen1)and size asX-Small. - On a new browser tab, navigate to this git repo and click on download button to download the
DE_100.ipynbfile.
-
Navigate to the Snowflake UI. Under
work with datasection on the left pane, selectProjects->Notebooks. On the top right, click on the down arrow next to+Notebookbutton and selectImport ipynb fileto load a notebook. -
Call it
AVALANCHE_ANALYTICS_NB. SelectAVALANCHE_DBdatabase for notebook location andAVALANCHE_SCHEMAfor schema, Query warehouse asDE_XSand create notebook. -
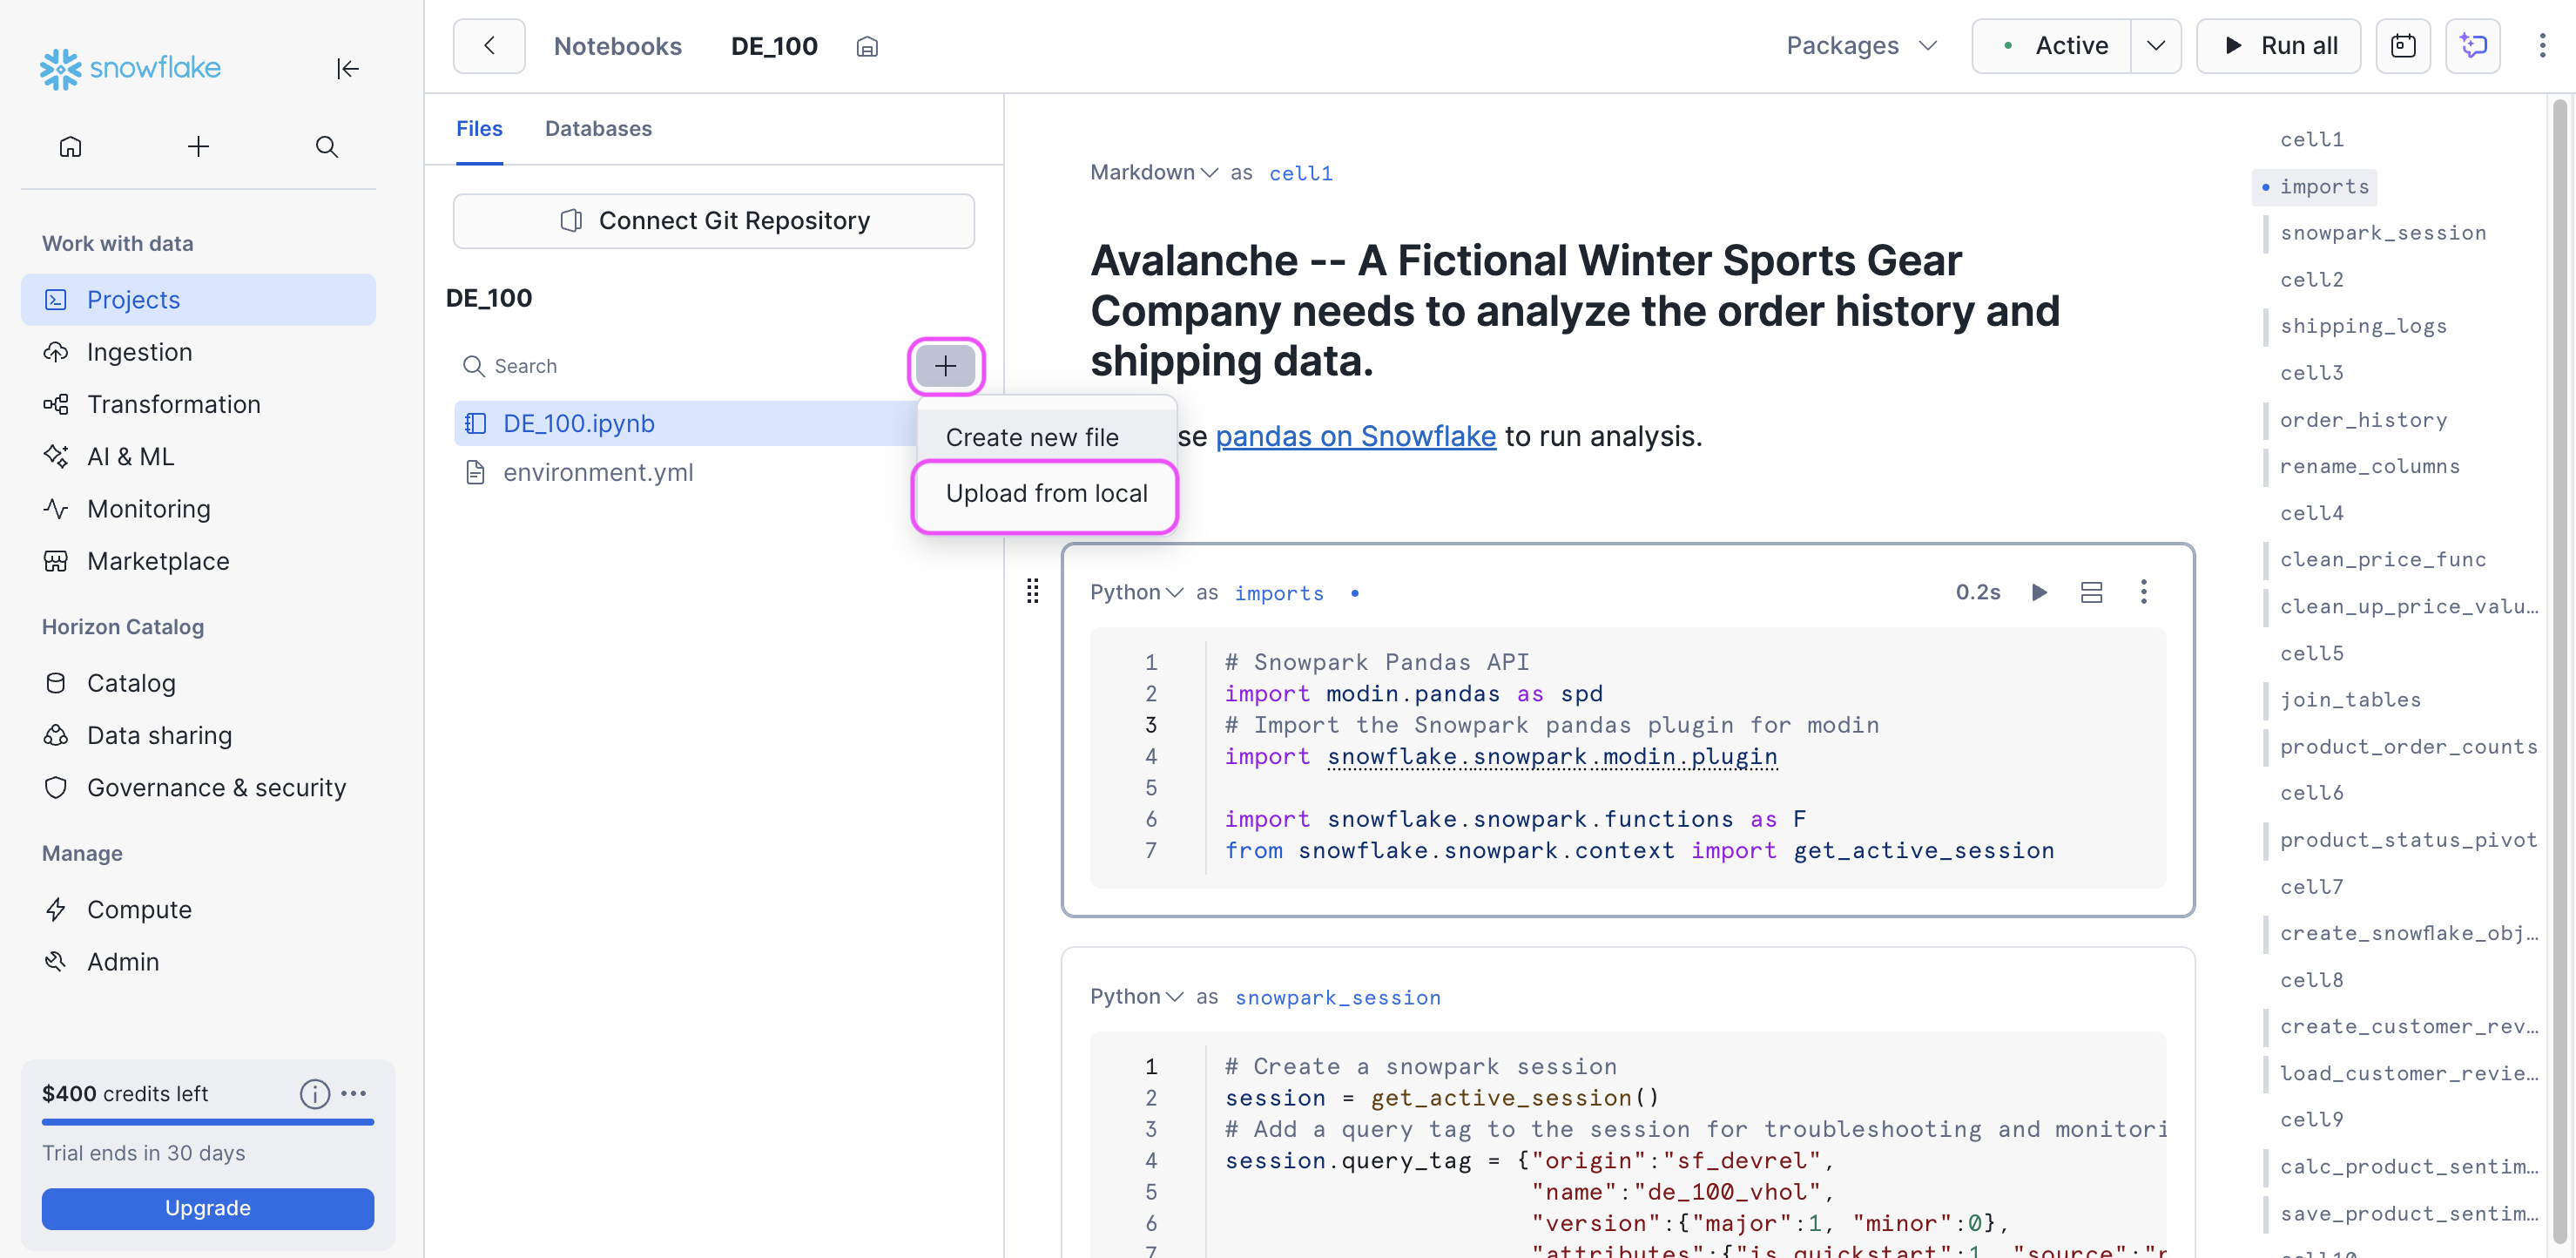
After the notebook is created, at the top right, click on
packages. Search and install modin. Once installed, click onStartto start the notebook session to run analysis. -
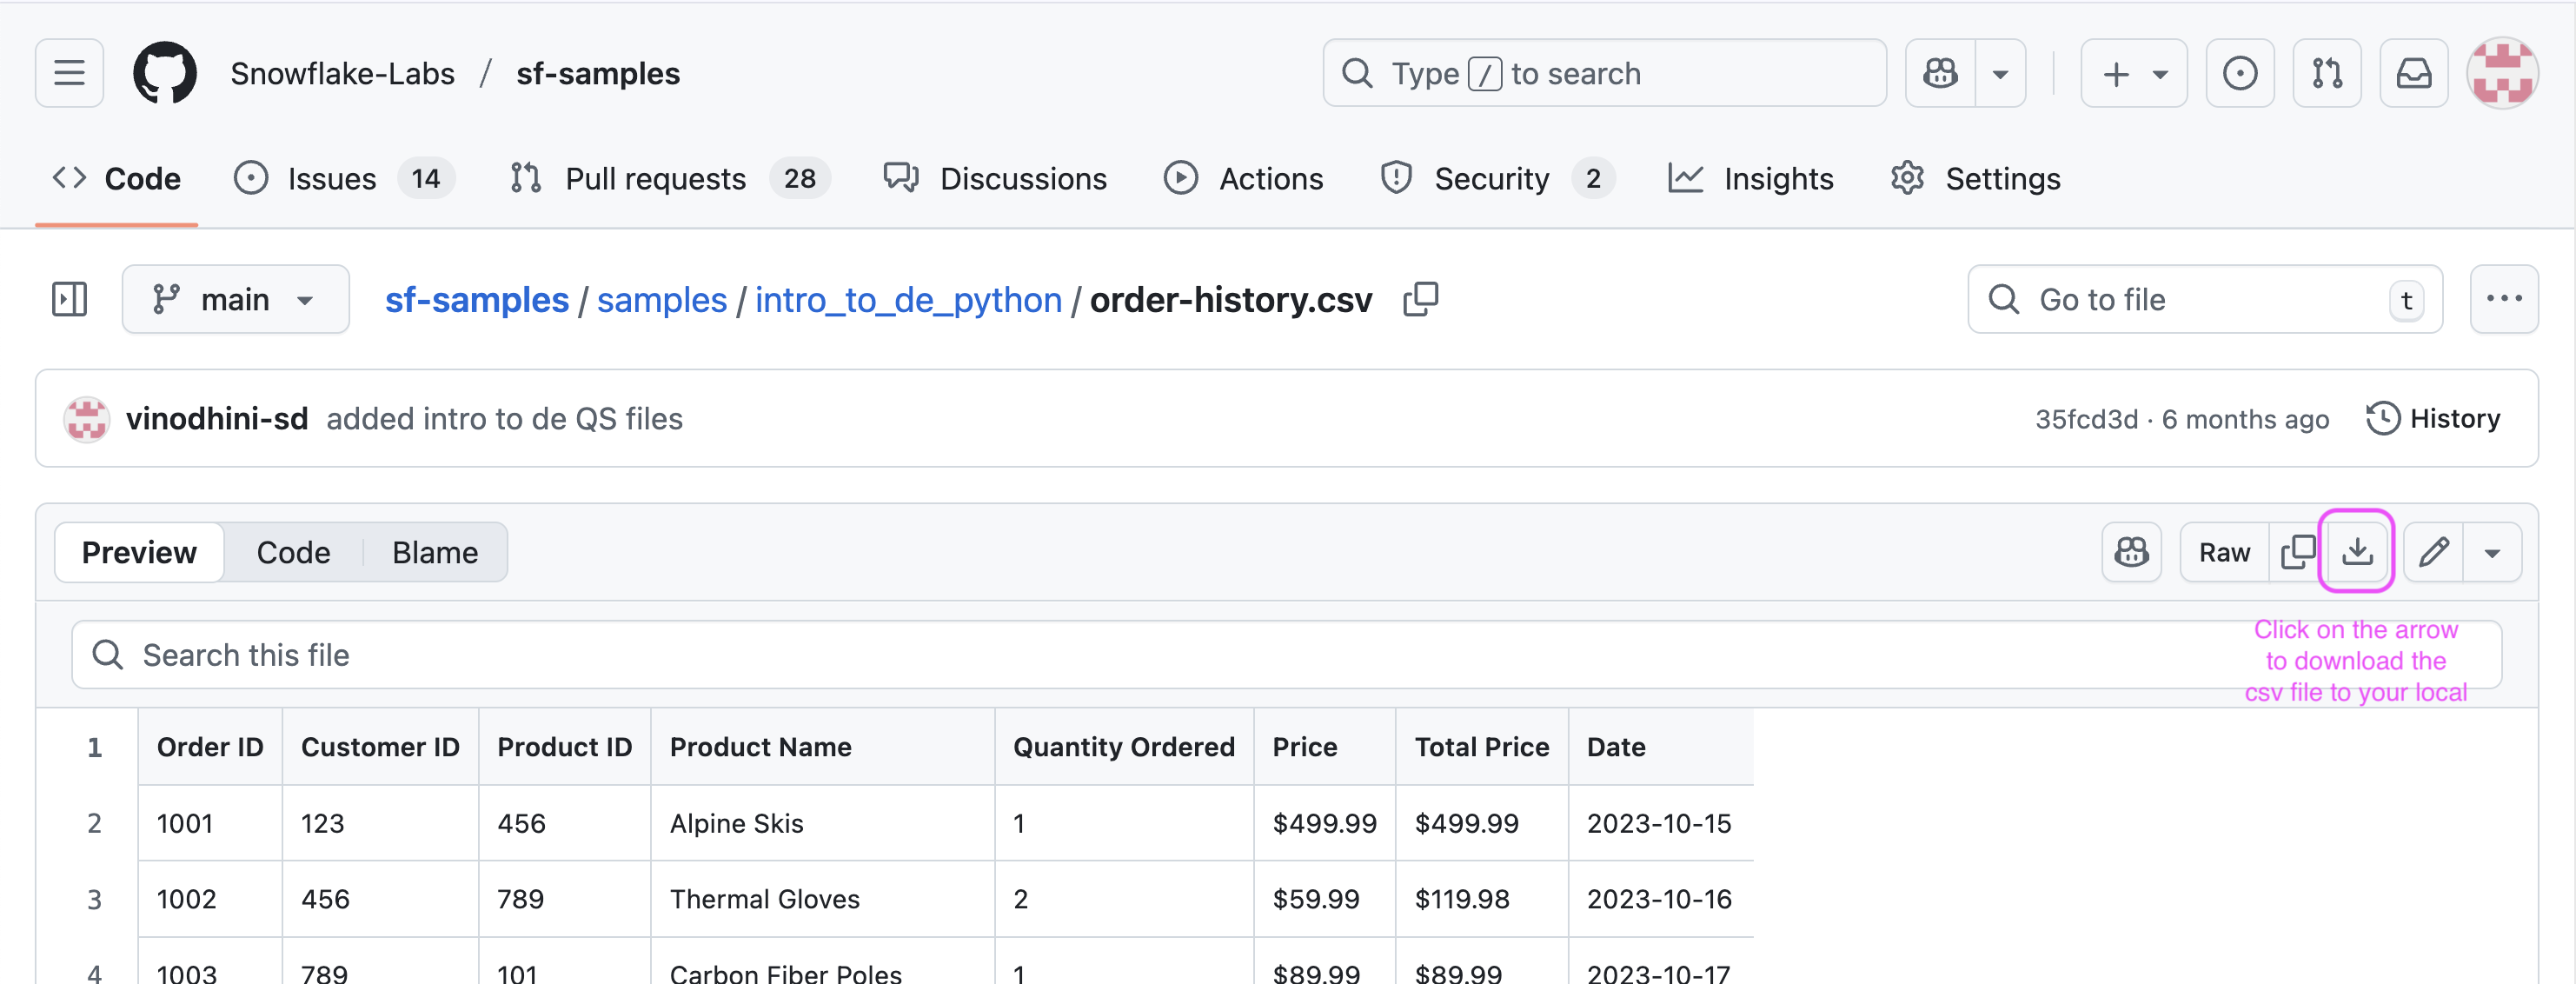
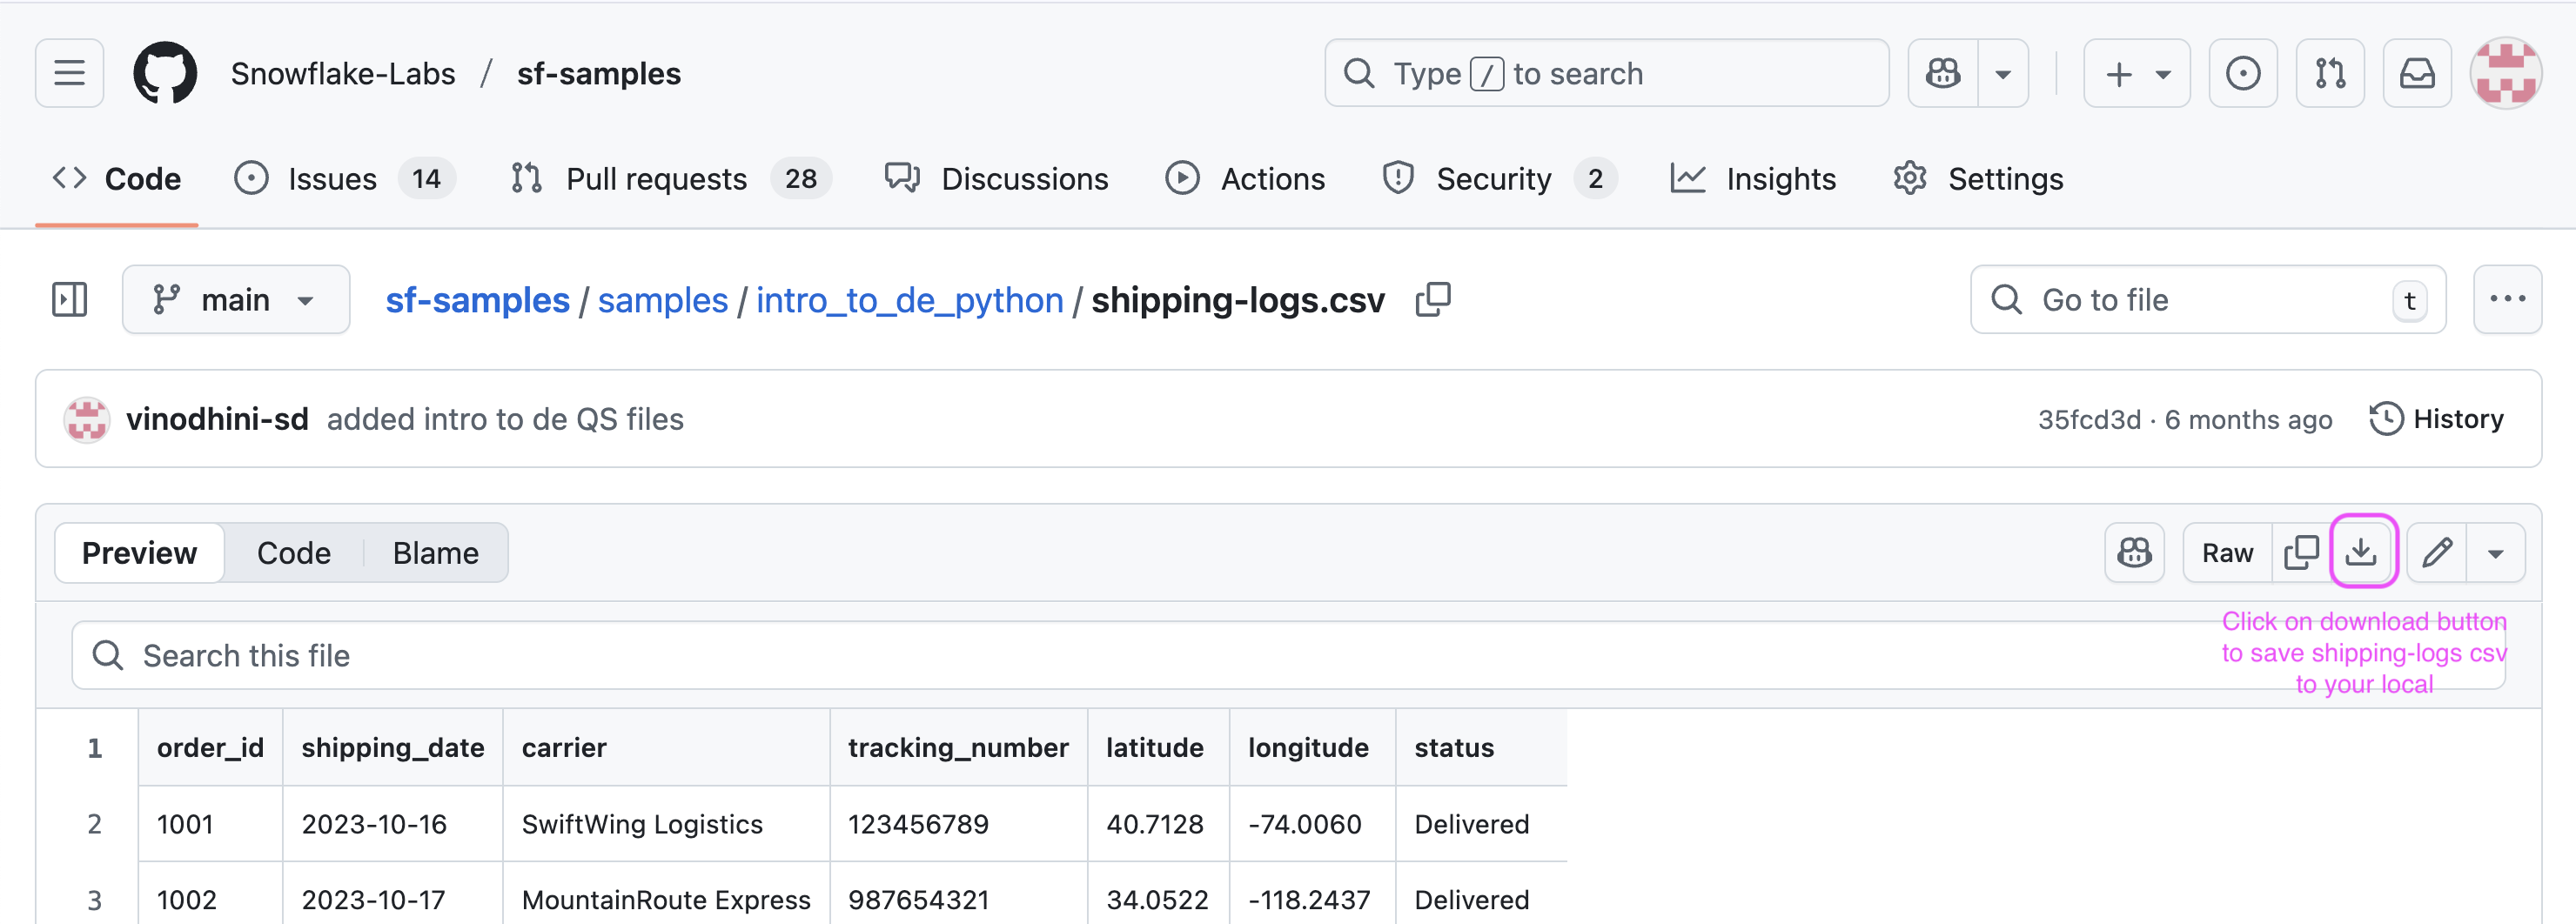
On a new browser tab, navigate to this git repo and click on download button to download the
order-history.csvfile.
- On a new browser tab, navigate to this git repo and click on download button to download the
shipping-logs.csvfile.
- Switch back to the Snowflake UI, On the left panel right below the name of the notebook, there is a
+sign. Click on+to load theorder-history.csvandshipping-logs.csvfiles to your notebook workspace.
With this, we are ready to run our first data engineering pipeline in Snowflake using Python.
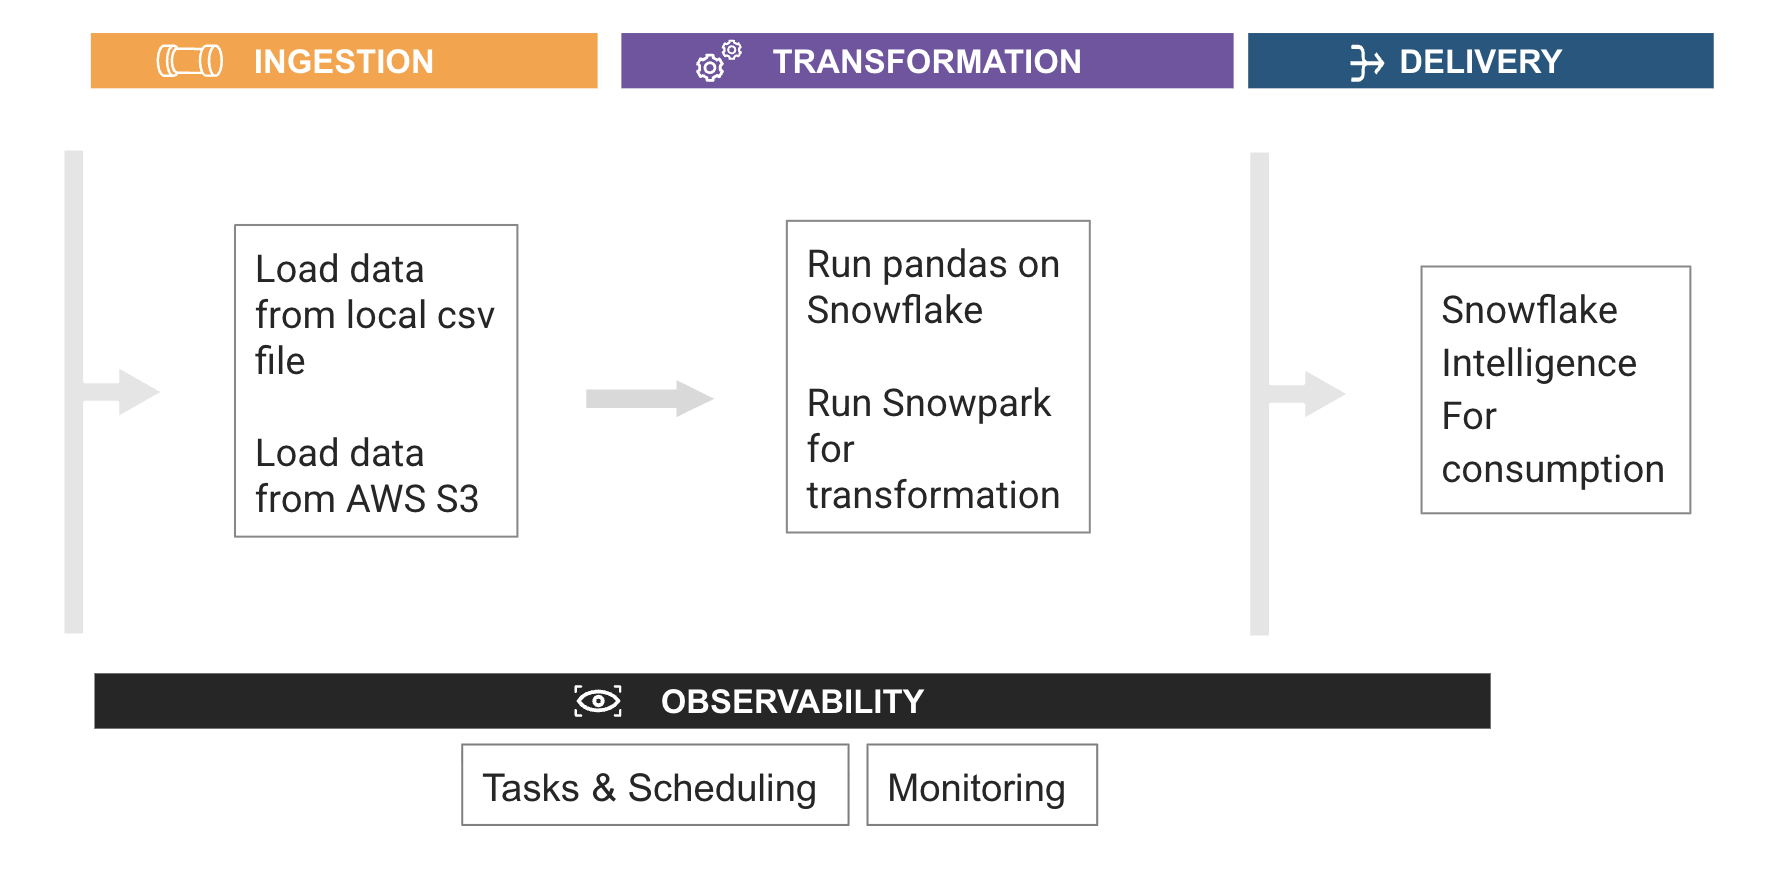
Data Engineering using Python
During this step you will learn how to use pandas on Snowflake to:
- Create a pandas dataframe from a local csv data file
- Clean up and transform data to create new features
- Join dataframes
You will also learn how to use Snowpark Python to:
- Create a Snowflake table from a csv file stored in AWS S3 bucket
- Load the Snowflake table as a Snowpark dataframe
- Aggregate data to derive insights
- Save the result into a Snowflake table
In addition to the ingestion and transformation steps above, you will learn how to:
- Create a serverless task to schedule the pipeline
Follow along and run each of the cells in the Notebook.
Conclusion & Resources
Congratulations, you have successfully completed this quickstart!
What you learned
- How to install and configure the Snowpark pandas library
- How to use Snowpark pandas to transform and analyze datasets using the power of Snowflake
- How to use Snowpark Python to transform and aggregate data
Related Resources
This content is provided as is, and is not maintained on an ongoing basis. It may be out of date with current Snowflake instances