Getting Started with Pipeline Builder
Overview
Tasty Bytes is a fictional global food truck company. Every morning its data engineering team receives the previous day's raw orders, and analysts expect a clean daily sales-by-truck table to be ready by 6:00 AM. Today, a teammate opens two notebooks and runs them by hand. One cleans the raw orders, and the other builds the daily sales table.
In this Quickstart, you'll turn those two notebooks into a scheduled pipeline with Pipeline Builder, a visual designer in Snowflake Workspaces. You drag notebooks onto a canvas, connect them to set the order they run in, and deploy. Pipeline Builder creates the tasks, the task graph, and the Code Bundles that package your code. You don't write CREATE TASK statements by hand.
Each pipeline is also a DCM project. Before anything changes in your account, you see a plan of every object a deployment will create, alter, or drop.
Note: Pipeline Builder is in public preview.
Prerequisites
- A Snowflake account (or free trial) in a region where Pipeline Builder and Snowpark Container Services are available
- Familiarity with SQL and basic Python
What You'll Learn
- How to turn notebooks into tasks by dragging them onto the Pipeline Builder canvas
- How connecting tasks creates a task graph, and how to schedule the graph as one unit
- How to plan and deploy a pipeline as a DCM project, and how the declarative model creates, alters, and drops objects
- How to run and monitor a deployed task graph in Snowsight
- How to generate a pipeline draft with CoCo
What You'll Need
- The ACCOUNTADMIN role, or an admin who can run the role and grants block in the next step. Creating the warehouse, compute pool, and database requires ACCOUNTADMIN.
- Access to Workspaces in Snowsight
- The companion repo, which you clone into a workspace in the next step. It's public, so you don't need a GitHub account.
What You'll Build
- A Tasty Bytes daily sales pipeline: a task graph that cleans raw food truck orders, then builds a daily sales table per truck, on a 6:00 AM schedule
RAW.ORDERS ──> clean_orders_task (notebook) ──> STAGING.ORDERS_CLEAN
                     │
                     v
               daily_sales_task (notebook) ──> ANALYTICS.DAILY_TRUCK_SALES
Setup
In this step, you clone the companion repo into a workspace, then run its setup script to create the role, warehouse, compute pool, database, and sample data this Quickstart uses. Do this step as ACCOUNTADMIN: make sure ACCOUNTADMIN is selected in your Snowsight user menu in the lower-left corner.
Note: If you don't have ACCOUNTADMIN access, ask your Snowflake admin to create an API integration named
TASTY_PIPELINE_QS_GIT_INTthat allowshttps://github.com/Snowflake-Labs, grant your roleUSAGEon it, and run setup.sql with your user name. Then clone the repo with the steps below and skip to Switch to the guide role.
Get the companion repo
-
In Snowsight, click Workspaces.
-
In the workspaces UI, click Create new Git workspace.
-
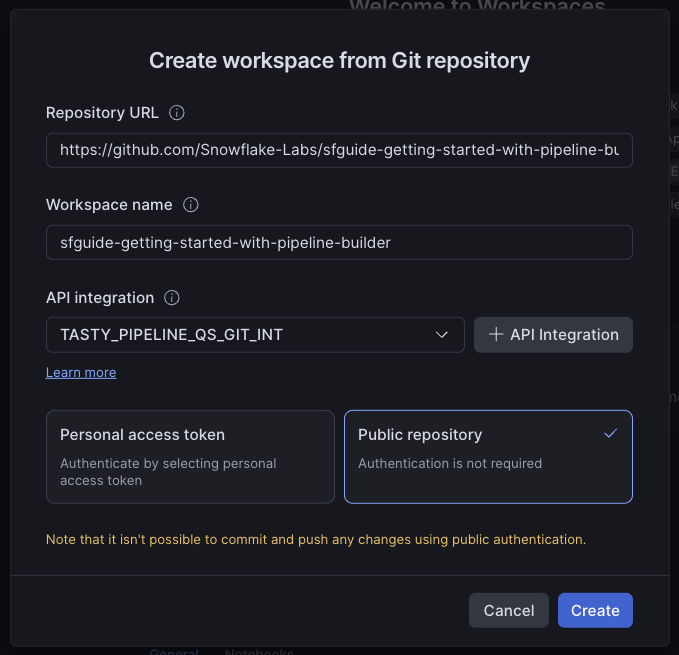
For Repository URL, enter
https://github.com/Snowflake-Labs/sfguide-getting-started-with-pipeline-builder. -
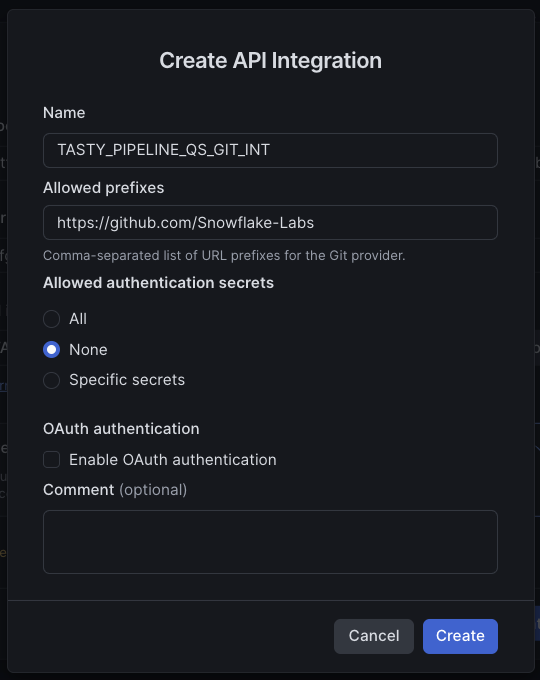
Next to API integration, select + API Integration, and fill in the Create API Integration dialog:
- For Name, enter
TASTY_PIPELINE_QS_GIT_INT. Use this exact name, so cleanup.sql can drop it at the end. - For Allowed prefixes, enter
https://github.com/Snowflake-Labs. - For Allowed authentication secrets, select None. The repo is public, so it doesn't need a secret.
- Leave Enable OAuth authentication cleared, and select Create.
- For Name, enter
-
Back in the Create workspace from Git repository dialog, select Public repository. You can't push changes back to the repo with public authentication, and this Quickstart doesn't need to. Leave Workspace name as it fills in from the URL.
-
Select Create.
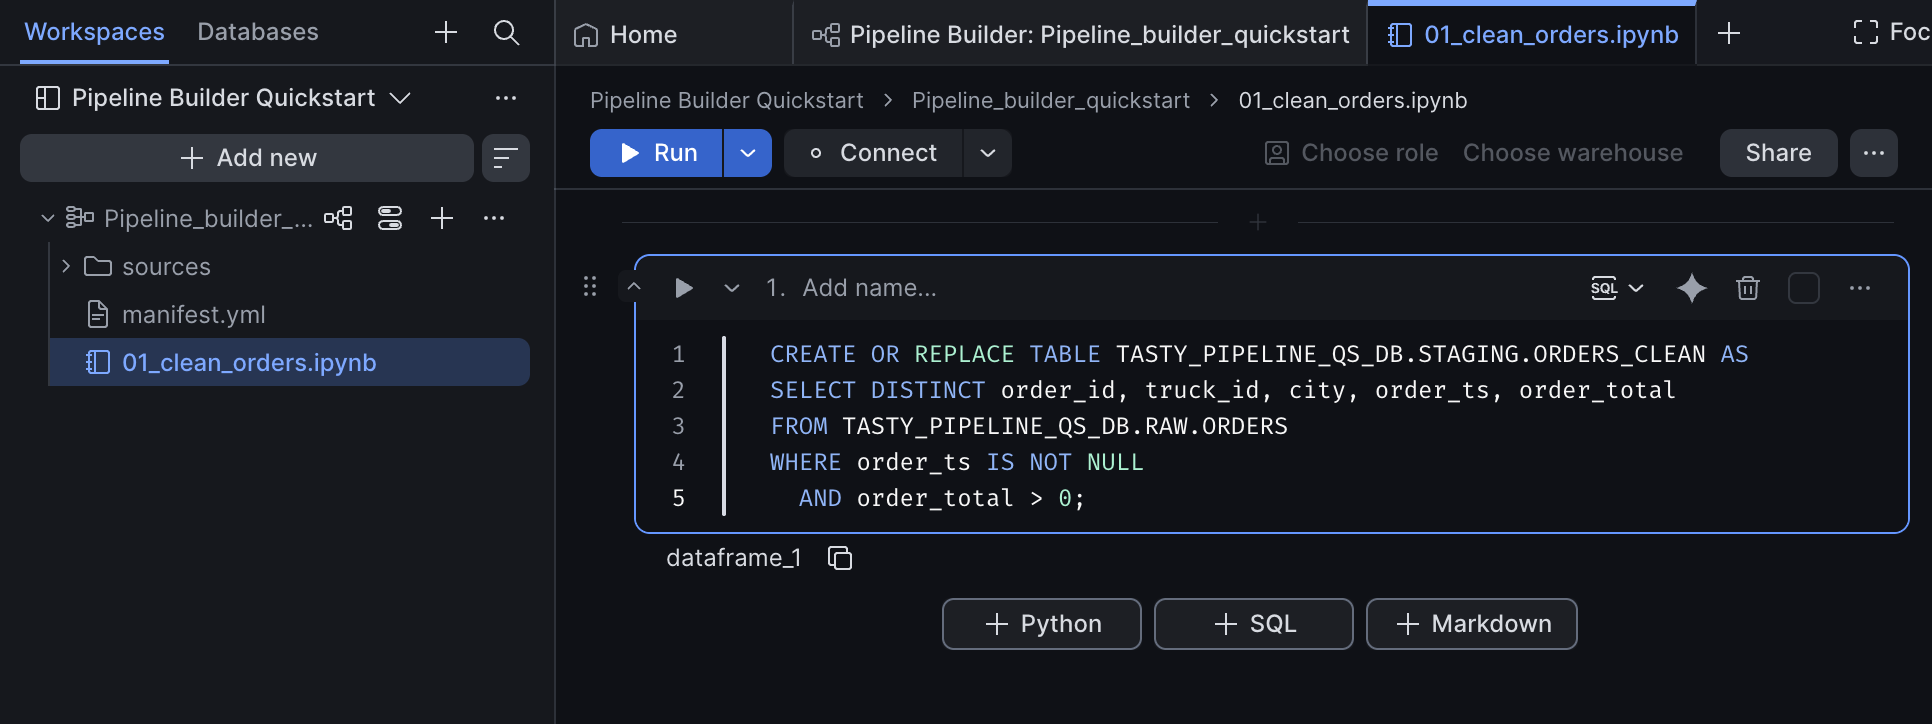
The workspace opens with setup.sql, cleanup.sql, 01_clean_orders.ipynb, and 02_daily_sales.ipynb.
Important: The repo gets fixes over time, so pull the latest changes now, before you start. Once you move the notebooks into your pipeline's folder later in this Quickstart, your workspace has local changes, and pulling again can conflict with them.
Run the setup script
Open setup.sql, replace <your_username> with your Snowflake user name, and run the whole file as ACCOUNTADMIN.
Here's what the script does:
- Creates the
TASTY_PIPELINE_QS_ROLErole and grants it to you and toSYSADMIN - Creates the
TASTY_PIPELINE_QS_WHwarehouse and theTASTY_PIPELINE_QS_POOLcompute pool. Notebooks in Pipeline Builder run on a compute pool. - Creates the
TASTY_PIPELINE_QS_DBdatabase and makes the guide role its owner, so the role can create the schemas, tables, tasks, task graphs, Code Bundles, and DCM project the pipeline needs - Grants the guide role
EXECUTE TASKon the account - Creates a RAW, STAGING, ANALYTICS, and PIPELINE schema. The PIPELINE schema holds the pipeline's tasks, task graph, Code Bundle, and DCM project.
- Seeds about 5,000 Tasty Bytes orders, plus 200 duplicate orders and 50 invalid orders for the pipeline to clean up
- Creates a
RUN_LOGtable that the optional Advanced modules write to
The last statement returns raw_rows = 5250.
Switch to the guide role
You create the pipeline in the next step, and it has to be created with the guide role. If you create it as ACCOUNTADMIN, deployments and runs fail with privilege errors.
- In the lower-left corner of Snowsight, select your name.
- Select Switch role.
- Select TASTY_PIPELINE_QS_ROLE.
- Confirm that your name in the lower-left corner now shows TASTY_PIPELINE_QS_ROLE.
Changing the role selector inside a SQL file doesn't count. Pipeline Builder uses the role in your user menu.
Create the Pipeline
A Pipeline Builder pipeline lives in a project folder in your workspace. Let's create one.
- In Snowsight, open your workspace.
- In the file explorer, select Add new, and then select Pipeline Builder.
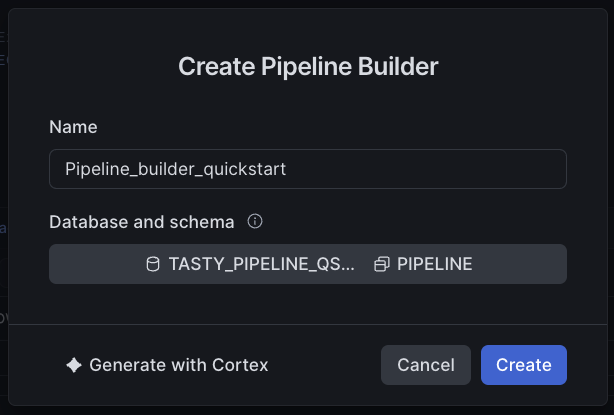
- In the Create Pipeline Builder dialog, enter
Pipeline_builder_quickstartfor the Name. Pipeline Builder creates a folder with this name for the pipeline. - Select Select database and schema, and select
TASTY_PIPELINE_QS_DB.PIPELINE. This is where the pipeline's DCM project object is created. - Select Create.
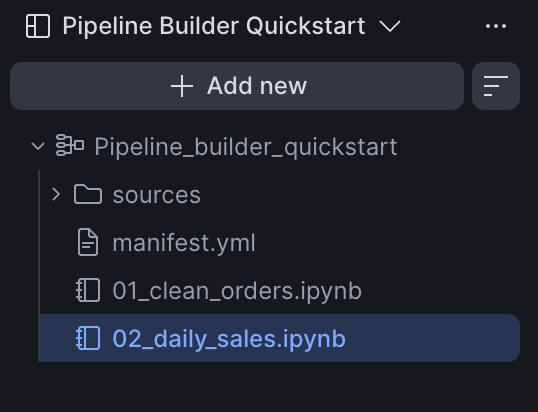
Pipeline Builder creates a Pipeline_builder_quickstart project folder and opens an empty canvas. The folder contains:
- manifest.yml: the DCM project's manifest, including its deployment target
- sources/: a folder for DCM definition files
When you add your first task, Pipeline Builder also creates pipeline.yml, which holds the tasks, task graphs, and Code Bundles you build on the canvas. You won't edit these files in this Quickstart. Pipeline Builder writes to them for you.
Open manifest.yml and confirm that the target's project_owner is TASTY_PIPELINE_QS_ROLE. If it shows another role, such as ACCOUNTADMIN, see Troubleshooting before you continue.
Move the notebooks into the pipeline
Now add the two notebooks your teammate has been running by hand. They came with the companion repo, at the root of your workspace. Pipeline Builder can only turn files inside the pipeline's project folder into tasks, so move them there first.
In the file explorer, drag 01_clean_orders.ipynb and 02_daily_sales.ipynb into the Pipeline_builder_quickstart folder. Drop them at the root of the folder, not in sources/ or out/. Pipeline Builder can't turn files in those two folders into tasks.
Here's what the notebooks do:
- 01_clean_orders.ipynb drops the invalid rows, removes the duplicates, and writes
STAGING.ORDERS_CLEAN - 02_daily_sales.ipynb aggregates the clean orders into one row per day, truck, and city in
ANALYTICS.DAILY_TRUCK_SALES - Both use fully qualified table names, because a notebook that runs as a task doesn't have a current database or schema
Note: You can open each notebook and run its cell to check it works. Running it now also creates the tables early, which is fine: the pipeline replaces them on every run.
Turn Notebooks into Tasks
This is where Pipeline Builder starts saving you work. You drag your notebooks onto the canvas, without publishing them or uploading files to a stage.
If the canvas isn't open, go back to it: select the Pipeline Builder tab for Pipeline_builder_quickstart at the top of the editor, or, in the file explorer, hover over the Pipeline_builder_quickstart folder and select the Open pipeline builder icon. Keep the file explorer visible next to the canvas, then drag 01_clean_orders.ipynb from the file explorer and drop it anywhere on the canvas.
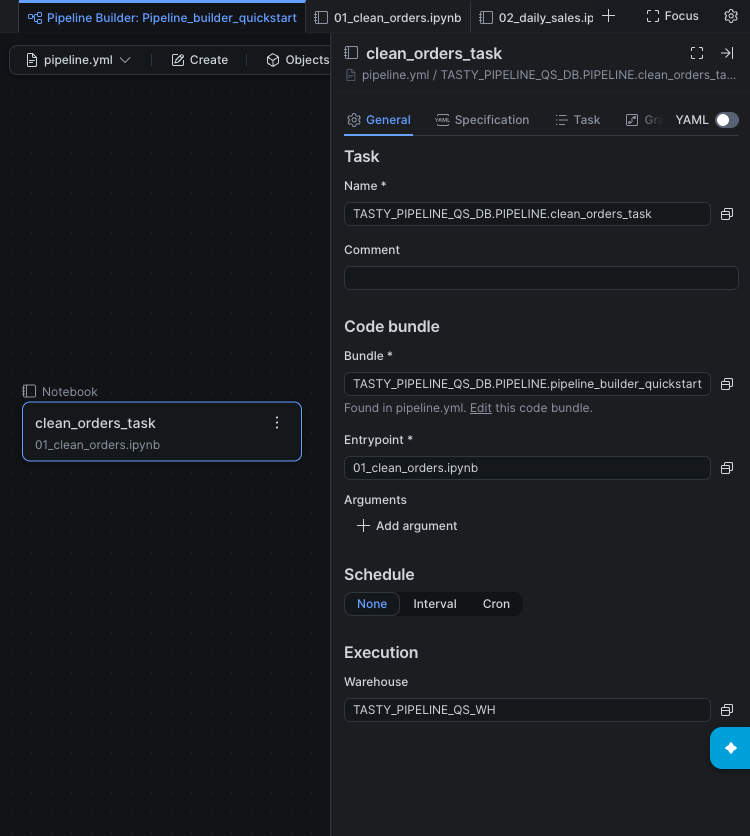
Pipeline Builder adds a card with a Notebook badge and opens the task's settings drawer. Behind the scenes, it also creates a Code Bundle that packages the project's code so Snowflake can run it, and fills in a default runtime, compute pool, and warehouse.
In the drawer, on the General tab:
- Confirm that Name is
TASTY_PIPELINE_QS_DB.PIPELINE.clean_orders_task. Pipeline Builder names the task after the file and the project's database and schema. Names in Pipeline Builder are always fully qualified. - Confirm that Entrypoint points at 01_clean_orders.ipynb.
- Under Execution, for Warehouse, set to
TASTY_PIPELINE_QS_WH.
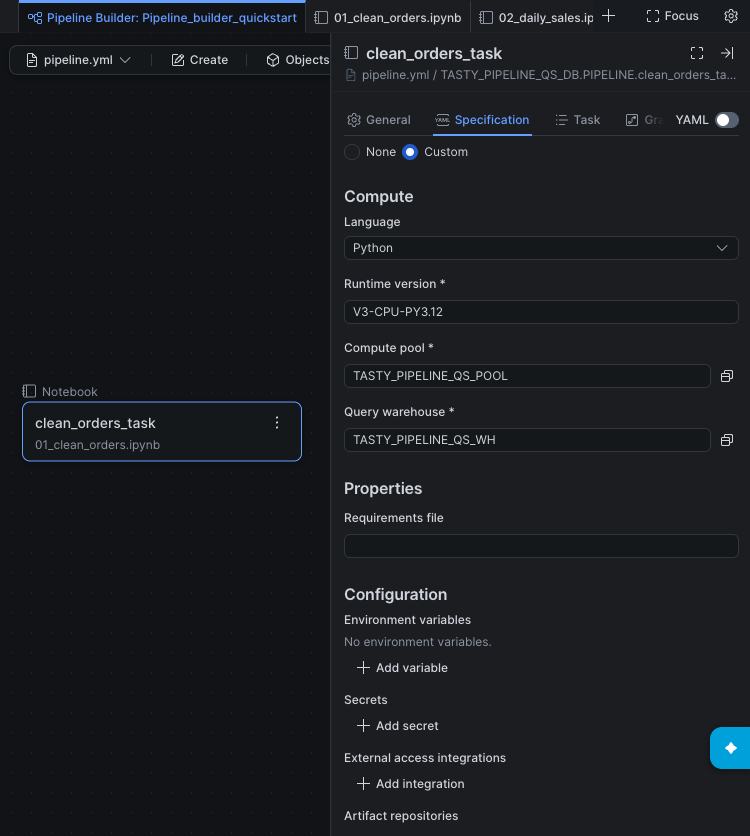
On the Specification tab:
- For Compute pool, set to
TASTY_PIPELINE_QS_POOL. - For Query warehouse, set to
TASTY_PIPELINE_QS_WH. This warehouse runs the SQL that the notebook issues. - Leave Runtime version at its default.
Note: If a field shows an error with a Fix action, the value is close to an existing object, for example a name with the wrong case. Select Fix to correct it.
Add the second task
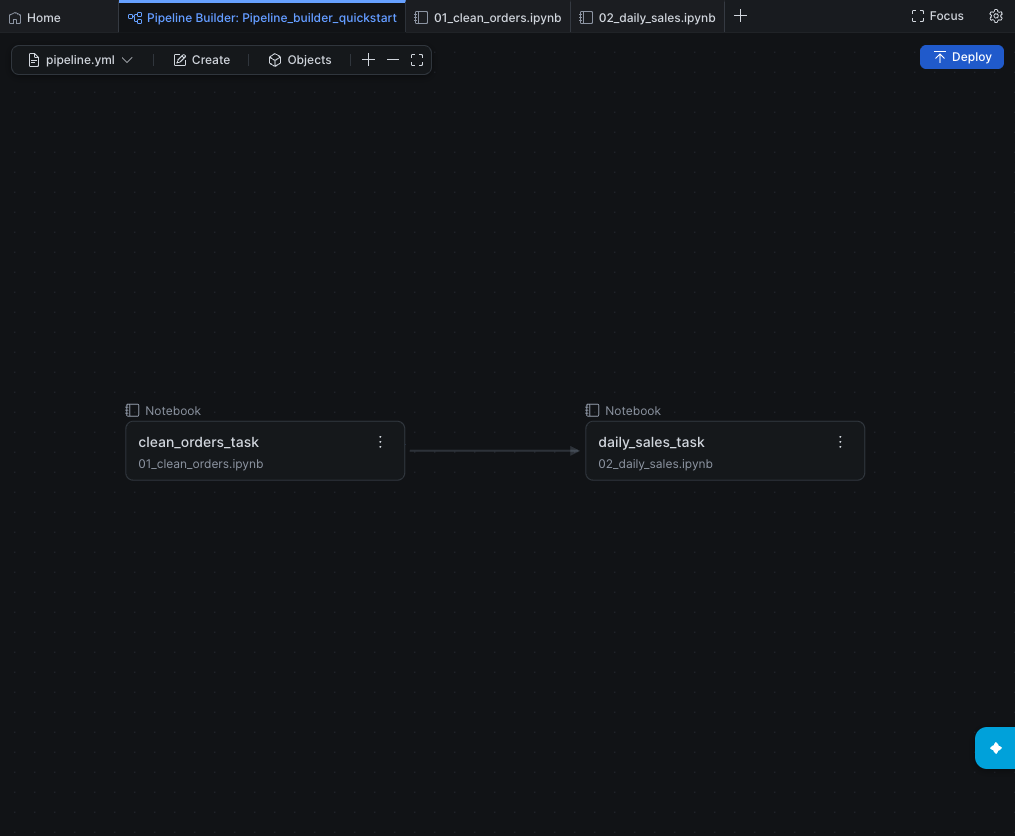
Now drag 02_daily_sales.ipynb onto the right side of the clean_orders_task card. When the Run After hint appears, drop the file.
Pipeline Builder adds a second task, connects the two cards, and makes the new task run after clean_orders_task. The new task reuses the same Code Bundle.
In its drawer, confirm that Name is TASTY_PIPELINE_QS_DB.PIPELINE.daily_sales_task, and under Execution, set Warehouse to TASTY_PIPELINE_QS_WH. On the Specification tab, select the same compute pool and query warehouse as the first task.
Then select the clean_orders_task card and check its Warehouse again. Connecting the tasks can clear it. If it's empty, set it to TASTY_PIPELINE_QS_WH.
You now have two connected cards on the canvas. You can also connect cards by dragging from the outgoing connector on the right of one card to the incoming connector on the left of another.
Schedule the Task Graph
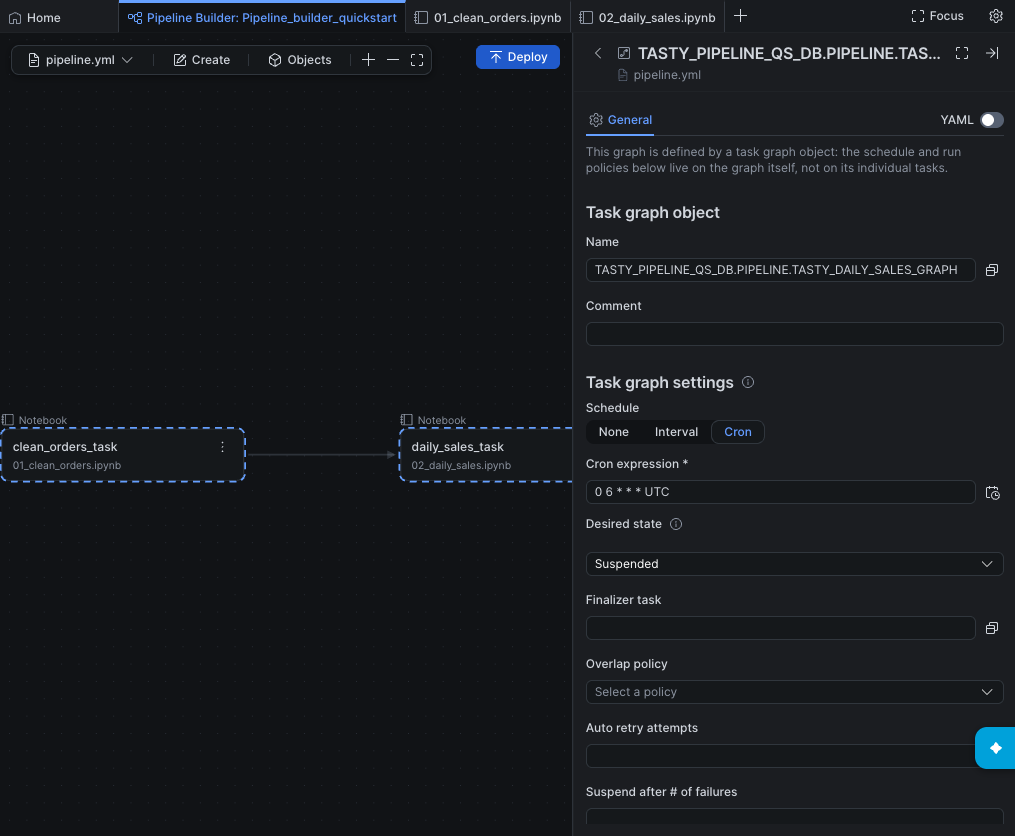
When you connected the two tasks, Pipeline Builder quietly did something else: it created a task graph that contains both of them. A task graph is a first-class object that holds the schedule, run policies, and the defaults its tasks inherit. clean_orders_task has no predecessors, so it's the graph's root.
Pipeline Builder also moved any values the tasks share, such as the warehouse, into the graph's task defaults. Let's look.
- Select Objects on the canvas toolbar, and then select Task graphs.
- Select the task graph that Pipeline Builder created.
- Under Task graph object, set Name to
TASTY_PIPELINE_QS_DB.PIPELINE.TASTY_DAILY_SALES_GRAPH. - Under Task graph settings, for Schedule, select Cron. Enter
0 6 * * *, and select your time zone (e.g.,0 6 * * * UTC). - For Desired state, leave Suspended. You'll run the graph manually for now, so it doesn't start running on a schedule and using credits before you're ready.
- Under Task defaults, confirm that Warehouse is
TASTY_PIPELINE_QS_WH. Any task in the graph that doesn't set its own warehouse uses this one. - Under Tasks in this graph, confirm both tasks are listed, with clean_orders_task marked Root.
You can open the same settings from any task: select the task, select the Graph tab, and then select Edit graph settings.
Plan and Deploy
Nothing you've built exists in your account yet. A pipeline doesn't run until you deploy it, and deploying starts with a plan that shows exactly what will change.
-
Select Deploy in the upper-right corner of the canvas. If you don't see it, collapse the workspace's bottom pane.
-
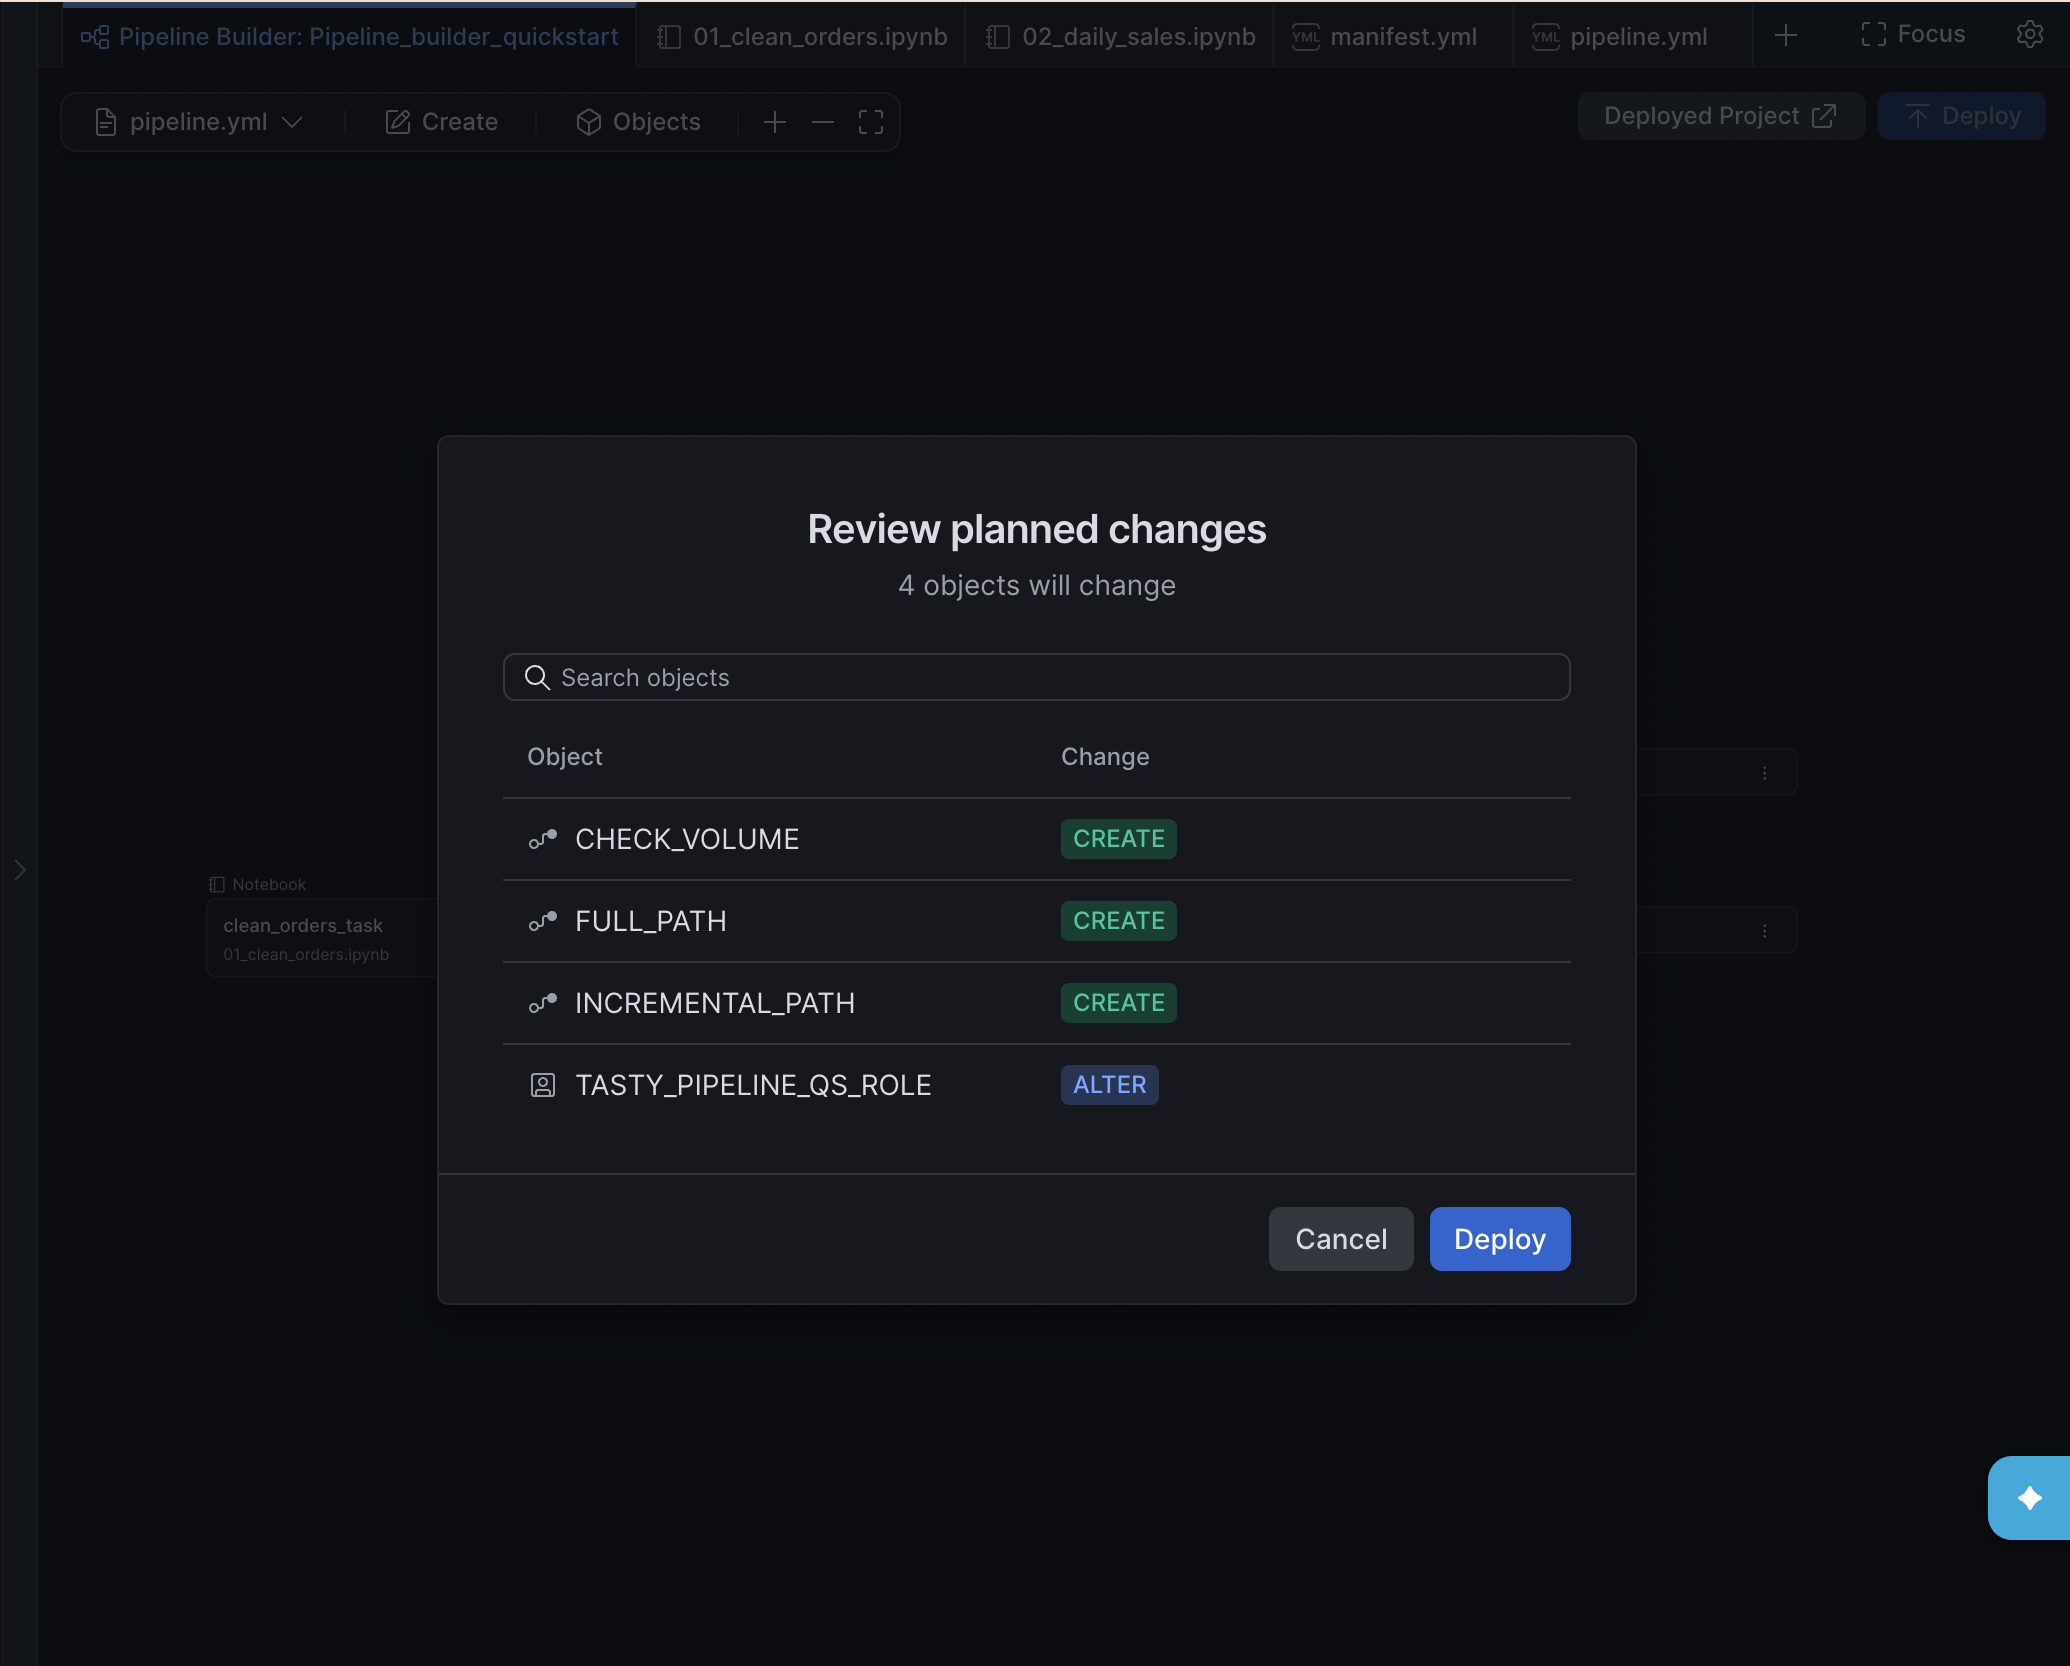
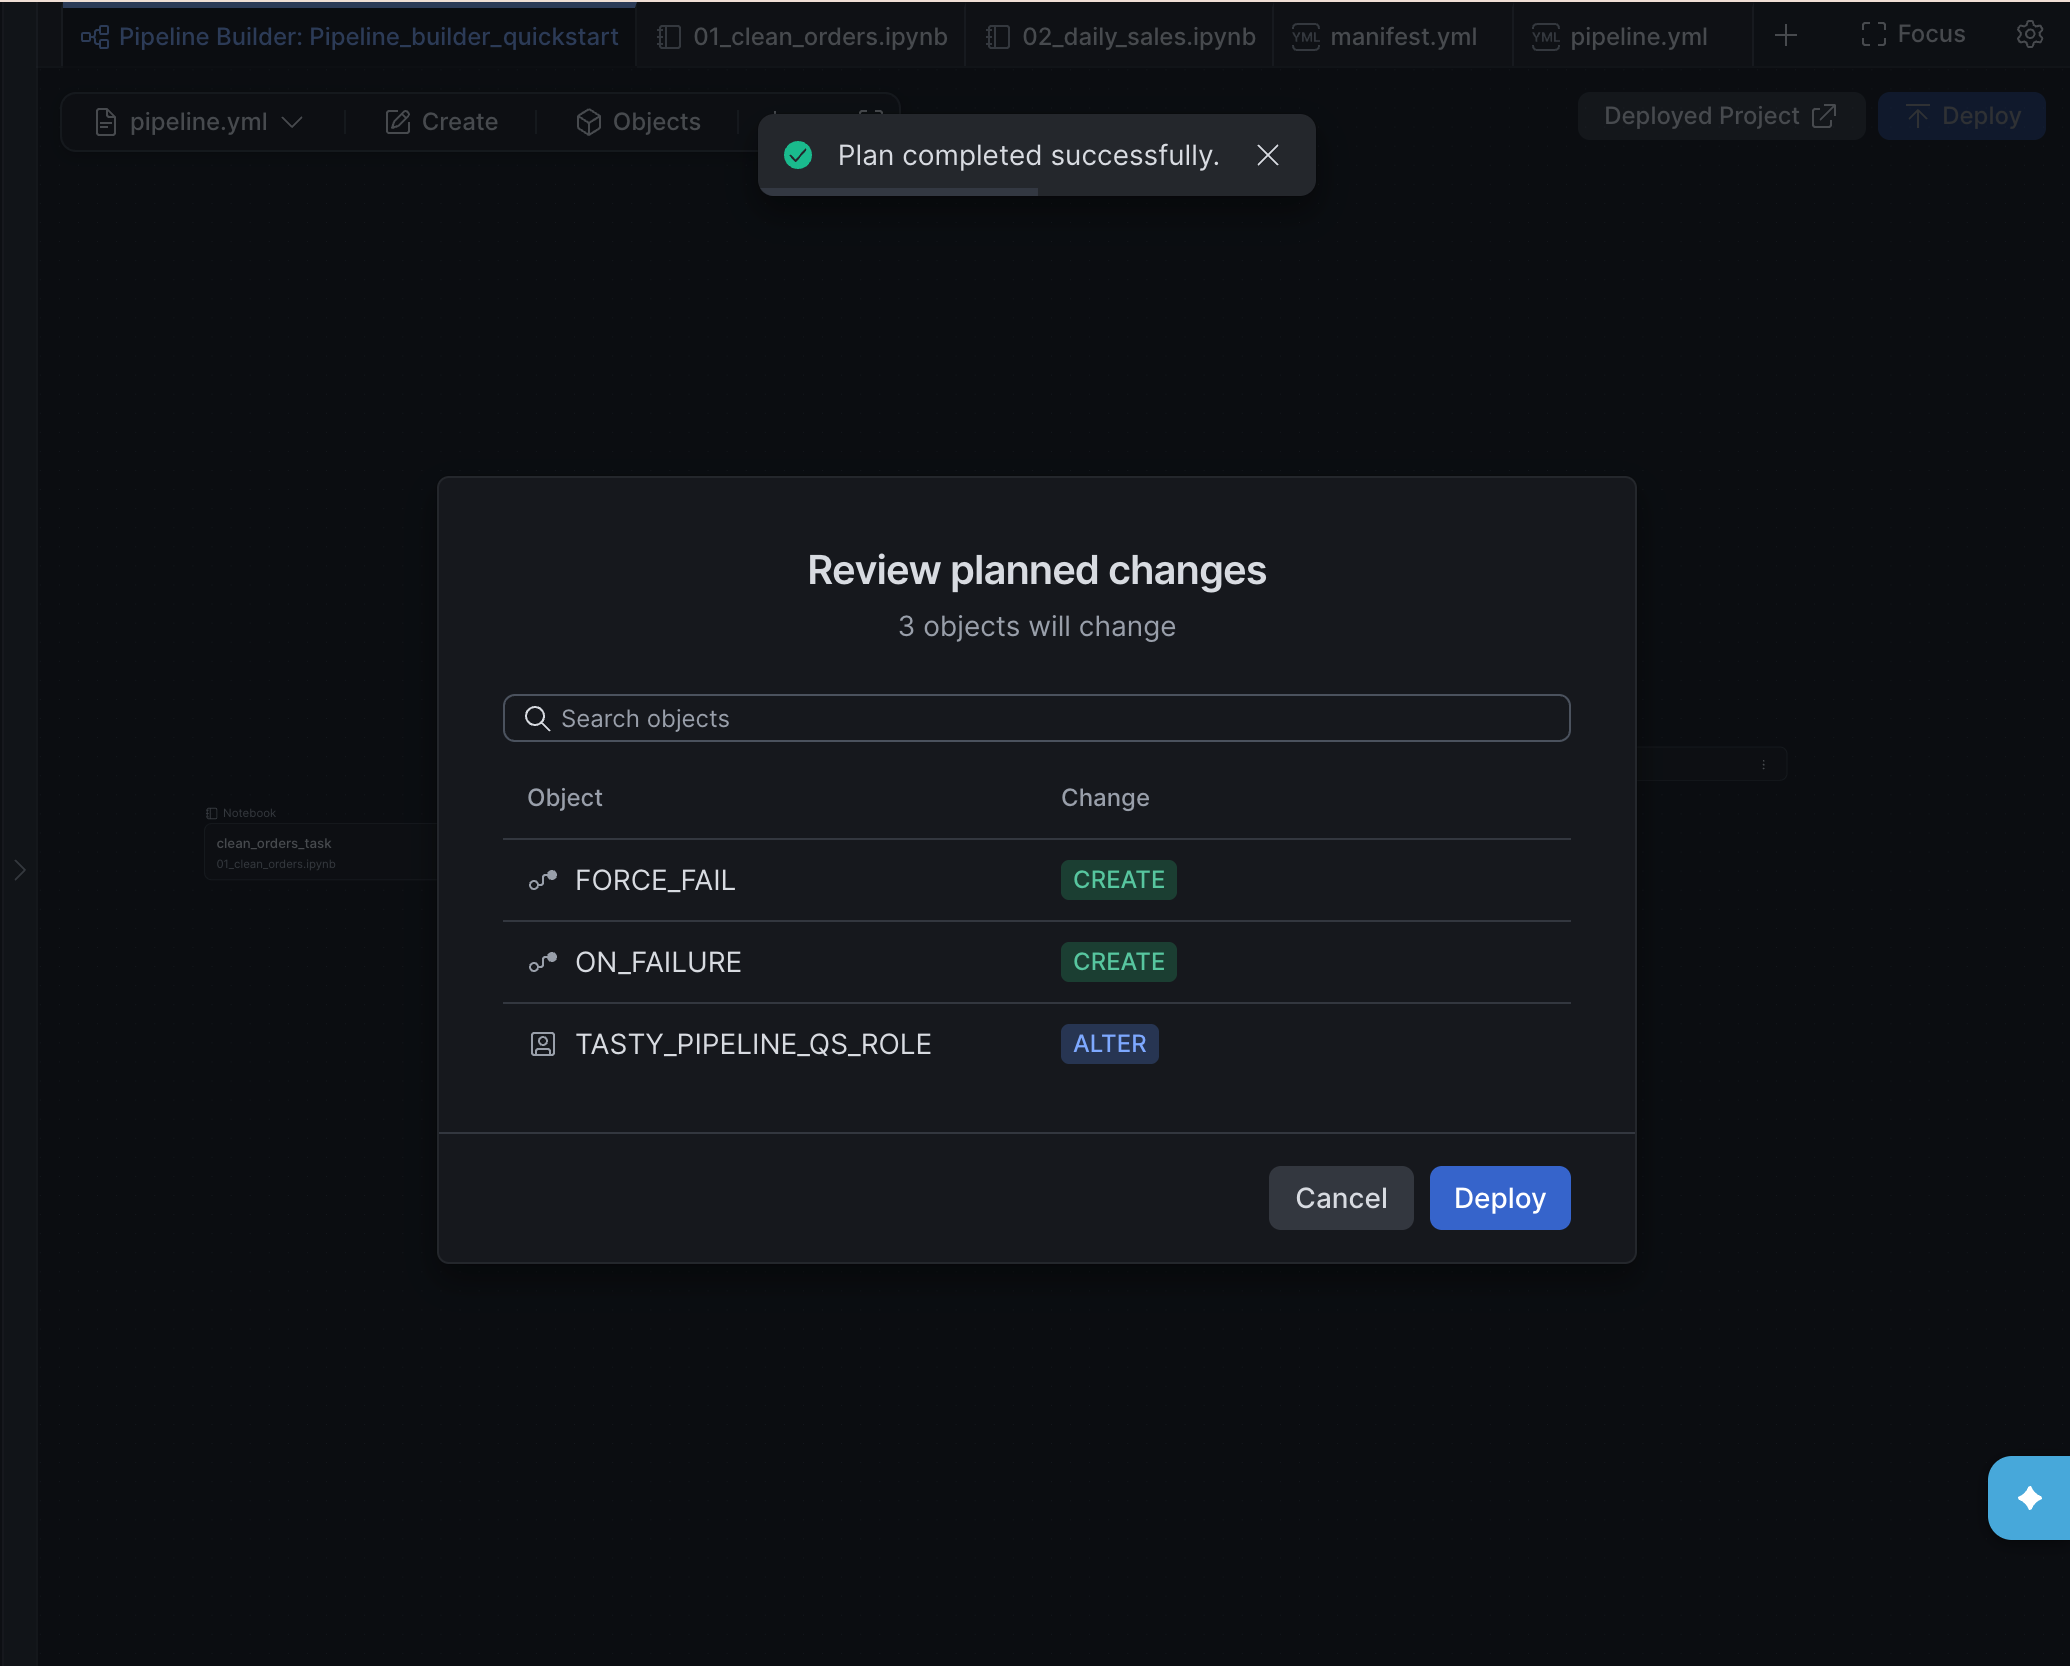
In the Review planned changes dialog, review the list. This first deployment creates the Code Bundle, the clean_orders_task and daily_sales_task tasks, and the TASTY_DAILY_SALES_GRAPH task graph. It also lists an ALTER on TASTY_PIPELINE_QS_ROLE. Confirm that this row names
TASTY_PIPELINE_QS_ROLE. If it namesACCOUNTADMIN, the pipeline was created with the wrong role. Cancel and see Troubleshooting.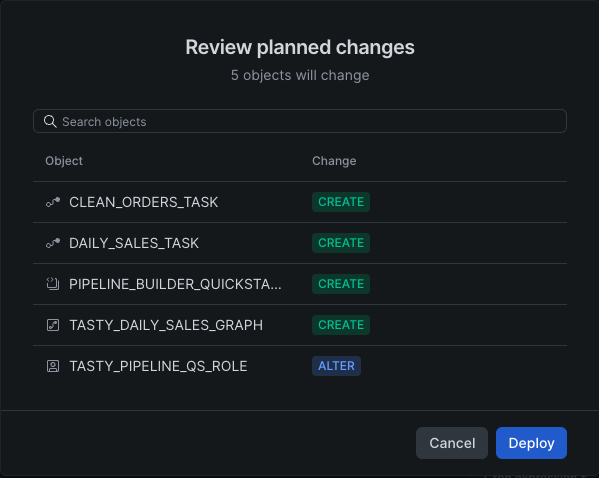
-
Select Deploy.
While the deployment runs, the Deploy button changes to Cancel. When it finishes, a Deployed Project button appears next to Deploy.
This plan-then-deploy loop comes from DCM. The project files describe the objects you want, not the steps to create them. Each deployment compares the files with your account and creates, alters, or drops objects to match, in the right order.
Run and Monitor
The graph is deployed but suspended. Let's run it once now, ahead of its 6:00 AM schedule.
-
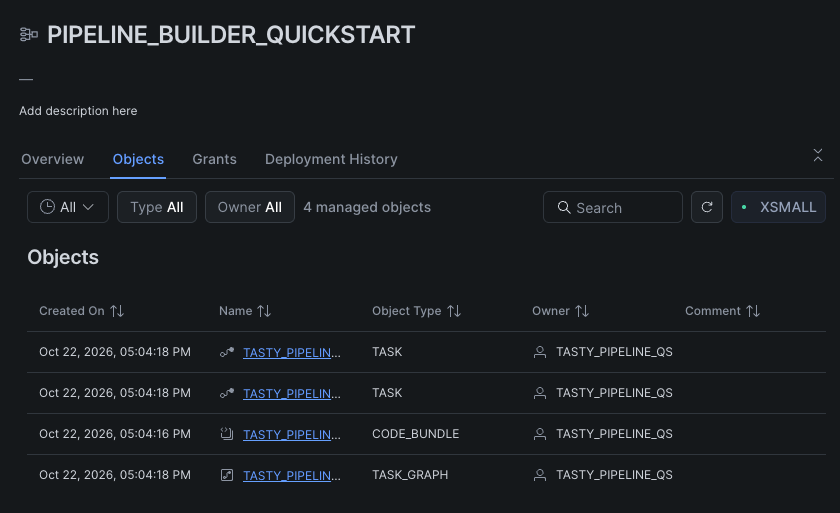
Select Deployed Project. The DCM project opens in Snowsight on the Objects tab, which lists the tasks, task graph, and Code Bundle the project manages.
-
Select TASTY_DAILY_SALES_GRAPH to open its details page.
-
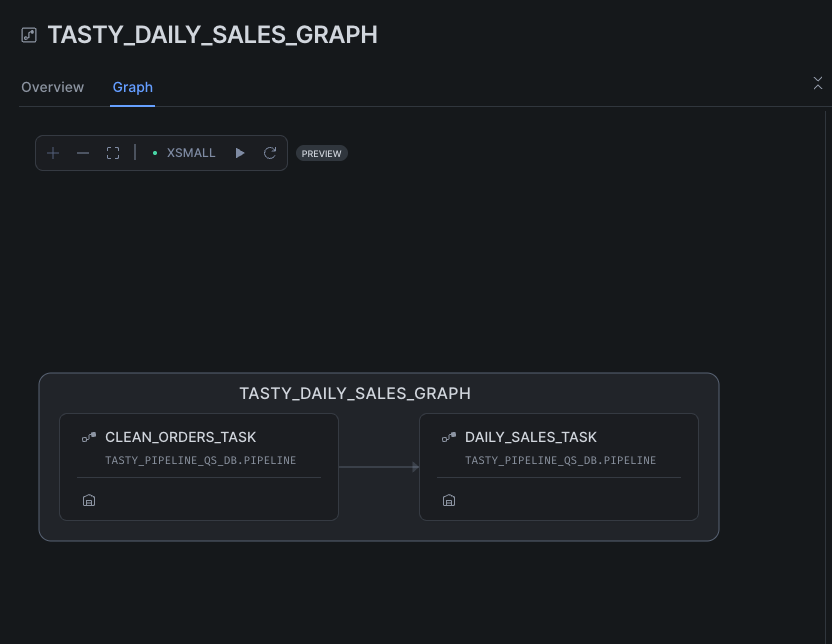
Select the Graph tab, and then select the Run Task Graph (play) icon in the toolbar above the graph.
-
To watch the run while it's in progress, open a task's details page (for example, select clean_orders_task on the Objects tab of the DCM project) and select its Run History tab. The task graph's Overview tab shows the run once it finishes.
You can also run the graph from SQL:
EXECUTE TASK GRAPH TASTY_PIPELINE_QS_DB.PIPELINE.TASTY_DAILY_SALES_GRAPH;
A task that belongs to a task graph runs only as part of its graph. You can't run daily_sales_task on its own.
Note: The first run after the compute pool resumes can take a few minutes while the pool starts. If a notebook task fails quickly on that first run, run the graph again once the pool is active.
When both tasks succeed, check the output:
SELECT city, SUM(orders) AS orders, SUM(revenue) AS revenue
FROM TASTY_PIPELINE_QS_DB.ANALYTICS.DAILY_TRUCK_SALES
GROUP BY city
ORDER BY revenue DESC;
You should see five cities. Check the clean row count too:
SELECT COUNT(*) AS clean_orders FROM TASTY_PIPELINE_QS_DB.STAGING.ORDERS_CLEAN;
You should see clean_orders = 5000: the 200 duplicates and the 50 invalid orders are gone.
Change It Like Code
Because the pipeline is a DCM project, every deployment brings your account in line with the project files. Let's see what that means in practice.
Redeploy with no changes
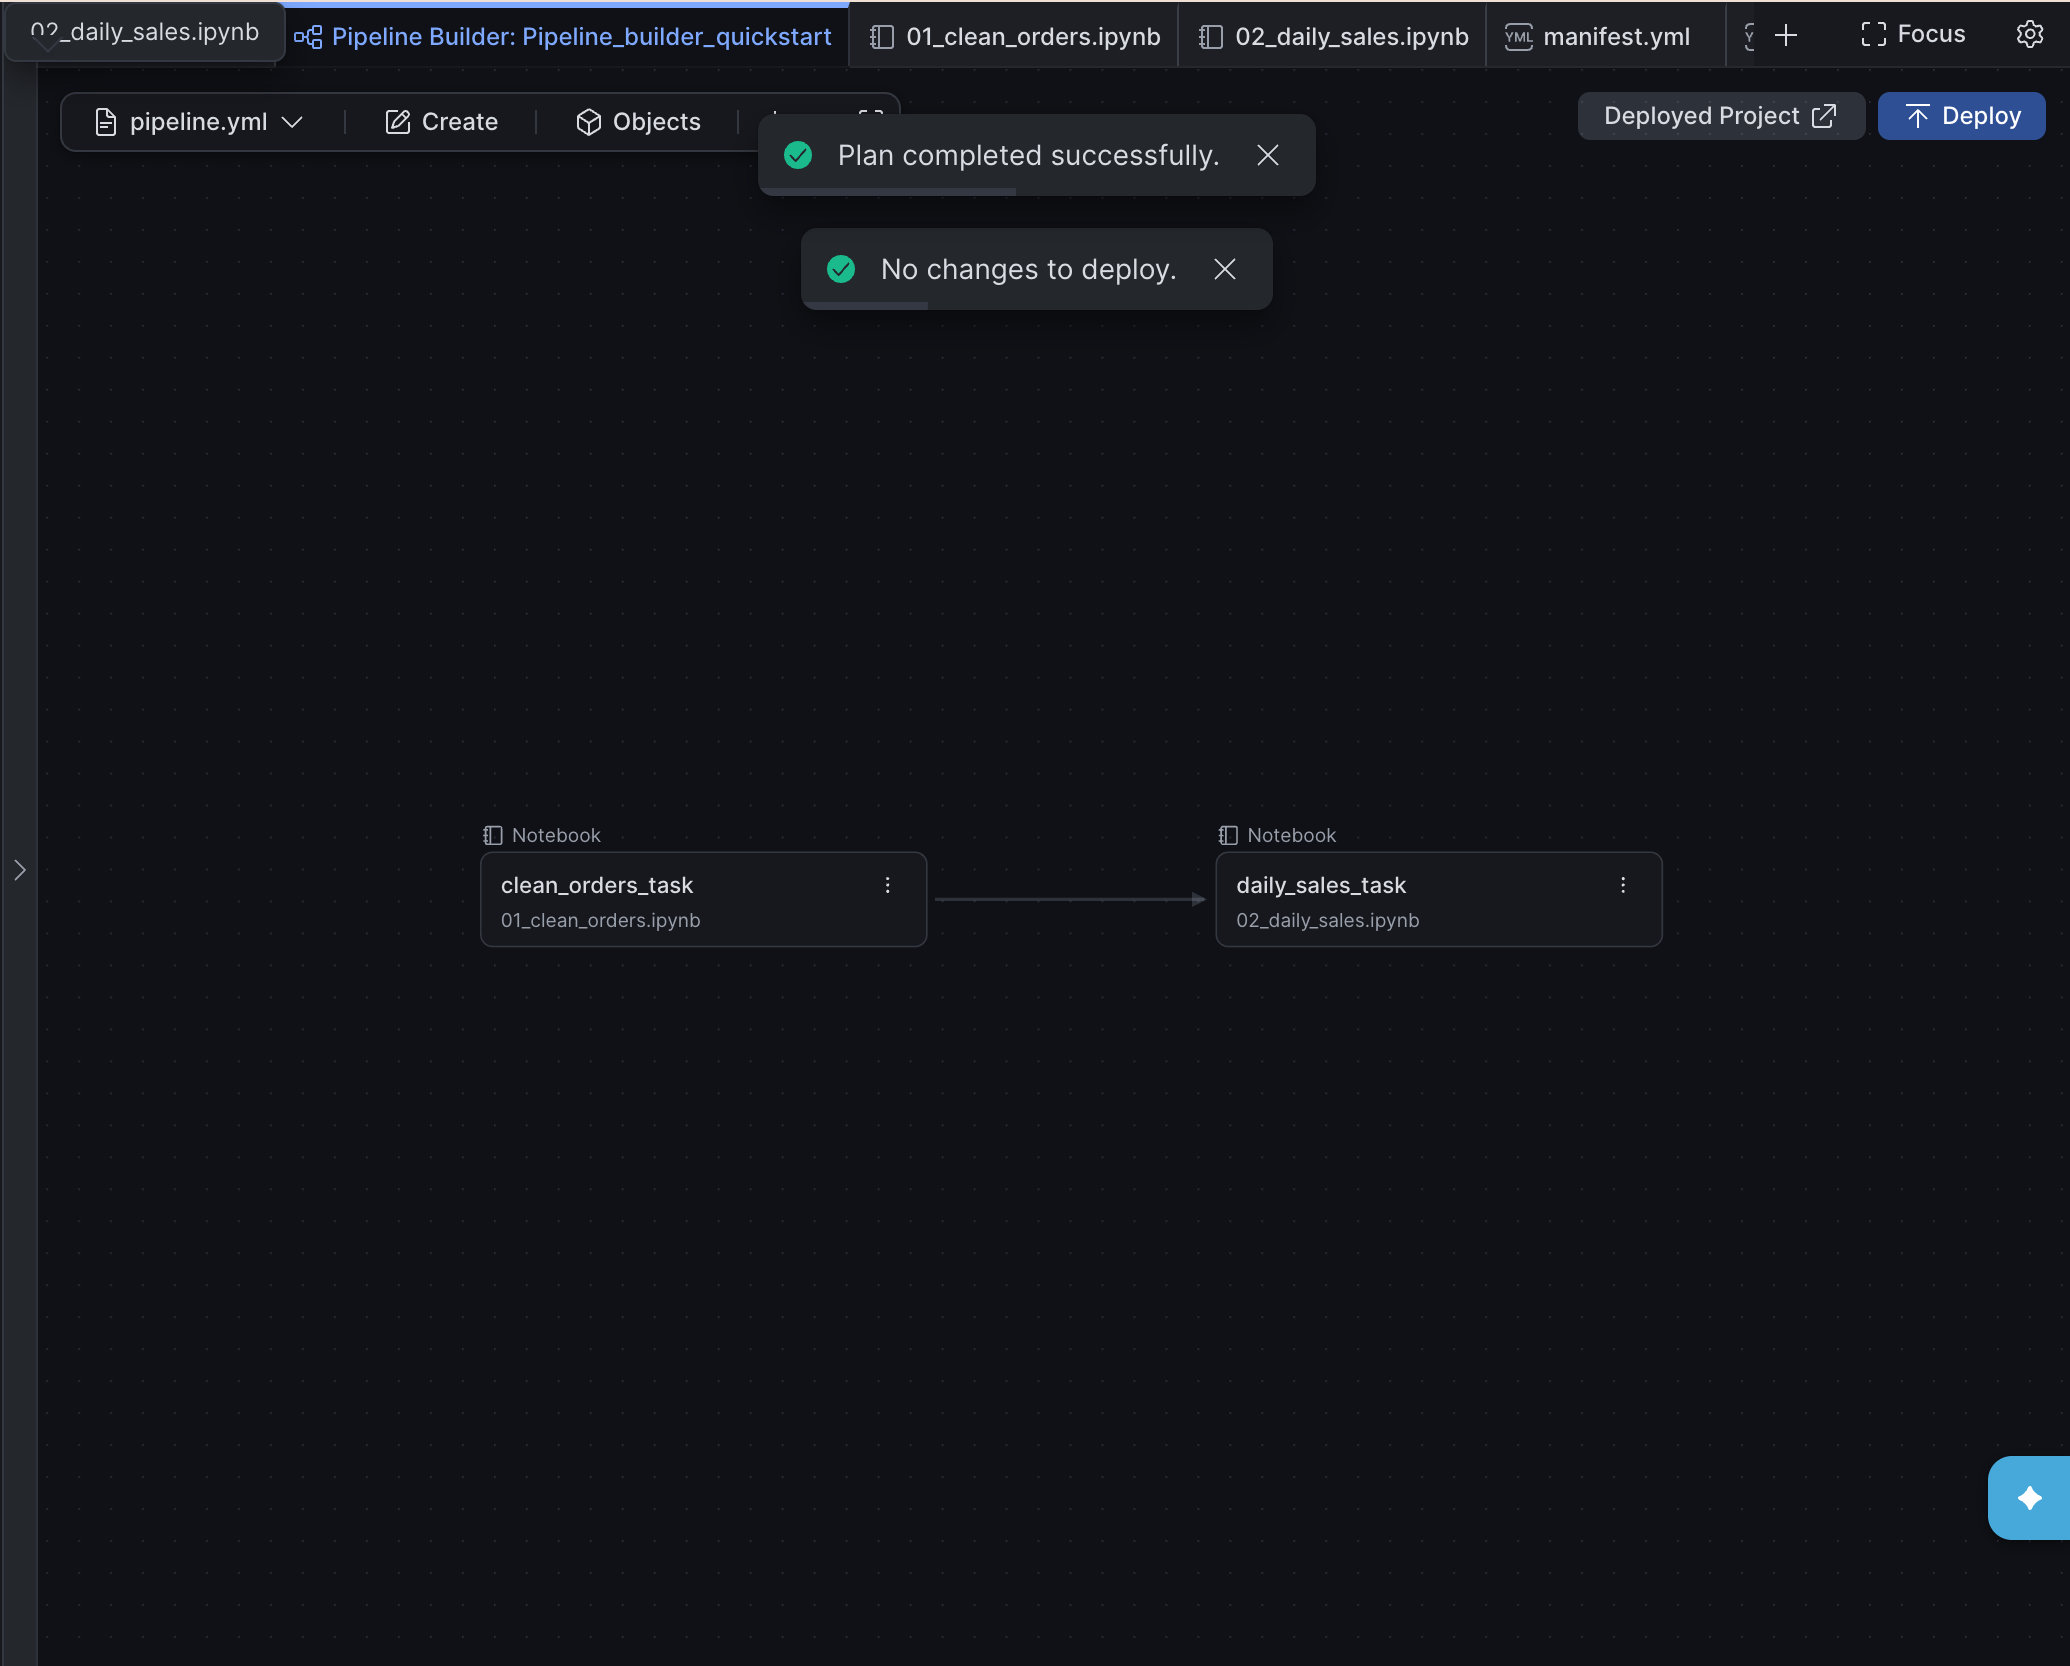
Select Deploy again without changing anything. Pipeline Builder shows "No changes to deploy." and doesn't deploy. Deployments are safe to repeat.
Add a task
Analysts have asked for a daily leaderboard of the top five trucks. Let's add a SQL task after daily_sales_task that rebuilds it on every run. A SQL task is also how you run stored procedures or any other Snowflake object from a pipeline.
- Hover over the daily_sales_task card, select + on its outgoing connector, and then select SQL. Pipeline Builder adds a new card that runs after daily_sales_task.
- Set Name to
TASTY_PIPELINE_QS_DB.PIPELINE.top_trucks_task. - Under Execution, set Warehouse to
TASTY_PIPELINE_QS_WH. - In the Source editor, enter:
CREATE OR REPLACE TABLE TASTY_PIPELINE_QS_DB.ANALYTICS.TOP_TRUCKS AS
SELECT truck_id, city, SUM(revenue) AS revenue
FROM TASTY_PIPELINE_QS_DB.ANALYTICS.DAILY_TRUCK_SALES
GROUP BY ALL
ORDER BY revenue DESC
LIMIT 5;
-
Select Deploy. The plan shows TOP_TRUCKS_TASK as a task to create and an ALTER on TASTY_PIPELINE_QS_ROLE. Confirm the ALTER row still names
TASTY_PIPELINE_QS_ROLE, and then select Deploy.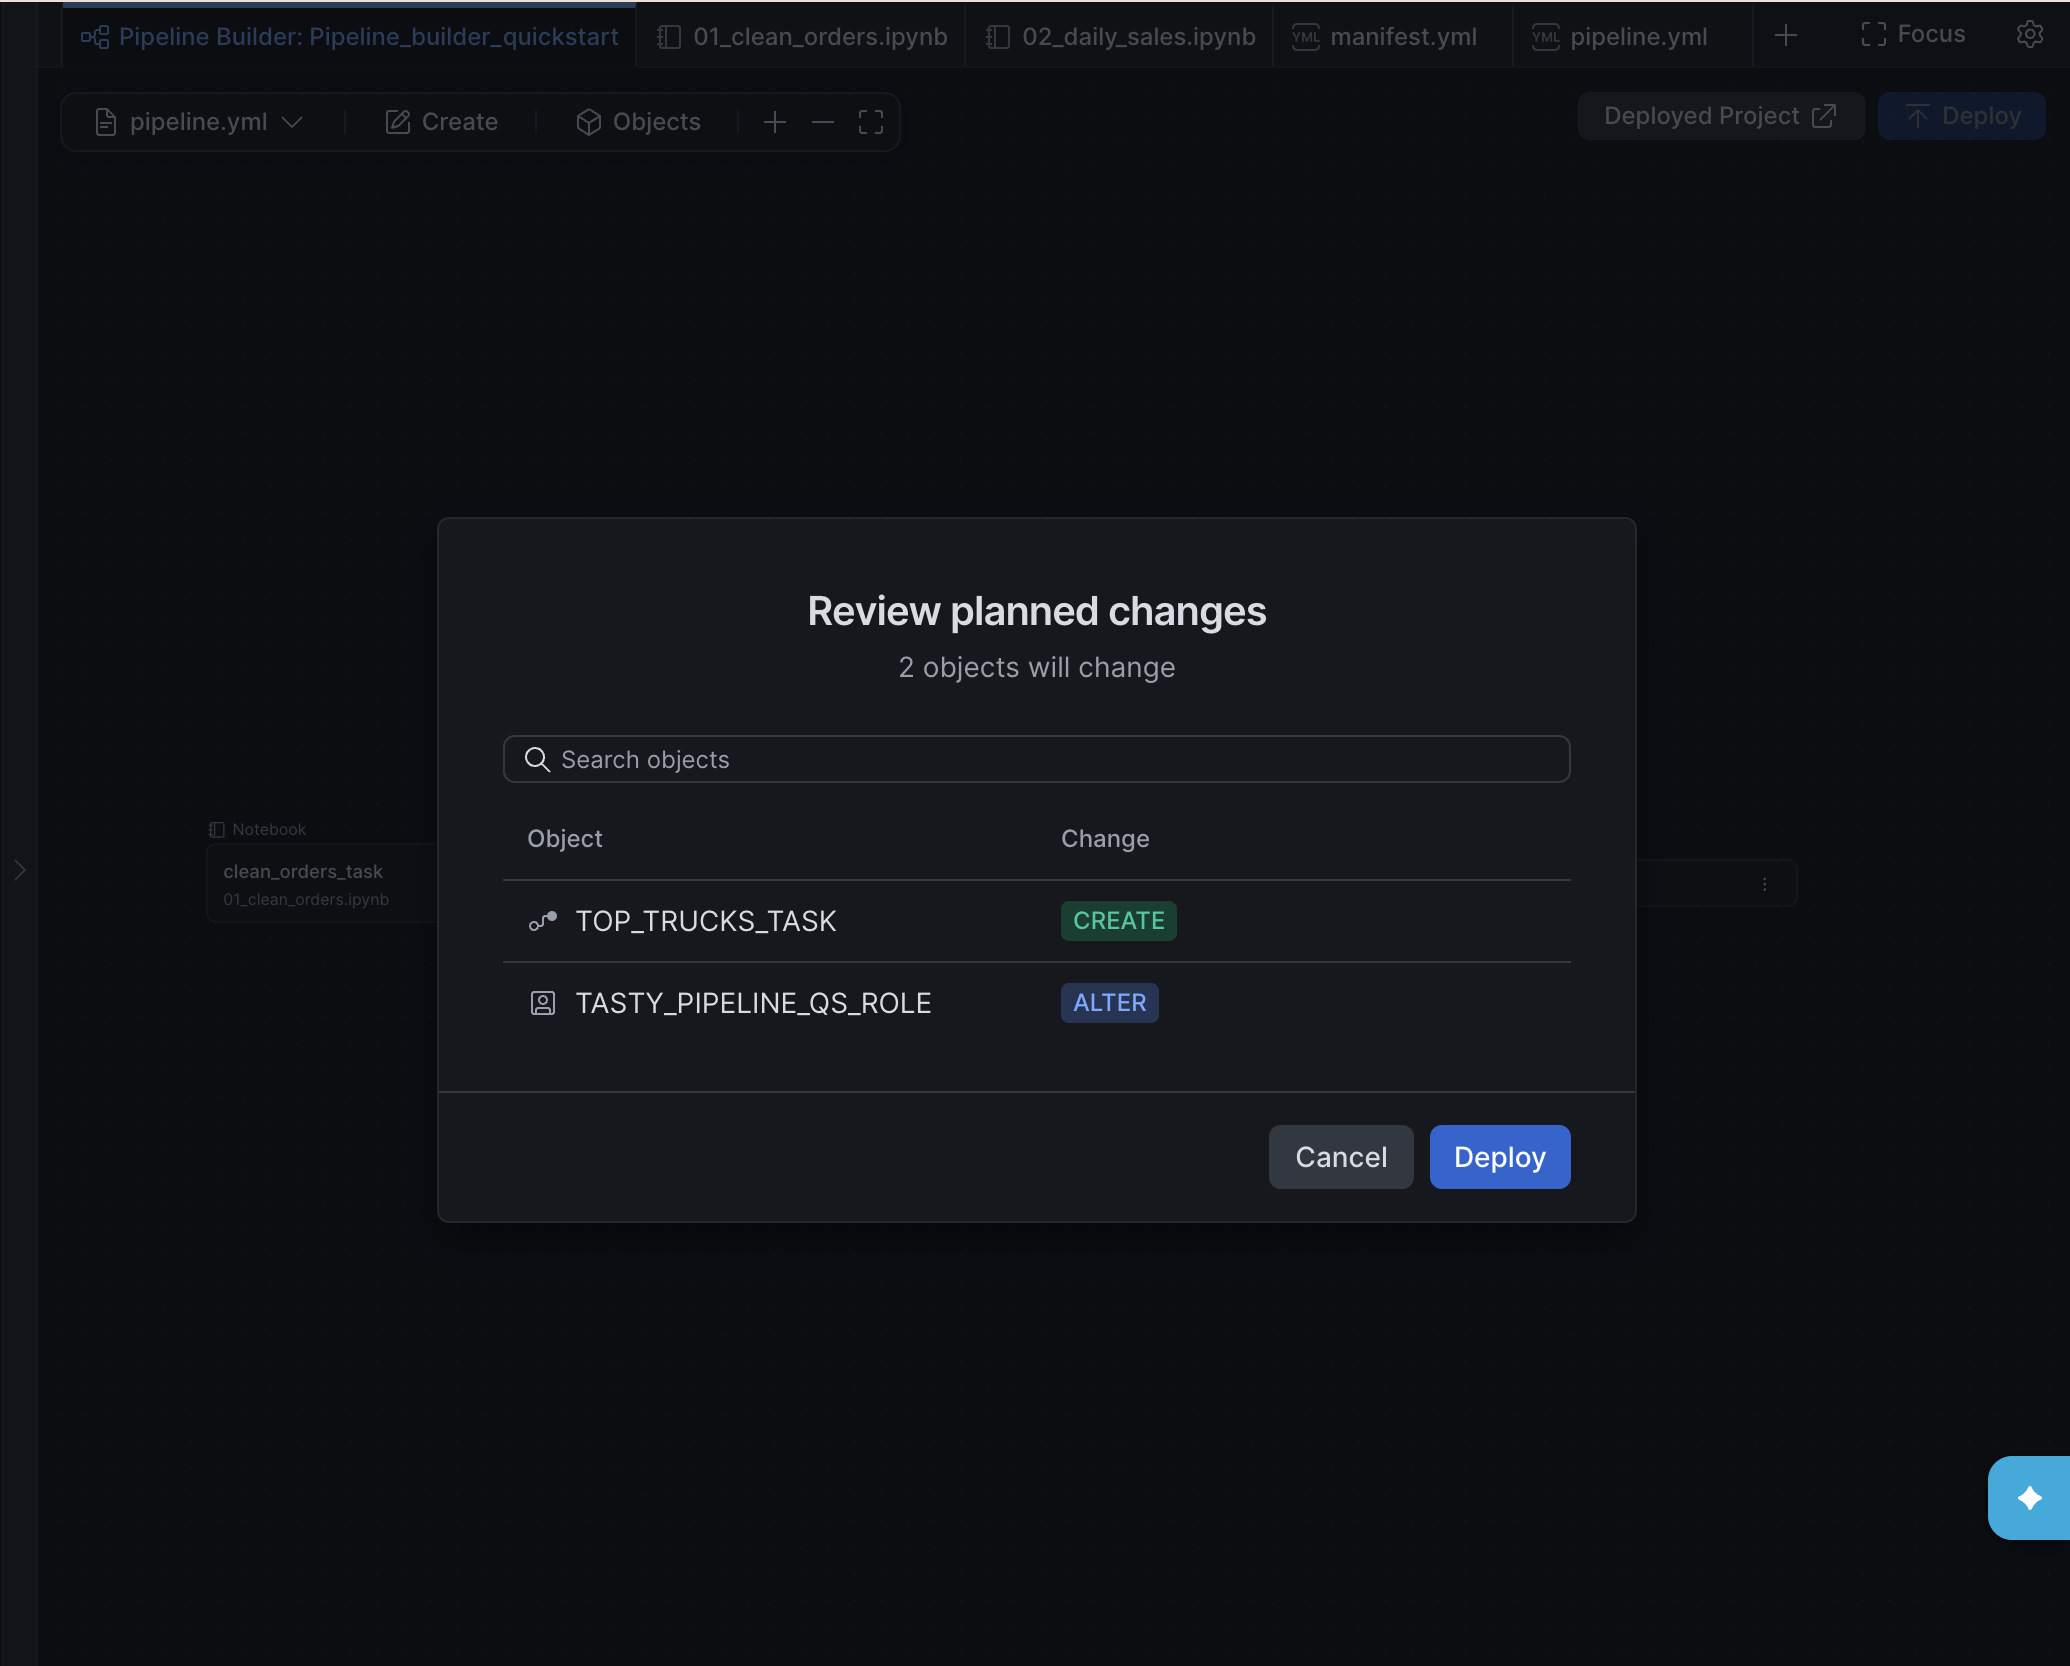
Delete a task
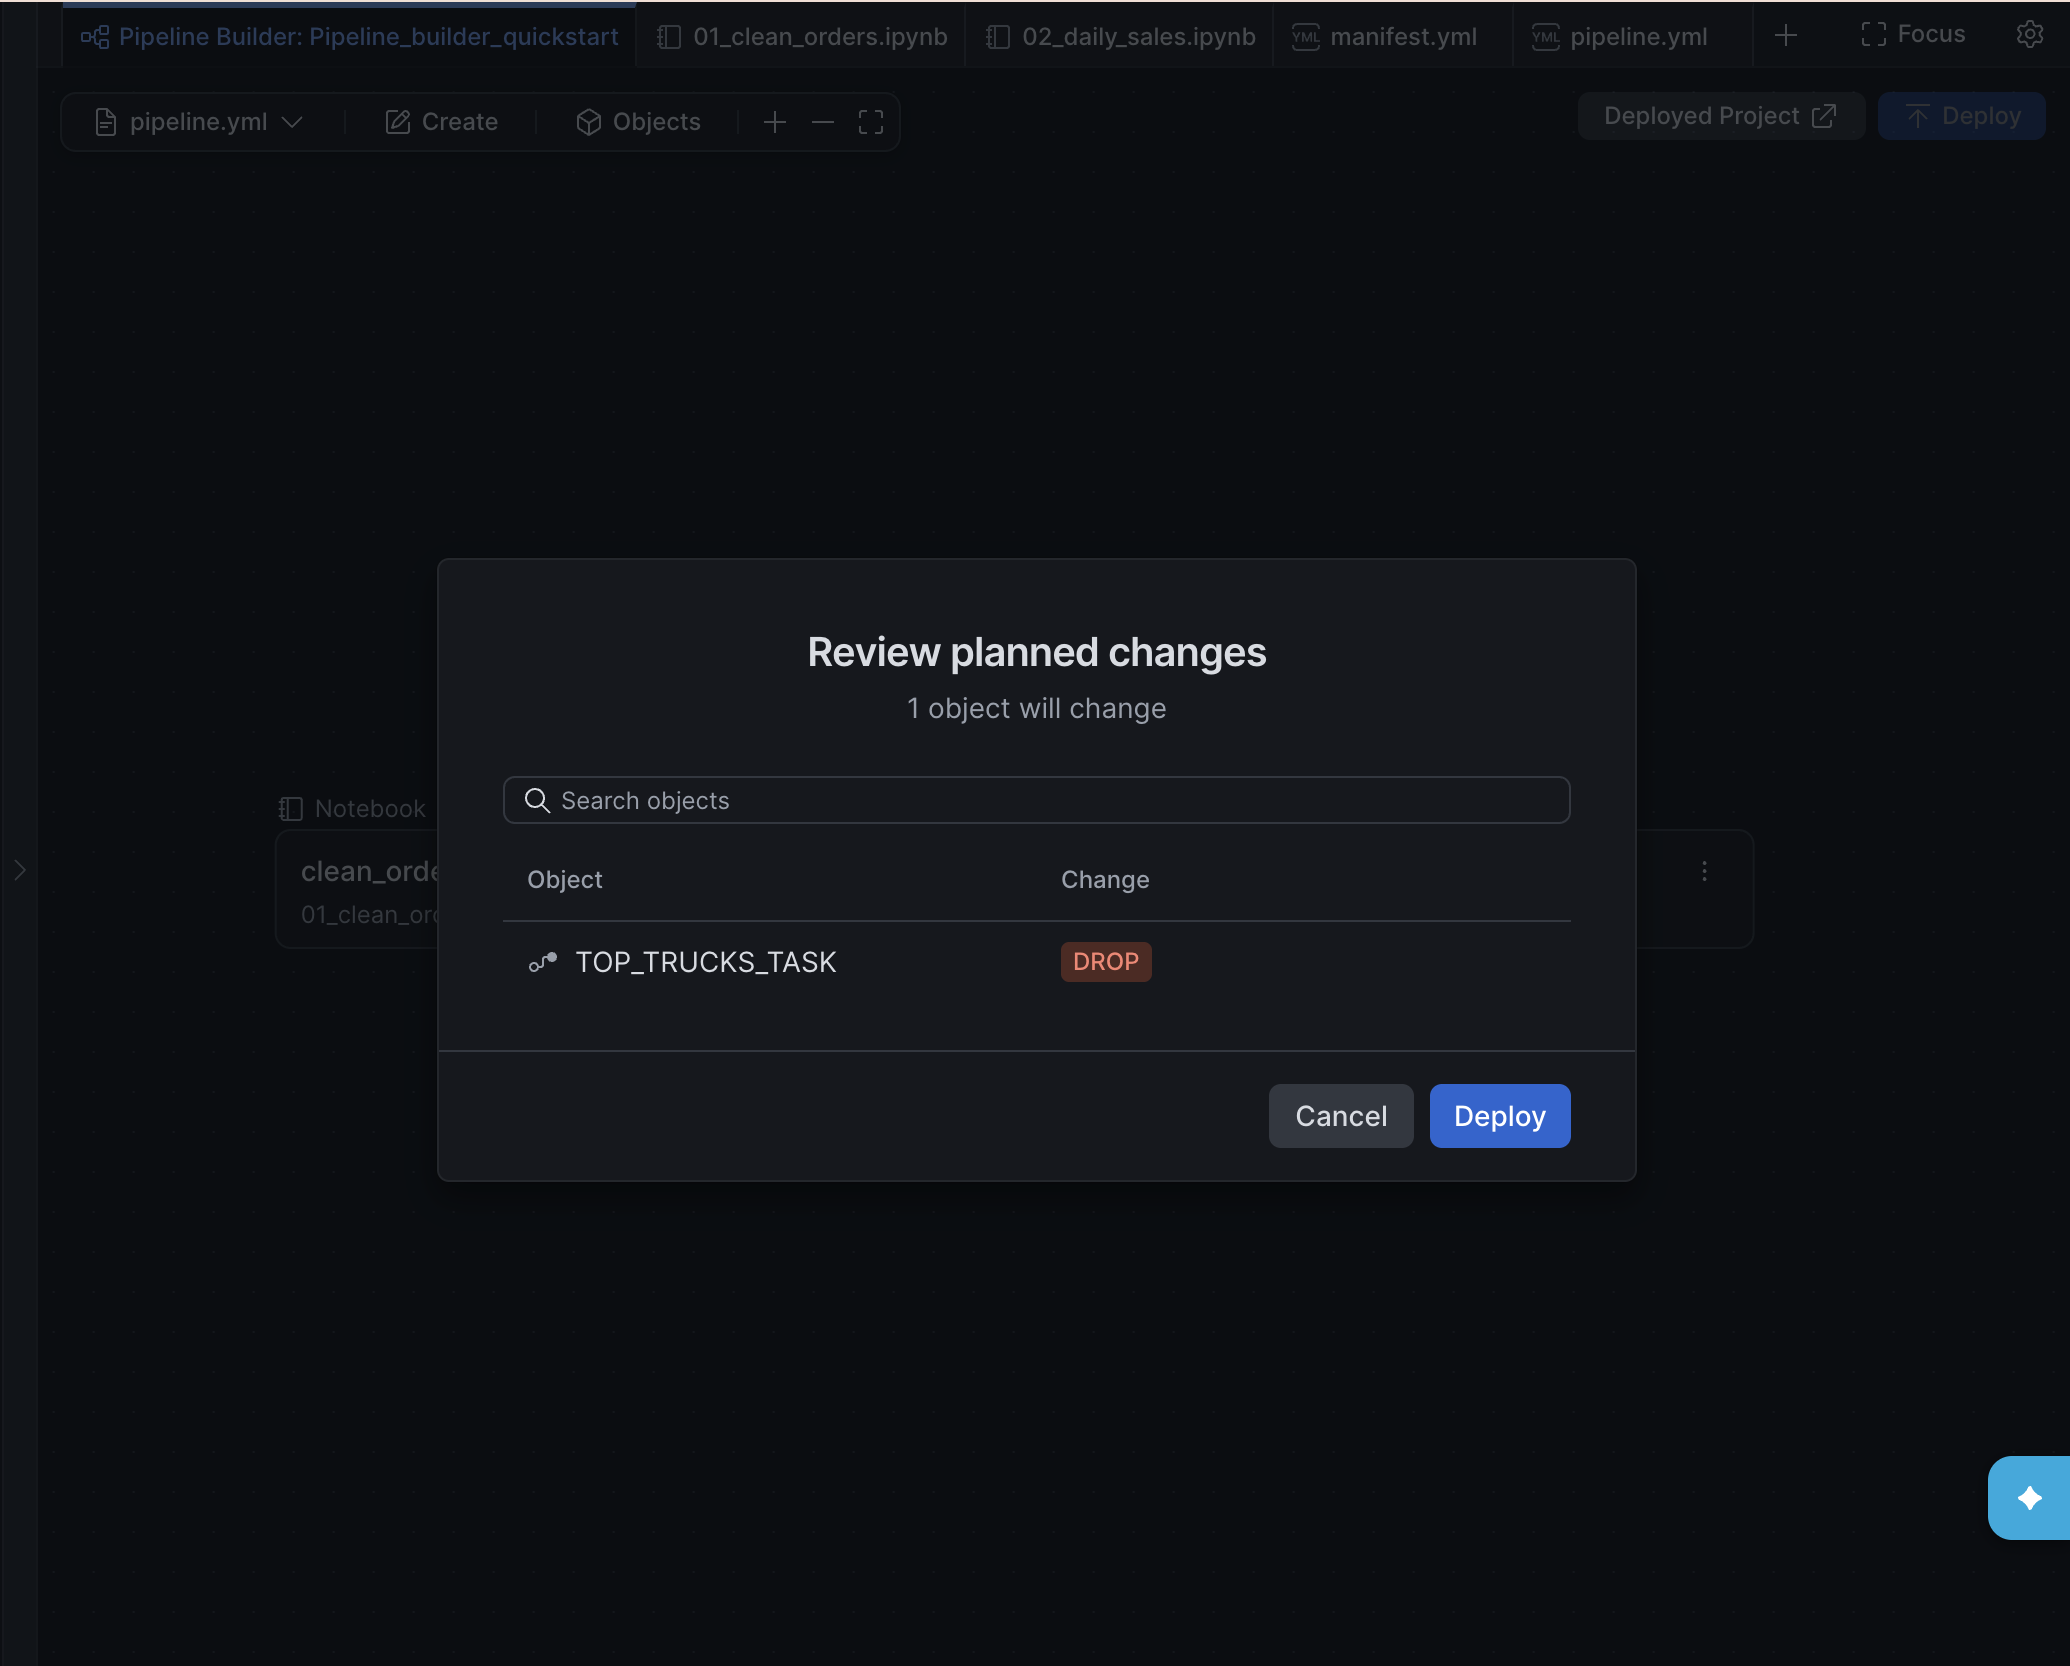
Now suppose the analysts change their minds. On the top_trucks_task card, select the ⋮ menu, and then select Delete. Select Deploy.
This time, the plan shows top_trucks_task as a task to drop. Deleting a card removes it from the project files, and the next deployment drops the task from your account. You never write a DROP TASK.
Note: The deployment drops the task, but not the
TOP_TRUCKStable the task created if it ran. DCM manages the objects defined in the project, such as tasks, task graphs, and Code Bundles. Tables that your code creates at run time aren't part of the project.
Turn on the schedule (optional)
To have Tasty Bytes' sales table ready every morning, open the task graph settings: select Objects on the canvas toolbar, select Task graphs, and then select TASTY_DAILY_SALES_GRAPH. Set Desired state to Resumed, and deploy. The graph then runs every day at 6:00 AM. If you do this, remember to clean up at the end of the Quickstart so the graph stops running.
Build with CoCo
You've built a pipeline card by card. Now let's have CoCo draft one from a description.
- In the file explorer, select Add new, and then select Pipeline Builder.
- In the Create Pipeline Builder dialog, enter
tasty_menu_popularityfor the Name, and selectTASTY_PIPELINE_QS_DB.PIPELINEfor Database and schema. - Select Generate with Cortex.
- In the Prompt field, enter:
Build a weekly pipeline for Tasty Bytes over TASTY_PIPELINE_QS_DB.RAW.ORDERS.
Step 1: a SQL task that writes weekly order counts and revenue per city to
TASTY_PIPELINE_QS_DB.ANALYTICS.WEEKLY_CITY_SALES.
Step 2: a SQL task, after step 1, that writes the top city for each week to
TASTY_PIPELINE_QS_DB.ANALYTICS.WEEKLY_TOP_CITY.
Put all tasks in TASTY_PIPELINE_QS_DB.PIPELINE, use warehouse TASTY_PIPELINE_QS_WH,
and schedule the graph every Monday at 7:00 AM America/Los_Angeles, suspended.
- Select Generate.
CoCo writes the tasks, the connection between them, and the task graph settings to the new project's definition file, so you can review its work on the canvas before anything is deployed. Select each card to check its SQL. To check the schedule, select Objects on the canvas toolbar, select Task graphs, and then select the graph CoCo created. If it looks right, select Deploy to plan and deploy it the same way as the first pipeline.
To change an existing pipeline with CoCo, open the CoCo chat in your workspace and use the /pipeline-builder skill. For example, ask it to add a task to Pipeline_builder_quickstart.
Advanced: Optional Modules
You've built, deployed, run, and changed a pipeline. That's the core of Pipeline Builder. The modules below go further. Each one starts from the Pipeline_builder_quickstart pipeline as you left it in Change It Like Code, and none depend on each other, so pick the ones that match your pipelines.
Each module ends with a deployment. To compare what changed, review the Review planned changes dialog before you select Deploy.
Before you start, make sure you're back on the Pipeline_builder_quickstart canvas, not the pipeline CoCo generated in the previous step. Select its Pipeline Builder tab, or, in the file explorer, hover over the Pipeline_builder_quickstart folder and select the Open pipeline builder icon.
For every task you add in these modules, set Warehouse to TASTY_PIPELINE_QS_WH under Execution on the task's General tab, as you did for the first two tasks.
Several modules write to TASTY_PIPELINE_QS_DB.ANALYTICS.RUN_LOG, a small log table that setup.sql already created. It has three columns: logged_at, source, and message.
A1: Branch on a Return Value
Tasty Bytes wants to reprocess everything when order volume is high, and take a lighter path otherwise. You'll build three tasks: one that decides, and one for each branch. To keep the focus on branching, each branch task writes a row to RUN_LOG. In a real pipeline, that's where the full or incremental logic would go.
clean_orders_task ──> CHECK_VOLUME ──> FULL_PATH
                                  └──> INCREMENTAL_PATH
Step 1: Create the deciding task
CHECK_VOLUME counts the clean orders and sets its return value to FULL if there are more than 4,000, or INCREMENTAL otherwise. Tasks that run after it can read that value.
- Hover over the clean_orders_task card and select + on its outgoing connector to add a SQL task.
- Set Name to
TASTY_PIPELINE_QS_DB.PIPELINE.CHECK_VOLUME. - Under Execution, set Warehouse to
TASTY_PIPELINE_QS_WH. - In the Source editor, enter:
EXECUTE IMMEDIATE $$
DECLARE
  path STRING;
BEGIN
  SELECT IFF(COUNT(*) > 4000, 'FULL', 'INCREMENTAL') INTO :path
  FROM TASTY_PIPELINE_QS_DB.STAGING.ORDERS_CLEAN;
  CALL SYSTEM$SET_RETURN_VALUE(:path);
END;
$$;
The block computes the path into a variable first, because SYSTEM$SET_RETURN_VALUE only accepts a constant or a variable, not a subquery.
Step 2: Create the full refresh branch
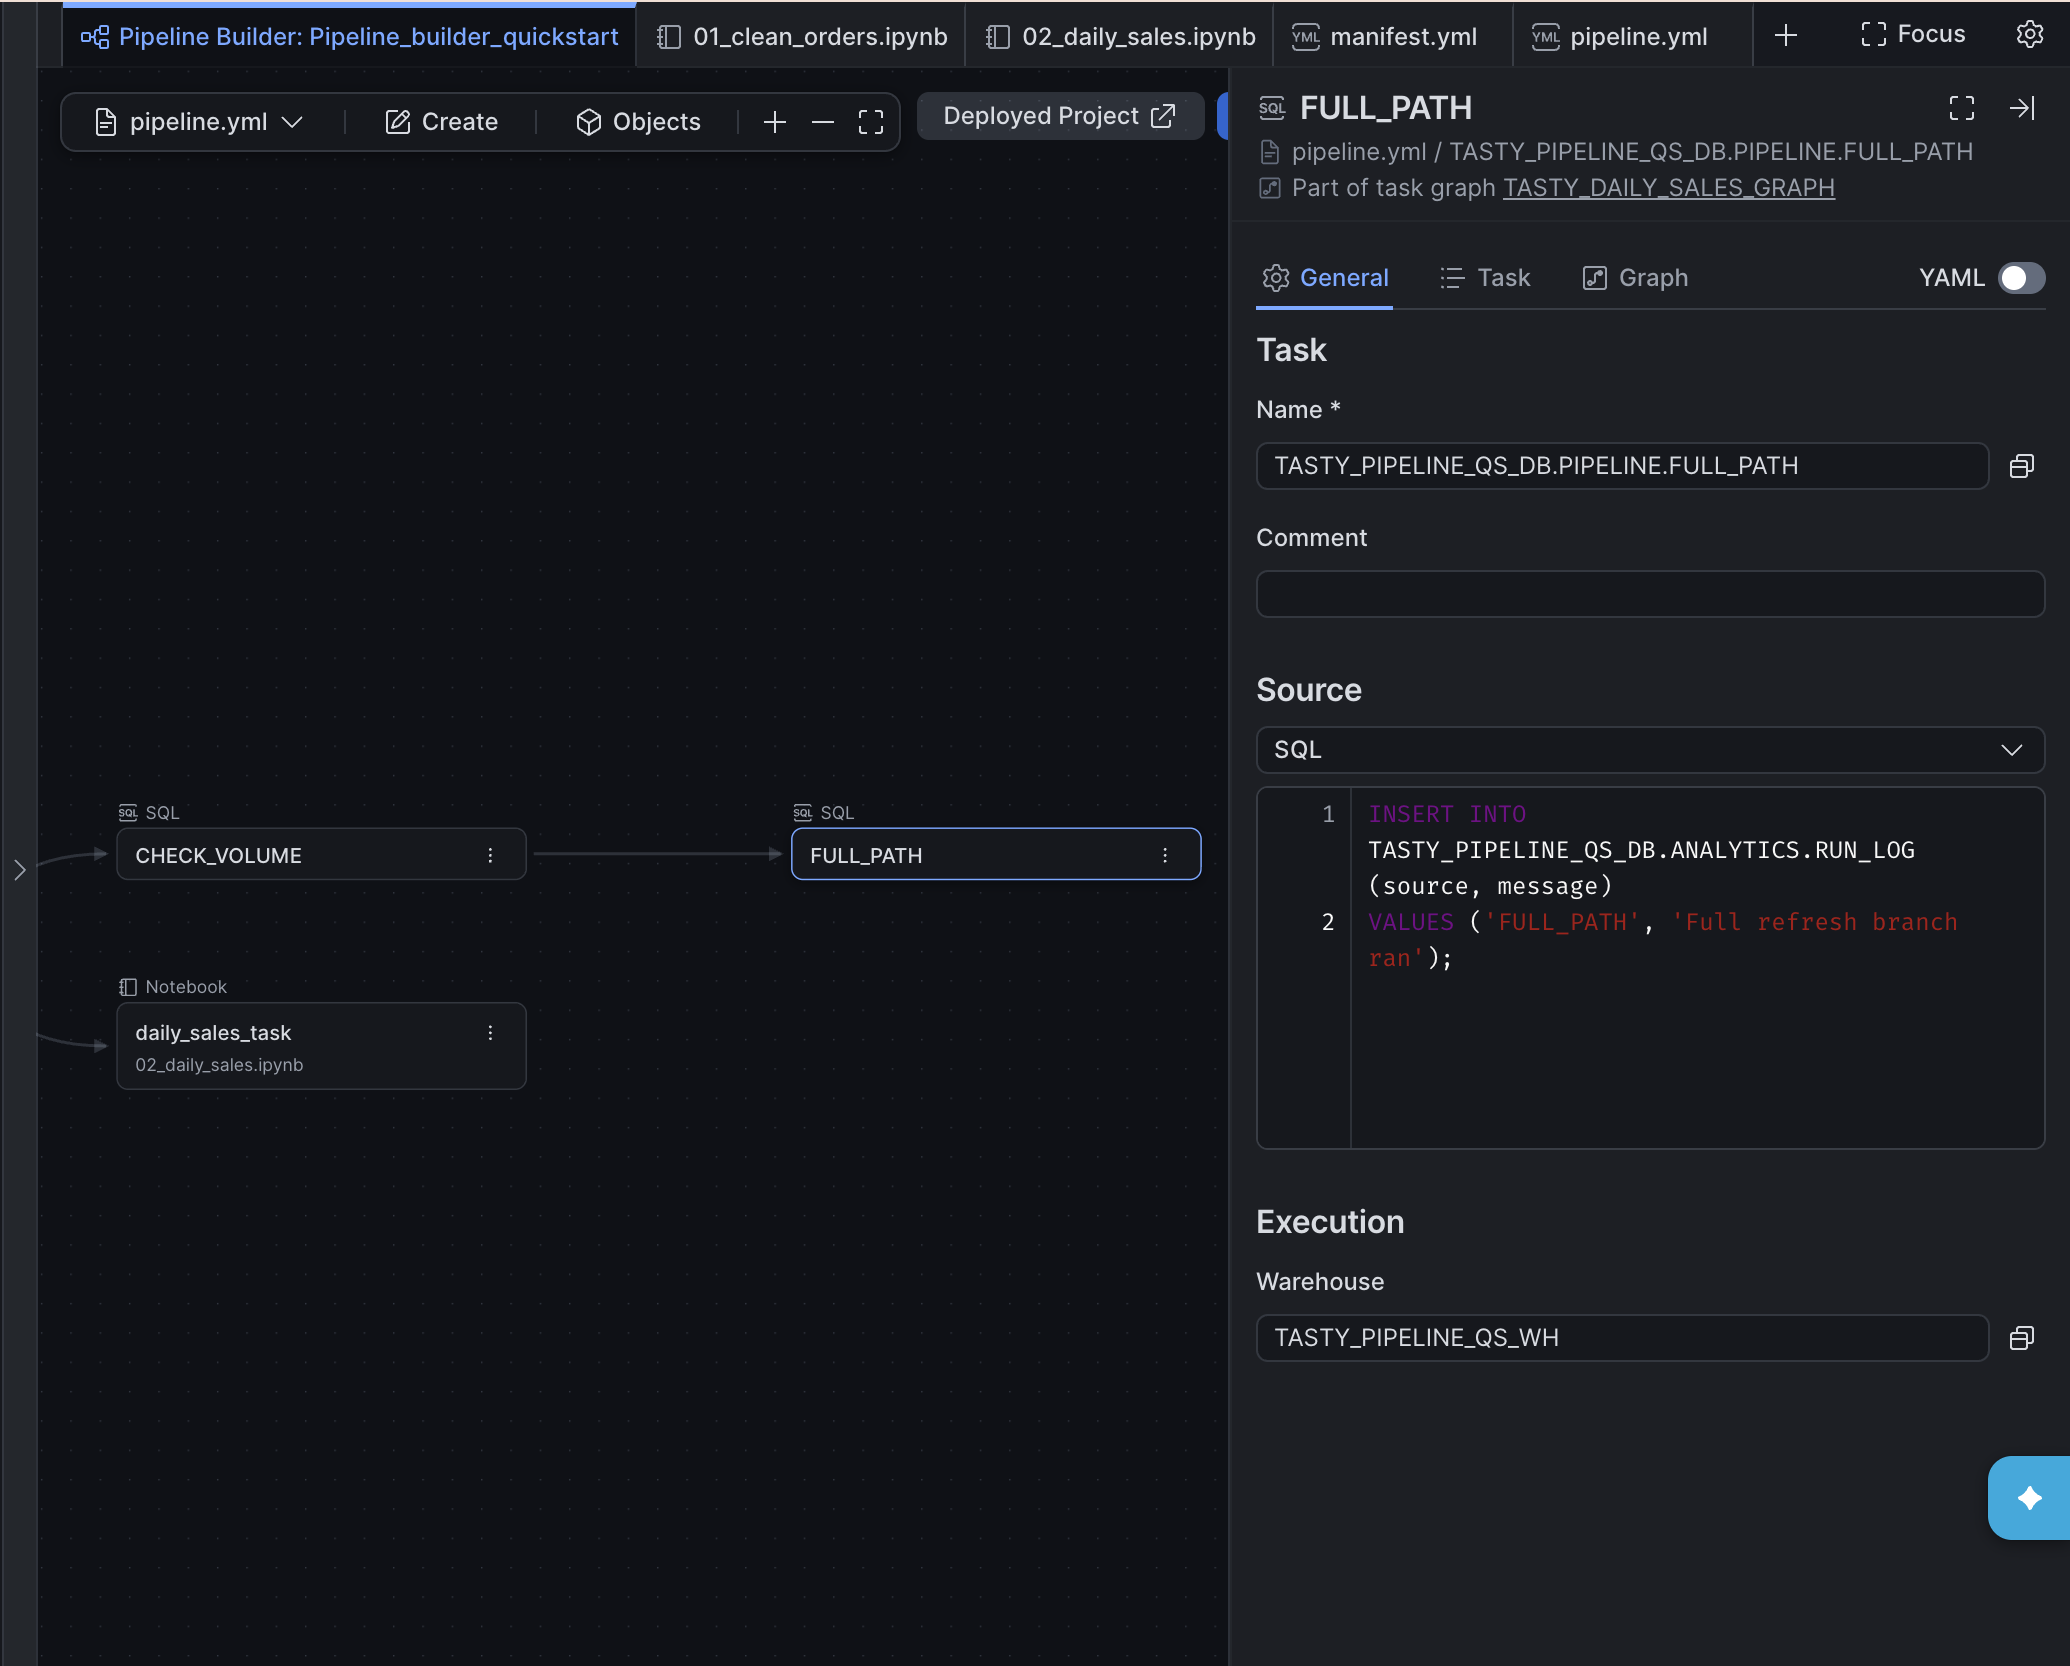
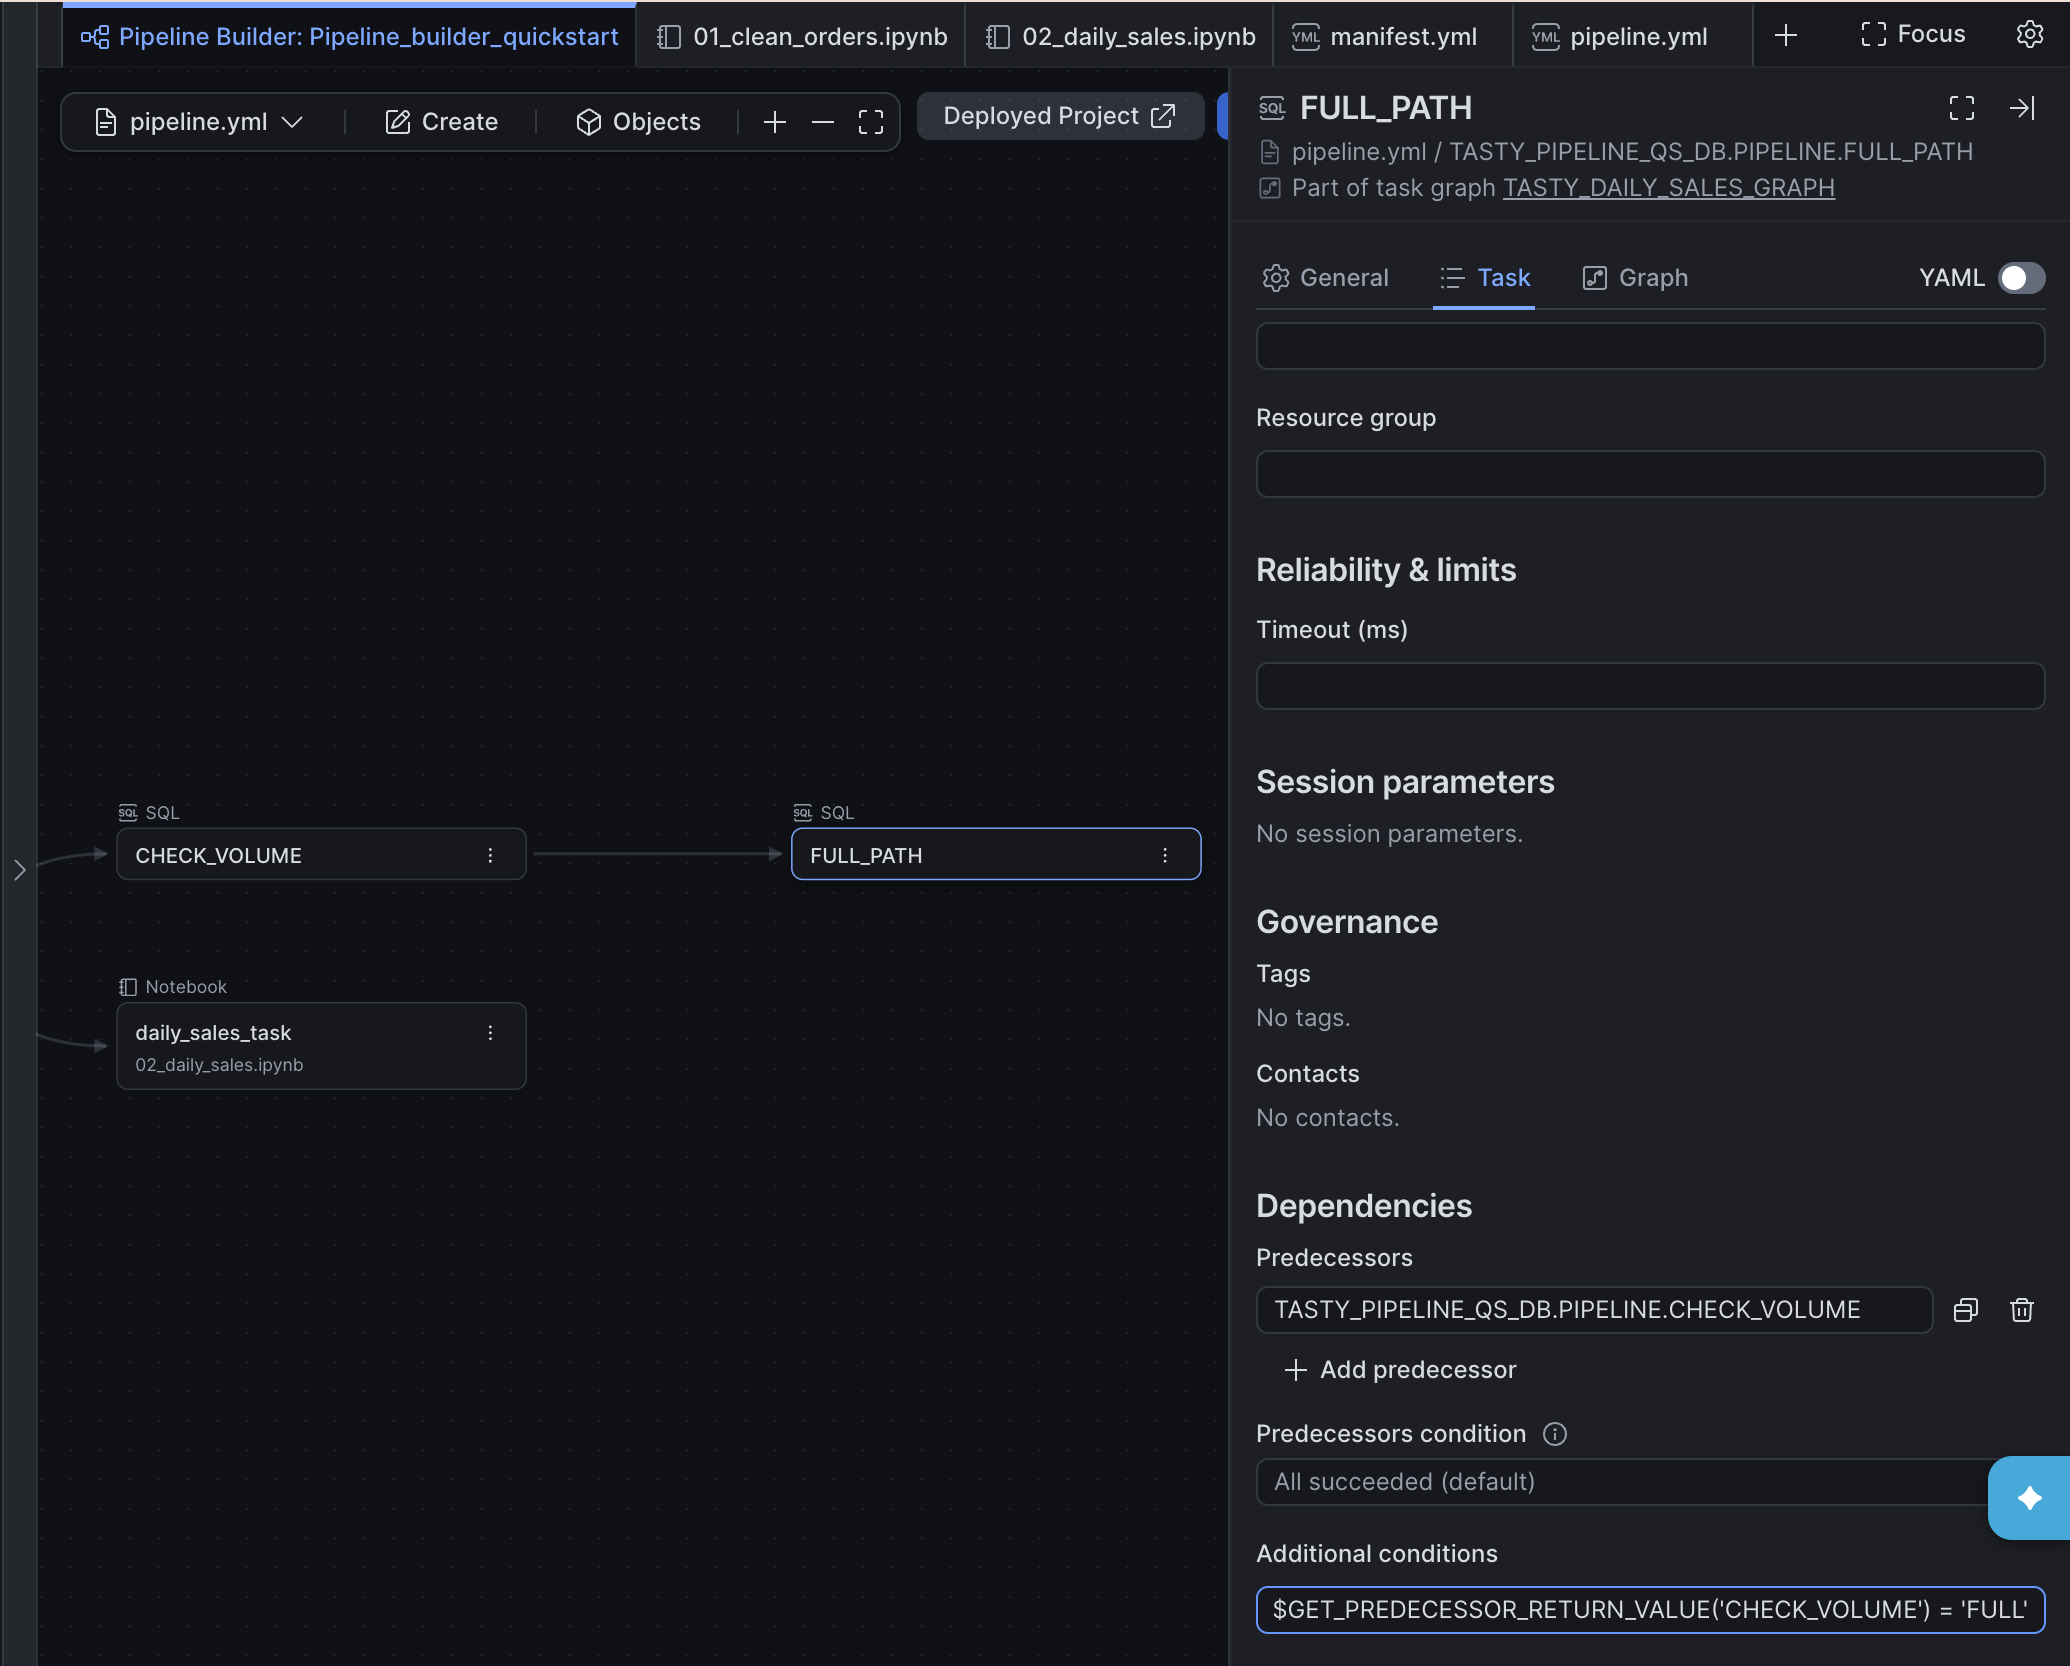
FULL_PATH stands in for a full reprocess. It logs FULL_PATH to RUN_LOG, and it runs only when CHECK_VOLUME returned FULL.
- Hover over the CHECK_VOLUME card and select + on its outgoing connector to add a SQL task.
- Set Name to
TASTY_PIPELINE_QS_DB.PIPELINE.FULL_PATH. - Under Execution, set Warehouse to
TASTY_PIPELINE_QS_WH. - In the Source editor, enter:
INSERT INTO TASTY_PIPELINE_QS_DB.ANALYTICS.RUN_LOG (source, message)
VALUES ('FULL_PATH', 'Full refresh branch ran');
- Select the Task tab. Under Dependencies > Additional conditions, enter:
SYSTEM$GET_PREDECESSOR_RETURN_VALUE('CHECK_VOLUME') = 'FULL'
Step 3: Create the incremental branch
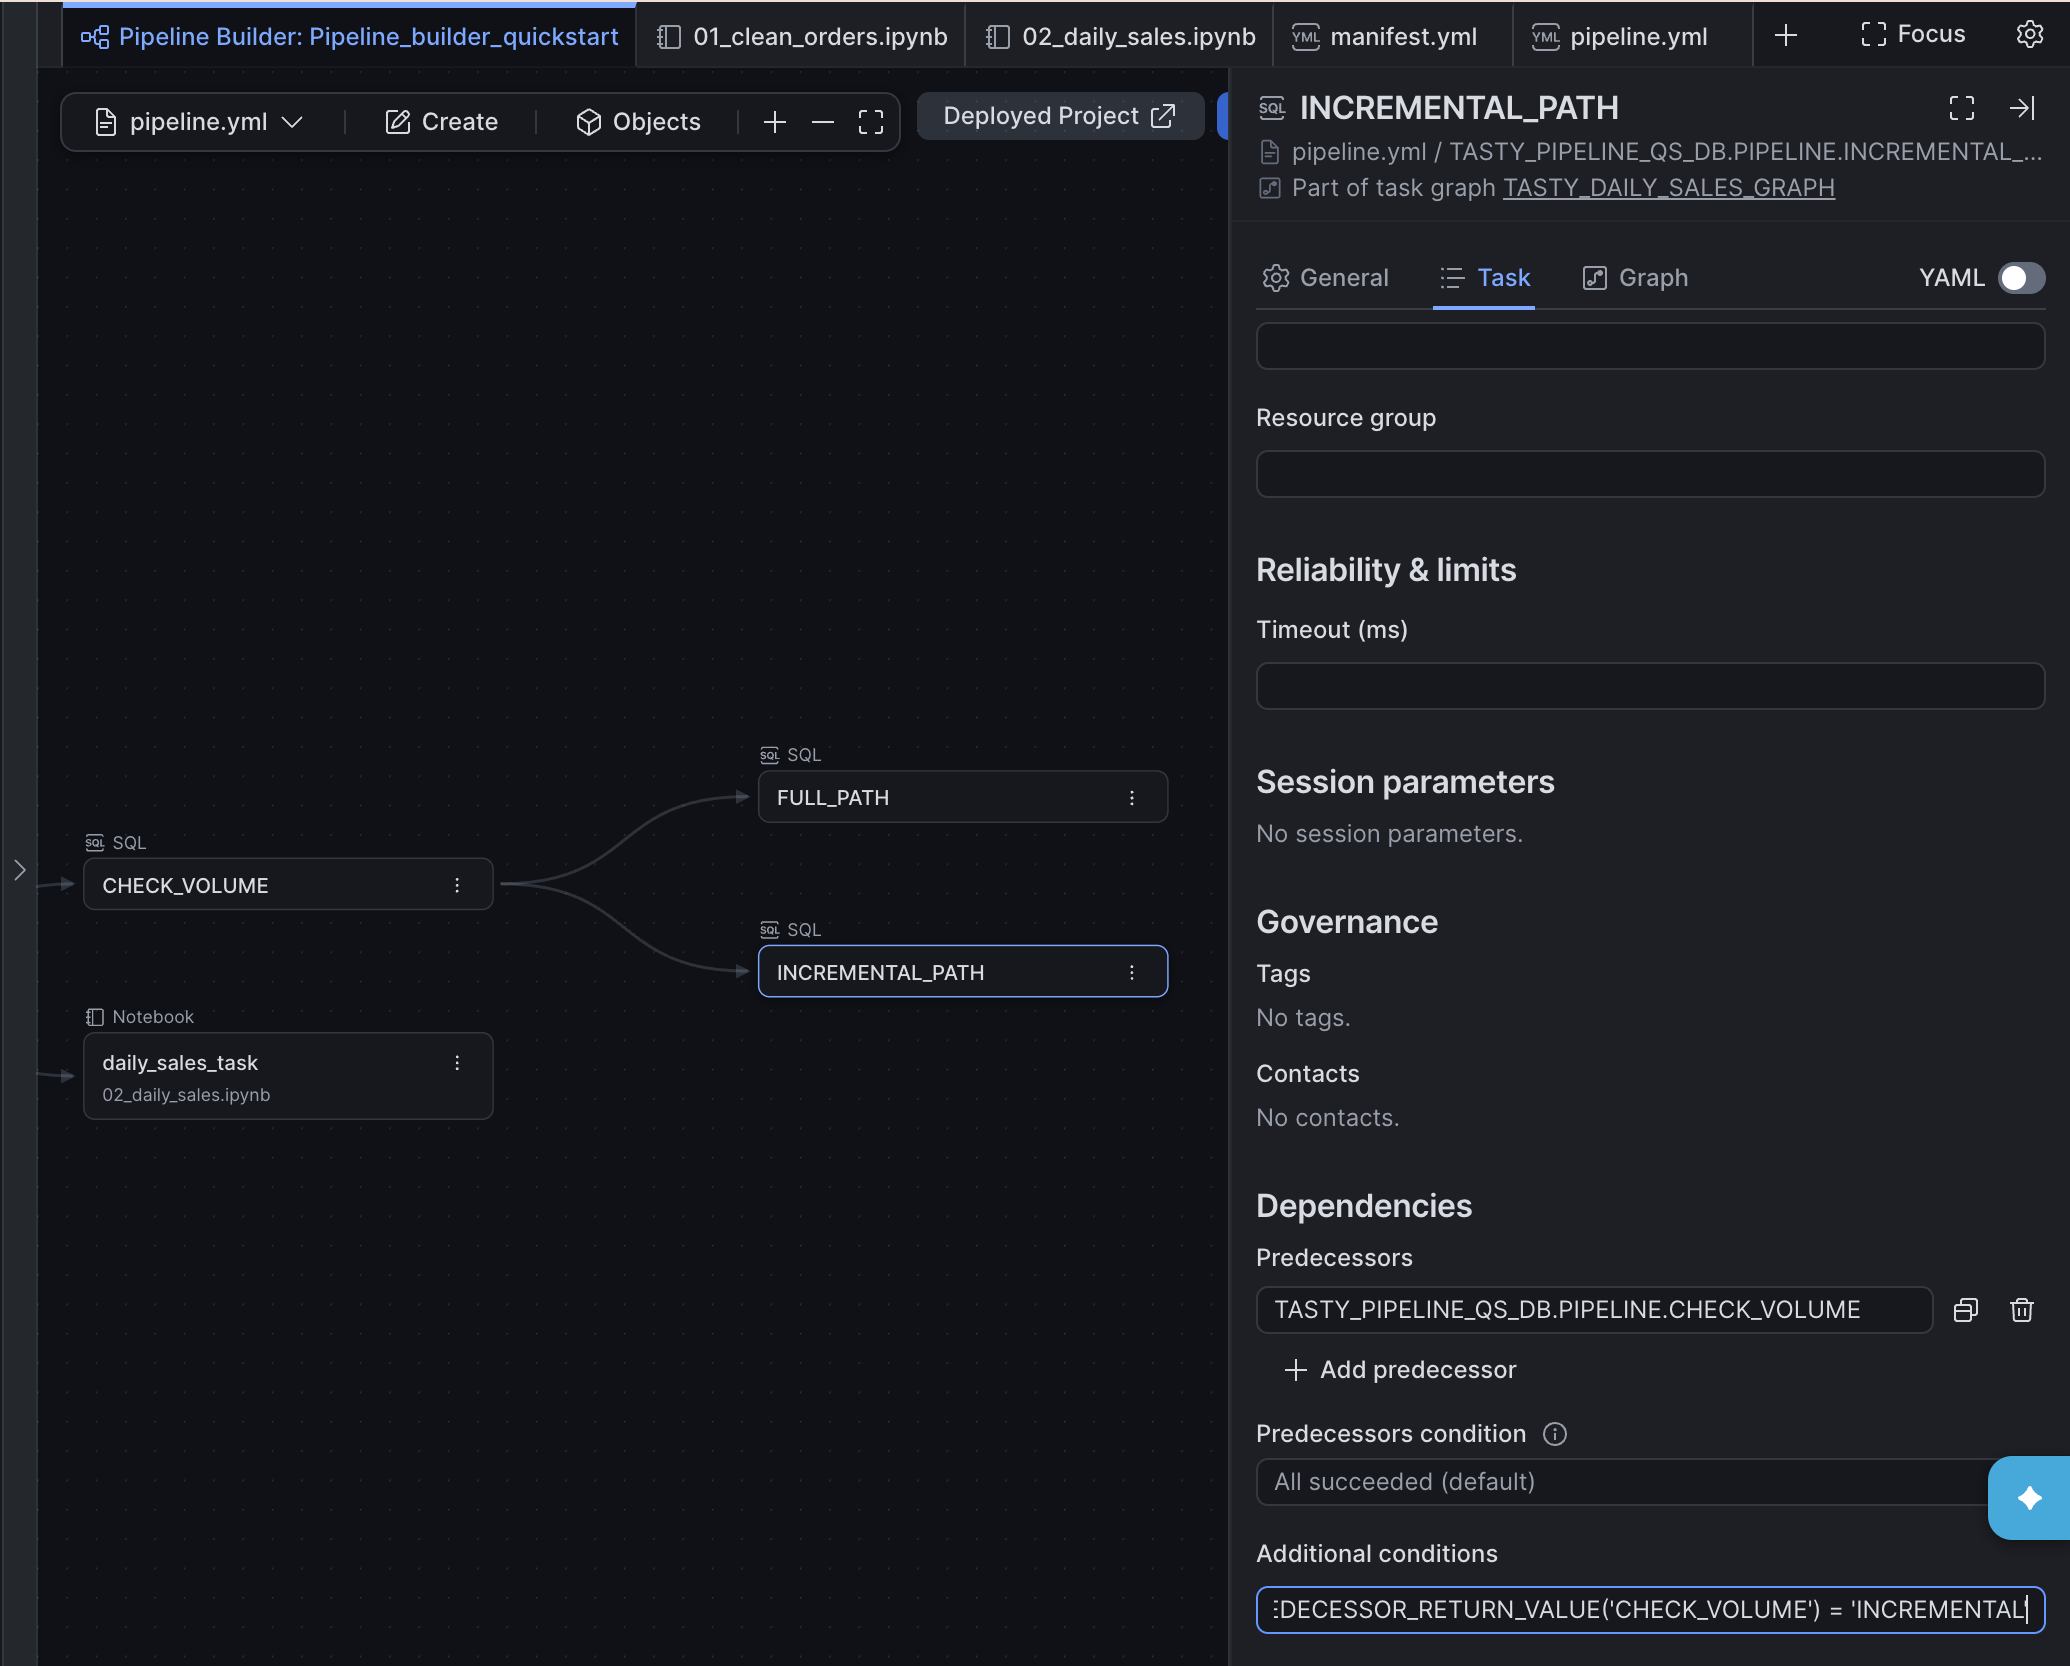
INCREMENTAL_PATH stands in for the lighter path. It logs INCREMENTAL_PATH to RUN_LOG, and it runs only when CHECK_VOLUME returned INCREMENTAL.
- Hover over the CHECK_VOLUME card and select + on its outgoing connector again to add a second SQL task.
- Set Name to
TASTY_PIPELINE_QS_DB.PIPELINE.INCREMENTAL_PATH. - Under Execution, set Warehouse to
TASTY_PIPELINE_QS_WH. - In the Source editor, enter:
INSERT INTO TASTY_PIPELINE_QS_DB.ANALYTICS.RUN_LOG (source, message)
VALUES ('INCREMENTAL_PATH', 'Incremental branch ran');
- Select the Task tab. Under Dependencies > Additional conditions, enter:
SYSTEM$GET_PREDECESSOR_RETURN_VALUE('CHECK_VOLUME') = 'INCREMENTAL'
Note:
SYSTEM$GET_PREDECESSOR_RETURN_VALUEtakes the name of a predecessor task without its database and schema, so the condition uses'CHECK_VOLUME'. The name is case-sensitive.
Step 4: Deploy and run
Deploy the pipeline, and then run the task graph.
When the run finishes, check which branch ran:
SELECT logged_at, source, message
FROM TASTY_PIPELINE_QS_DB.ANALYTICS.RUN_LOG
ORDER BY logged_at;
ORDERS_CLEAN has 5,000 rows, so you should see only FULL_PATH. INCREMENTAL_PATH doesn't write a row, because its condition isn't met.
A2: Handle Failures
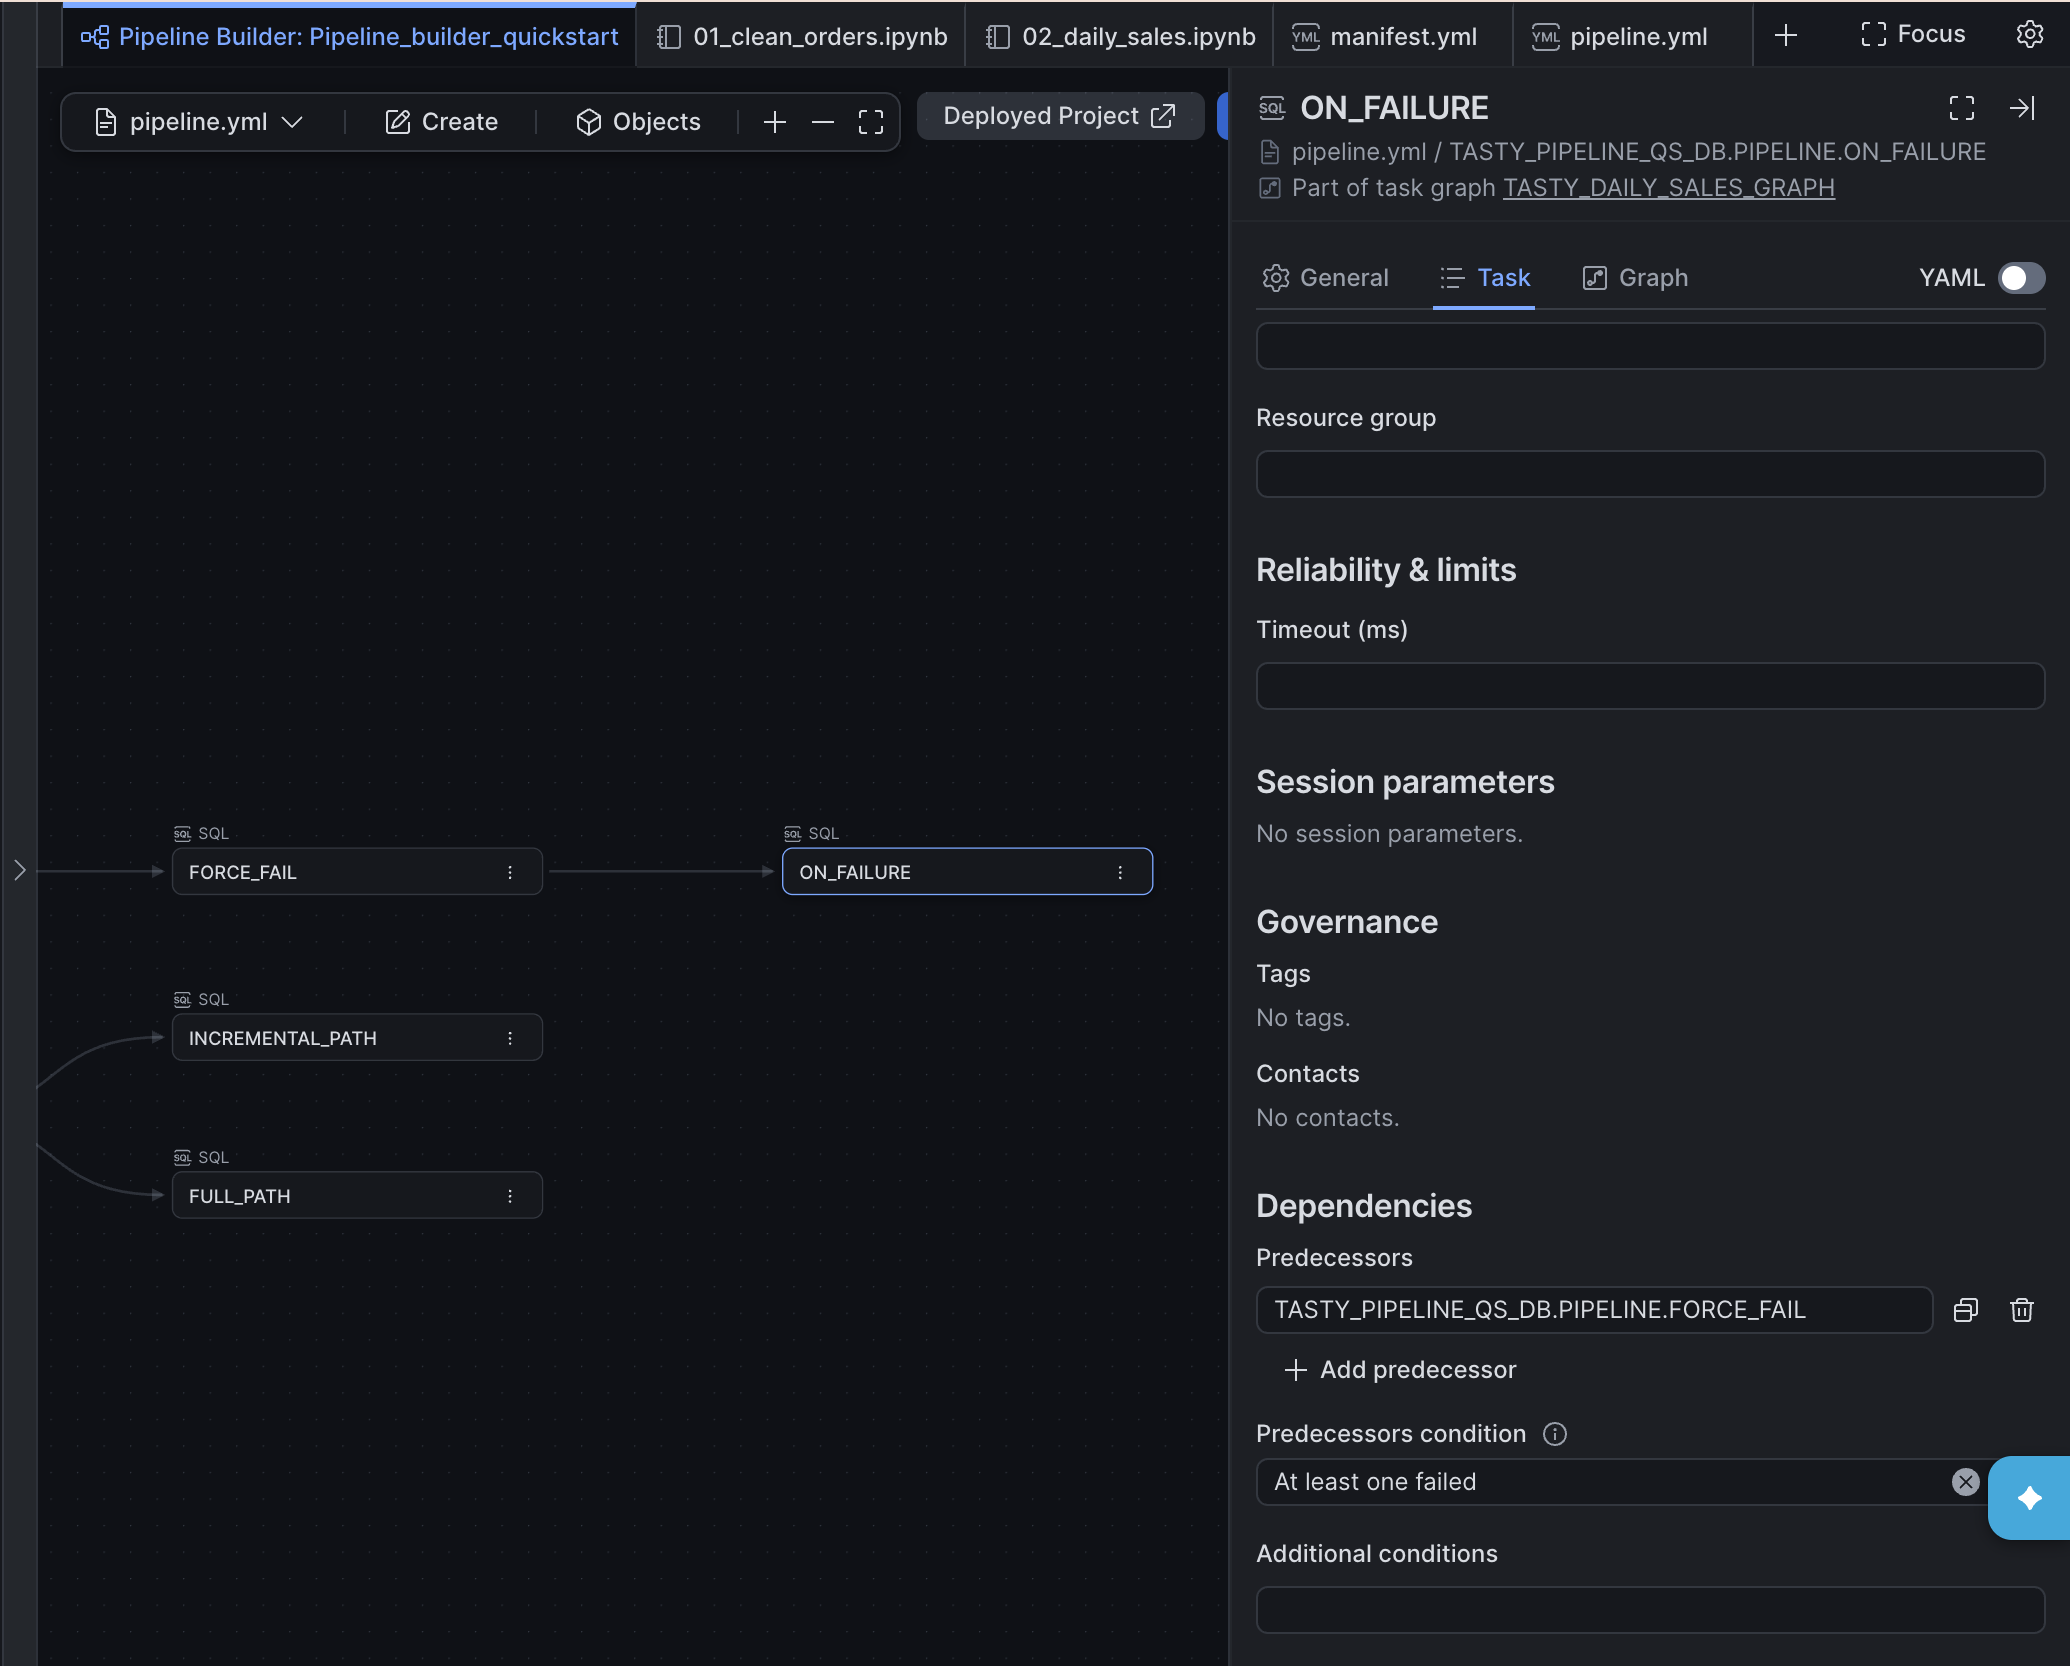
When a step fails, you want to know. A task with the At least one failed condition runs only when something upstream fails.
- Hover over the daily_sales_task card and select + on its outgoing connector to add a SQL task. Set Name to
TASTY_PIPELINE_QS_DB.PIPELINE.FORCE_FAIL, set Warehouse toTASTY_PIPELINE_QS_WHunder Execution, and enterSELECT 1/0;in the Source editor. This stands in for a step that breaks. - Hover over the FORCE_FAIL card and select + on its outgoing connector to add a SQL task. Set Name to
TASTY_PIPELINE_QS_DB.PIPELINE.ON_FAILURE, set Warehouse toTASTY_PIPELINE_QS_WHunder Execution, and in the Source editor, enter:
INSERT INTO TASTY_PIPELINE_QS_DB.ANALYTICS.RUN_LOG (source, message)
VALUES ('ON_FAILURE', 'A pipeline step failed');
- On the ON_FAILURE drawer, select the Task tab, and under Dependencies, set Predecessors condition to At least one failed.
- Deploy and run the graph.
FORCE_FAIL fails, and ON_FAILURE runs and writes to RUN_LOG. In production, the handler could call a stored procedure that sends an alert. When you're done, delete both cards and deploy.
A3: Add a Finalizer
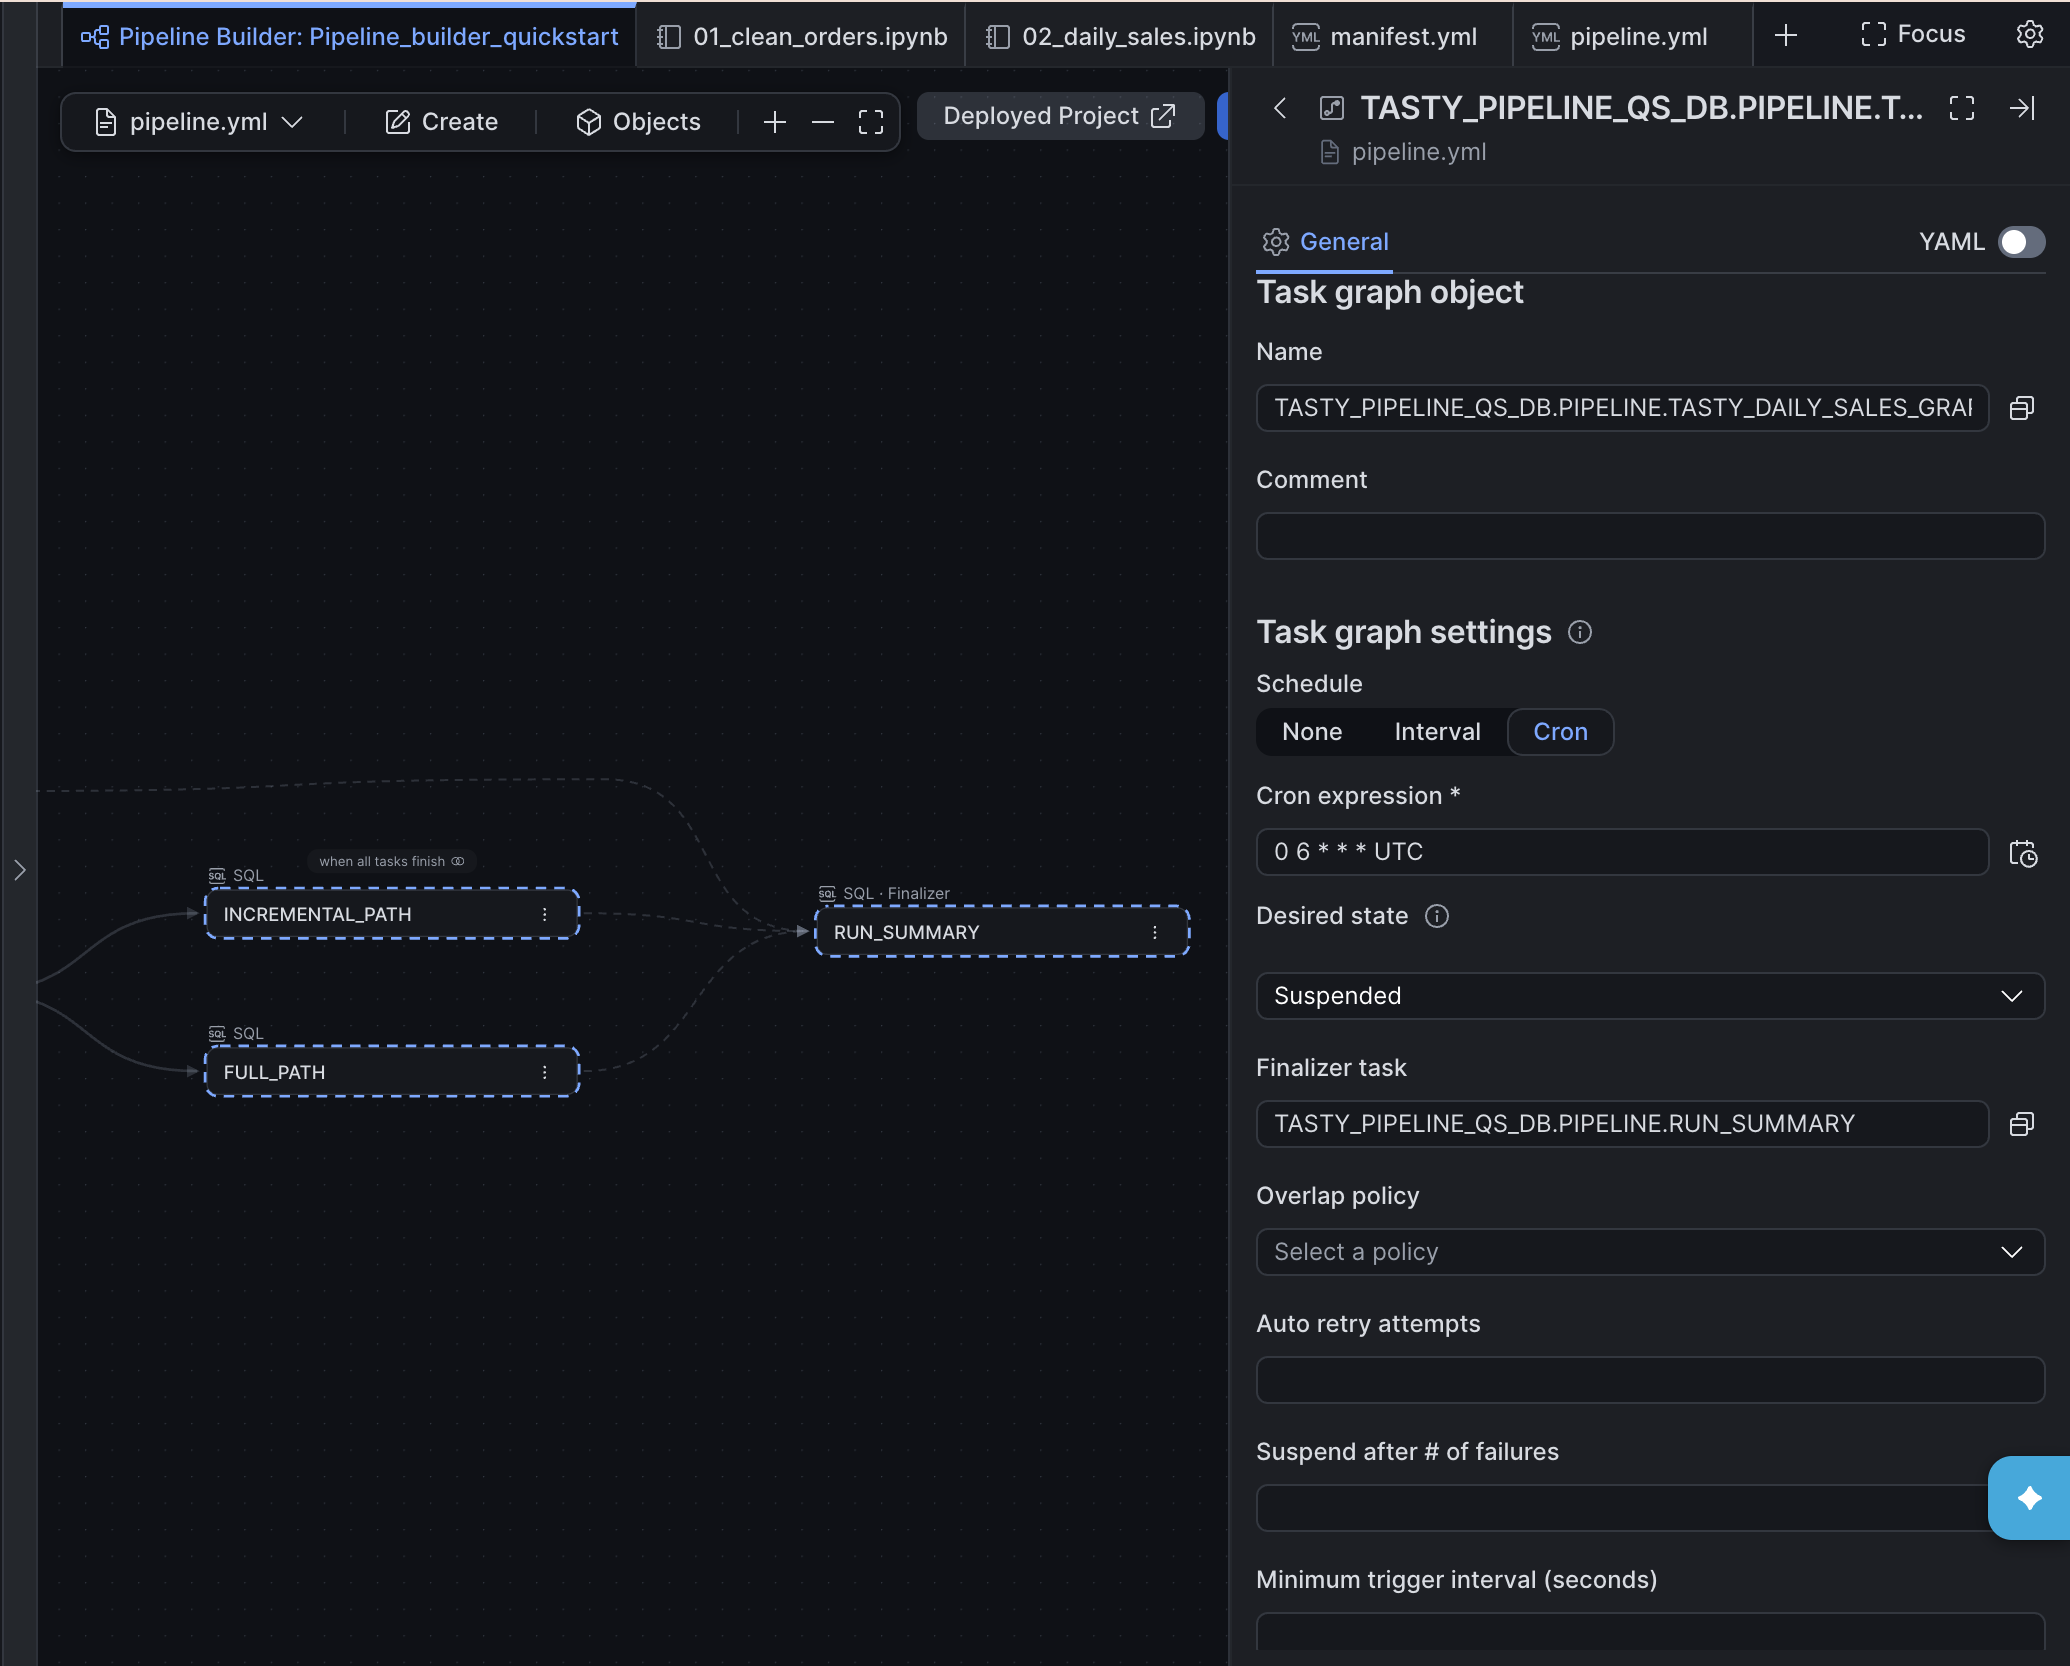
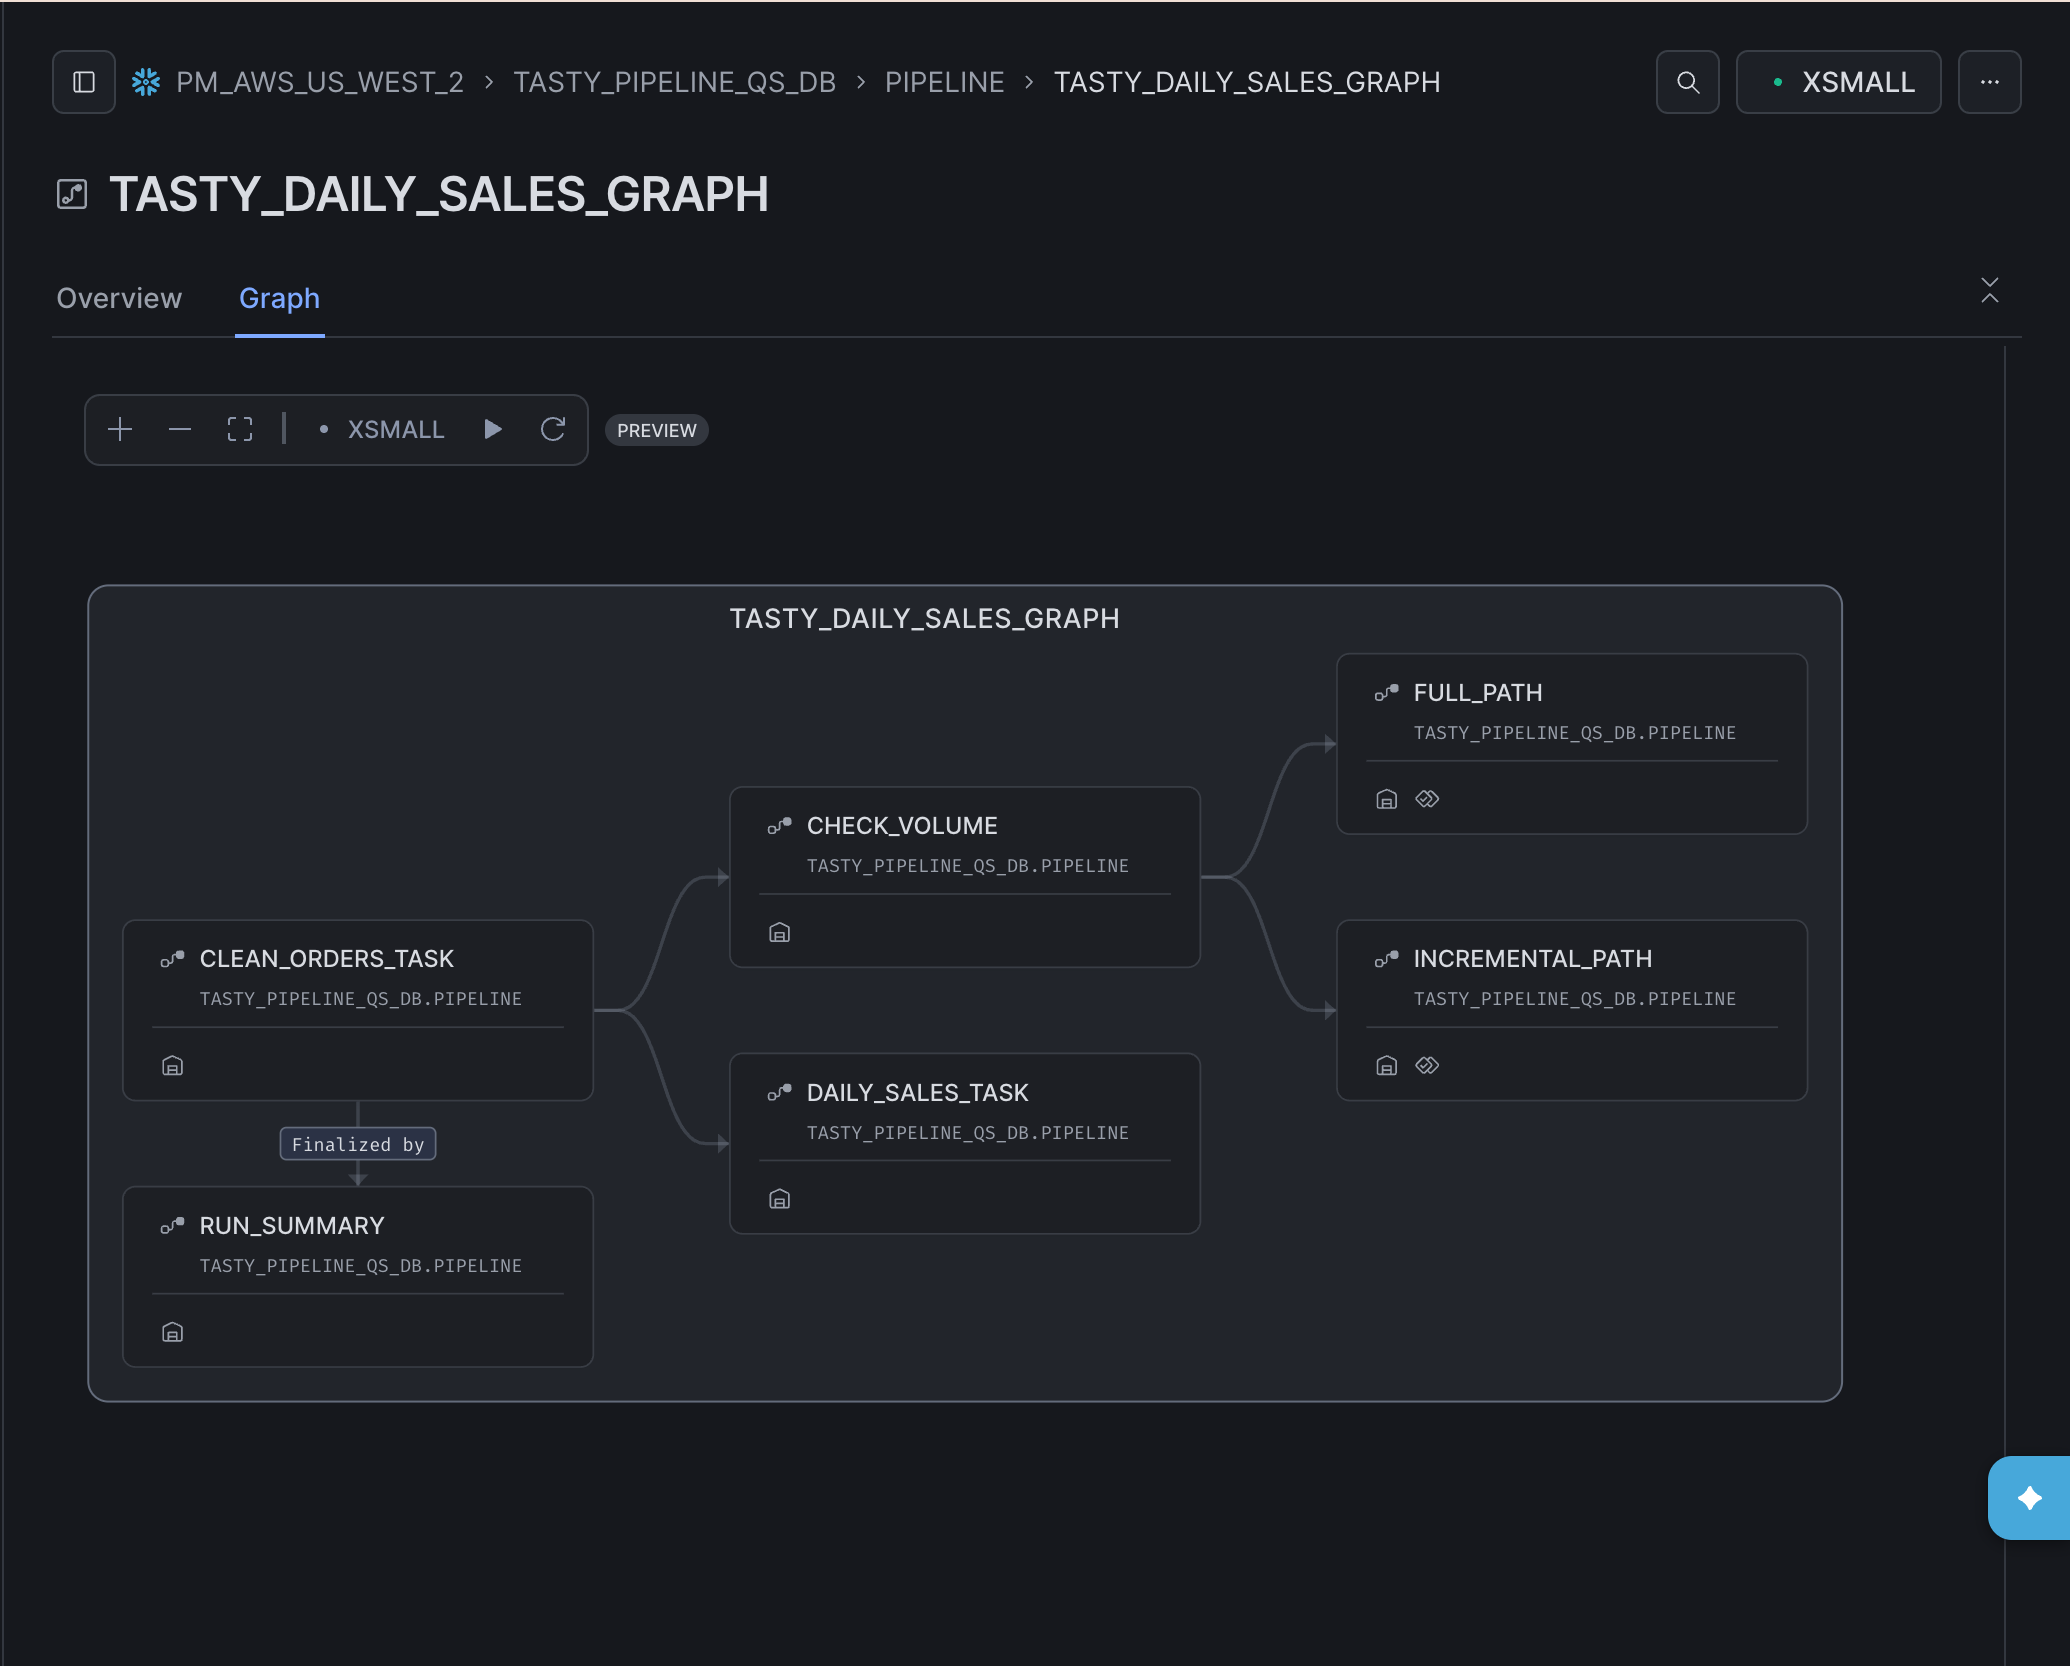
A finalizer task runs after all other tasks in the graph finish, whether they succeeded or failed. It's a good place for cleanup or a run summary. A finalizer can't also be a member of the graph, so you create it as a standalone task first and then attach it to the graph.
RUN_SUMMARY stands in for an end-of-run report. It writes one row to RUN_LOG with the number of daily sales rows the run produced.
- Select Create on the canvas toolbar, and then select SQL. Don't connect the new card to anything.
- Set Name to
TASTY_PIPELINE_QS_DB.PIPELINE.RUN_SUMMARY, and under Execution, set Warehouse toTASTY_PIPELINE_QS_WH. - In the Source editor, enter:
INSERT INTO TASTY_PIPELINE_QS_DB.ANALYTICS.RUN_LOG (source, message)
SELECT 'RUN_SUMMARY', COUNT(*) || ' daily sales rows'
FROM TASTY_PIPELINE_QS_DB.ANALYTICS.DAILY_TRUCK_SALES;
-
Open the task graph settings: select Objects on the canvas toolbar, select Task graphs, and then select TASTY_DAILY_SALES_GRAPH. You can also select any task in the graph, select its Graph tab, and then select Edit graph settings.
-
Under Task graph settings, for Finalizer task, select RUN_SUMMARY.
-
Deploy, and then run the task graph.
When the run finishes, check RUN_LOG:
SELECT logged_at, source, message
FROM TASTY_PIPELINE_QS_DB.ANALYTICS.RUN_LOG
ORDER BY logged_at;
The last row is from RUN_SUMMARY, written after every other task in the graph finished. On the graph's Graph tab in Snowsight, the finalizer appears with a Finalized by label.
Troubleshooting
Most problems in this Quickstart come from creating the pipeline with a role other than TASTY_PIPELINE_QS_ROLE. The pipeline's owner role is set when you create it, so switching your Snowsight role afterward doesn't change which role deploys.
| Error or symptom | Cause | Fix |
|---|---|---|
| Creating the pipeline fails with "ACCOUNTADMIN must have CREATE DCM PROJECT on SCHEMA TASTY_PIPELINE_QS_DB.PIPELINE." | Your Snowsight role was ACCOUNTADMIN when you created the pipeline | Switch your Snowsight role to TASTY_PIPELINE_QS_ROLE, and create the pipeline again |
Deployment fails on CREATE NOTEBOOK PROJECT or CREATE TASK, and the error names ACCOUNTADMIN | The pipeline's project_owner in manifest.yml is ACCOUNTADMIN | Change the target's owner to TASTY_PIPELINE_QS_ROLE: open the DCM project controls in the bottom pane, open the target menu, and select the pencil icon. Or delete the pipeline folder and create it again as the guide role. |
| Review planned changes shows an ALTER on ACCOUNTADMIN | Same as above | Same as above |
| Running the graph fails with "Cannot execute task, USAGE privilege on the task's schema and database must be granted to owner role." | The tasks are owned by a role, such as ACCOUNTADMIN, that has no usage on the guide database | Fix the owner role as above and redeploy, so the guide role owns the tasks |
| Creating the API integration in the Create API Integration dialog fails | Your Snowsight role can't create integrations | Switch your Snowsight role to ACCOUNTADMIN, or ask your admin to create the integration for you |
Clean Up
Let's remove everything this Quickstart created. cleanup.sql in the companion repo does it in order. Start with the DCM project, because it knows every object it manages.
- Open cleanup.sql. If you deployed the CoCo pipeline, uncomment its two lines.
- Run the first part as the guide role.
PURGEruns a deployment with no definitions, so it drops every task, task graph, and Code Bundle the project manages, and records the purge in the project's deployment history. Purge doesn't drop the project object itself, so the script drops it next. - Run the second part as ACCOUNTADMIN. It drops the database, compute pool, warehouse, Git API integration, and role. Dropping the database also removes the sample data and the tables your notebooks created, which the DCM project didn't manage.
Important: Purge before you drop. Dropping a DCM project without purging it first leaves its tasks and task graphs in your account as unmanaged objects.
Note: If your DCM project names differ, check them with
SHOW DCM PROJECTS IN SCHEMA TASTY_PIPELINE_QS_DB.PIPELINE;.
Finally, delete the workspace you created from the companion repo.
Conclusion And Resources
Tasty Bytes' daily sales table no longer depends on someone remembering to run two notebooks. You turned them into a scheduled task graph on a canvas, reviewed a plan before anything changed, and deployed it, without writing a CREATE TASK statement.
What You Learned
- Dragging notebooks onto the Pipeline Builder canvas creates tasks and the Code Bundles that package your code
- Connecting tasks creates a task graph that holds the schedule and the defaults its tasks share
- Every deployment is planned first, and the declarative model creates, alters, and drops objects to match your project
- How to run and monitor a task graph from Snowsight or with
EXECUTE TASK GRAPH - How to have CoCo draft a pipeline for you to review
- How to purge a DCM project to clean up everything it manages
Resources
- Companion repo
- Pipeline Builder
- Build and configure pipelines with Pipeline Builder
- Run tasks conditionally
- Deploy, run, and monitor pipelines
- Code Bundles
- DCM Projects for Tasks: build a similar task graph code-first with DCM definition files
- Getting Started with Task Graphs
This content is provided as is, and is not maintained on an ongoing basis. It may be out of date with current Snowflake instances
