DCM Projects for Dynamic Tables
Overview
In the Build Data Pipelines with Snowflake DCM Projects guide, you learned how to split infrastructure across multiple DCM Projects and build a medallion architecture with Dynamic Tables defined as code.
In this guide, you'll focus on dynamic table lifecycle management — making changes and enhancements to your pipeline while maintaining control over the backfill process.
Dynamic tables are the backbone of declarative data pipelines in Snowflake — you define the what, and Snowflake handles the when and how. But managing dynamic tables at scale introduces real challenges: How do you version-control their definitions? How do you promote changes across environments? And when you need to evolve a schema, how do you avoid an expensive full recomputation of historical data?
This guide answers all three questions by combining a few powerful Snowflake features:
- DCM Projects — Define your entire pipeline (databases, schemas, tables, dynamic tables, roles, grants) as code, then plan and deploy changes declaratively.
- Frozen regions — Tell Snowflake which rows in a dynamic table will never change, so that schema evolutions and dimension table updates only reprocess the active region.
- Cortex AI functions in dynamic tables — Call an LLM-powered function like
AI_CLASSIFYdirectly in a dynamic table's definition, so AI-derived columns refresh automatically as data flows through your pipeline.
You'll start by deploying a food truck analytics pipeline using DCM Projects, then evolve a dynamic table's schema by adding an AI-classified column — and see firsthand how frozen regions prevent a full rewrite of historical data and stop the AI function from re-running on rows that will never change.
Note: DCM Projects is currently in Public Preview. See the DCM Projects documentation for the latest details.
Prerequisites
- Basic knowledge of Snowflake concepts (databases, schemas, tables, roles)
- Familiarity with SQL and dynamic tables
What You'll Learn
- How DCM Projects define Snowflake infrastructure as code
- How to structure a DCM Project with a manifest and definition files
- How to use Jinja templating to parameterize definitions across environments
- How to plan (dry-run) and deploy changes using Snowsight Workspaces or Snowflake CLI
- Why
INITIALIZE = ON_SCHEDULEmatters for fast DCM deployments - How frozen regions work on dynamic tables
- How to evolve a dynamic table's schema without triggering a full recomputation
- How to call a Cortex AI function (
AI_CLASSIFY) inside a dynamic table — and why a frozen region keeps its cost down - How to use
METADATA$IS_FROZENto verify which rows were reprocessed
What You'll Need
- A Snowflake account with ACCOUNTADMIN access (or a role with sufficient privileges)
- Cortex AI functions available in your account's region (used for the
AI_CLASSIFYstep) - (Optional) Snowflake CLI v3.16.0+ if you prefer CLI over the Snowsight UI
What You'll Build
- A fully deployed food truck analytics pipeline — databases, schemas, tables, dynamic tables, views, roles, and grants — all defined as code
- An evolved dynamic table with an AI-classified column and a frozen region, deployed through a DCM plan-deploy cycle with only partial recomputation
Create a Workspace from Git
In this step, you'll create a Snowsight Workspace linked to the sample DCM Project repository on GitHub.
- Navigate to Projects > Workspaces in Snowsight.
- Click Create (+) and select Git repository.
- Enter the repository URL:
https://github.com/snowflake-labs/snowflake-dcm-projects - Select an API Integration for GitHub (create one if needed).
- Select Public repository.
Once the workspace is created, you'll see the repository files in the file explorer. Navigate to Quickstarts/dcm-projects-for-dynamic-tables to find two directories:
DCM_Projects_DT_Lifecycle/— The DCM Project itself (manifest, definitions, macros). This is what DCM reads during Plan & Deploy.scripts/— Numbered SQL files that you'll run in Snowsight worksheets at different stages of this guide. These live outside the DCM project directory so they don't interfere with it.
| File | When to Run |
|---|---|
scripts/01_pre_deploy.sql | Before the first DCM Plan & Deploy |
scripts/02_post_deploy.sql | After the first successful deployment |
scripts/03_verify_evolution.sql | After the second deployment (with frozen region + AI column) |
scripts/04_cleanup.sql | When you're done and want to tear everything down |
Open scripts/01_pre_deploy.sql in a Snowsight worksheet — you'll use it in the next step.
Set Up Roles and Permissions
Before deploying the pipeline, you need to create a dedicated role for managing DCM Projects and a DCM Project object.
Open scripts/01_pre_deploy.sql in a Snowsight worksheet and run each section in order. This script lives outside the DCM project directory, so it won't be picked up by Plan or Deploy. The script does the following:
1. Create a DCM Developer Role
USE ROLE ACCOUNTADMIN;

CREATE ROLE IF NOT EXISTS dcm_developer;
SET user_name = (SELECT CURRENT_USER());
GRANT ROLE dcm_developer TO USER IDENTIFIER($user_name);
2. Grant Infrastructure Privileges
The DCM_DEVELOPER role needs privileges to create infrastructure objects through DCM deployments:
GRANT CREATE WAREHOUSE ON ACCOUNT TO ROLE dcm_developer;
GRANT CREATE ROLE ON ACCOUNT TO ROLE dcm_developer;
GRANT CREATE DATABASE ON ACCOUNT TO ROLE dcm_developer;
GRANT EXECUTE MANAGED TASK ON ACCOUNT TO ROLE dcm_developer;
GRANT EXECUTE TASK ON ACCOUNT TO ROLE dcm_developer;

GRANT MANAGE GRANTS ON ACCOUNT TO ROLE dcm_developer;
3. Grant Data Quality Privileges
To define and test data quality expectations, grant the following:
GRANT APPLICATION ROLE SNOWFLAKE.DATA_QUALITY_MONITORING_VIEWER TO ROLE dcm_developer;
GRANT APPLICATION ROLE SNOWFLAKE.DATA_QUALITY_MONITORING_ADMIN TO ROLE dcm_developer;
GRANT DATABASE ROLE SNOWFLAKE.DATA_METRIC_USER TO ROLE dcm_developer;
GRANT EXECUTE DATA METRIC FUNCTION ON ACCOUNT TO ROLE dcm_developer;
4. Create the DCM Project Object
USE ROLE dcm_developer;

CREATE DATABASE IF NOT EXISTS dcm_demo;
CREATE SCHEMA IF NOT EXISTS dcm_demo.projects;

CREATE OR REPLACE DCM PROJECT dcm_demo.projects.dcm_dt_project_dev
    COMMENT = 'for testing DCM Projects with Dynamic Tables';
The DCM Project object dcm_dt_project_dev is now created in dcm_demo.projects. This is the object referenced in the manifest's DCM_DEV target.
Note: After running this script, refresh your browser so Snowsight picks up the newly created DCM Project object. It won't appear in the Workspaces project selector until you do.
CLI Alternative: You can also create the DCM Project object from the command line using Snowflake CLI:
snow dcm create --target DCM_DEV
Explore the Project Files
Now that the infrastructure is in place, take a moment to explore the DCM Project structure before deploying. Navigate into the DCM_Projects_DT_Lifecycle/ directory — this is the actual DCM Project that the Plan & Deploy operations read. A DCM Project consists of a manifest file and one or more definition files organized in a sources/ directory.
Manifest
Open DCM_Projects_DT_Lifecycle/manifest.yml in the file explorer. The manifest is the configuration file for your DCM Project. It defines:
- Targets — Named deployment environments (e.g., DEV, STAGE, PROD), each pointing to a specific Snowflake account and DCM Project object
- Templating configurations — Variable values that change per environment (e.g., database suffixes, warehouse sizes, team lists)
Here's the manifest for this project:
manifest_version: 2
type: DCM_PROJECT

default_target: DCM_DEV

targets:
  DCM_DEV:
    account_identifier: MYORG-MY_DEV_ACCOUNT        # update to your account identifier
    project_name: DCM_DEMO.PROJECTS.DCM_DT_PROJECT_DEV
    project_owner: DCM_DEVELOPER
    templating_config: DEV

  DCM_STAGE:
    account_identifier: MYORG-MY_STAGE_ACCOUNT
    project_name: DCM_DEMO.PROJECTS.DCM_PROJECT_STG
    project_owner: DCM_STAGE_DEPLOYER
    templating_config: STAGE

  DCM_PROD_US:
    account_identifier: MYORG-MY_ACCOUNT_US
    project_name: DCM_DEMO.PROJECTS.DCM_PROJECT_PROD
    project_owner: DCM_PROD_DEPLOYER
    templating_config: PROD

  DCM_PROD_EU:
    account_identifier: MYORG-MY_ACCOUNT_EU
    project_name: DCM_DEMO.PROJECTS.DCM_PROJECT_PROD
    project_owner: DCM_PROD_DEPLOYER
    templating_config: PROD

templating:
  defaults:
    user: "GITHUB_ACTIONS_SERVICE_USER"
    wh_size: "X-SMALL"

  configurations:
    DEV:
      env_suffix: "_DEV"
      user: "INSERT_YOUR_USER"                          # update to your username
      project_owner_role: "DCM_DEVELOPER"
      teams:
        - name: "DT_TEAM_1"
          data_retention_days: 1
          needs_sandbox_schema: true

    STAGE:
      env_suffix: "_STG"
      project_owner_role: "DCM_STAGE_DEPLOYER"
      teams:
        - name: "STAGE_TEAM_1"
          data_retention_days: 1
          needs_sandbox_schema: true

    PROD:
      env_suffix: ""
      wh_size: "LARGE"
      project_owner_role: "DCM_PROD_DEPLOYER"
      teams:
        - name: "Marketing"
          data_retention_days: 1
          needs_sandbox_schema: true
        - name: "Finance"
          data_retention_days: 30
          needs_sandbox_schema: false
        - name: "HR"
          data_retention_days: 7
          needs_sandbox_schema: false
        - name: "IT"
          data_retention_days: 14
          needs_sandbox_schema: true
        - name: "Sales"
          data_retention_days: 1
          needs_sandbox_schema: false
        - name: "Research"
          data_retention_days: 7
          needs_sandbox_schema: true
Notice how the DEV configuration uses env_suffix: "_DEV" while PROD uses env_suffix: "". This allows the same definition files to create DCM_DEMO_3_DEV in development and DCM_DEMO_3 in production. The teams list is also different per environment — DEV has a single team, while PROD has six.
Definition Files
The sources/definitions/ directory contains SQL files that define your Snowflake infrastructure. Each file uses DEFINE statements and Jinja templating variables (like {{env_suffix}}):
| File | What It Defines |
|---|---|
raw.sql | Database, schemas, and raw landing tables (TRUCK, MENU, CUSTOMER, etc.) |
access.sql | Warehouse, database roles, account roles, and grants |
analytics.sql | Dynamic tables for transformations and a UDF for profit margin calculation |
serve.sql | Views for dashboards and reporting |
ingest.sql | A stage and a Task for loading data from CSV files |
expectations.sql | Data quality expectations using Data Metric Functions |
jinja_demo.sql | Examples of Jinja loops, conditionals, and macros |
For example, here's how raw.sql defines the database and a table:
DEFINE DATABASE DCM_DEMO_3{{env_suffix}}
    COMMENT = 'This is a Quickstart Demo for DCM Projects';

DEFINE SCHEMA DCM_DEMO_3{{env_suffix}}.RAW;

DEFINE TABLE DCM_DEMO_3{{env_suffix}}.RAW.MENU (
    MENU_ITEM_ID NUMBER,
    MENU_ITEM_NAME VARCHAR,
    ITEM_CATEGORY VARCHAR,
    COST_OF_GOODS_USD NUMBER(10, 2),
    SALE_PRICE_USD NUMBER(10, 2)
)
CHANGE_TRACKING = TRUE;
The {{env_suffix}} variable is replaced at deployment time based on the target configuration — _DEV for development, empty string for production.
And here's how analytics.sql defines a dynamic table that joins across several raw tables to create enriched order details:
DEFINE DYNAMIC TABLE DCM_DEMO_3{{env_suffix}}.ANALYTICS.ENRICHED_ORDER_DETAILS
WAREHOUSE = DCM_DEMO_3_WH{{env_suffix}}
TARGET_LAG = 'DOWNSTREAM'
INITIALIZE = 'ON_SCHEDULE'
DATA_METRIC_SCHEDULE = 'TRIGGER_ON_CHANGES'
AS
SELECT
    oh.ORDER_ID,
    oh.ORDER_TS,
    od.QUANTITY,
    m.MENU_ITEM_NAME,
    m.ITEM_CATEGORY,
    m.SALE_PRICE_USD,
    m.COST_OF_GOODS_USD,
    (od.QUANTITY * m.SALE_PRICE_USD) AS LINE_ITEM_REVENUE,
    (od.QUANTITY * (m.SALE_PRICE_USD - m.COST_OF_GOODS_USD)) AS LINE_ITEM_PROFIT,
    c.CUSTOMER_ID,
    c.FIRST_NAME,
    c.LAST_NAME,
    INITCAP(c.CITY) AS CUSTOMER_CITY,
    t.TRUCK_ID,
    t.TRUCK_BRAND_NAME
FROM DCM_DEMO_3{{env_suffix}}.RAW.ORDER_HEADER oh
JOIN DCM_DEMO_3{{env_suffix}}.RAW.ORDER_DETAIL od ON oh.ORDER_ID = od.ORDER_ID
JOIN DCM_DEMO_3{{env_suffix}}.RAW.MENU m ON od.MENU_ITEM_ID = m.MENU_ITEM_ID
JOIN DCM_DEMO_3{{env_suffix}}.RAW.CUSTOMER c ON oh.CUSTOMER_ID = c.CUSTOMER_ID
JOIN DCM_DEMO_3{{env_suffix}}.RAW.TRUCK t ON oh.TRUCK_ID = t.TRUCK_ID;
Why
INITIALIZE = ON_SCHEDULE? By default, dynamic tables useINITIALIZE = ON_CREATE, which runs a full synchronous refresh during theCREATEstatement. When a project creates many tables at once, those synchronous refreshes can make deployments slow.INITIALIZE = ON_SCHEDULEskips the refresh at creation time and lets DCM finish the deployment quickly — each dynamic table populates itself in the background on its normal schedule. This is the recommended pattern for DCM deployments where speed and predictability matter most.
Macros
The sources/macros/ directory contains reusable Jinja macros. Open grants_macro.sql to see a macro that creates a standard set of roles for each team:
{% macro create_team_roles(team) %}

    DEFINE ROLE {{team}}_OWNER{{env_suffix}};
    DEFINE ROLE {{team}}_DEVELOPER{{env_suffix}};
    DEFINE ROLE {{team}}_USAGE{{env_suffix}};

    GRANT USAGE ON DATABASE DCM_DEMO_3{{env_suffix}}
        TO ROLE {{team}}_USAGE{{env_suffix}};
    GRANT OWNERSHIP ON SCHEMA DCM_DEMO_3{{env_suffix}}.{{team}}
        TO ROLE {{team}}_OWNER{{env_suffix}};

    GRANT CREATE DYNAMIC TABLE, CREATE TABLE, CREATE VIEW
        ON SCHEMA DCM_DEMO_3{{env_suffix}}.{{team}}
        TO ROLE {{team}}_DEVELOPER{{env_suffix}};

    GRANT ROLE {{team}}_USAGE{{env_suffix}} TO ROLE {{team}}_DEVELOPER{{env_suffix}};
    GRANT ROLE {{team}}_DEVELOPER{{env_suffix}} TO ROLE {{team}}_OWNER{{env_suffix}};
    GRANT ROLE {{team}}_OWNER{{env_suffix}} TO ROLE {{project_owner_role}};

{% endmacro %}
This macro is called in jinja_demo.sql inside a {% for %} loop that iterates over the teams list from the manifest configuration. For each team, it creates a schema, a set of roles, a products table, and optionally a sandbox schema — all driven by the manifest's templating values.
Plan and Deploy the Initial Pipeline
Before deploying changes, always run a Plan first. A Plan is a dry-run that shows you exactly what changes DCM will make without actually executing them.
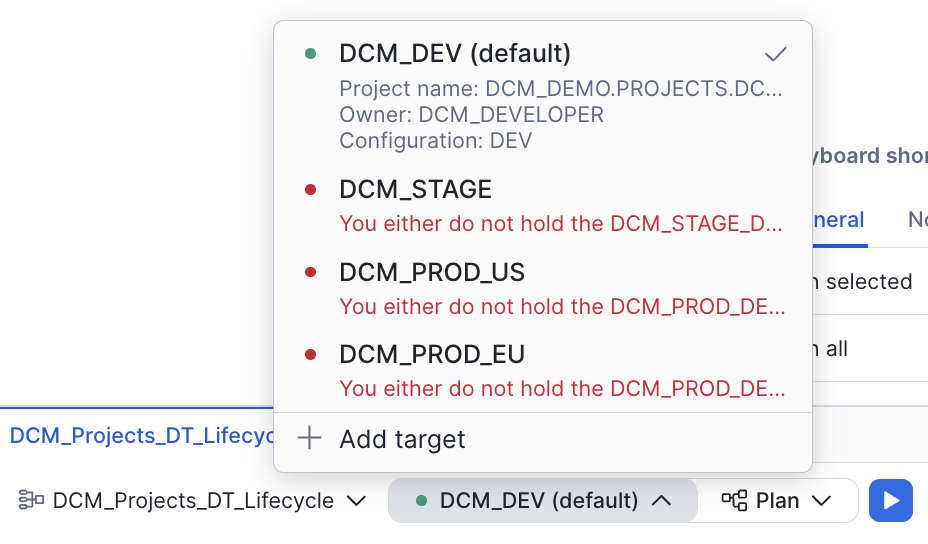
Select the Project
- You should see the DCM control panel in the first tab in the bottom panel. Select the project DCM_Projects_DT_Lifecycle.
- The
DCM_DEVtarget should already be selected (it's the default in the manifest). - Click on the target profile to verify it uses
DCM_DT_PROJECT_DEVand theDEVtemplating configuration.
Important: Before running a Plan, update
account_identifieranduserunder theDCM_DEVtarget inmanifest.ymlto match your Snowflake account. The last query inscripts/01_pre_deploy.sql(step 6) returns both values — copy them from that output.
CLI Alternative: From the command line, plan with:
snow dcm plan --target DCM_DEV -D "user='YOUR_USERNAME'"
Execute the Plan
Click the play button to the right of Plan and wait for the definitions to render, compile, and dry-run.
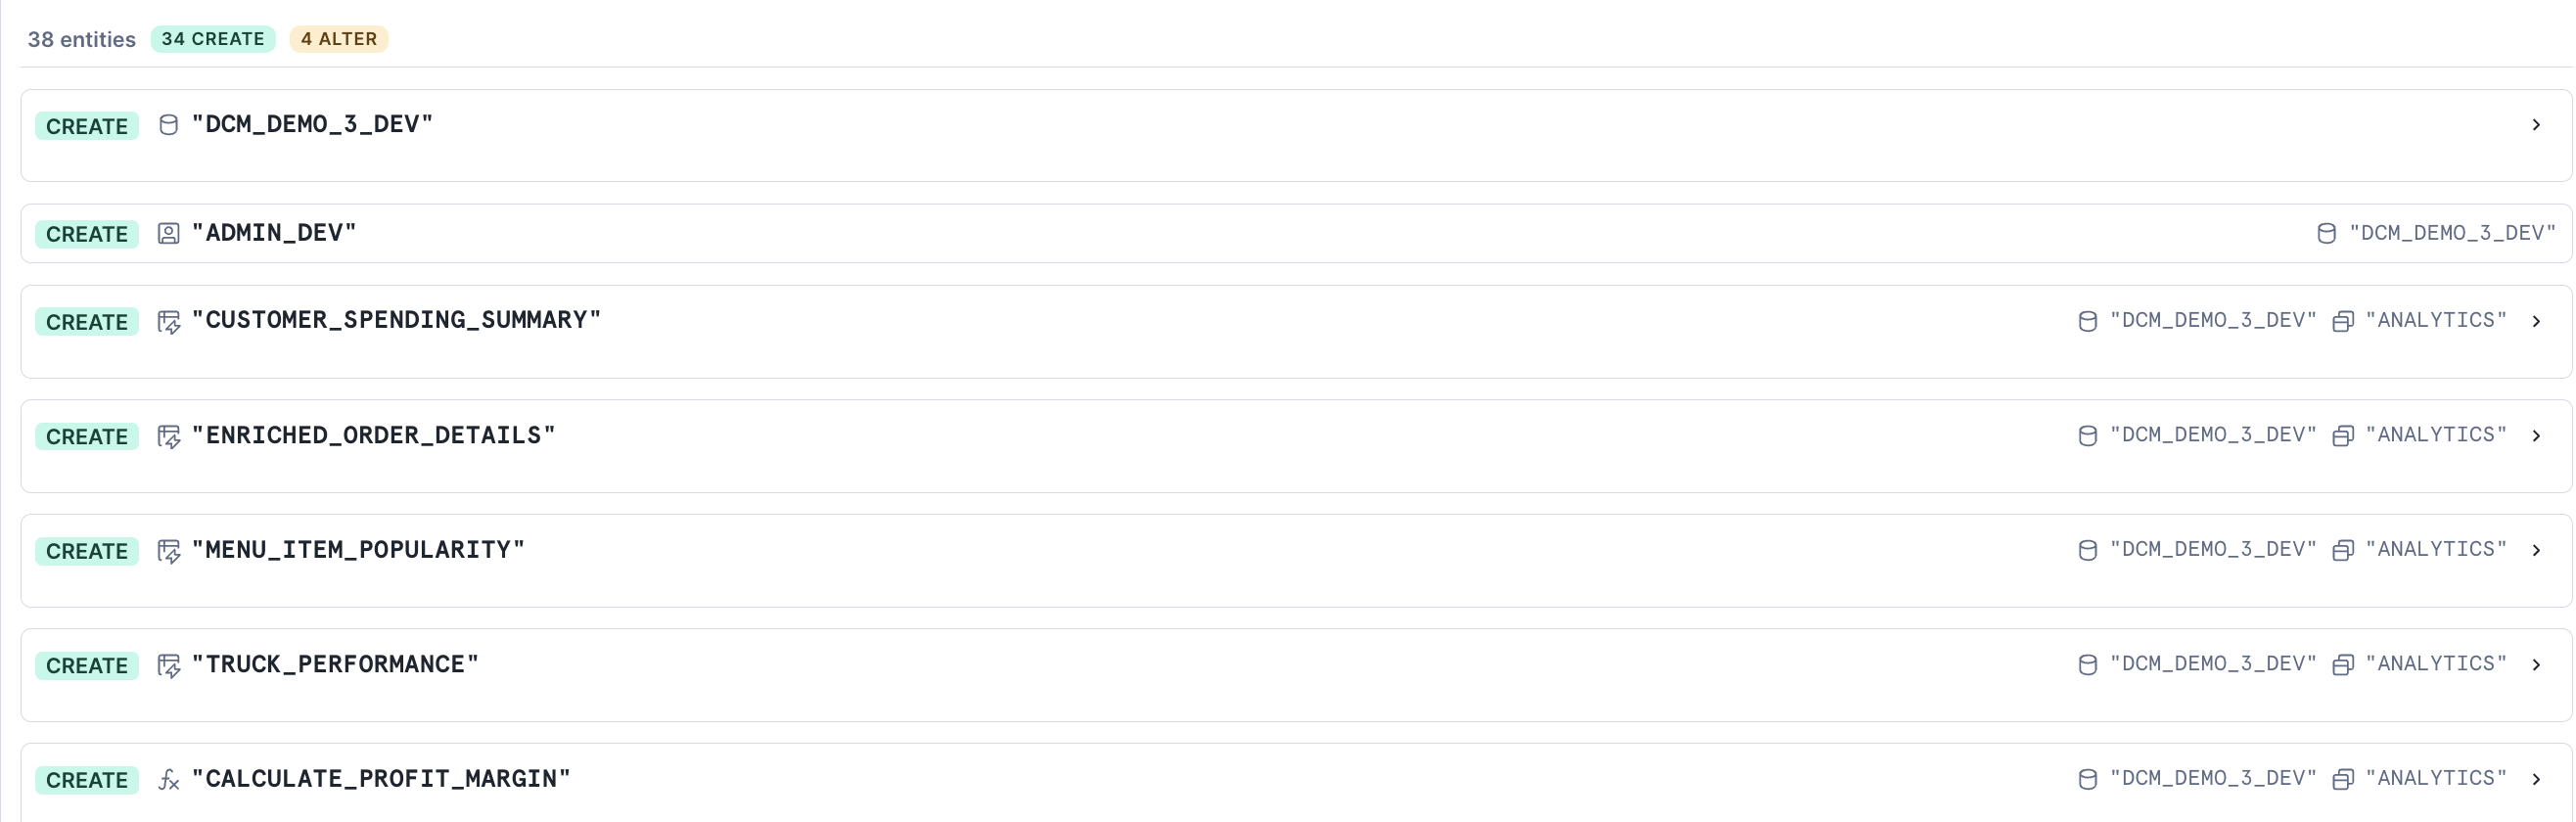
Since none of the defined objects exist yet, the plan will show only CREATE statements. You should see planned operations for:
- 1 database (
DCM_DEMO_3_DEV) - Multiple schemas (
RAW,ANALYTICS,SERVE, plus team schemas from the Jinja demo) - Tables with change tracking enabled
- Dynamic tables with various target lags
- Views and secure views
- A warehouse, roles, and grants
- A stage and a task for data ingestion
- Data quality expectations (Data Metric Functions attached to columns)
Review the Plan Output
In the file explorer, notice that a new out folder was created above sources. This contains the rendered Jinja output for all definition files.
Open the jinja_demo.sql file from the plan output side-by-side with the original jinja_demo.sql in sources/definitions/ to see how the Jinja templating was resolved — loops expanded, conditionals evaluated, and variables replaced with their DEV configuration values.
Deploy
If the plan result looks correct and all planned changes match your expectations, deploy:
- Instead of Plan, set the operation to Deploy.
- Optionally, add a Deployment alias (e.g., "Initial pipeline deployment") — think of it as a commit message that appears in the deployment history of your project.
- DCM will create all objects and attach grants and expectations using the owner role of the project object.
CLI Alternative: From the command line, deploy with:
snow dcm deploy --target DCM_DEV --alias "Initial pipeline deployment"
Once the deployment completes successfully, refresh the Database Explorer on the left side of Snowsight. You should see the DCM_DEMO_3_DEV database and all of the created objects inside it.
Insert Sample Data
The deployment created the table structures, but they're empty. Now you'll insert sample data to populate the raw tables and bring the dynamic tables and views to life.
Open scripts/02_post_deploy.sql in a Snowsight worksheet and run each section in order.
1. Insert Sample Data
The script inserts data into the raw tables: trucks, menu items, customers, inventory, order headers, and order details. Run all the INSERT statements.
Note: Orders 1024 and 1025 are inserted with
CURRENT_TIMESTAMP()instead of a fixed date. This matters later — when you add a frozen region, these recent rows will fall in the active region and get the new AI-classified column, while older rows stay frozen (and skip the AI call entirely).
2. Refresh Dynamic Tables
Because all dynamic tables use INITIALIZE = ON_SCHEDULE, they were created without data. Use EXECUTE DCM PROJECT ... REFRESH ALL to kick off the first refresh of every DT the project manages in one statement:
EXECUTE DCM PROJECT DCM_DEMO.PROJECTS.DCM_DT_PROJECT_DEV REFRESH ALL;
DCM triggers refreshes in dependency order — upstream tables refresh before downstream ones.
3. Verify
Run the final query in the script to see the enriched order details:
SELECT * FROM dcm_demo_3_dev.analytics.enriched_order_details;
You should see rows with columns like order_id, order_ts, quantity, menu_item_name, line_item_revenue, line_item_profit, customer_city, and truck_brand_name. Take note of this schema — in the next step, you'll evolve it.
Evolve the Dynamic Table with a Frozen Region and AI
This is where the guide diverges from the basics. You have a running pipeline — but now the analytics team wants every order tagged with a diet classification (Healthy or Indulgent) so they can analyze ordering trends. Rather than maintain a lookup table by hand, you'll let a Cortex AI function classify each menu item directly inside the dynamic table.
There's a catch: AI inference isn't free. Running an LLM over every historical order on every refresh would be slow and expensive. You only want to classify rows that are still changing — not years of frozen history. This is exactly what a frozen region is for.
Understanding Frozen Regions
The FROZEN WHERE clause on a dynamic table declares a condition under which rows are considered frozen. Snowflake skips these rows during refreshes, which means:
- Schema changes only recompute the active region — Snowflake preserves the frozen rows as-is and avoids a full rewrite of the data.
- Expensive expressions only run on the active region — a Cortex AI function in the SELECT clause is evaluated for active rows only, so you never pay to re-classify frozen history.
- Dimension table updates (e.g., a customer changes city) don't trigger reprocessing of old fact rows that joined against that dimension.
METADATA$IS_FROZEN— a virtual column on every dynamic table with a frozen region — lets you verify which rows are frozen and which are active.
Note: Frozen regions were previously called immutability constraints. The legacy
IMMUTABLE WHEREsyntax still works, andSHOW DYNAMIC TABLESstill reports the predicate in theimmutable_wherecolumn — butFROZEN WHEREandMETADATA$IS_FROZENare the current names.
For more details, see the Snowflake documentation on frozen regions.
Modify the Definition File
Open sources/definitions/analytics.sql in your workspace and update the enriched_order_details dynamic table definition. You're making two changes:
- Add a
DIET_CLASSIFICATIONcolumn powered byAI_CLASSIFY. - Add a
FROZEN WHEREclause that freezes rows older than 1 day.
Replace the existing enriched_order_details definition with:
DEFINE DYNAMIC TABLE DCM_DEMO_3{{env_suffix}}.ANALYTICS.ENRICHED_ORDER_DETAILS
WAREHOUSE = DCM_DEMO_3_WH{{env_suffix}}
TARGET_LAG = 'DOWNSTREAM'
INITIALIZE = 'ON_SCHEDULE'
DATA_METRIC_SCHEDULE = 'TRIGGER_ON_CHANGES'
FROZEN WHERE (ORDER_TS < CURRENT_TIMESTAMP() - INTERVAL '1 day')
AS
SELECT
    oh.ORDER_ID,
    oh.ORDER_TS,
    od.QUANTITY,
    m.MENU_ITEM_NAME,
    m.ITEM_CATEGORY,
    m.SALE_PRICE_USD,
    m.COST_OF_GOODS_USD,
    (od.QUANTITY * m.SALE_PRICE_USD) AS LINE_ITEM_REVENUE,
    (od.QUANTITY * (m.SALE_PRICE_USD - m.COST_OF_GOODS_USD)) AS LINE_ITEM_PROFIT,
    c.CUSTOMER_ID,
    c.FIRST_NAME,
    c.LAST_NAME,
    INITCAP(c.CITY) AS CUSTOMER_CITY,
    t.TRUCK_ID,
    t.TRUCK_BRAND_NAME,
    AI_CLASSIFY(m.MENU_ITEM_NAME, ['Healthy', 'Indulgent']):labels[0]::VARCHAR AS DIET_CLASSIFICATION
FROM DCM_DEMO_3{{env_suffix}}.RAW.ORDER_HEADER oh
JOIN DCM_DEMO_3{{env_suffix}}.RAW.ORDER_DETAIL od ON oh.ORDER_ID = od.ORDER_ID
JOIN DCM_DEMO_3{{env_suffix}}.RAW.MENU m ON od.MENU_ITEM_ID = m.MENU_ITEM_ID
JOIN DCM_DEMO_3{{env_suffix}}.RAW.CUSTOMER c ON oh.CUSTOMER_ID = c.CUSTOMER_ID
JOIN DCM_DEMO_3{{env_suffix}}.RAW.TRUCK t ON oh.TRUCK_ID = t.TRUCK_ID;
Note: The new
DIET_CLASSIFICATIONcolumn must be added as the last column in the SELECT list. Inserting it mid-schema breaks the frozen region (ordinal position mismatch).
Cortex AI functions in dynamic tables are supported in the SELECT clause for incremental refresh only — not in
WHERE,GROUP BY,HAVING, orQUALIFY. This definition'sAUTOrefresh mode resolves to incremental because the query qualifies. For the full list of supported functions, see Supported queries for dynamic tables.
Here's what changed and why:
| Change | Purpose |
|---|---|
Added DIET_CLASSIFICATION as the last column | New AI-derived column: AI_CLASSIFY tags each menu item as Healthy or Indulgent. Must be appended at the end — inserting mid-schema breaks the frozen region. |
Added FROZEN WHERE (ORDER_TS < CURRENT_TIMESTAMP() - INTERVAL '1 day') | Orders older than 1 day are frozen — they won't be recomputed on refresh, and the AI function won't run on them |
The frozen region is the key. Most of the sample data has order timestamps from October 2023 — well over a day ago — so those rows are frozen. But orders 1024 and 1025, inserted with CURRENT_TIMESTAMP() in the previous step, fall in the 1-day active region. Because DCM applies the change with CREATE OR ALTER (not a full replace), Snowflake will:
- Preserve the frozen rows as-is — they are skipped entirely, so
DIET_CLASSIFICATIONstaysNULLfor them and no AI inference runs on them. - Classify only the active rows (orders 1024 and 1025) using
AI_CLASSIFY—DIET_CLASSIFICATIONwill have a calculated value.
This means you'll see both behaviors side-by-side after a single refresh — no need to insert additional data.
Redeploy and Verify
Now push your definition change through the DCM plan-deploy cycle.
Plan the Change
- In the DCM control panel in the bottom panel, click the play button next to Plan.
- This time, the plan output will look different from the initial deployment. Instead of all CREATEs, you'll see an ALTER operation for
enriched_order_details— DCM applies the change withCREATE OR ALTER, updating the definition in place rather than rebuilding the table. This is what preserves the frozen rows.
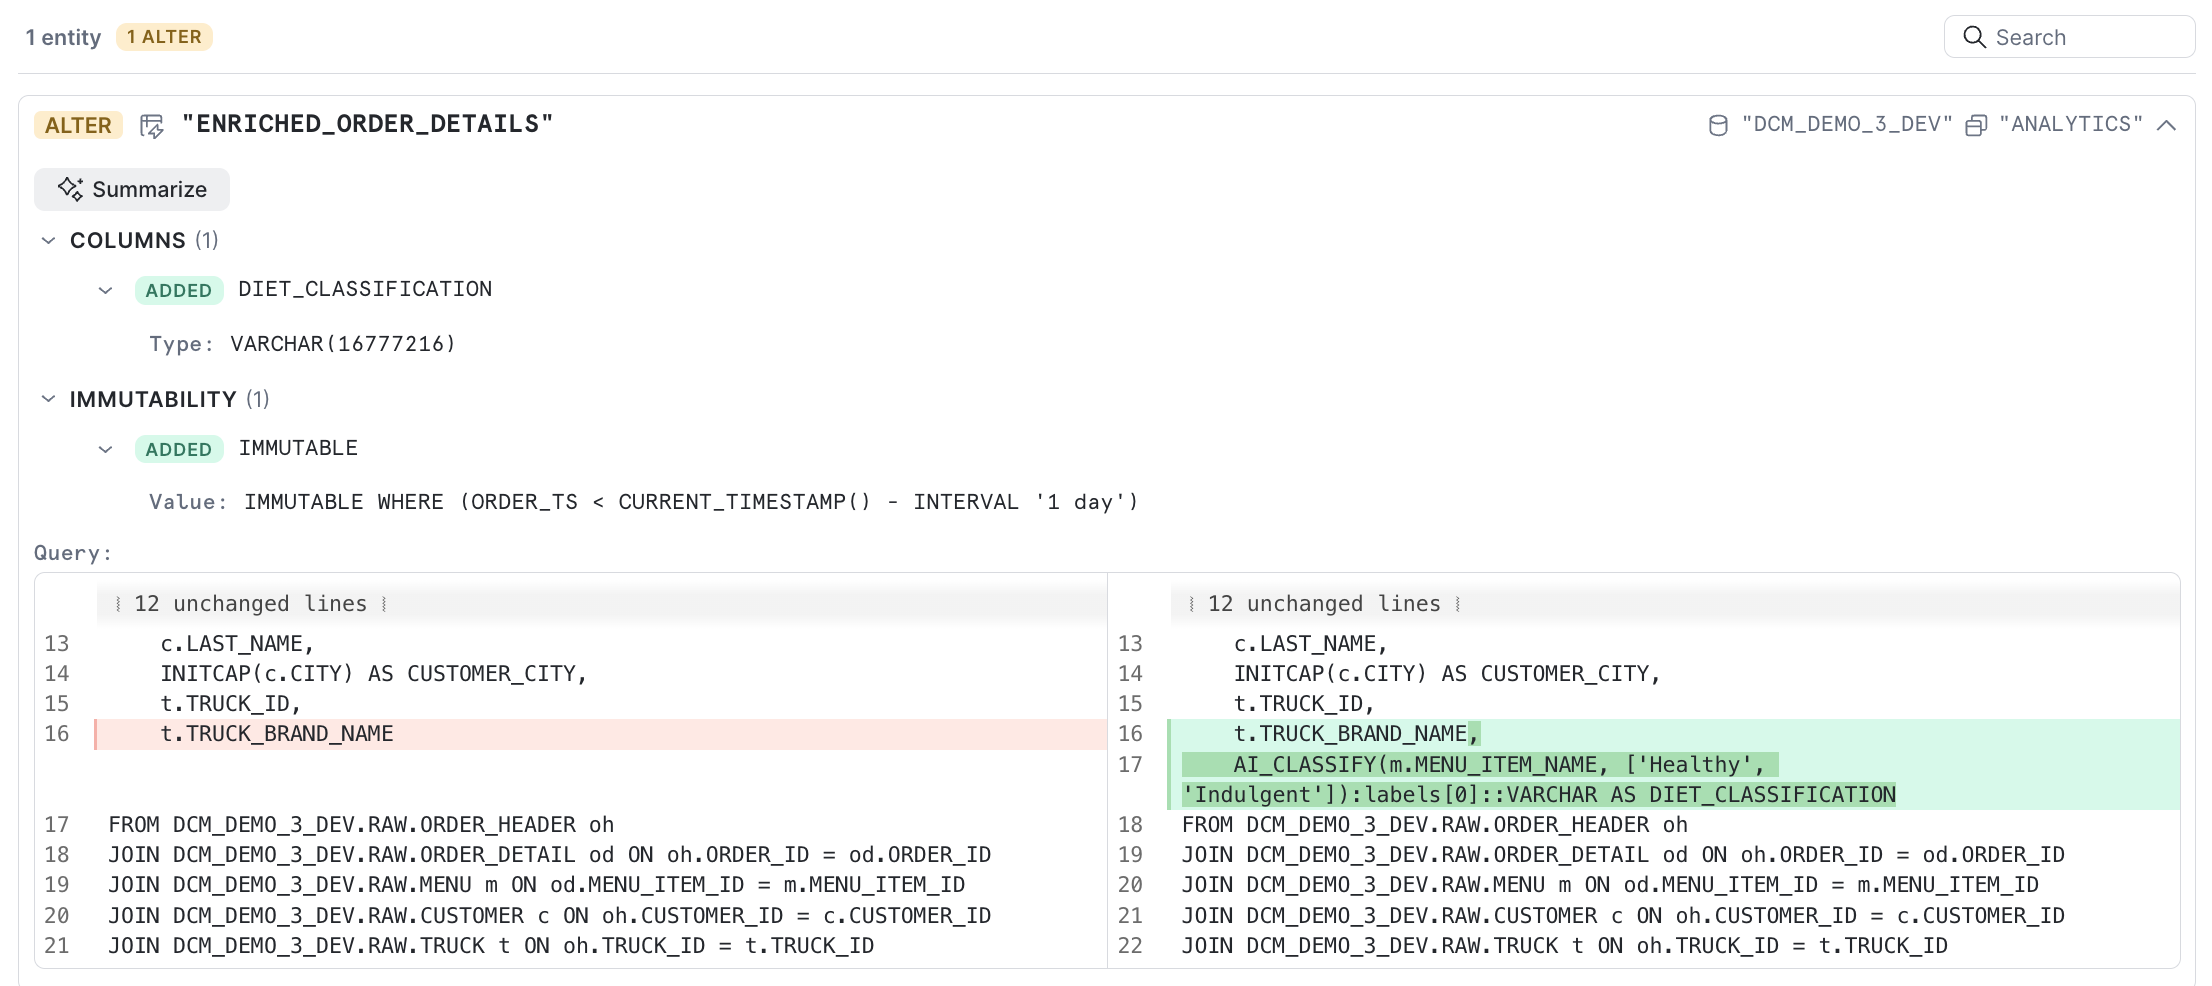
Review the rendered output in the out folder to confirm the FROZEN WHERE clause and the new DIET_CLASSIFICATION column appear correctly.
Deploy the Change
- Instead of Plan, set the operation to Deploy.
- Add a deployment alias like "Add AI diet classification with frozen region".
- DCM will alter the dynamic table in place with the new column and frozen region.
Refresh and Verify
After deployment, open scripts/03_verify_evolution.sql in a Snowsight worksheet and run each section in order.
First, refresh the dynamic table:
ALTER DYNAMIC TABLE DCM_DEMO_3_DEV.ANALYTICS.ENRICHED_ORDER_DETAILS REFRESH;
Then query the table and include the METADATA$IS_FROZEN virtual column:
SELECT
    ORDER_ID,
    ORDER_TS,
    MENU_ITEM_NAME,
    LINE_ITEM_REVENUE,
    DIET_CLASSIFICATION,
    METADATA$IS_FROZEN AS IS_FROZEN
FROM DCM_DEMO_3_DEV.ANALYTICS.ENRICHED_ORDER_DETAILS
ORDER BY ORDER_TS DESC;
You should see results like this:
| ORDER_ID | ORDER_TS | MENU_ITEM_NAME | LINE_ITEM_REVENUE | DIET_CLASSIFICATION | IS_FROZEN |
|---|---|---|---|---|---|
| 1025 | 2026-03-27 ... | Margherita Pizza | 12.00 | Indulgent | FALSE |
| 1024 | 2026-03-27 ... | Beef Birria Tacos | 34.50 | Indulgent | FALSE |
| 1023 | 2023-10-30 11:30:00 | ... | ... | NULL | TRUE |
| 1022 | 2023-10-30 11:00:00 | ... | ... | NULL | TRUE |
| ... | ... | ... | ... | NULL | TRUE |
The two most recent orders (1024 and 1025) have:
DIET_CLASSIFICATIONwith a value fromAI_CLASSIFY— the AI function ran on these active rowsIS_FROZEN = FALSE— they fell in the active region
All historical orders (October 2023) have:
DIET_CLASSIFICATION = NULL— they were preserved from the previous version; the AI function never ran on themIS_FROZEN = TRUE— Snowflake skipped them entirely
This is a frozen region in action: a schema change was deployed, and Snowflake only reprocessed the rows that needed it — keeping your AI inference cost confined to the active region.
Cleanup
When you're done, open scripts/04_cleanup.sql in a Snowsight worksheet and run it to tear down all objects:
USE ROLE dcm_developer;
EXECUTE DCM PROJECT dcm_demo.projects.dcm_dt_project_dev PURGE;

DROP DCM PROJECT IF EXISTS dcm_demo.projects.dcm_dt_project_dev;
DROP SCHEMA IF EXISTS dcm_demo.projects;
DROP DATABASE IF EXISTS dcm_demo;

USE ROLE ACCOUNTADMIN;
DROP ROLE IF EXISTS dcm_developer;
Conclusion and Resources
In this guide, you learned how to:
- Define a complete data pipeline as code using DCM Projects — databases, schemas, tables, dynamic tables, views, roles, and grants in SQL definition files
- Deploy and manage your pipeline through the DCM plan-deploy cycle in Snowsight Workspaces
- Evolve a dynamic table's schema by adding a new column to the definition file and redeploying through DCM
- Call a Cortex AI function (
AI_CLASSIFY) inside a dynamic table to enrich rows automatically as they refresh - Use frozen regions (
FROZEN WHERE) to prevent full recomputation of historical data — and to stop an expensive AI function from re-running on rows that never change - Verify partial recomputation using
METADATA$IS_FROZEN— confirming that Snowflake preserved historical rows and only the active region was computed with the updated definition
The combination of DCM Projects, frozen regions, and Cortex AI functions gives you a production-grade workflow: version-controlled pipeline definitions, environment-aware deployments, AI-enriched columns that refresh automatically, and efficient schema evolution that respects the cost of reprocessing large datasets.
What's Next
Continue the series:
- Part 4 — DCM Projects for Tasks — orchestrate your pipelines with task graphs, finalizers, and data-quality-driven routing, all defined as code.
Related Resources
This content is provided as is, and is not maintained on an ongoing basis. It may be out of date with current Snowflake instances