Any Data Source, One Proxy: Connecting Snowflake Notebooks to On-Prem, Cloud and Local Databases with DCP
Reaching Private Databases Without Opening Inbound Ports
Your data doesn't always live in the cloud. Sometimes it's on your NAS, on-premises behind a corporate firewall, or in a private VPC. Getting Snowflake to see it usually means opening inbound ports, standing up a VPN, or exposing infrastructure you'd rather keep private.
Snowflake's Data Connectivity Proxy (DCP) takes a different approach. A lightweight agent runs inside your network, opens an outbound-only connection to Snowflake, and acts as a secure tunnel. You don't need inbound firewall rules, public IPs, or a VPN. Once the agent is running, virtually any data source reachable from the agent's network becomes available to Snowpark Container Services workloads, including Openflow and Snowflake Notebooks, as if it were sitting right next to your warehouse.
aside positive At the time of publishing, Data Connectivity Proxy (DCP) is generally available for Openflow, and support for Snowflake Notebooks is in private preview.
The Architecture: One Agent, Many Data Sources
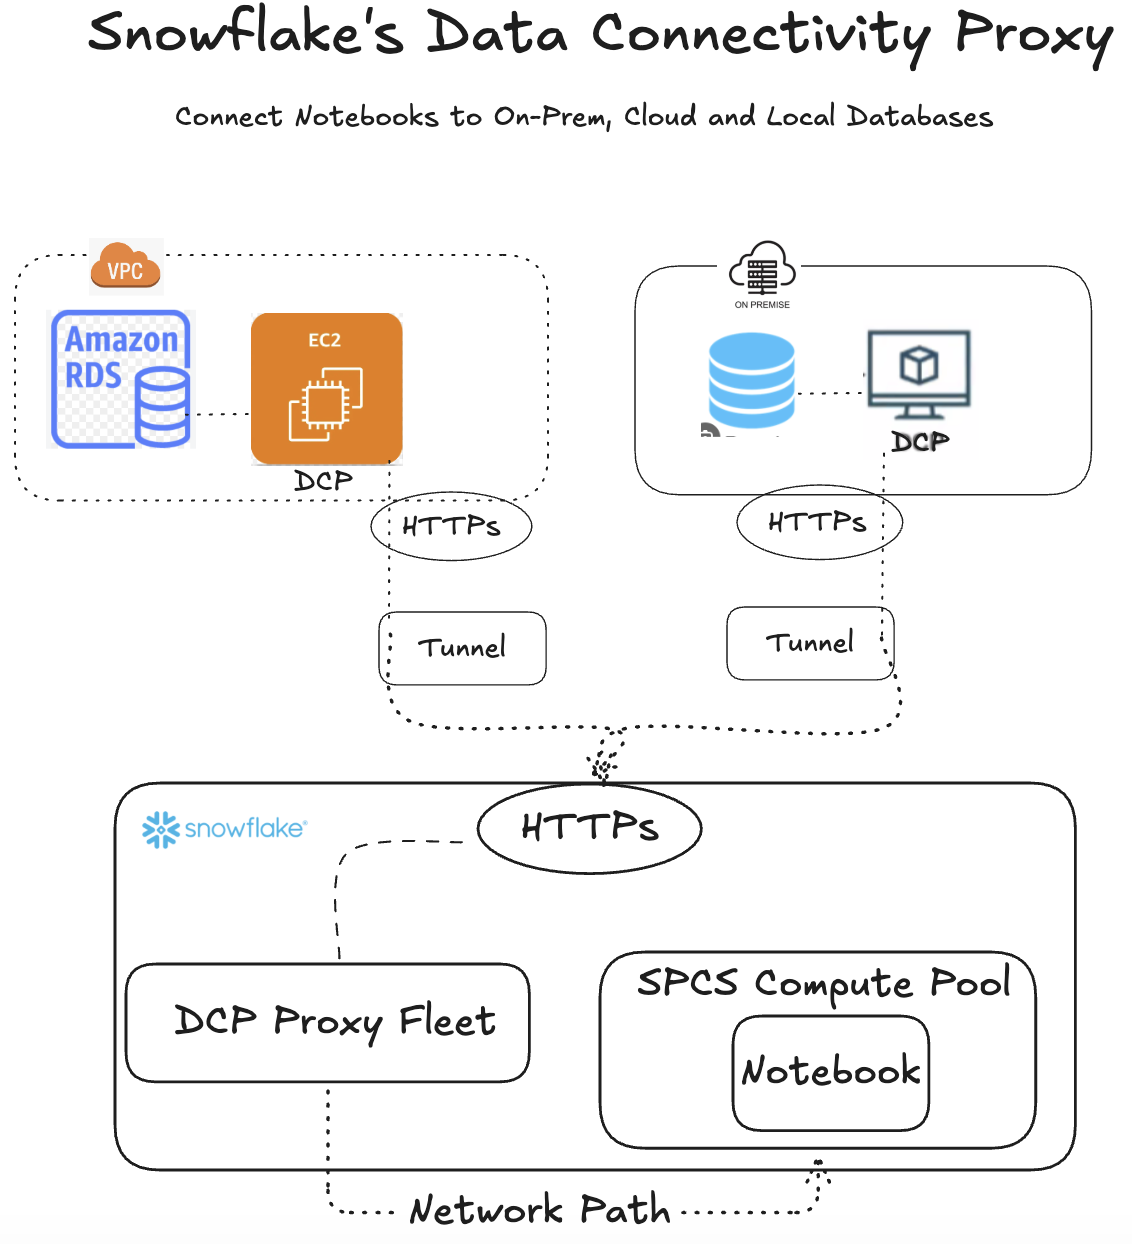
Figure 1: Architecture diagram of DCP providing connection to multiple sources
In this article, we'll connect to SQL Server running in a local Docker container, reach it through the DCP agent, and query it live from a Snowflake Notebook. The example uses SQL Server, but the same pattern applies broadly: if a service speaks TCP, DCP can generally reach it.
Installing and Configuring the DCP Agent
Official documentation: Data Connectivity Proxy setup
With our data sources running, we need to set up the DCP agent that bridges them to Snowflake. This involves three parts: configuring network access on the Snowflake side, generating a bootstrap token, and running the agent container locally.
Create a Network Rule
USE ROLE ACCOUNTADMIN;

CREATE OR REPLACE NETWORK RULE DCP_NETWORK_RULE
  MODE = DATA_CONNECTIVITY_PROXY_EGRESS
  TYPE = HOST_PORT
  VALUE_LIST = ('docker-sqlserver.example.com:1433');
Create the External Access Integration
Create the EAI and grant access to your runtime role.
CREATE EXTERNAL ACCESS INTEGRATION IF NOT EXISTS DCP_EAI
  ALLOWED_NETWORK_RULES = (DCP_NETWORK_RULE)
  ENABLED = TRUE;

GRANT USAGE ON INTEGRATION DCP_EAI TO ROLE NOTEBOOK_ROLE;
Create the DCP Object
CREATE DATA CONNECTIVITY PROXY IF NOT EXISTS DCP_PROXY
  EXTERNAL_ACCESS_INTEGRATIONS = (DCP_EAI)
  ENABLED = TRUE;
Issue Certificates and Generate the Bootstrap Token
After you create the DCP object, issue account-level TLS certificates:
SELECT SYSTEM$ISSUE_PER_ACCOUNT_CERTIFICATES();
Certificate issuance is asynchronous. After the first call in the account, wait at least 30 minutes before starting the DCP agent. Then generate the bootstrap token and continue with deployment.
SELECT SYSTEM$GENERATE_DATA_CONNECTIVITY_PROXY_BOOTSTRAP_TOKEN('DCP_PROXY', 7);
Write the Token to the Credential File
sudo mkdir -p /etc/dcp-agent/secrets

echo '<token from step above>' > /etc/dcp-agent/secrets/dcp-bootstrap-token
chmod 600 /etc/dcp-agent/secrets/dcp-bootstrap-token
aside positive To avoid storing the bootstrap token in plaintext, you can store it in a secrets manager instead. See Store the token in a secrets manager.
Deploy the DCP Agent
Docker
docker run -d --name snowflake-dcp-agent --restart unless-stopped \
  -v /etc/dcp-agent/secrets/dcp-bootstrap-token:/etc/dcp-agent/secrets/dcp-bootstrap-token:ro \
  -e DCP_METRICS_PORT=9092 \
  -p 9092:9092 \
  --add-host docker-sqlserver.example.com:host-gateway \
  snowflakedb/dcp-client:latest
AKS/EKS
apiVersion: apps/v1
kind: Deployment
metadata:
  name: snowflake-dcp-agent
spec:
  replicas: 1
  selector:
    matchLabels:
      app: snowflake-dcp-agent
  template:
    metadata:
      labels:
        app: snowflake-dcp-agent
    spec:
      containers:
        - name: snowflake-dcp-agent
          image: snowflakedb/dcp-client:latest
          imagePullPolicy: Always
          # For production, pin a specific tag instead of latest:
          # image: snowflakedb/dcp-client:<version>
          # See: https://hub.docker.com/r/snowflakedb/dcp-client
          env:
            - name: DCP_METRICS_PORT
              value: "9092"
              # Setting this env var is sufficient — the agent binds on 0.0.0.0:9092
              # automatically, making the liveness/readiness probes reachable by the kubelet.
          ports:
            - name: metrics
              containerPort: 9092
              protocol: TCP
          livenessProbe:
            httpGet:
              path: /healthz
              port: 9092
            periodSeconds: 10
            timeoutSeconds: 5
            failureThreshold: 3
          readinessProbe:
            httpGet:
              path: /readyz
              port: 9092
            periodSeconds: 5
            timeoutSeconds: 5
            failureThreshold: 3
          resources:
            requests:
              cpu: 250m
              memory: 512Mi
            limits:
              cpu: "1"
              memory: 1Gi
          securityContext:
            allowPrivilegeEscalation: false
            readOnlyRootFilesystem: false
            capabilities:
              drop: ["ALL"]
          volumeMounts:
            - name: bootstrap-token
              mountPath: /etc/dcp-agent/secrets
              readOnly: true
      volumes:
        - name: bootstrap-token
          secret:
            secretName: dcp-bootstrap-token
            items:
              - key: token
                path: dcp-bootstrap-token
Verify the DCP Agent Deployment
DESCRIBE DATA CONNECTIVITY PROXY DCP_PROXY;
Querying It All from a Snowflake Notebook
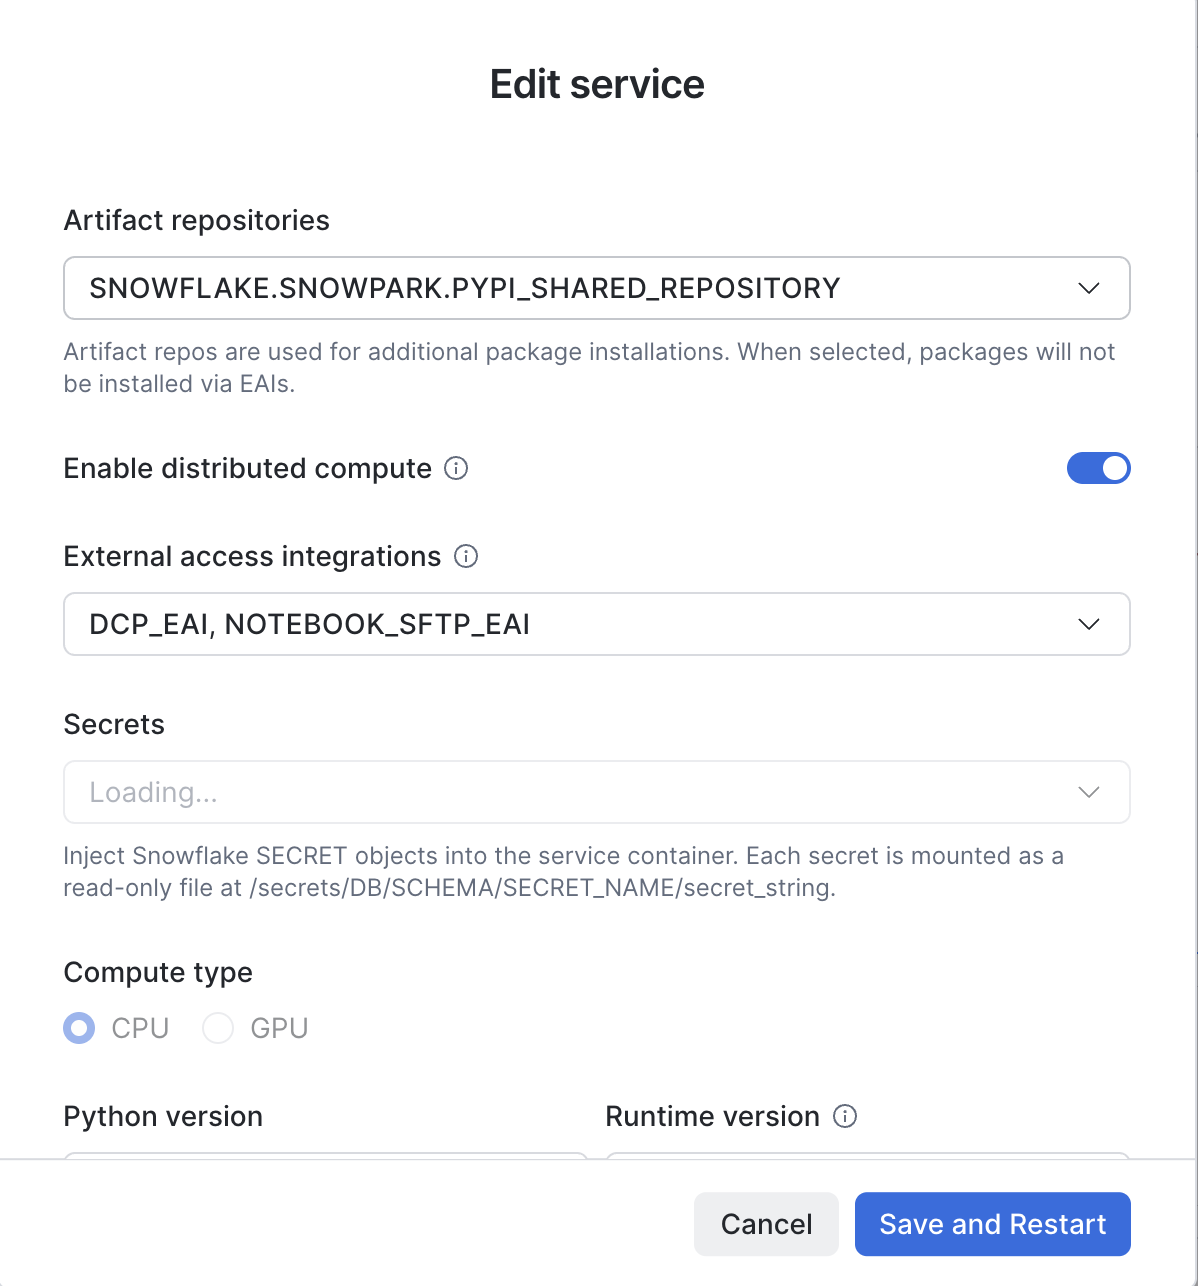
With the DCP agent running and the network rule in place, we can create a service for a Snowflake Notebook in Workspaces, attach the External Access Integration, and query our containers as if they were native Snowflake objects.
In the Notebook service dialog, attach the compute pool, EAI, and secrets created in the previous steps. Once the service is up and running, we can connect multiple notebooks to it and query from the SQL Server data source.
Install the SQL Server Driver
Once the notebook is connected to the service, install the pymssql package:
%pip install pymssql
aside positive You don't need to restart the notebook kernel after installing the package.
Connect to SQL Server
import pymssql
import pandas as pd
from snowflake.snowpark.secrets import get_generic_secret_string

DB_HOST = 'docker-sqlserver.example.com'
DB_PORT = 1433
DB_USER = 'sa'
DB_PASSWORD = get_generic_secret_string('openflow/openflow/dcp_creds')

def get_db_connection(db_name):
    try:
        conn = pymssql.connect(
            server=DB_HOST,
            port=DB_PORT,
            database=db_name,
            user=DB_USER,
            password=DB_PASSWORD,
            autocommit=True,
        )
        print(f"Successfully connected to SQL Server database '{db_name}'.")
        return conn
    except Exception as e:
        print(f"Error connecting to database '{db_name}': {e}")
        return None

conn = get_db_connection('demo_db')
Expected output:
Successfully connected to SQL Server database 'demo_db'.
Bonus: Connect to a NAS Server over SFTP
import paramiko
import io
import pandas as pd
from snowflake.snowpark.secrets import get_generic_secret_string

# SFTP connection details
SFTP_HOST = '********.blob.core.windows.net'
SFTP_PORT = 22
SFTP_USER = '********.afesftpuser'
SFTP_PRIVATE_KEY = get_generic_secret_string('notebook/public/notebook_sftp_key')

def get_sftp_connection():
    try:
        pkey = paramiko.RSAKey.from_private_key(io.StringIO(SFTP_PRIVATE_KEY))
        transport = paramiko.Transport((SFTP_HOST, SFTP_PORT))
        transport.connect(username=SFTP_USER, pkey=pkey)
        sftp = paramiko.SFTPClient.from_transport(transport)
        print(f"Successfully connected to SFTP server '{SFTP_HOST}'.")
        return sftp, transport
    except Exception as e:
        print(f"Error connecting to SFTP server: {e}")
        return None, None

sftp, transport = get_sftp_connection()

# List files in remote directory
if sftp:
    print(sftp.listdir('/home/shantanu'))

if sftp:
    with sftp.open('/home/shantanu/Demo.csv', 'r') as f:
        df = pd.read_csv(f)
    print(df.head())

if transport:
    transport.close()
    print("SFTP connection closed.")
Conclusion And Resources
With a single DCP agent running, we connected to SQL Server running in a local container and queried it live from a Snowflake Notebook. No inbound firewall rules, no public endpoints, no VPN. Just an outbound-only agent and a network rule per host:port.
The pattern generalizes well beyond this demo. Point the same agent at a database on-prem, in a private VPC, or behind a corporate firewall, and the Notebook code barely changes: swap the host, port, and driver, and you're connected. If your data source speaks TCP, DCP can generally reach it.
Next step: point DCP at a real data source in your own environment, such as an on-prem SQL Server, an RDS instance in a private subnet, or a database behind a corporate VPN, and see how little changes.
Related Resources
This content is provided as is, and is not maintained on an ongoing basis. It may be out of date with current Snowflake instances
