Sep 14, 2026/6 min readData Engineering
Introducing Data Connectivity Proxy: Bring Snowflake Openflow to Private Data


Enterprise data spans multi-clouds, apps and platforms, creating critical blind spots for perimeter firewalls. Securing the network boundary is no longer enough. Governance and control must be embedded right where the data lives. A typical large organization may run Oracle databases for core financials on premises, stream real-time events through Kafka brokers inside a private VPC and operate databases scattered across multiple public clouds. Reaching these private sources in a hybrid environment has either been impossible until now or required a different network solution for every topology. This patchwork of VPNs, PrivateLinks and one-off agents becomes its own infrastructure problem over time.
Today, we're introducing Data Connectivity Proxy (DCP) for Snowflake Openflow to address the private data access problem. Snowflake Openflow is our fully managed data integration service that connects data without standing up custom ETL infrastructure, and DCP gives it access to private sources that were unreachable before. It does so through a consistent, Snowflake-provided agent model that reduces the need for per-topology VPNs, PrivateLinks and third-party agents.
Private data connectivity has been a network project
Getting private data into a managed pipeline has historically forced a choice. Teams either take on the operational cost of custom ETL infrastructure at every network boundary, or embark on months-long projects to get approvals to open inbound ports in environments where that's typically not allowed.
For companies in financial services, healthcare and manufacturing, a deny-all-inbound policy is often a regulatory requirement. When a managed pipeline vendor says “set up a private network connection,” what that actually requires is looping in network engineering, opening firewall rules and clearing a change advisory board. DCP is built for deny-all-inbound networks: The agent only makes outbound TLS on port 443. One related constraint: The agent host needs direct outbound access to Snowflake on that port. Routing the agent’s own outbound traffic through an enterprise-managed forward proxy (HTTPS_PROXY or CONNECT-based forwarding) is not supported today.
Still, setting all of this up is a multiweek project before any data moves, and existing options only solve parts of the problem:
- CSP-native private connectivity (AWS PrivateLink, Azure Private Endpoint and Google Private Service Connect) is the right fit when you need private, in-cloud paths in the same cloud. It is not aimed at on-premises sources. DCP covers those cases with an outbound agent on your network.
- VPN, ExpressRoute and VPC peering work, but each is a multiweek network engineering project requiring infrastructure team coordination, approvals and ongoing maintenance.
- Legacy pipeline tools largely leave this unsolved. Some have no first-party agent at all, so customers must stand up a VPN and dedicated network connections themselves before the pipeline can do anything.
- Third-party connectivity agents solve the technical problem but add another vendor, another contract and another system to operate and support.
How Data Connectivity Proxy works
DCP removes these network dependencies from the data integration path by being delivered as a lightweight agent that runs inside the environment where your data already lives: an on-premises data center, a private cloud environment, a VPC or another cloud.
The agent creates an outbound connection on port 443 to Snowflake and establishes an encrypted tunnel. Snowflake then routes Openflow traffic through that tunnel to reach the private source.
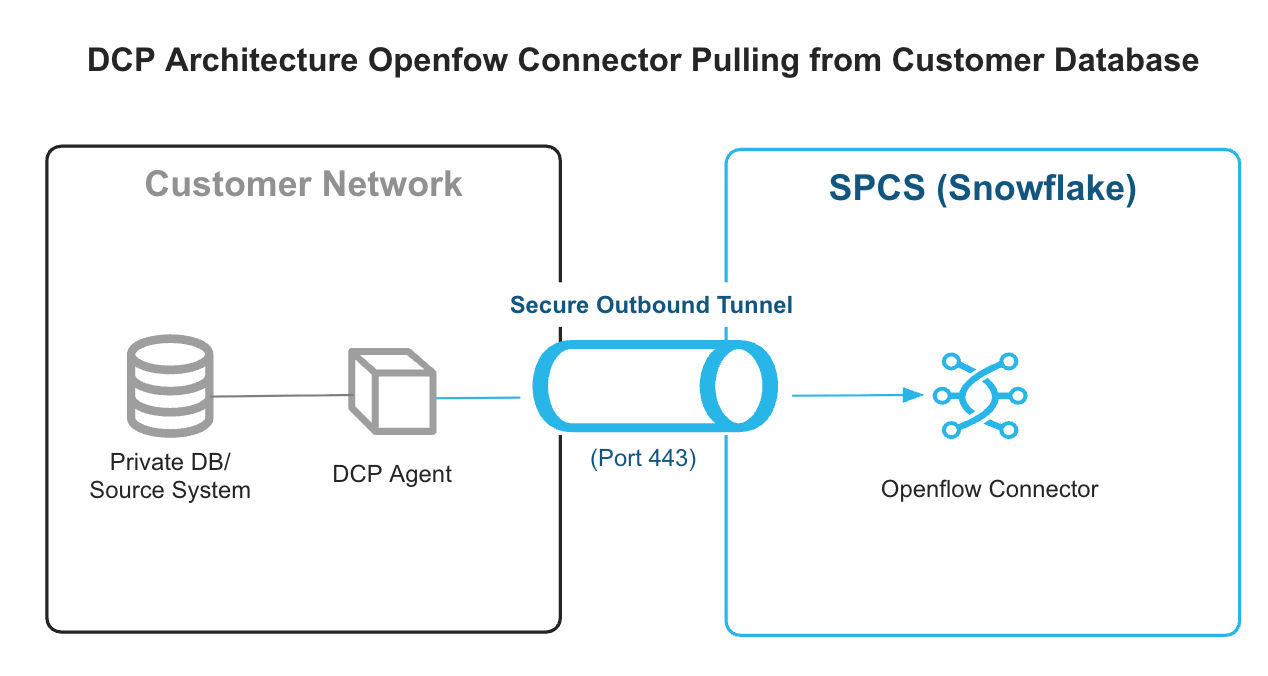
The design flips the usual model. Instead of Snowflake reaching into your network, your network reaches out to Snowflake. Your firewall only ever sees outbound TLS connections initiated from inside your perimeter. There are no inbound firewall rules to open, change or approve.
Traffic between the agent and Snowflake is protected with mutual TLS (mTLS), meaning both sides verify each other's identity using certificates. Setup starts with a one-time bootstrap token; after that, the agent authenticates automatically using its certificate pair, which Snowflake rotates in the background. The agent operates at the TCP level: It forwards traffic without inspecting, parsing or storing the data passing through it.
Why choose DCP with Openflow to reach your private data sources
Security. DCP is built for a deny-all-inbound network. The agent never accepts inbound connections, so you don't request a firewall exception and you don't add a new inbound listener. Your firewall sees one class of traffic: outbound TLS on port 443.
Identity is explicit and auditable. You mint a bootstrap JSON web token (JWT) in Snowflake and put it on the agent host. The agent presents that token once to the DCP control plane and receives an mTLS certificate tied to that DCP client. After that, tunnels, heartbeats and routing updates use mTLS. Both sides verify certificates on every connection. The bootstrap token isn't used again until the next certificate rotation.
The agent is a TCP pass-through. It doesn't inspect, parse or store the bytes in the tunnel. Source credentials stay in Snowflake; they never land on the agent. Destinations are allowlisted in Snowflake: A network rule names the private host and port, an external access integration allows that rule, and you bind the integration on the DCP object. Optionally, a network policy on the object can restrict which source IPs may talk to the DCP control plane. Disable or drop the object and the agent's certificate stops working, even if the cert has not expired.
Reach. DCP covers the gaps that same-cloud private endpoints and public SaaS connectors leave open:
- On-premises databases behind a corporate firewall, including Oracle, SQL Server, PostgreSQL and MySQL
- Private Kafka brokers in a VPC or data center
- Cross-cloud sources such as data on AWS while the Snowflake account is on Azure
- Hybrid estates with several of these topologies at once
The agent only needs outbound port 443, so the same pattern works whether your data and your Snowflake account sit on AWS, Azure, Google Cloud or on-premises. If you've been stitching third-party tools to cover those gaps, DCP replaces that patchwork with a first-party path that's native to Openflow.
Simplicity. The agent ships as a Docker image and runs on any Linux host with Docker or another OCI-compatible runtime. Kubernetes isn't required. The agent reconnects if the tunnel drops, and Snowflake rotates the agent certificate in the background without tearing down active connections.
How to get started with DCP today
DCP is generally available today on AWS, Azure and GCP for Snowflake customers on Standard, Enterprise and Business-Critical editions. Organizations with private-source connectivity needs from a mid-market manufacturer with Oracle on premises to a regional bank operating PostgreSQL behind its firewall can get started with a first-party Openflow capability without moving to a higher Snowflake edition first.
If you have on-premises databases, private Kafka brokers or cross-cloud sources you haven't been able to connect to Snowflake Openflow, try DCP with Openflow today to connect them without opening inbound firewall access or redesigning your network.
Quick start
-- Step 1: Create the DCP object
CREATE DATA CONNECTIVITY PROXY my_dcp_client;

-- Step 2: Generate a bootstrap token (valid for 7 days)
SELECT SYSTEM$GENERATE_DATA_CONNECTIVITY_PROXY_BOOTSTRAP_TOKEN('my_dcp_client', 7);
# Step 3: Deploy the agent
docker run -d \
--name dcp-agent \
--restart unless-stopped \
-v /etc/dcp/credentials:/credentials:ro \
snowflake/dcp-agent:latest \
--dcp-client-name my_dcp_client \
--credentials-file /credentials \
--snowflake-account <your-account>-- Step 4: Verify
DESCRIBE DATA CONNECTIVITY PROXY my_dcp_client;Documentation
- Data Connectivity Proxy overview: Architecture, when to use DCP, comparison with PrivateLink and stable egress IPs
- Set up Data Connectivity Proxy: Step-by-step deployment guide
- Security model: mTLS, certificate management and access revocation
- Monitor Data Connectivity Proxy:
DESCRIBE DATA CONNECTIVITY PROXY, event history, Prometheus metrics - Using Snowflake Openflow with Data Connectivity Proxy

Mar 4, 2026Data Engineering
Bridging Oracle and Snowflake AI: The Snowflake Openflow Connector for Oracle Is Now Generally Available

Feb 13, 2026Data Engineering
Snowflake Egress IPs: The Missing Piece for Predictable Outbound Connectivity

Aug 20, 2024Machine Learning
Secure Connections with New Outbound Private Link with Snowflake Support in Preview

