Running Your Notebooks on Snowflake Compute from VS Code and Cursor
Until now, getting a local editor onto remote compute was something you assembled yourself. You generated a keypair, got the public key onto the host, wrote an ~/.ssh/config entry, sorted out tunneling when the host sat on a private subnet, then waited for a remote extension host to install itself. The alternative was pulling a sample down to a laptop that can't hold the real dataset.
Remote Development, currently in public preview, is a capability in the Snowflake extension that stands up a Snowflake-managed development environment and connects your editor to it, so your notebooks run on Snowflake compute next to your data.
Remote Development changes where data teams run their notebooks without changing the editor they write them in. Here are the things worth knowing.
Keeping your editor and your compute in different places
Connecting an editor to a remote machine is a well-worn pattern: the editor UI runs on your laptop while your files, terminal, language servers, and interpreter live on the remote host. It's how Codespaces, JetBrains Gateway, Gitpod, and dev containers all work. The reason it keeps getting reinvented is that it separates two things worth separating: the editing experience, and the execution environment with its CPUs, GPUs, network access, and data locality.
Doing it by hand is the setup described above, repeated for every host. Remote Development gives you the same separation with Snowflake as the remote host, and handles the connection setup for you.
What runs locally and what runs on Snowflake
Snowflake Notebooks already run on Snowflake compute, close to the data, with the connecting role governing what they can reach. Remote Development extends that to the editor on your own machine.
The editor still runs on your laptop, with your keybindings and your project layout. The environment it connects to (the kernel, the compute pool, the Python runtime, the Snowflake libraries) runs on Snowflake. Extensions that act on your code run on the remote host, so the first connection installs them there.
How the connection works
The Snowflake extension does the work here. You stay in its UI, and it handles the connection end to end:
- You pick a compute pool and options in the extension UI.
- Snowflake stands up a container service running an SSH endpoint.
- The extension writes the SSH config and reopens your editor into a remote window.
The extension generates the SSH keys, sets up port forwarding, and handles jump host configuration for you, and it behaves the same in VS Code and in Cursor because Cursor is a VS Code fork with the same extension model. The remote window itself is a standard Remote-SSH session underneath, which is how both editors already handle remote hosts, but that layer isn't something you drive directly.
Inside the remote window, notebooks use the Snowflake Kernel (Python + SQL), the same kernel Snowflake Notebooks use when they run in Workspaces in the Snowsight UI. Mixing Python and SQL in one notebook usually means choosing between them: a Python kernel with SQL wrapped in string cells, or a SQL kernel without Python's ecosystem.
The Snowflake Kernel folds that into one. Python and SQL cells run side by side in the same notebook. A SQL cell runs against Snowflake directly. A Python cell already has a live Snowpark session bound to it, so session.table('...') returns a DataFrame without any connection-setup boilerplate. The kernel handles the plumbing between the two languages for you.
Setting up your first Snowflake Remote Environment
-
Install or update the Snowflake extension in VS Code (or Cursor) to the latest version. Persistent storage and Git support require a recent release.
-
Make sure the Remote - SSH extension (
ms-vscode-remote.remote-ssh) is present. It's usually already there, since it comes along with the Snowflake extension; install it from the marketplace if it isn't. -
Sign in to Snowflake from the extension and expand Remote Environments in the sidebar.
-
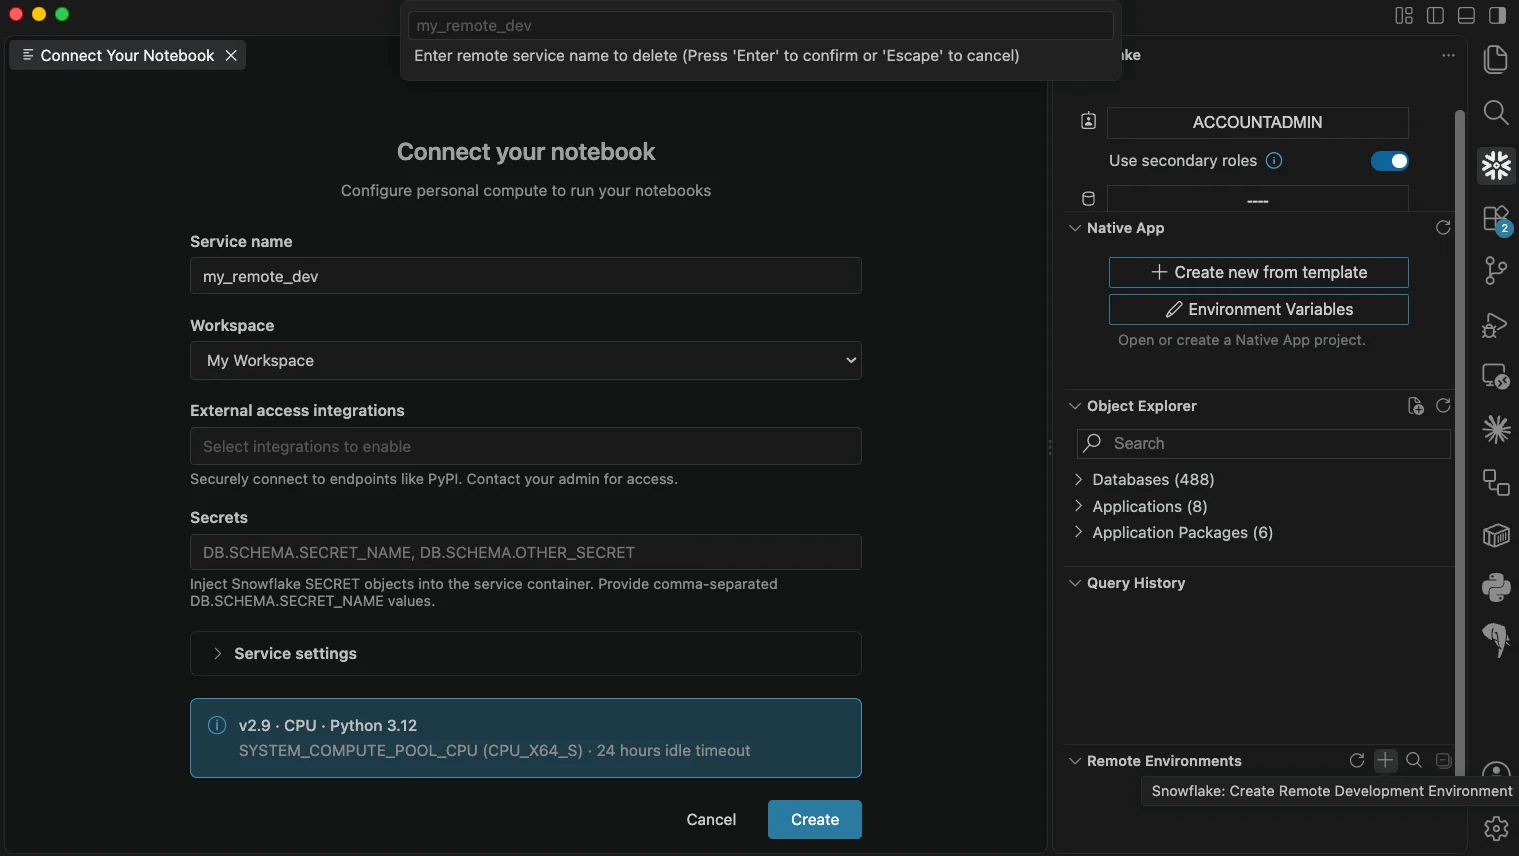
Select Create Remote Development Environment. Give it a name, pick workspaces to mount, choose a compute pool, and set Service settings, including Enable persistent storage if you want it.
-
When the service reaches
RUNNING, select Setup SSH. The editor opens a new window connected to the environment.
Remote Development is on by default via the ENABLE_NOTEBOOK_SERVICE_REMOTE_VS_CODE_ACCESS account parameter. An account admin can disable it, but there's no enrollment step to turn it on. Remote Development is in public preview.
If your work needs outbound network access (package installs from a public index, pushes to a Git provider), attach an external access integration when you create the environment.
Choosing your compute and storage
When you create a Remote Development environment, you choose:
- The compute pool it runs on. Your role needs
USAGEon it, and the pool must allow theNOTEBOOKworkload type. - CPU or GPU, if your account has a GPU pool.
- The Snowflake Container Runtime version. The runtime ships with Python, Jupyter, and Snowflake libraries preinstalled.
- Which workspaces to mount. Each mounts at
/root/workspaces/<name>/. You can attach more workspaces later with Manage workspaces on remote. Note that these workspaces correspond to the Workspaces you have defined in Snowflake. At the moment, this feature only supports mounting private workspaces (not shared ones).
One decision is worth making at creation time and can't be changed later: persistent storage. If you enable it under Service settings, the environment gets a drive at /mnt/pd0 that survives suspend and resume. If you don't enable it at creation, you can't add it after, unless you recreate the service.
Working with production data from VS Code
Because the environment lives on Snowflake, your notebook queries Snowflake data in place. There's no extraction of data to a laptop.
from snowflake.snowpark.context import get_active_session

session = get_active_session()
raw = session.table('tb_101.ml.daily_sales_weather').to_pandas()
raw.columns = [c.lower() for c in raw.columns]
The role you connected with governs what you can see. Masking policies, row access policies, and grants that apply everywhere else in Snowflake apply here too. For training data specifically, that means you aren't sampling down to what a laptop can hold, and you aren't standing up a separate copy to work around governance.
That table didn't appear out of nowhere. Here's the SQL cell that built it, joining daily sales against Marketplace weather data. In a notebook it would sit a few cells above the Python, and it runs against Snowflake directly:
CREATE OR REPLACE TABLE tb_101.ml.daily_sales_weather AS
WITH weather_by_city AS (
    SELECT
        date_valid_std,
        UPPER(city_name)              AS city_upper,
        AVG(avg_temperature_air_2m_f) AS avg_temperature_air_2m_f,
        AVG(tot_precipitation_in)     AS tot_precipitation_in
    FROM frostbyte_weathersource.onpoint_id.history_day
    WHERE date_valid_std BETWEEN (SELECT MIN(date) FROM tb_101.ml.daily_sales)
                             AND (SELECT MAX(date) FROM tb_101.ml.daily_sales)
    GROUP BY date_valid_std, UPPER(city_name)
)
SELECT ds.date, ds.location_id, ds.city, ds.daily_sales,
       w.avg_temperature_air_2m_f AS temp_f,
       w.tot_precipitation_in * 25.4 AS precip_mm
FROM tb_101.ml.daily_sales ds
JOIN weather_by_city w
  ON w.date_valid_std = ds.date
 AND w.city_upper = UPPER(ds.city);
Both cells live in the same notebook, on the same kernel. The Snowflake Kernel runs each cell in the language it's written in, so you can shape a feature table in SQL and pick it up in pandas a few cells later without a connection handoff in between.
Installing packages
The Container Runtime already includes the common ML stack. When you need something else, there are three ways in, and they aren't additive. Pick one per environment.
Snowflake's PyPI shared repository. snowflake.snowpark.pypi_shared_repository is a schema-level, RBAC-governed artifact repository. Package policies can restrict which packages resolve. This is the option that needs no package infrastructure of your own.
A customer-hosted artifact repository registered in Snowflake. If your organization already runs Nexus, JFrog, Azure DevOps Artifacts, GCP Artifact Registry, or AWS CodeArtifact, register that repository in Snowflake and point the environment at it. Package pinning and provenance stay in the platform your team already manages.
An external access integration to a package index. For a package index you can reach over the network (public PyPI, an internal mirror), attach an EAI to the environment. An external access integration is the Snowflake object that grants outbound network access to a specific set of hosts.
The catch: when the environment is configured to use a repository, that's where packages come from. The EAI path is an alternative to the repository path. Be sure to pick the sourcing model on the way in.
With persistent storage enabled, whatever you install lands on /mnt/pd0 and is still there next time you connect.
Working from a Git repository
Training code and notebooks usually live in a repository rather than as loose files. With persistent storage on, the pattern is the one you'd expect:
cd /mnt/pd0
git clone https://github.com/your-org/your-repo.git
Add the folder to your workspace and the editor's Source Control view works the way it does locally. For a private repo, store the credential in a Snowflake secret and attach it to the environment. Don't write a token to disk in the container.
This allows your Snowflake data to stay on Snowflake, your code to stay in Git where your team expects it, and makes the editor the seam between them.
Training a model end to end on Snowflake compute
Training on real GPUs usually involves standing up a substrate for it: a GPU instance with a matching CUDA and framework stack, a managed training service with your data staged into object storage, or a Ray cluster on Kubernetes. Remote Development starts you inside the substrate your data is already on.
Because the environment runs inside Snowflake, the compute underneath is Snowflake Container Runtime, a managed containerized execution layer built for ML and data science workloads. Container Runtime lets you bring any Python package, framework, or compute shape without provisioning the underlying infrastructure yourself.
Ray is an open-source framework for distributed Python workloads that ML teams use to scale training and inference across a cluster without hand-writing MPI or thread-pooling code. Container Runtime is a Ray cluster enriched with Snowflake ML components: distributed data ingestion, feature engineering pipelines, distributed model training, and hyperparameter tuning APIs.
Once the data pull, the packages, and the code are all sorted, an actual training loop looks about like it would anywhere else. Load features, do a time-based split, fit the model, log it to the Model Registry:
from snowflake.ml.registry import Registry

registry = Registry(
    session=session,
    database_name="TB_101",
    schema_name="ML",
)
registry.log_model(
    model,
    model_name="tb_sales_forecaster",
    version_name="v1",
    sample_input_data=X_train.head(),
    comment=f"Tasty Bytes daily sales forecaster. Holdout MAPE={mape:.3f}.",
    target_platforms=["WAREHOUSE", "SNOWPARK_CONTAINER_SERVICES"],
)
Nothing about that snippet is Remote-Development-specific, which is the point. Once the environment is up, the surface is your normal editor and the code is your normal ML code. What Remote Development changes is where the code runs and what data it reaches. The code itself stays the same.
CoCo is also available in the remote window through the Snowflake extension, so if you're used to it as a pair programmer, it comes into the remote session with you.
What's next?
The Quickstart is a good way to get a feel for Remote Development end to end. It walks through creating an environment, connecting your editor to it, cloning a repo into persistent storage, and training an XGBoost sales forecaster over the Tasty Bytes dataset with Marketplace weather joined in. Everything in this post is exercised end to end.
Try it here: https://www.snowflake.com/en/developers/guides/get-started-with-remote-development-snowflake-vscode-extension/
If you hit friction where this meets your workflow, reach out through your account team.
Review the docs for more: https://docs.snowflake.com/en/user-guide/vscode-ext-remote-development
Disclaimer: This article contains forward-looking statements, including about our future product offerings, and are not commitments to deliver any product offerings. Actual results and offerings may differ and are subject to known and unknown risk and uncertainties. See our latest 10-Q for more information.
This content is provided as is, and is not maintained on an ongoing basis. It may be out of date with current Snowflake instances
