SAS to Snowflake Migration
1. Introduction
This T1A Alchemist Quickstart Guide will demonstrate how to leverage Alchemist to accelerate the migration of your legacy SAS code to Snowflake. We'll be covering the 3 most frequently occurring types of SAS assets:
- SAS Enterprise Guide projects
- SAS Data Integration Studio jobs
- SAS BASE code files
Prerequisites
- Snowflake account (a free 30-day trial works perfectly)
- T1A Alchemist license (steps to obtain are outlined below)
- Basic familiarity with SQL and SAS concepts
- (Optional) Access to SAS tools:
- SAS Enterprise Guide to preview the sample EG project and SAS BASE code
- SAS Data Integration Studio to explore the sample job
- SAS Studio to explore SAS BASE code
What You'll Learn
By the end of this guide, you will know how to:
- Assess the scope and complexity of your SAS estate
- Convert SAS Enterprise Guide projects and SAS BASE code files to Snowflake-ready code
- Convert SAS Data Integration Studio jobs using a metadata-driven approach
2. Migration Overview
Why migrate?
SAS has been at the core of enterprise data environments for decades. While it started as a statistical analysis platform, many organizations have come to rely on it far beyond analytics. It's common to find SAS powering full-scale data warehouses, complex ETL pipelines, and regulatory reporting workflows — often through tools like SAS Data Integration Studio (SAS DI) and SAS Enterprise Guide (SAS EG). Over the years these environments have grown into mission-critical systems with hundreds or even thousands of jobs running daily.
However, maintaining a legacy SAS estate comes at a growing cost. Licensing is expensive, the talent pool is shrinking, and the platform was not designed for the modern cloud-native world. Snowflake offers a compelling alternative: near-unlimited scalability, separation of storage and compute, and all of that at pay-per-use pricing. Migrating to Snowflake lets your team consolidate data engineering, analytics, and data science workloads onto a single modern platform, while significantly reducing infrastructure overhead and operational complexity.
Migration challenges: what to expect
Migrating from SAS to Snowflake might sound straightforward on the surface, given that SAS is just code and data flows. In reality, most organizations significantly underestimate the scope. Years of organic growth leave behind a tangled mess where the actual code is just the tip of the iceberg.
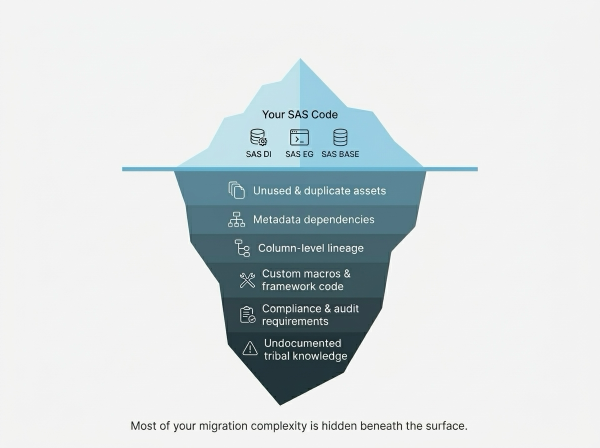
Beneath the surface lie hidden dependencies between jobs, undocumented macros, duplicate assets scattered across teams, and compliance constraints. Without full visibility into these layers, migration projects quickly spiral into missed deadlines and budget overruns. The bulk of the complexity of a migration project comes from uncovering the right scope for migration and coming up with a robust migration plan that takes all the different aspects into account.
The biggest risk in SAS migration isn't the code you can see — it's everything you can't. The right tools turn hidden complexity into a clear plan.
Most of this hidden complexity can be uncovered and reduced with the right tooling. Rather than attempting to migrate everything at once, a structured approach lets you filter out what's no longer needed, understand what remains, and convert only what matters.
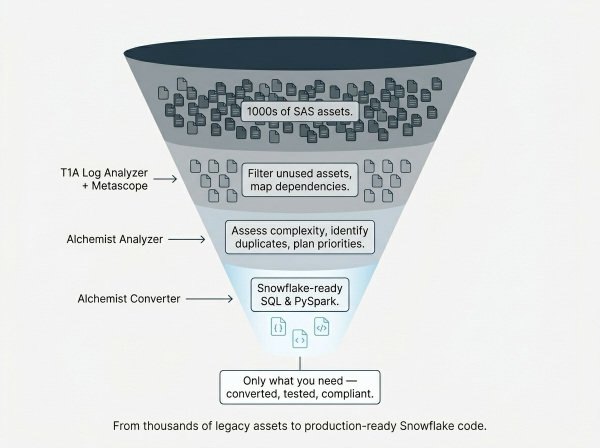
This is exactly the workflow that our toolkit is built around. SAS Logs Analyzer and Metascope help you see the full picture. Alchemist Code Analyzer tells you what you're actually dealing with. And Alchemist Converter turns it into production-ready Snowflake code.
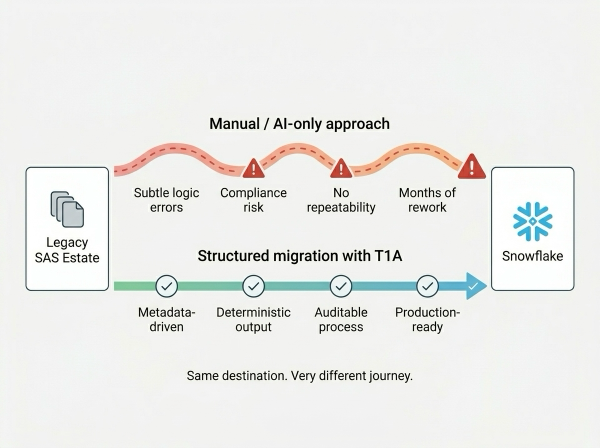
Why not just use an AI?
With the rise of AI, it may be tempting to paste your SAS code into an LLM and ask for a translation. While LLMs are great for explaining code or quick prototyping, they often introduce subtle logic differences — a changed join order, unexpected null handling, slightly different rounding. In regulated industries, even minor deviations can mean a compliance violation. Additionally, with not a lot of SAS code available publicly, LLMs were not trained to understand it on a deep enough level - which leads to conversion mistakes.
LLMs can rewrite your code, but they can't guarantee consistency and compliance. Production migration demands repeatability and precision that pure AI alone cannot deliver.
This is why Alchemist uses a combinaion of deterministic conversion logic and AI in a broader, structured conversion pipeline — not AI as the sole engine.
3. Prepare Your Environment
Sign Up for Snowflake Trial
If you haven't already, register for a Snowflake free 30-day trial. The rest of the sections in this lab assume you are using a new Snowflake account created by registering for a trial.
After your first login, go to Projects, click + Add new, and choose SQL file.
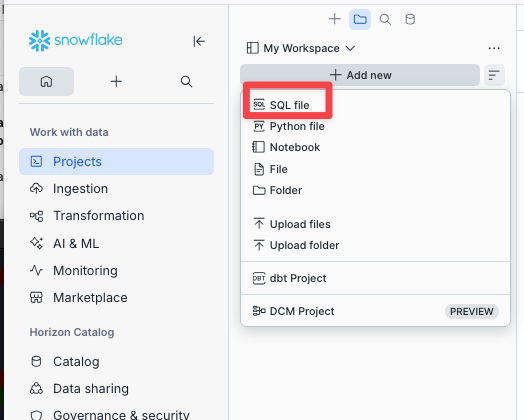
Paste and run the following to create the database all converted notebooks will use:
CREATE DATABASE IF NOT EXISTS LDEMO;
USE DATABASE LDEMO;
USE SCHEMA PUBLIC;
All three SAS libraries referenced in this lab (LDEMO, LDEMODI, LMART) map to LDEMO.PUBLIC — a single Snowflake database and schema is all you need.
Sign Up for Alchemist Trial
Register at app.getalchemist.io to get access to the portal. The trial signup is free and gives you the credentials needed to download the installer.
Install Alchemist
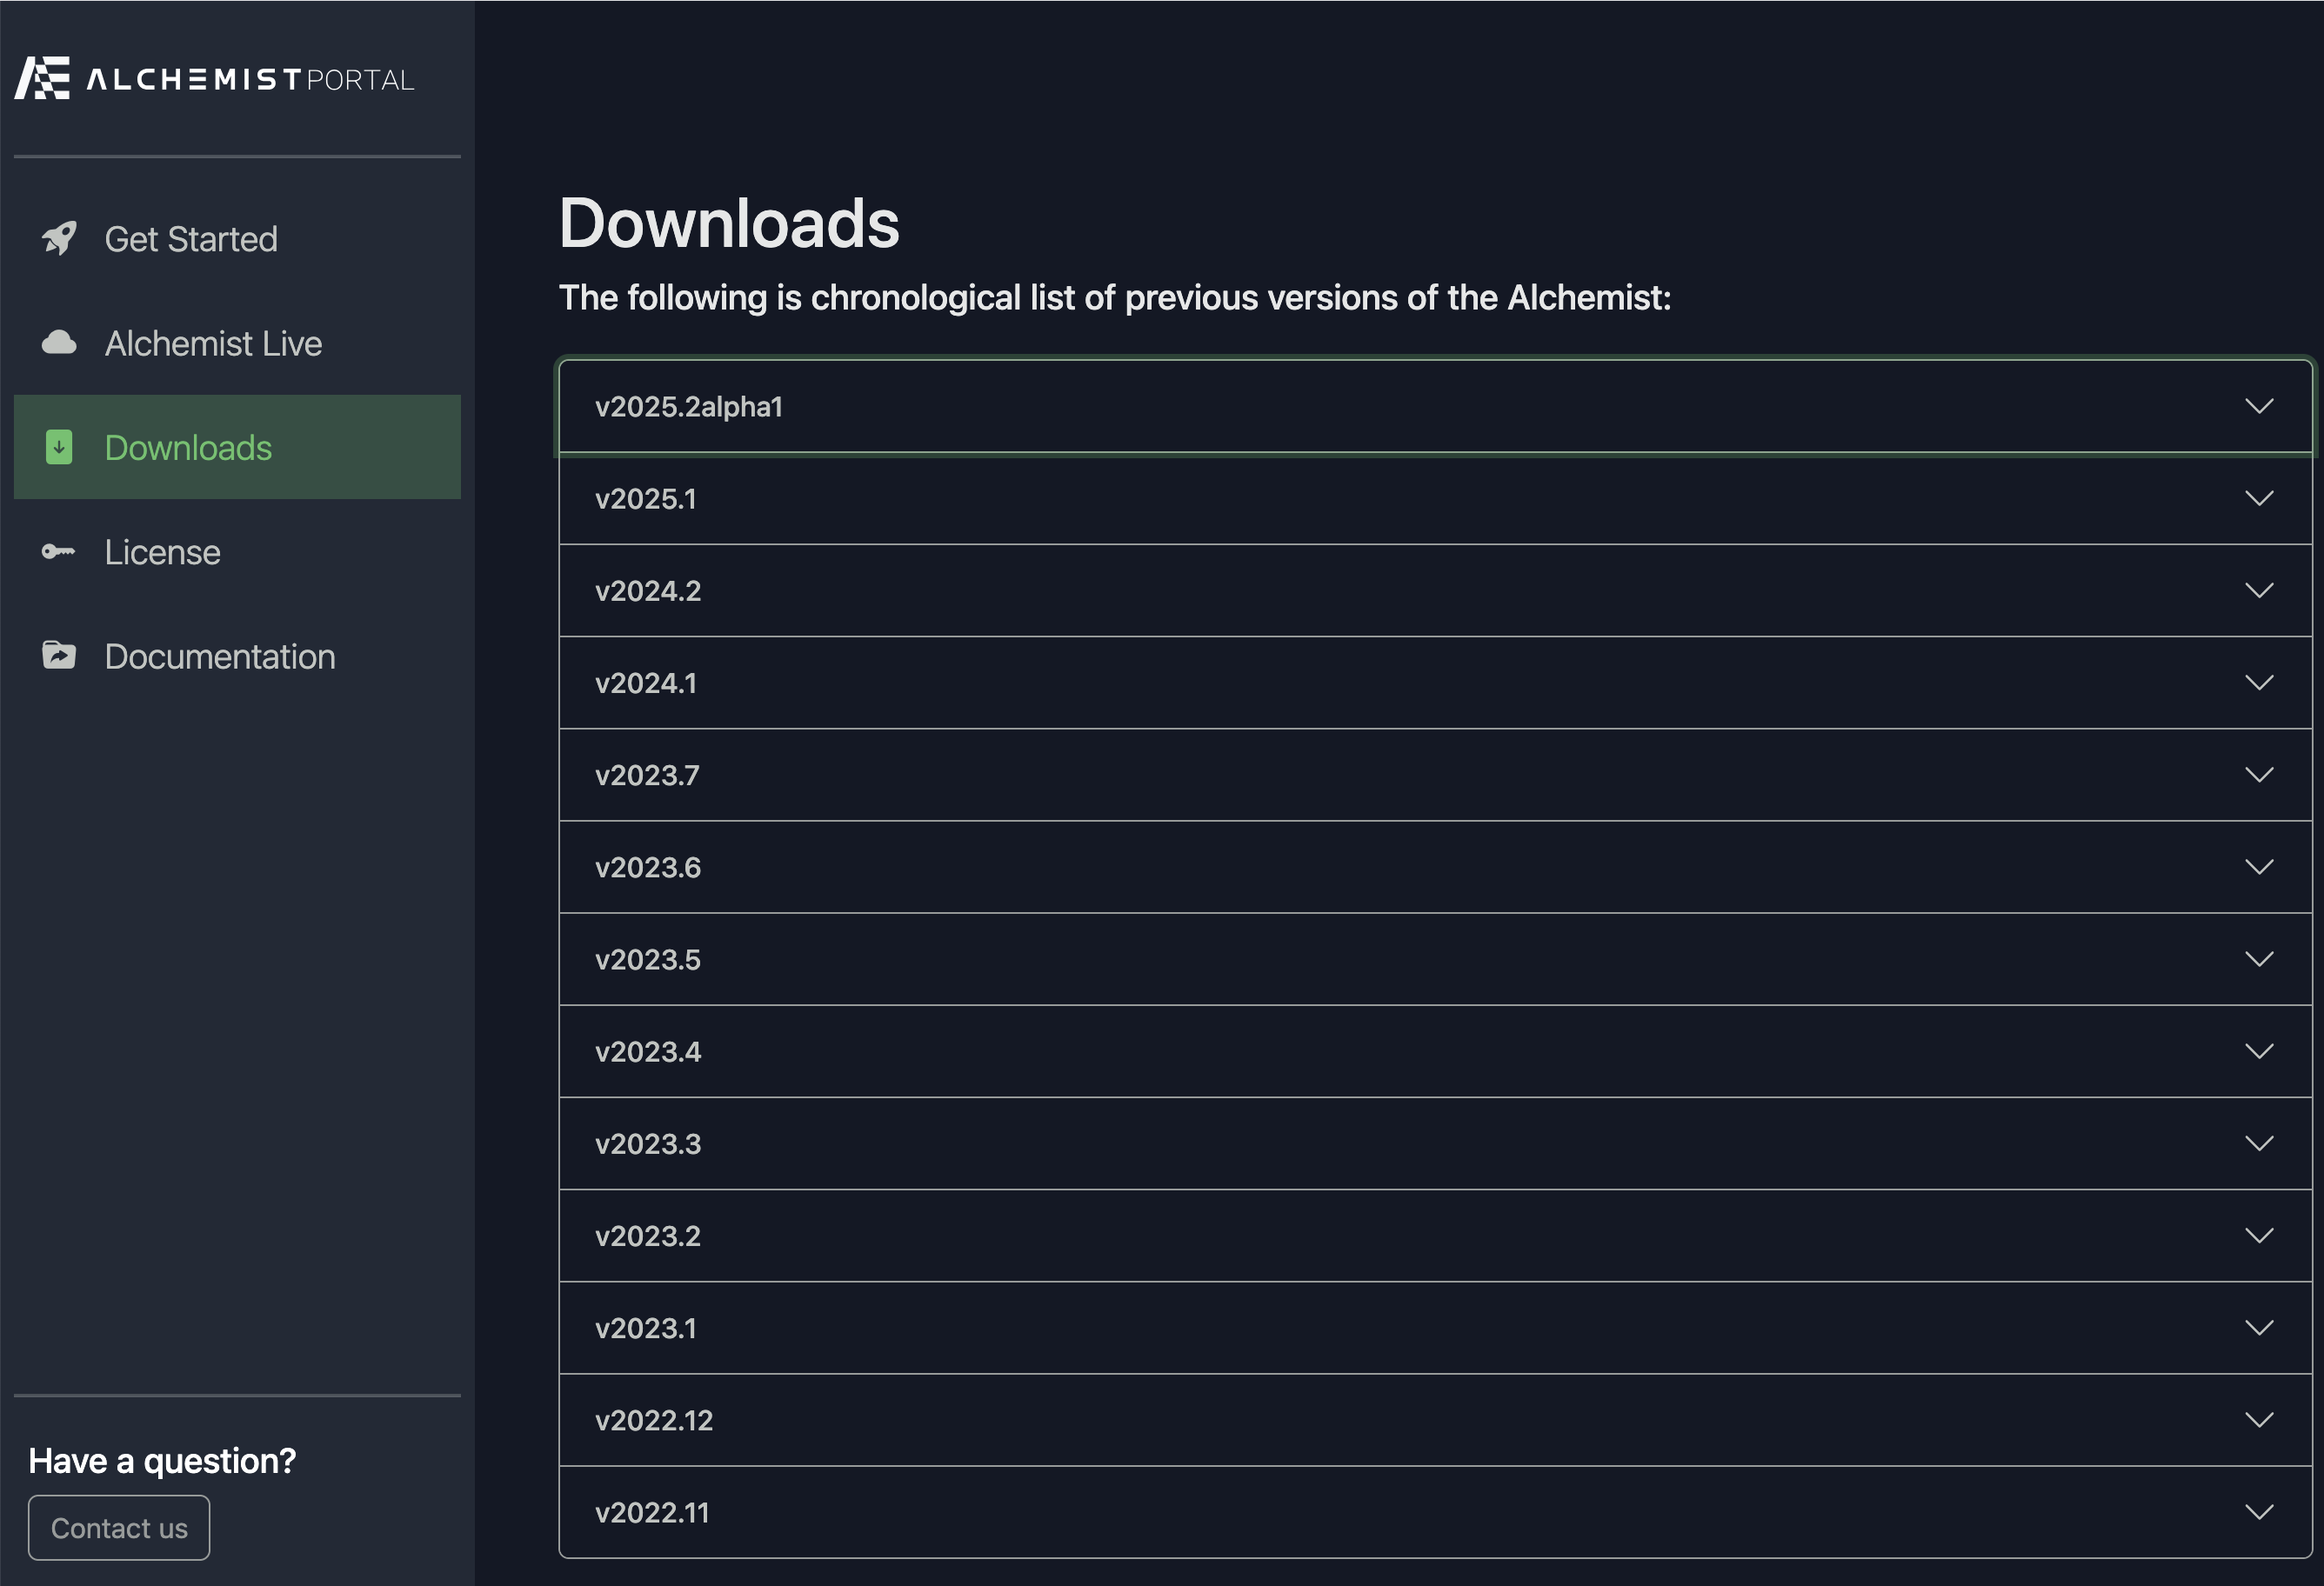
This guide requires Alchemist version 2025.2 or later. Sign in to the portal, open the Downloads page, and pick the installer for your operating system (macOS Apple Silicon or Windows).
Run the installer.
On macOS, add Alchemist to your PATH after installing:
export PATH="/Applications/Alchemist:$PATH"
To make this permanent, add the line above to your ~/.zshrc or ~/.bash_profile.
On Windows, the installer should register the Alchemist install directory on your Path automatically — open a fresh Command Prompt or PowerShell window after installation to pick up the change.
Verify the installation:
alchemist --version
If alchemist --version returns "command not found" in a fresh shell, add the install directory to your user Path manually:
$env:Path = "C:\Program Files (x86)\Alchemist\Alchemist;$env:Path"
The line above is for the current session only. To make it permanent, add C:\Program Files (x86)\Alchemist\Alchemist to your user Path via System Properties → Environment Variables, then restart the shell.
The license file you'll need is bundled with the lab assets you'll clone in the next sections — license activation is covered at the end of step 5.
4. Explore SAS Artifacts
This tutorial uses three sample SAS artifacts that represent a typical insurance analytics estate.
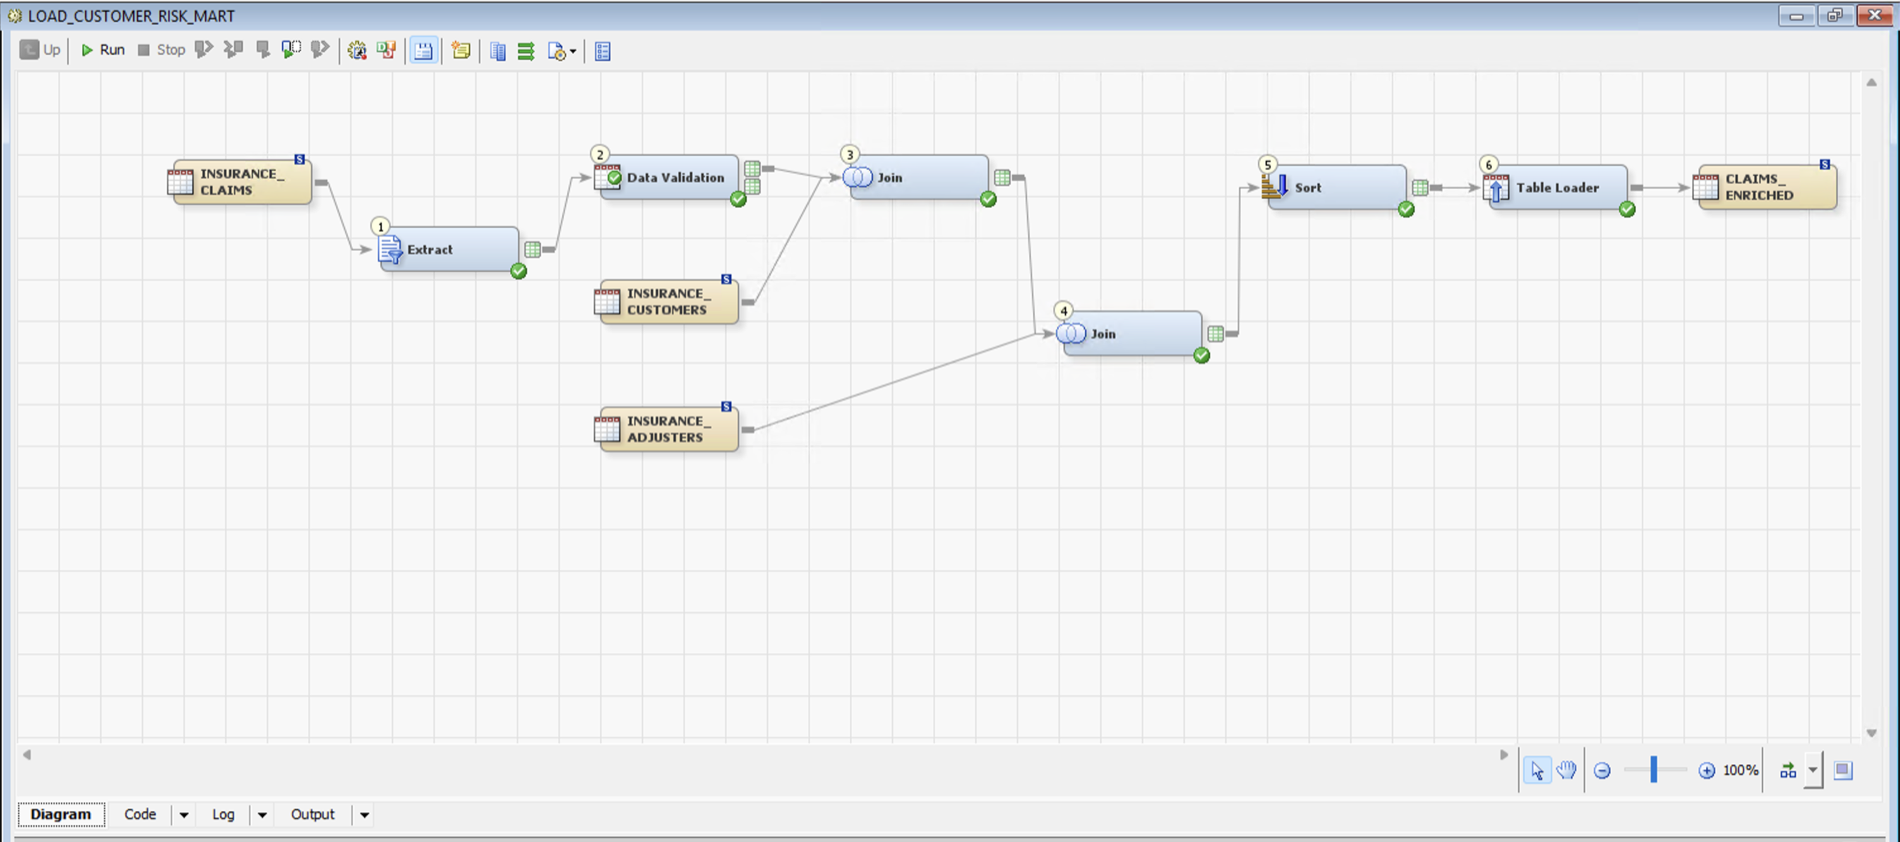
insurance.egp(EG Project) — end-to-end insurance workflow: risk tiering, premium ranking, claim enrichment, and adjuster reporting. Covers Sort, Query Builder, Rank, Transpose, Split, Append, and custom PROC SQL/DATA step tasks.quarterly_portfolio_review.sas(BASE Code) — parameterized quarterly review producing a multi-section ODS PDF: headline KPIs, policy mix, risk-band cross-tabs, and adjuster workload. Exercises PROC FORMAT, PROC SQL, PROC MEANS, PROC FREQ, PROC TABULATE, PROC SGPLOT, and ODS styling.di.spk(DI Job) — metadata-driven ETL that joins three operational tables intoMART.CLAIMS_ENRICHED. Flow: Data Validation → SQL Join × 2 → Sort → Table Loader (Replace).
5. Set Up the Lab
Pull just this guide's lab folder using a shallow, sparse clone. The same commands work on macOS, Linux, Git Bash on Windows, and Windows PowerShell — git is identical across platforms.
git clone --depth 1 --filter=blob:none --sparse --branch sas-to-snowflake-migration https://github.com/ibaranov91/sfquickstarts.git
cd sfquickstarts
git sparse-checkout set site/sfguides/src/sas-to-snowflake-migration/assets
cd site/sfguides/src/sas-to-snowflake-migration/assets
Note: the
git cloneline is long but intentionally on a single line — it works without modification in macOS Terminal, Linux, Git Bash, and Windows PowerShell. Bash backslash continuations (\) would break in PowerShell.
You are now in the lab directory. It contains everything you need:
.
├── alc_config.yml
├── source_lock.json
├── .gitattributes
├── sas_artifacts/
│   ├── enterprise_guide/insurance.egp
│   ├── data_integration/di.spk
│   └── base_code/quarterly_portfolio_review.sas
├── data/
│   ├── insurance_customers.csv
│   ├── insurance_claims.csv
│   └── insurance_adjusters.csv
├── snowflake/00_setup.sql
└── output/
    ├── base_code/
    ├── enterprise_guide/
    └── data_integration/
A few pieces of scaffolding worth understanding:
alc_config.yml— picked up automatically byalchemistwhen run from this directory. It tells the converter to emit Jupyter notebooks (output_format: ipynb) instead of plain.pyfiles, and maps the SAS librefs used in the samples (LDEMO,LDEMODI,LMART) all toLDEMO.PUBLICin Snowflake.source_lock.json— the demo license file. You'll activate it at the end of this step..gitattributes— pins SAS source line endings to LF so the source-locked license validates identically on macOS, Linux, and Windows. Don't remove this file.output/— three empty subfolders the convert commands write into.alchemist convert -odoes not create the output directory itself, so they ship pre-created in the repo.
Note: Alchemist performs static code analysis and does not require or process the CSV data — it only needs the SAS source files. The CSVs are loaded into Snowflake separately in step 7.1.
Activate the demo license
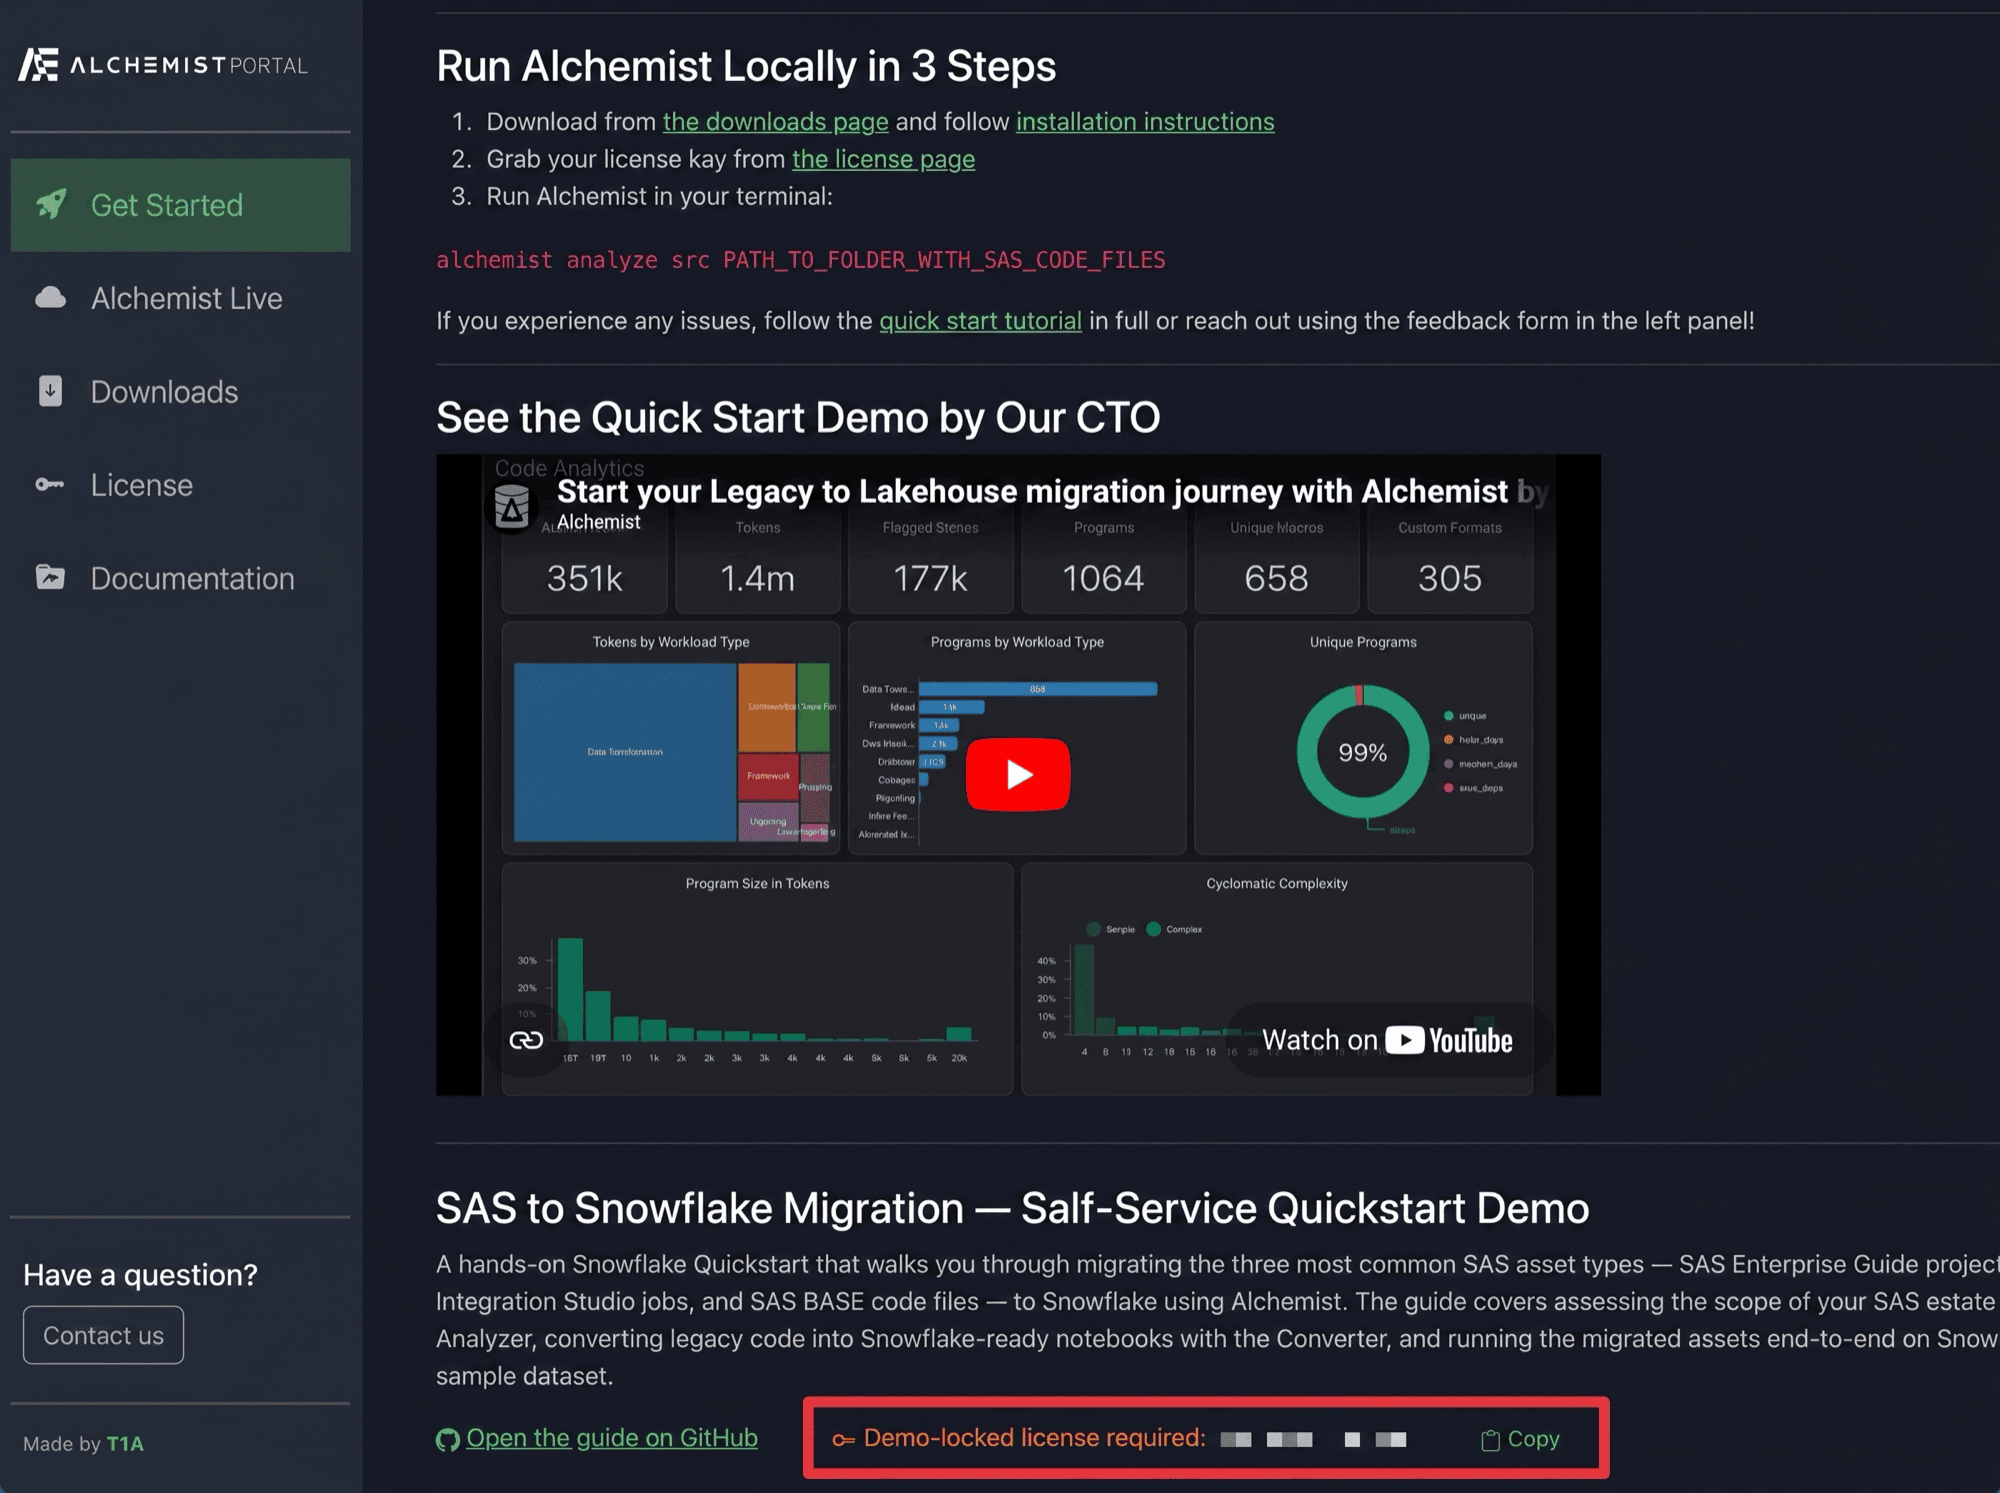
The lab uses a source-locked demo license: the source_lock.json file in the lab folder is paired with a license key listed on the Alchemist Portal Get Started page. Scroll to the bottom of that page, find the SAS to Snowflake Migration — Self-Service Quickstart Demo section, and copy the Demo-locked license required key.
From the lab directory you cd'd into above, run:
alchemist license -l source_lock.json
When prompted, paste the license key you copied from the portal.
Note: If you previously activated a different Alchemist license on this machine, reset it first so the demo license takes effect:
alchemist license reset
alchemist license -l source_lock.json
6. Analyze SAS Artifacts
Before converting, run Alchemist Analyzer to get a breakdown of your SAS estate: file count, token volume, workload type mix, and the constructs that will need attention during conversion.
A single analyzer run covers all three sample asset types at once:
alchemist analyze src ./sas_artifacts
The dashboard opens automatically at http://127.0.0.1:10888. The Main tab shows a project overview across every source file — token count, executable-type breakdown (SAS Programs, EG Flows, DI Jobs), and workload-type mix:
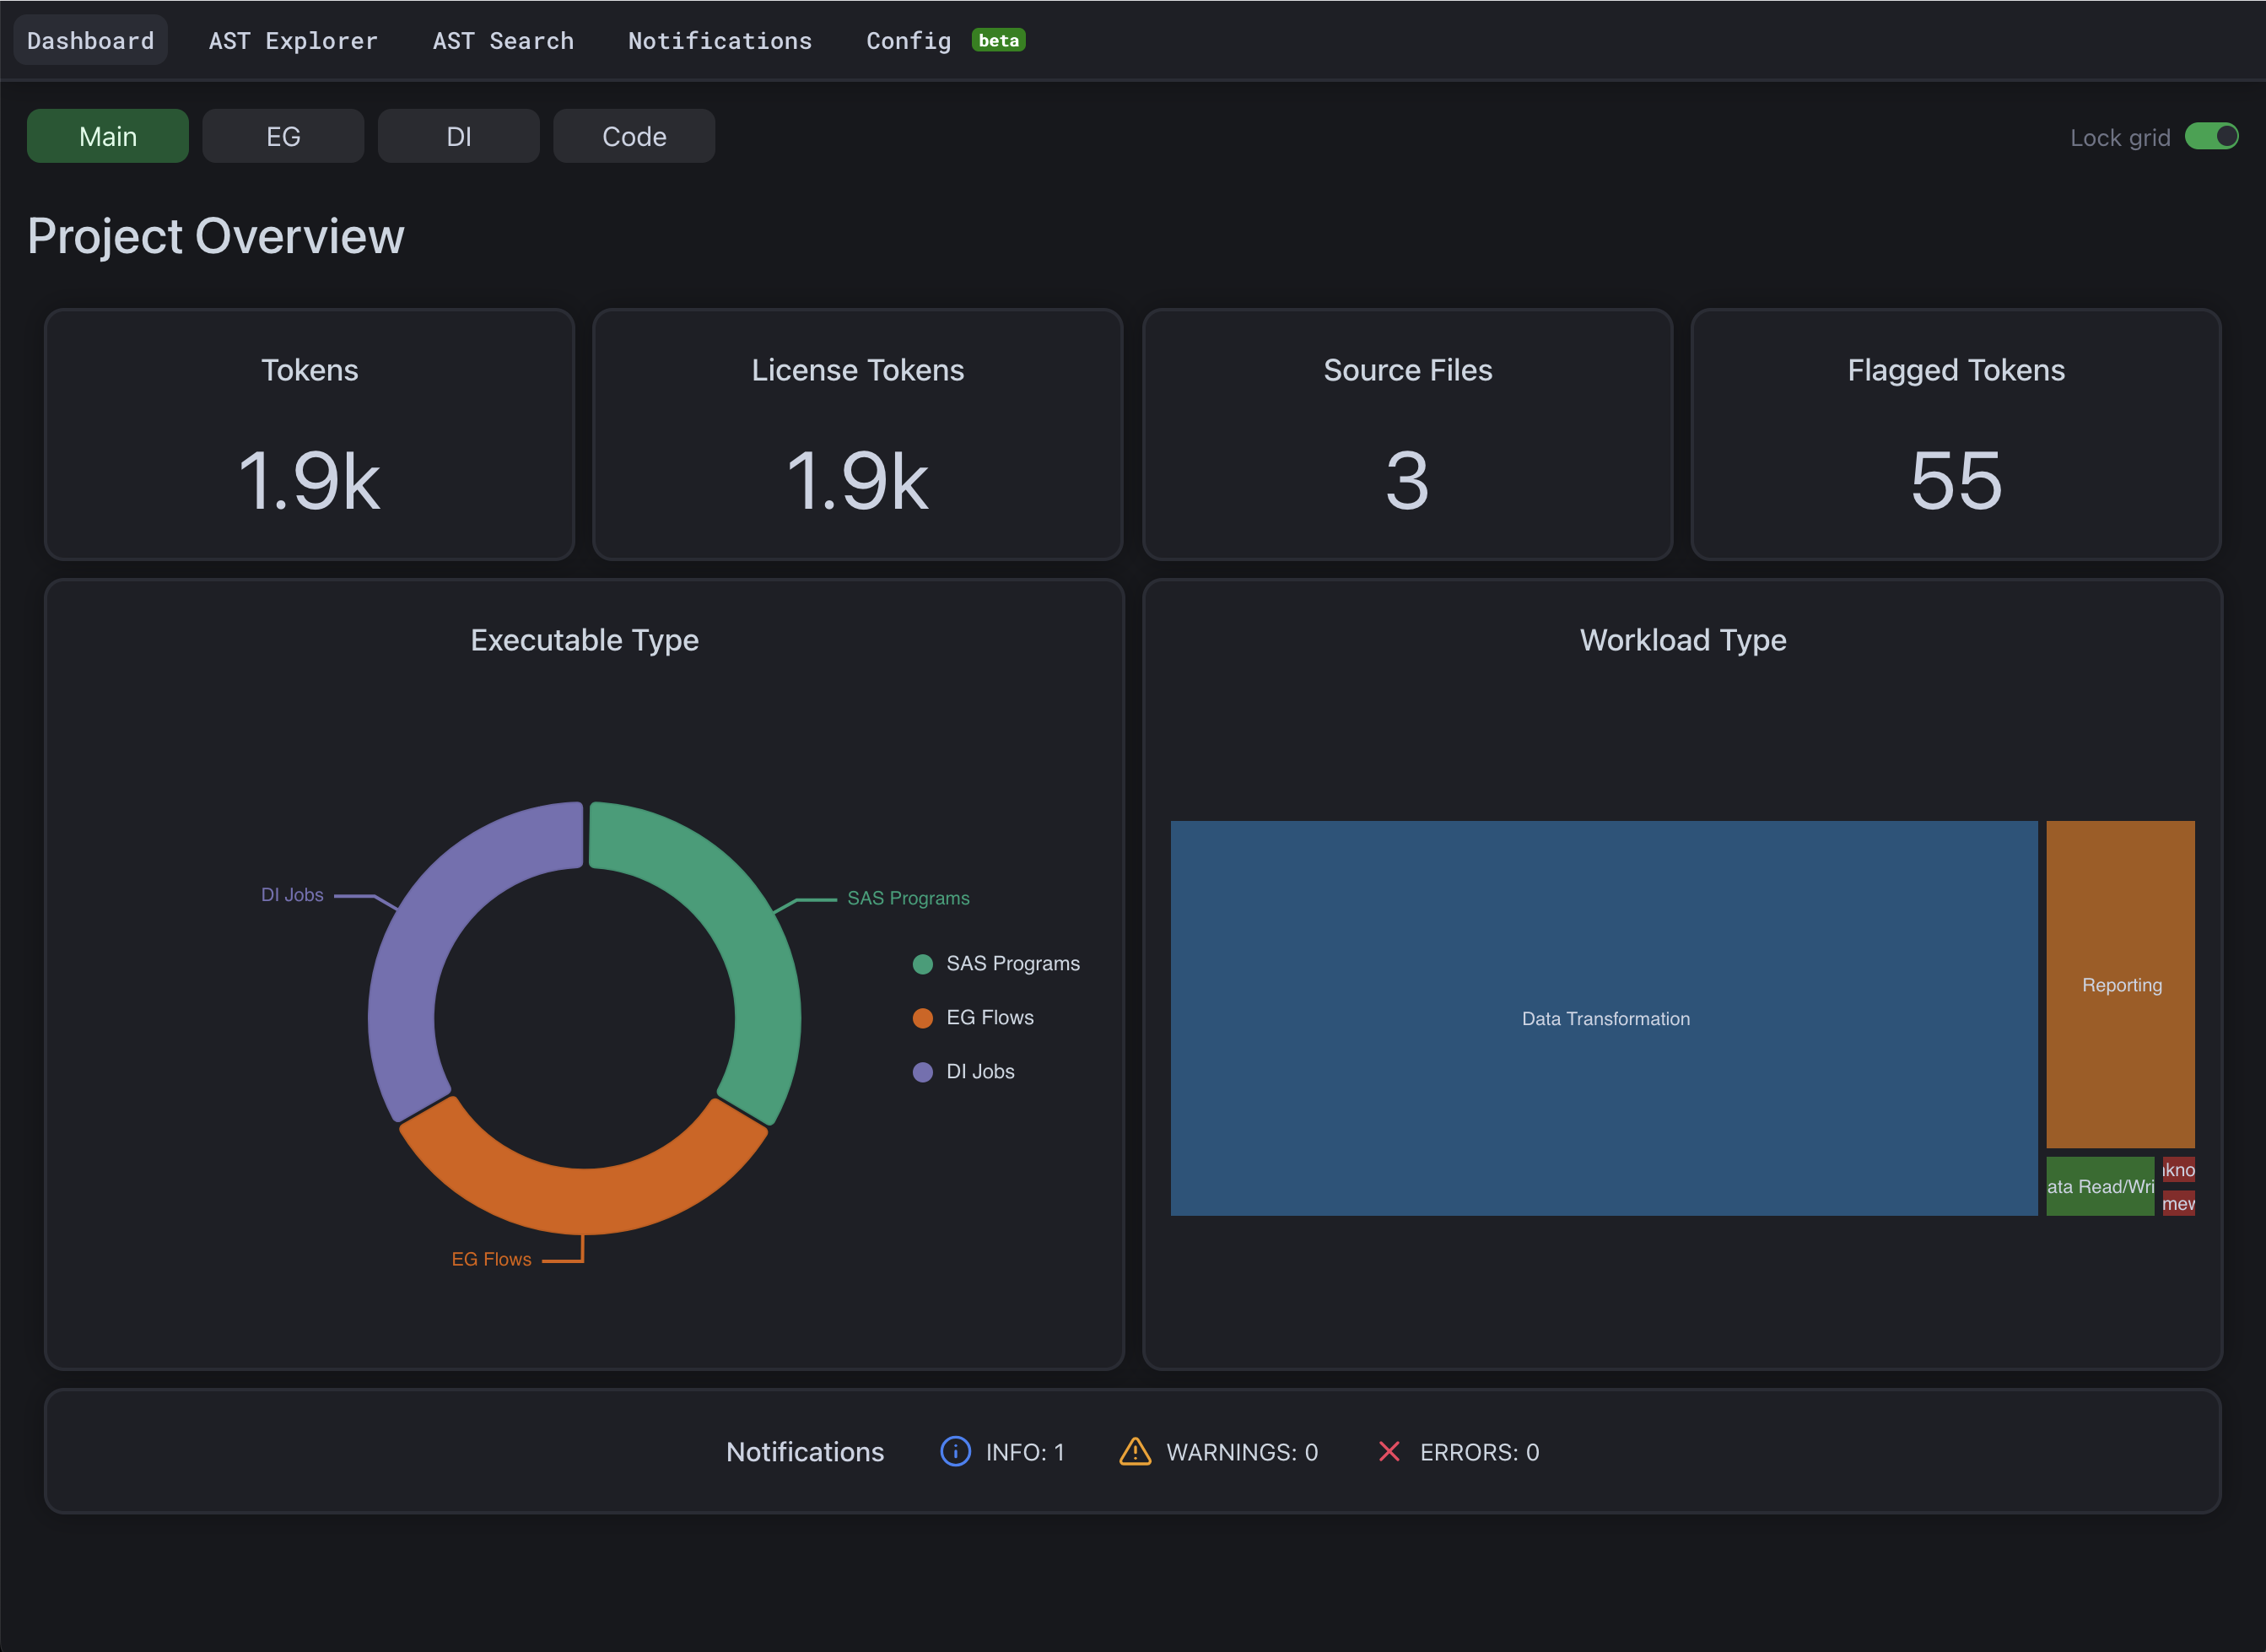
The EG, DI, and Code tabs alongside Main provide more details about each specific asset type.
Note: Alchemist Analyzer can include at most one
.spkfile per run, but that single.spkcan be analyzed alongside any number of.egpprojects and.sasfiles. If your estate has multiple DI jobs, run the analyzer once per.spkand combine the others freely with each run.
7. SAS BASE Code
7.1 Import Source Data
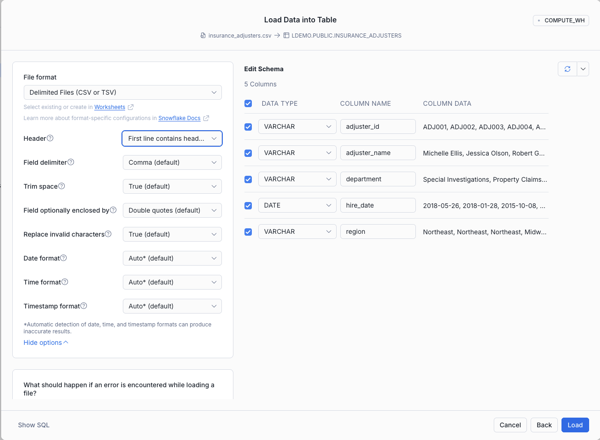
The converted code reads from three tables — INSURANCE_CUSTOMERS, INSURANCE_CLAIMS, and INSURANCE_ADJUSTERS. Load them into Snowflake using the Add Data UI before running the converted code.
The CSV files are in the data/ folder of the cloned repository.
Repeat the following steps for each of the three CSV files:
- In Snowsight under Ingestion select Add Data
- Choose Load data into a Table.
- Upload the CSV file from your local
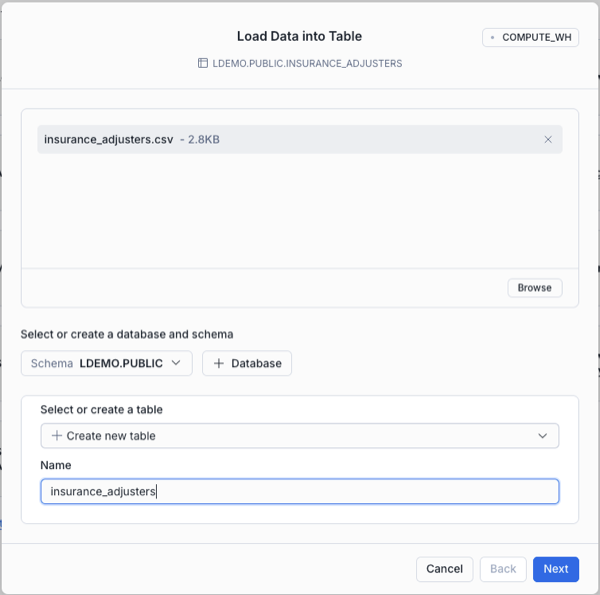
data/folder. - Set the database to
LDEMOand the schema toPUBLIC. The converted code references tables asLDEMO.INSURANCE_*so these names must match exactly. - Use the filename as the table name:
insurance_customers,insurance_claims,insurance_adjusters.
- On the next tab click "View options" and select "First line contains header" in the Header dropdown
- Let Snowflake infer the schema from the file, then confirm and Load
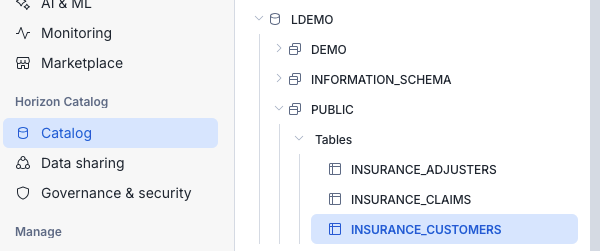
- After loading all 3 files your LDEMO.PUBLIC schema should look like that
7.2 Convert
- From your lab directory, run:
alchemist convert \
  -p insurance_review \
  -t spark \
  -o ./output/base_code \
  ./sas_artifacts/base_code
-
Open the converted notebook. Alchemist preserves the source-tree shape under your output directory, so the full path is:
output/base_code/insurance_review_converted_files/Programs/sas_artifacts/base_code/quarterly_portfolio_review.ipynbSubsequent steps abbreviate this as
output/base_code/.../quarterly_portfolio_review.ipynb. -
Any construct Alchemist couldn't convert automatically is marked
# TODO:. Reporting-only statements (ODS,TITLE,FOOTNOTE) can be deleted — they have no notebook equivalent.
7.3 Deploy
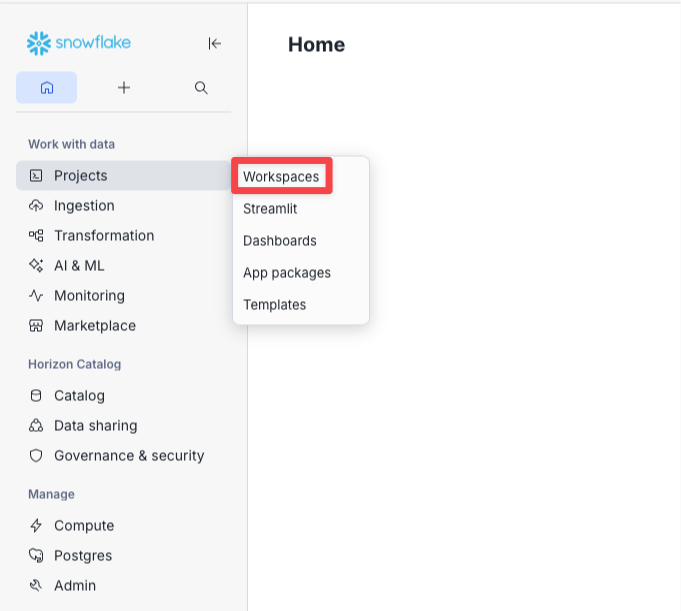
- In Snowsight go to Projects → Workspaces.
-
Click + Add new → Notebook → Upload .ipynb file. Select
output/base_code/.../quarterly_portfolio_review.ipynb, name it, and click Create. -
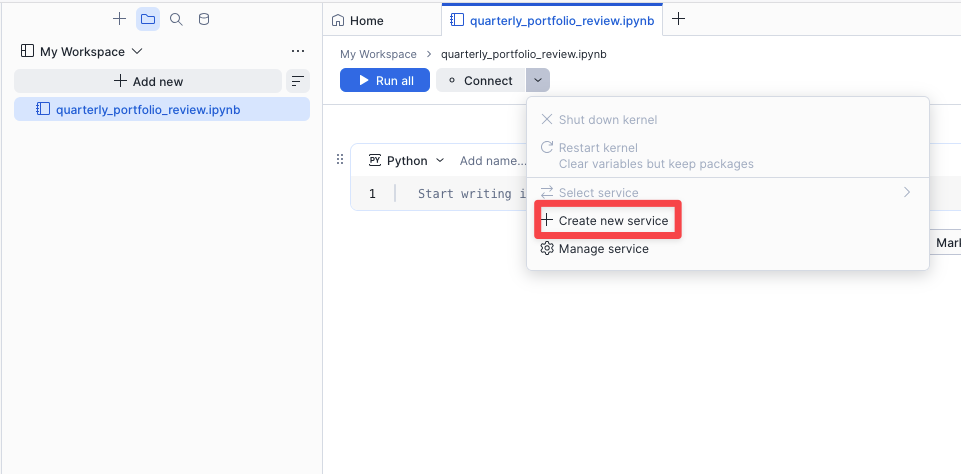
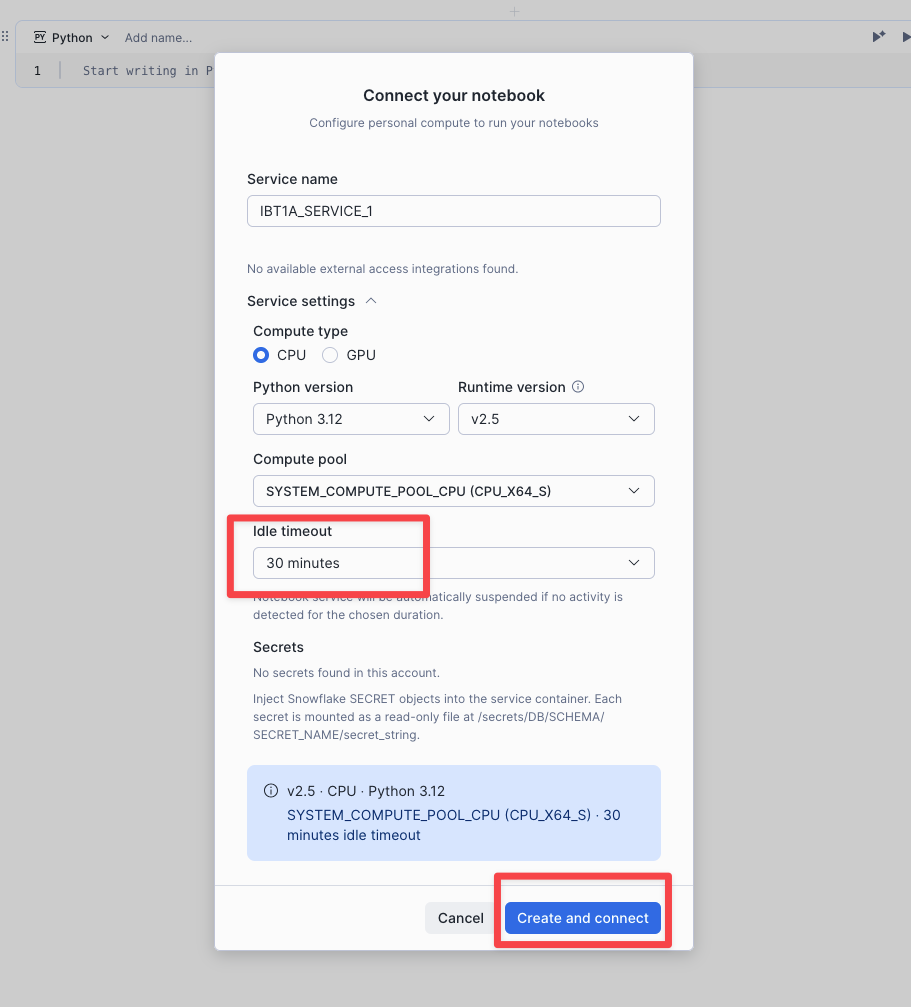
Click Connect → + Create new service, set Idle timeout to 30 minutes, and click Create and connect.
- Add a SQL cell at the very top of the notebook:
USE DATABASE LDEMO;
USE SCHEMA PUBLIC;
- In cell "1. Imports", swap
SparkSessionforsnowpark_connect:
# Before
from pyspark.sql import SparkSession
from pyspark.sql.functions import desc, expr, when

# After
from snowflake import snowpark_connect
from pyspark.sql.functions import desc, expr, when
- In cell "2. Setup Spark session", replace the builder:
# Before
spark = SparkSession.builder.config("spark.sql.ansi.enabled", True).getOrCreate()

# After
spark = snowpark_connect.server.init_spark_session()
- Click Run all.
8. EG Project
8.1 Convert
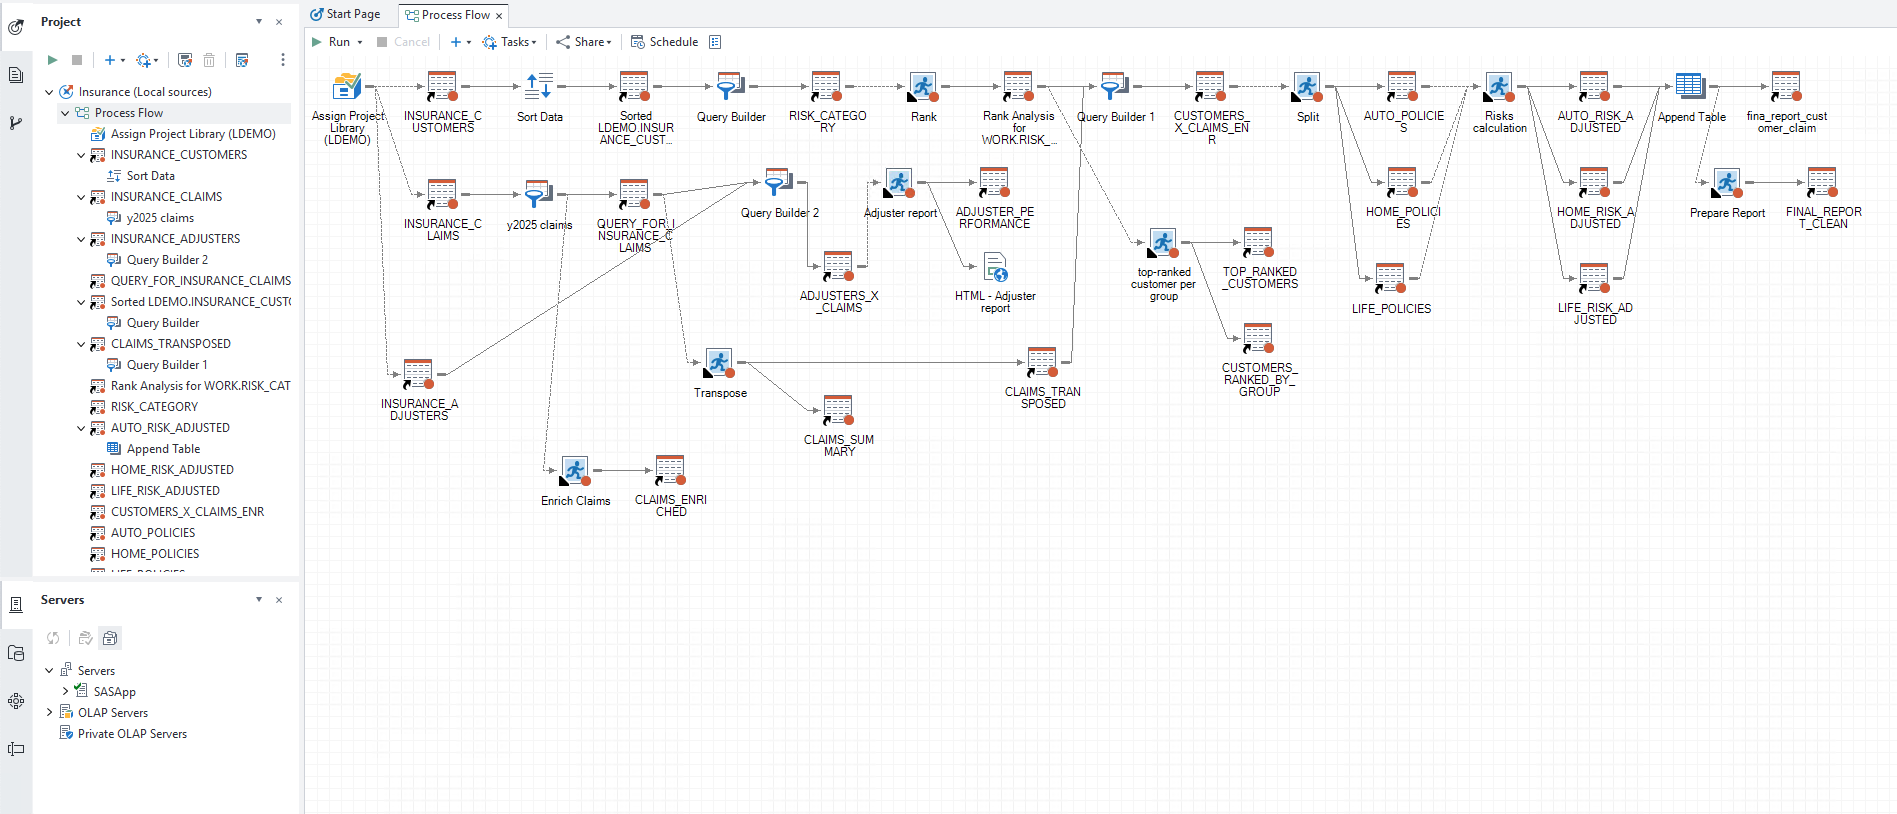
The sample project contains 15 task nodes across two parallel branches — a customer risk path and a claims enrichment path — that merge into a final reporting stage:
- Run the converter:
alchemist convert \
  -p insurance_eg \
  -t spark \
  -o ./output/enterprise_guide \
  ./sas_artifacts/enterprise_guide
- Open
output/enterprise_guide/.../insurance_Process_Flow.ipynb. Delete the four cosmetic TODOs:
# TODO: Unsupported node type <SASLibnameDef>     ← delete
# TODO: Unsupported node type <SASRunStatement>   ← delete
# TODO: Unsupported statement: TITLE              ← delete
# TODO: Unsupported statement: FOOTNOTE           ← delete
- The Adjuster report task ends with
# TODO: Unsupported procedure PRINT. Replace it with:
df_adjuster_performance.show(20)
8.2 Deploy
The three source tables are already loaded in LDEMO.PUBLIC from step 7.1 — no additional data loading needed.
-
In Snowsight go to Projects → Workspaces → Add new → Notebook → Upload .ipynb file. Select
output/enterprise_guide/.../insurance_Process_Flow.ipynb, name itinsurance_eg_flow, and click Create. -
Click Connect and select the compute service you already created.
-
Add a SQL cell at the very top:
USE DATABASE LDEMO;
USE SCHEMA PUBLIC;
- In cell "1. Imports", swap
SparkSessionforsnowpark_connect:
# Before
from pyspark.sql import SparkSession, Window
from pyspark.sql.functions import asc, col, desc, expr, row_number, when

# After
from snowflake import snowpark_connect
from pyspark.sql.functions import asc, col, desc, expr, row_number, when
from pyspark.sql import Window
- In cell "2. Setup Spark session", replace the builder:
# Before
spark = SparkSession.builder.config("spark.sql.ansi.enabled", True).getOrCreate()

# After
spark = snowpark_connect.server.init_spark_session()
- Click Run all.
9. DI Job
9.1 Convert
The sample DI job (LOAD_CUSTOMER_RISK_MART) reads three operational tables and produces the CLAIMS_ENRICHED mart through six numbered transforms — Extract, Data Validation, two Joins, Sort, and a Table Loader:
- Run the converter:
alchemist convert \
  -p insurance_di \
  -t spark \
  -o ./output/data_integration \
  ./sas_artifacts/data_integration
- Open
output/data_integration/.../LOAD_CUSTOMER_RISK_MART.ipynb. Find thestep2_Data_Validationstub and replace it — the notebook will fail without this:
# Before (stub — will crash at runtime)
def step2_Data_Validation(spark, df_input):
    # TODO: Unsupported Data/Data Validation transform <Data Validation> (node.sas_meta_id='A5JCJVA0.BW005NFI'). Convert manually or via a template.
    return (df_output1, df_output2)

# After
def step2_Data_Validation(spark, df_input):
    from pyspark.sql.functions import col
    df_output1 = df_input.filter(
        (col("CLAIM_AMOUNT") > 0) & col("ADJUSTER_ID").isNotNull()
    )
    df_output2 = df_input.subtract(df_output1)
    return (df_output1, df_output2)
9.2 Deploy
-
In Snowsight go to Projects → Workspaces → + Add new → Notebook → Upload .ipynb file. Select
output/data_integration/.../LOAD_CUSTOMER_RISK_MART.ipynb, name itload_customer_risk_mart, and click Create. -
Click Connect and select the compute service you already created.
-
Add a SQL cell at the very top:
USE DATABASE LDEMO;
USE SCHEMA PUBLIC;
- In cell "1. Imports", swap
SparkSessionforsnowpark_connect:
# Before
from pyspark.sql import SparkSession
from pyspark.sql.functions import asc, col, desc

# After
from snowflake import snowpark_connect
from pyspark.sql.functions import asc, col, desc
- In cell "2. Setup Spark session", replace the builder:
# Before
spark = SparkSession.builder.config("spark.sql.ansi.enabled", True).getOrCreate()

# After
spark = snowpark_connect.server.init_spark_session()
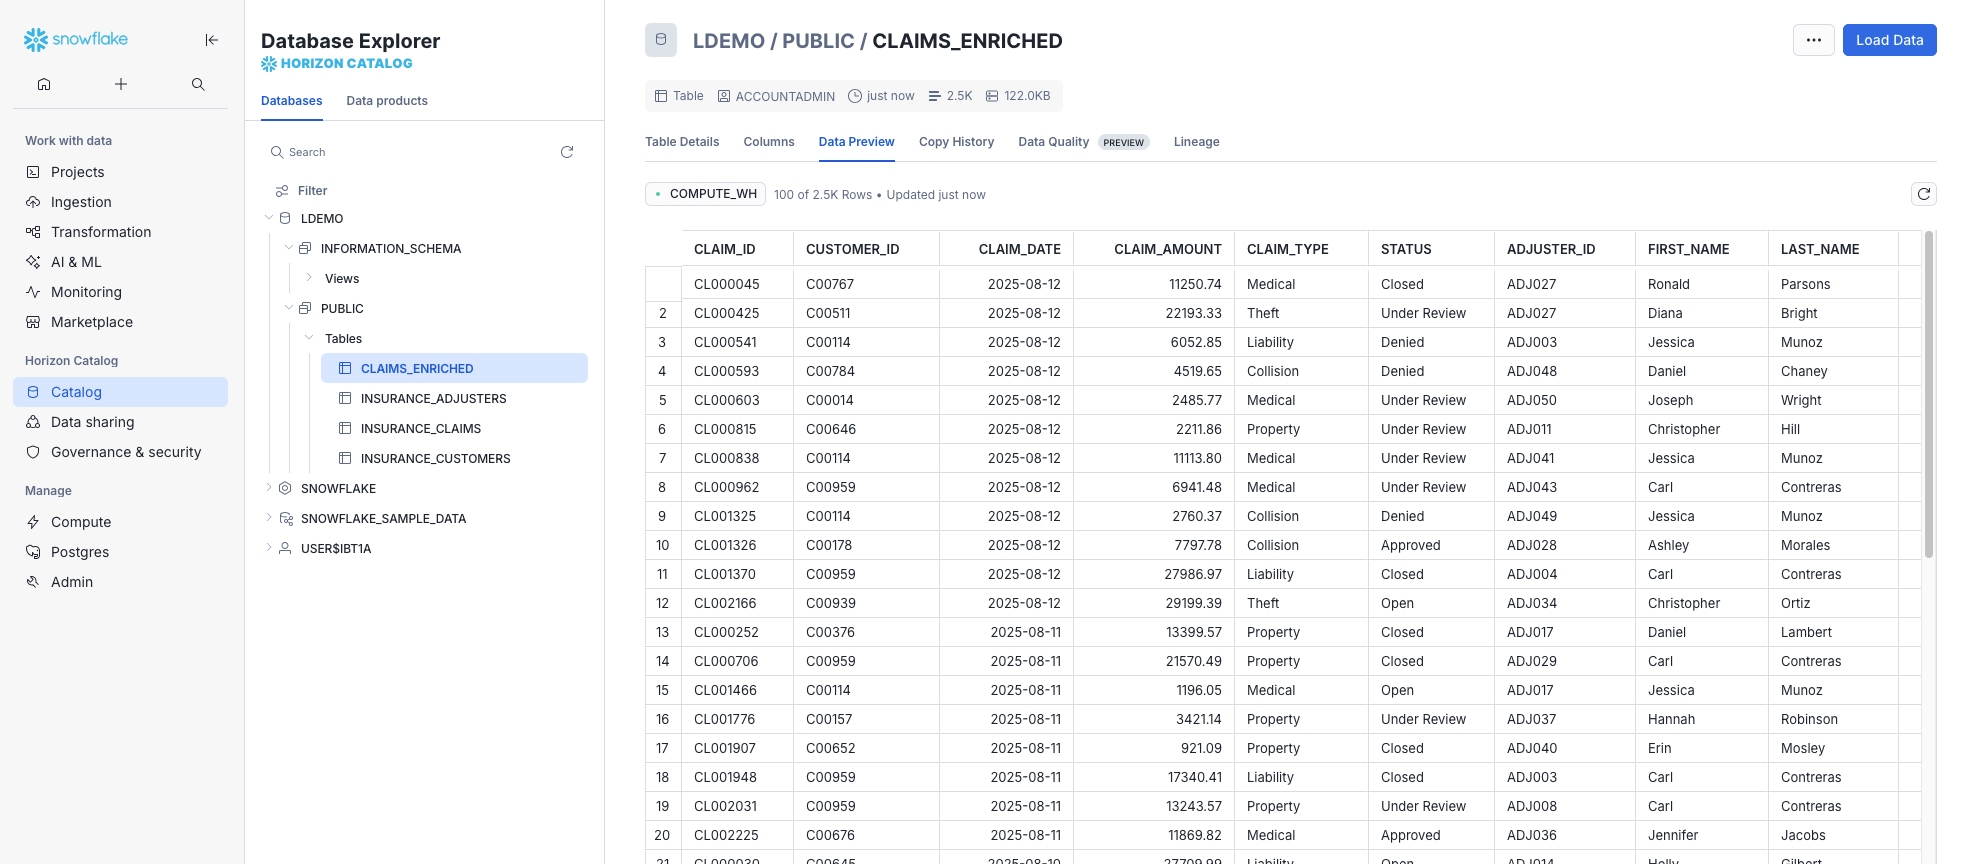
- Click Run all. Once complete, open Database Explorer → LDEMO → PUBLIC → CLAIMS_ENRICHED to verify the output.
10. Conclusion
Congratulations — you have completed the full SAS-to-Snowflake migration workflow using T1A Alchemist.
What you learned
- Assess: how to use Alchemist Analyzer to build a complete, dependency-aware picture of a SAS estate before writing a single line of SQL.
- Convert: how to migrate all three major SAS asset types (Enterprise Guide projects, Data Integration Studio jobs, and BASE code files) to Snowflake-ready SQL and Snowpark notebooks.
Validation of the converted code outside the scope of this guide, but T1A provides a dedicated validation framework that automatically compares the output of original SAS code against the converted Snowflake code — row by row, column by column — to confirm logical equivalence. This is especially important for regulated workloads where manual spot-checking is not sufficient.
Why Alchemist
Manual SAS migration is slow, error-prone, and expensive. Alchemist shortens the cycle significantly by automating the parts that can be automated — syntax translation, dependency mapping, and notebook scaffolding — while keeping a human in the loop for the logic that requires review. Key advantages:
- Repeatability: the same pipeline produces consistent output across hundreds or thousands of assets.
- Auditability: every conversion decision is traceable, so compliance and QA teams can verify the migration rather than trust it.
- AI with guardrails: LLMs are used as one layer inside a structured pipeline, not as a free-form translator. This prevents the logic errors that plague purely generative approaches on regulated workloads.
Next steps
- Explore the T1A Alchemist documentation for advanced converter templates and batch-conversion workflows.
- Run Alchemist Analyzer against your own SAS estate to get a complexity and effort estimate before committing to a full migration project.
- Reach out to T1A if you need help scoping or accelerating a production migration.
This content is provided as is, and is not maintained on an ongoing basis. It may be out of date with current Snowflake instances
