Agentic AI for Your Lakehouse: Snowflake Cortex and Gemini Enterprise on Iceberg
Overview
We're going to build an AI agent that answers economic questions about the wellbeing of Americans — and make it available to anyone in the organization. The agent will live in Snowflake, but employees will talk to it from Gemini Enterprise, their everyday corporate AI assistant.
We start from raw public data. We land it in an Apache Iceberg table on your own GCS bucket. We teach an AI model what the data means through a Semantic View. And we wrap it all in a Cortex Agent powered by Gemini.
The key idea: define your business logic once, in the data layer, not in prompts. That way every consumer — a chat interface, a BI dashboard, an external AI assistant — gets the same correct answer from the same governed data.
Tip: This quickstart is also available as a Snowflake Notebook that you can run directly in Snowsight Workspaces. More info.
What You Will Learn
- How to create Snowflake-managed Iceberg tables on GCS
- How to build a Semantic View that grounds AI on business logic
- How to create a Cortex Agent powered by Gemini
- How to expose the agent via MCP (Model Context Protocol)
- How to connect Gemini Enterprise to Snowflake through MCP
- How to connect Looker to the same Iceberg data for BI dashboards
What You Will Build
- An Apache Iceberg table on your GCS bucket with US economic indicators
- A Semantic View defining dimensions, facts, and metrics
- A Cortex Agent accessible from Snowflake CoWork and Gemini Enterprise
- An MCP server with OAuth for secure cross-platform access
- A Looker dashboard connected to the same Iceberg data
Prerequisites
- A Snowflake account on GCP with
ACCOUNTADMINprivileges - A Google Cloud project with permissions to create GCS buckets
- Gemini Enterprise enabled in your Google Workspace (for the MCP connection step)
Setup
We need three environments for this lab:
Tip: Use Incognito mode or create a temporary Chrome profile (top right of Chrome window > Profile icon > Add > Stay signed out > name: "workshop") to manage all lab accounts. Qwiklabs and DataOps will provide URLs for your GCP and Snowflake accounts. Open all account URLs in this "workshop" profile or Incognito window.
If you are using official workshop that Qwiklabs provides your GCP account and DataOps provides your Snowflake account, follow the below video and instructions.
Follow this how-to setup video to set up your environments.
In your main Chrome profile:
-
Google Cloud — We will create a GCS bucket for Iceberg storage and later use Gemini Enterprise to interact with our agent.
- Go to Qwiklabs for your GCP lab environment.
- Log in or sign up using the same email you used to register for the workshop.
- Choose the snowflake lab and click.
- Qwiklabs will provide a URL to open the Google Cloud Console along with temporary credentials.
-
Snowflake — This is where we will build everything: Iceberg tables, Semantic Views, Cortex Agents, and the MCP server.
- Go to DataOps to sign in or register.
- DataOps will provide a URL to your Snowflake account along with a username and password.
-
Looker — We will connect a BI dashboard to the same Iceberg data.
- Login information will be provided during the workshop.
In your Incognito window or temporary "Workshop" Chrome profile:
-
GCP Environment:
- Use the Qwiklabs URL to open your provisioned GCP console, which we will use to set up GCS buckets.
- You can also use
Cloud Shell(located on the top right bar) as a terminal connected directly to your GCP account if scripting is needed.
-
Snowflake Environment for running the lab:
- Use the DataOps URL to open your provisioned Snowflake environment.
- Open Workspaces from the left panel.
- Open the shared workspace
gcp-snowflake-solutions. - Open the file
hands-on-lab-cortex-gemini/hol-cortex-gemini.ipynb— the notebook version of this guide — if you prefer to run the lab as a notebook, cell by cell. Otherwise follow the steps in this guide from a SQL worksheet.
-
Snowflake Environment for UI exploration:
- Open a second Snowflake tab using the DataOps URL so you can explore the UI during the workshop.
- From the left panel, locate Cortex Agents, Analyst, Snowflake Marketplace, Database Explorer, Workspaces, dbt Projects, Streamlit, Openflow, and Dynamic Tables.
- Feel free to explore Snowflake before the workshop begins.
Workspace
Snowflake Workspaces give you a full developer environment in the browser. It connects to a git repo so you can collaborate with a team, and runs Python and SQL files with a built-in compute engine.
Everything in this guide is plain SQL plus UI steps, so you can run it straight from a SQL worksheet. If you would rather run it as a notebook — mixed SQL, Python, and markdown cells sharing one session context — open the notebook version of this quickstart in a Snowflake Workspace:
UI-Snowsight: Go to Projects → Workspaces.
- Create a public git integration and connect to this repo.
- Click + on the very top left > Git Workspace
- Repo name:
https://github.com/sfc-gh-akhosro/gcp-snowflake-solutions - Choose public repo connection (no auth needed).
- Open
hands-on-lab-cortex-gemini/hol-cortex-gemini.ipynb. Click "Connected" to start service. It takes a few minutes — start it now and read ahead while it spins up.
UI-Snowsight: Open a second browser tab at the same Snowflake instance URL for exploring components. In this tab find Marketplace, Cortex Analyst, Agents, AI Functions, dbt Projects, Database Explorer, and Workspaces.
Role Based Access Control
Throughout this lab we use two roles:
hol_role— this is us, the developer. It runs the lab and owns everything we create.end_user_role— this simulates a business user who can only ask questions through the agent but can't build or modify anything.
Let's create those roles and grant the needed privileges.
USE ROLE ACCOUNTADMIN;

-- Create a warehouse for this lab (guaranteed to exist)
CREATE WAREHOUSE IF NOT EXISTS hol_wh
  WAREHOUSE_SIZE = 'XSMALL' AUTO_SUSPEND = 60 INITIALLY_SUSPENDED = TRUE;
USE WAREHOUSE hol_wh;

-- Builder role: owns all workshop objects
CREATE ROLE IF NOT EXISTS hol_role;

-- Consumer role: can only use the agent (CoWork, Gemini Enterprise)
CREATE ROLE IF NOT EXISTS end_user_role;

-- Attach both roles to the role hierarchy.
-- hol_role OWNS everything we build, so without this an admin has no path to
-- those objects once the workshop user goes away -- and cleanup becomes impossible.
-- ACCOUNTADMIN inherits SYSADMIN, so it can always do whatever hol_role can do.
GRANT ROLE hol_role      TO ROLE SYSADMIN;
GRANT ROLE end_user_role TO ROLE SYSADMIN;

-- Grant both roles to whoever is running this lab
BEGIN
  LET usr := CURRENT_USER();
  EXECUTE IMMEDIATE 'GRANT ROLE hol_role TO USER ' || :usr;
  EXECUTE IMMEDIATE 'GRANT ROLE end_user_role TO USER ' || :usr;
  -- MCP OAuth sessions (e.g., Gemini Enterprise) fail to initialize if the connecting user's DEFAULT_WAREHOUSE is null.
  EXECUTE IMMEDIATE 'ALTER USER ' || :usr || ' SET DEFAULT_WAREHOUSE = ''hol_wh''';
END;

-- Builder privileges
GRANT CREATE DATABASE        ON ACCOUNT TO ROLE hol_role;
GRANT CREATE WAREHOUSE       ON ACCOUNT TO ROLE hol_role;
GRANT CREATE INTEGRATION     ON ACCOUNT TO ROLE hol_role;
GRANT CREATE EXTERNAL VOLUME ON ACCOUNT TO ROLE hol_role;
GRANT OWNERSHIP ON WAREHOUSE hol_wh TO ROLE hol_role COPY CURRENT GRANTS;

-- Cortex access for both roles
GRANT DATABASE ROLE SNOWFLAKE.CORTEX_USER TO ROLE hol_role;
GRANT DATABASE ROLE SNOWFLAKE.CORTEX_USER TO ROLE end_user_role;

-- Switch to hol_role to build
USE ROLE hol_role;
USE WAREHOUSE hol_wh;

CREATE DATABASE IF NOT EXISTS hol_db;
USE SCHEMA hol_db.public;

-- Schema-level privileges (must come after database/schema exist)
USE ROLE ACCOUNTADMIN;
GRANT CREATE SEMANTIC VIEW ON SCHEMA hol_db.public TO ROLE hol_role;
USE ROLE hol_role;
USE WAREHOUSE hol_wh;
USE SCHEMA hol_db.public;

-- Grant consumer role usage on warehouse and database
GRANT USAGE ON WAREHOUSE hol_wh TO ROLE end_user_role;
GRANT USAGE ON DATABASE hol_db TO ROLE end_user_role;
GRANT USAGE ON SCHEMA hol_db.public TO ROLE end_user_role;

-- Verify context
SELECT CURRENT_ROLE() AS role, CURRENT_WAREHOUSE() AS wh, CURRENT_DATABASE() AS db, CURRENT_SCHEMA() AS schema;
Architecture
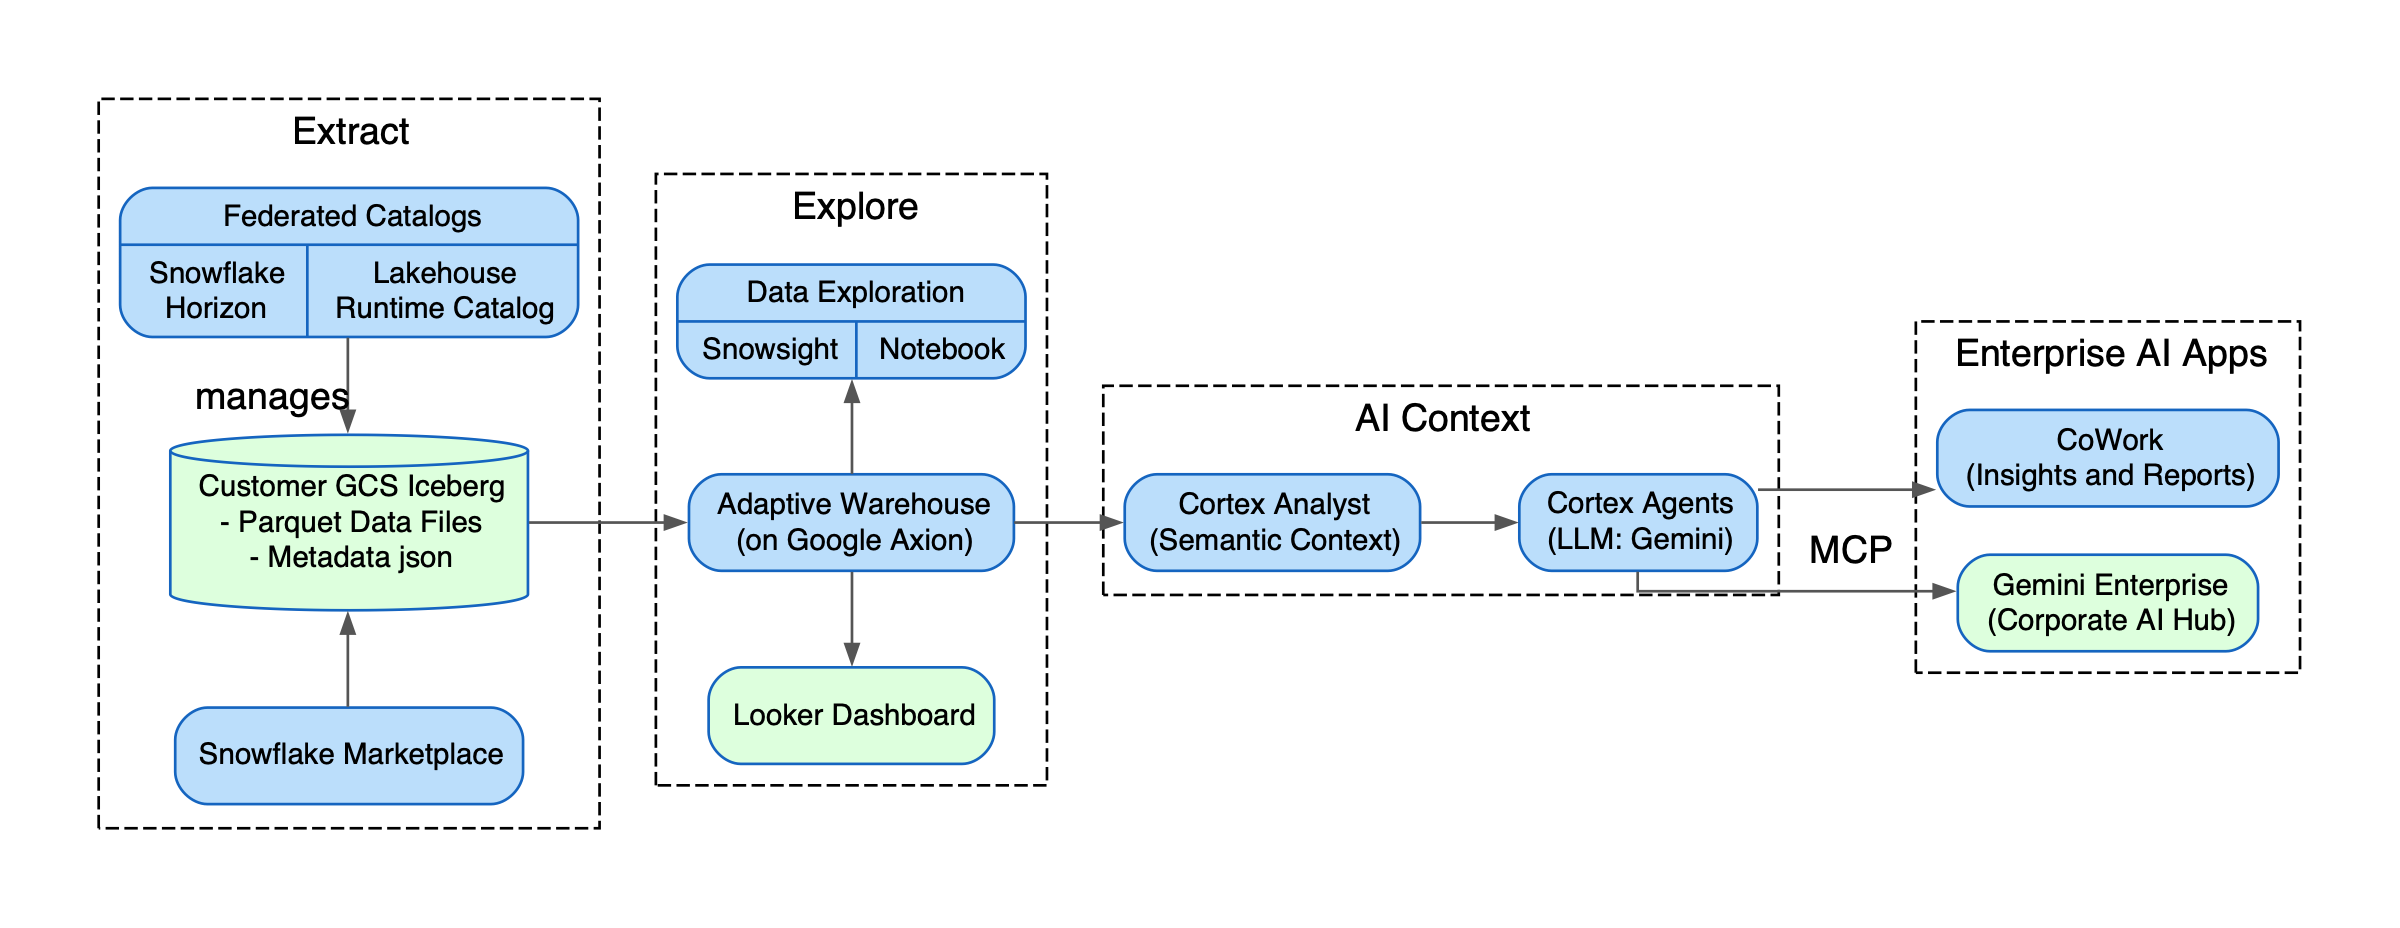
Apache Iceberg is the cornerstone of a modern data platform. It allows multiple engines to read and write directly to the same data, while that data stays in one place — your cloud storage. No copies between systems, no vendor lock-in.
We'll get our data sources from Snowflake Marketplace and land them in an Iceberg table on a GCS bucket. Snowflake Horizon serves as the catalog and governance layer. We could just as easily use Google Cloud Open Lakehouse Runtime or any other IRC-compliant catalog instead.
Next, we use Snowflake Semantic View Autopilot to create a Semantic View that defines the business logic of our Iceberg table. We wrap this in a Cortex Agent and use Gemini as the reasoning model behind it. The biggest gain from Snowflake Cortex is the added context and logic that makes answers accurate and thorough — customers love it for reduced hallucination.
Then we build an MCP connection between Gemini Enterprise and our Cortex Agent, so employees can talk to their data through their corporate AI chat. Looker helps us visualize and get insights from the same data.
Here's a summary of what each component does:
- Snowflake Marketplace — instant access to curated, live datasets. No ETL, no ingestion pipelines.
- Iceberg — open table format on your GCS bucket. Multiple engines read the same files. You own the data.
- Snowflake Horizon — catalog and governance layer for Iceberg tables. Access control, lineage, and discoverability.
- Semantic View — business logic defined once in the data layer. Grounds the AI so it doesn't guess.
- Cortex Agent — natural-language interface that turns questions into governed SQL and returns correct answers.
- Gemini — the reasoning model powering our agent. Large context window, native to Google Cloud.
- MCP — open protocol to expose the agent. Connect once, access from any MCP-compatible client.
- Snowflake CoWork — chat interface inside Snowflake for business users who don't write SQL.
- Gemini Enterprise — Google Cloud's corporate AI assistant. Employees ask questions in a familiar interface and get grounded answers from Iceberg data via MCP.
Marketplace
We get our source data from Snowflake Marketplace. It lets teams access curated, live datasets instantly — you click "Get" and the data appears in your account. No ETL pipelines, no data copying. For data providers, it's a secure channel to share or sell data to the world.
We want to build an economic dataset that tracks the financial wellbeing of Americans at the state level. We need income, inflation, mortgage rates, and unemployment — all on a monthly basis. That means four source tables from the Bureau of Labor Statistics and related public data.
Let's go get them.
UI-Snowsight: Marketplace → Snowflake Marketplace → Data products → search "Snowflake Public Data" → Click on Snowflake Public Data (Free) → Get.
- Database name:
SNOWFLAKE_PUBLIC_DATA_FREE(accept default options and don't change them). - Direct link: https://app.snowflake.com/marketplace/listing/GZTSZ290BV255/snowflake-public-data-products-snowflake-public-data-free
This dataset is already available on many Snowflake accounts. The query below verifies access to all four source tables we need.
-- Verify marketplace data access
SELECT 'BLS_PRICE' AS source, COUNT(*) AS row_count FROM SNOWFLAKE_PUBLIC_DATA_FREE.PUBLIC_DATA_FREE.BUREAU_OF_LABOR_STATISTICS_PRICE_TIMESERIES
UNION ALL
SELECT 'BLS_EMPLOYMENT', COUNT(*) FROM SNOWFLAKE_PUBLIC_DATA_FREE.PUBLIC_DATA_FREE.BUREAU_OF_LABOR_STATISTICS_EMPLOYMENT_TIMESERIES
UNION ALL
SELECT 'FREDDIE_MAC', COUNT(*) FROM SNOWFLAKE_PUBLIC_DATA_FREE.PUBLIC_DATA_FREE.FREDDIE_MAC_HOUSING_TIMESERIES
UNION ALL
SELECT 'IRS_INCOME', COUNT(*) FROM SNOWFLAKE_PUBLIC_DATA_FREE.PUBLIC_DATA_FREE.IRS_INDIVIDUAL_INCOME_TIMESERIES;
Iceberg
Now we need somewhere to land this data.
Iceberg is an open table format. Parquet data files and metadata sit in your own GCS bucket — you own them. Any engine that speaks Iceberg can read them directly: Snowflake, BigQuery, Managed Spark, or any Iceberg REST Catalog–compliant runtime. No copying between systems.
We use catalog=snowflake, which means Snowflake manages the table through Snowflake Horizon, handling governance, access control, and discoverability. But the actual data never leaves your bucket.
Let's create the bucket in Google Cloud Console, give Snowflake write access, and build our economic indicators table.
UI-GCP: Google Cloud Console → Cloud Storage → Create Bucket.
- Name:
firstname_lastname_hol_0729 - Location:
Multi-region - Leave everything else as default.
-- Create an external volume pointing to your GCS bucket
CREATE OR REPLACE EXTERNAL VOLUME hol_gcs_vol
  STORAGE_LOCATIONS = ((
    NAME = 'hol-gcs'
    STORAGE_PROVIDER = 'GCS'
    STORAGE_BASE_URL = 'gcs://<your-bucket-name>/iceberg/'
  ));

-- Describe to get storage config
DESCRIBE EXTERNAL VOLUME hol_gcs_vol;
SET desc_qid = LAST_QUERY_ID();

-- Extract the GCS service account to grant on the bucket
SELECT
  PARSE_JSON("property_value"):STORAGE_GCP_SERVICE_ACCOUNT::STRING
    AS gcs_service_account_to_grant
FROM TABLE(RESULT_SCAN($desc_qid))
WHERE "property" = 'STORAGE_LOCATION_1';
Copy the service account printed above (Snowflake will use it to access your bucket).
UI-GCP: Google Cloud Console → your bucket → Permissions tab → Grant Access.
- Paste the service account you copied.
- Role: Storage Admin → Save.
We have created the bucket for Iceberg data and metadata files, and granted read/write access to Snowflake's service account.
-- Create Iceberg table: join four marketplace sources into one wide-format table
CREATE OR REPLACE ICEBERG TABLE hol_db.public.economic_indicators
  CATALOG = 'SNOWFLAKE'
  EXTERNAL_VOLUME = 'hol_gcs_vol'
  BASE_LOCATION = 'economic_indicators'
  AS
WITH cpi AS (
  SELECT
    DATE_TRUNC('month', date) AS month,
    AVG(value) AS cpi_index
  FROM SNOWFLAKE_PUBLIC_DATA_FREE.PUBLIC_DATA_FREE.BUREAU_OF_LABOR_STATISTICS_PRICE_TIMESERIES
  WHERE variable_name = 'CPI: All items, Not seasonally adjusted, Monthly'
    AND geo_id = 'country/USA'
  GROUP BY 1
),
mortgage_30yr AS (
  SELECT
    DATE_TRUNC('month', date) AS month,
    ROUND(AVG(value) * 100, 2) AS mortgage_rate_30yr_pct
  FROM SNOWFLAKE_PUBLIC_DATA_FREE.PUBLIC_DATA_FREE.FREDDIE_MAC_HOUSING_TIMESERIES
  WHERE variable_name = '30-Year Fixed Rate Mortgage Rate, National Average'
    AND geo_id = 'country/USA'
  GROUP BY 1
),
mortgage_15yr AS (
  SELECT
    DATE_TRUNC('month', date) AS month,
    ROUND(AVG(value) * 100, 2) AS mortgage_rate_15yr_pct
  FROM SNOWFLAKE_PUBLIC_DATA_FREE.PUBLIC_DATA_FREE.FREDDIE_MAC_HOUSING_TIMESERIES
  WHERE variable_name = '15-Year Fixed Rate Mortgage Rate, National Average'
    AND geo_id = 'country/USA'
  GROUP BY 1
),
unemployment AS (
  SELECT
    DATE_TRUNC('month', date) AS month,
    geo_id,
    AVG(value) AS unemployment_rate_pct
  FROM SNOWFLAKE_PUBLIC_DATA_FREE.PUBLIC_DATA_FREE.BUREAU_OF_LABOR_STATISTICS_EMPLOYMENT_TIMESERIES
  WHERE variable_name = 'Local Area Unemployment: Unemployment Rate, Not seasonally adjusted, Monthly'
    AND LENGTH(geo_id) = 8
  GROUP BY 1, 2
),
national_unemployment AS (
  SELECT month, ROUND(AVG(unemployment_rate_pct), 2) AS unemployment_rate_pct
  FROM unemployment
  GROUP BY 1
),
income_raw AS (
  SELECT
    agi.geo_id,
    YEAR(agi.date) AS yr,
    ROUND(agi.value / NULLIF(ret.value, 0), 0) AS avg_income_per_return
  FROM SNOWFLAKE_PUBLIC_DATA_FREE.PUBLIC_DATA_FREE.IRS_INDIVIDUAL_INCOME_TIMESERIES agi
  JOIN SNOWFLAKE_PUBLIC_DATA_FREE.PUBLIC_DATA_FREE.IRS_INDIVIDUAL_INCOME_TIMESERIES ret
    ON agi.geo_id = ret.geo_id AND agi.date = ret.date
  WHERE agi.variable_name = 'Adjusted gross income (AGI), AGI bin: Total'
    AND ret.variable_name = 'Number of returns, AGI bin: Total'
    AND LENGTH(agi.geo_id) = 8
),
income_indexed AS (
  SELECT
    geo_id,
    yr,
    avg_income_per_return,
    ROUND((avg_income_per_return / FIRST_VALUE(avg_income_per_return) OVER (PARTITION BY geo_id ORDER BY yr)) * 100, 1) AS income_index
  FROM income_raw
),
national_income AS (
  SELECT yr, ROUND(AVG(income_index), 1) AS income_index
  FROM income_indexed
  GROUP BY 1
),
geo AS (
  SELECT geo_id, geo_name
  FROM SNOWFLAKE_PUBLIC_DATA_FREE.PUBLIC_DATA_FREE.GEOGRAPHY_INDEX
  WHERE level = 'State'
),
national AS (
  SELECT
    c.month AS date,
    'country/USA' AS geo_id,
    'United States' AS geo_name,
    ROUND(c.cpi_index, 2) AS cpi_index,
    ROUND(((c.cpi_index - LAG(c.cpi_index, 12) OVER (ORDER BY c.month))
      / NULLIF(LAG(c.cpi_index, 12) OVER (ORDER BY c.month), 0)) * 100, 2) AS inflation_pct,
    m30.mortgage_rate_30yr_pct,
    m15.mortgage_rate_15yr_pct,
    nu.unemployment_rate_pct,
    ni.income_index
  FROM cpi c
  LEFT JOIN mortgage_30yr m30 ON c.month = m30.month
  LEFT JOIN mortgage_15yr m15 ON c.month = m15.month
  LEFT JOIN national_unemployment nu ON c.month = nu.month
  LEFT JOIN national_income ni ON YEAR(c.month) = ni.yr
),
states AS (
  SELECT
    u.month AS date,
    u.geo_id,
    g.geo_name,
    NULL::FLOAT AS cpi_index,
    NULL::FLOAT AS inflation_pct,
    NULL::FLOAT AS mortgage_rate_30yr_pct,
    NULL::FLOAT AS mortgage_rate_15yr_pct,
    u.unemployment_rate_pct,
    ii.income_index
  FROM unemployment u
  JOIN geo g ON u.geo_id = g.geo_id
  LEFT JOIN income_indexed ii ON u.geo_id = ii.geo_id AND YEAR(u.month) = ii.yr
)
SELECT * FROM national
UNION ALL
SELECT * FROM states
ORDER BY date, geo_id;
Explore Iceberg Data and Metadata
UI-GCP: Google Cloud Console → your bucket → explore the files.
- You'll see Parquet data files and a metadata folder with JSON files.
Look at the Iceberg table definition above and identify the catalog we used (CATALOG = 'SNOWFLAKE'). All data and metadata is in your own bucket — not owned by Snowflake, BigQuery, or any other vendor. Every engine reads and writes directly while a catalog (here Snowflake Horizon) provides governance and security.
This is the cornerstone of a modern data platform: one source of truth in a datalake with high data gravity. All services are drawn to this data to perform their tasks.
Data Profiling
We have our Iceberg table. Let's look at what's inside.
Snowsight gives you profiling, charting, and pivot tables right in the query results. You can understand the shape of a dataset without leaving the browser.
UI-Snowsight: After running the query, explore the results pane:
- Click Chart tab to visualize trends over time.
- Click Query Profile tab to see the execution plan.
- Click column headers for quick profiling stats (min, max, distribution).
-- National economic indicators since 2015
-- Try: Chart (line) to visualize trends, Query Profile to see execution plan
SELECT
  date,
  cpi_index,
  income_index,
  inflation_pct,
  mortgage_rate_30yr_pct,
  unemployment_rate_pct
FROM hol_db.public.economic_indicators
WHERE geo_id = 'country/USA'
  AND date >= '2015-01-01'
  AND inflation_pct IS NOT NULL
ORDER BY date;
Cortex
We have a clean Iceberg table. Any analyst can query it with SQL. But that doesn't make it AI-ready.
Here's the gap: when an LLM sees column names like CPI_INDEX or GEO_ID, it guesses what they mean. It guesses wrong. We need to tell it which columns are dimensions, which are facts, how metrics are calculated, and what kinds of questions this table can answer.
That's what a Semantic View does. You define your business logic once — in the data layer, not scattered across prompts — and every AI consumer inherits the same correct definitions.
Semantic View
The Semantic View is the grounding layer for our agent. We define dimensions (date, geography), facts (CPI, mortgage rate, unemployment, income), and metrics (year-over-year inflation, average mortgage rate by state).
We can also add verified queries — known-good question-to-SQL pairs that anchor the model's behavior for common questions. Without this layer, an LLM guesses and hallucinates. With it, a question like "How has inflation compared to income growth?" maps to the exact right SQL every time.
UI-Snowsight: AI & ML → Cortex Analyst → Create Semantic View.
- Select table:
HOL_DB.PUBLIC.ECONOMIC_INDICATORS. - Click Autopilot to auto-generate dimensions, facts, and metrics from the table schema.
- Review the generated YAML — check that dimensions (DATE, GEO_ID, GEO_NAME), facts (CPI_INDEX, INFLATION_PCT, etc.), and metrics are correct.
- Add or edit descriptions to clarify business meaning.
- Optionally add verified queries (known-good question → SQL pairs).
- Save as
economic_semantic_view.
In this lab we create it via code (YAML below), but Autopilot is the fastest way to get started.
CALL SYSTEM$CREATE_SEMANTIC_VIEW_FROM_YAML(
  'hol_db.public',
  $$
name: economic_semantic_view
tables:
  - name: economic_indicators
    base_table:
      database: HOL_DB
      schema: PUBLIC
      table: ECONOMIC_INDICATORS
    dimensions:
      - name: DATE
        description: "Date of the observation"
        expr: economic_indicators.DATE
        data_type: DATE
      - name: GEO_ID
        description: "Geographic area identifier"
        expr: economic_indicators.GEO_ID
        data_type: TEXT
      - name: GEO_NAME
        description: "Geographic area — United States for national, or state name (e.g. California)"
        expr: economic_indicators.GEO_NAME
        data_type: TEXT
    facts:
      - name: CPI_INDEX
        description: "Consumer Price Index, base period 1982-84 = 100 (national only)"
        expr: economic_indicators.CPI_INDEX
        data_type: NUMBER
      - name: INFLATION_PCT
        description: "Year-over-year inflation rate as percent (national only)"
        expr: economic_indicators.INFLATION_PCT
        data_type: NUMBER
      - name: MORTGAGE_RATE_30YR_PCT
        description: "30-year fixed mortgage rate, national average, percent (national only)"
        expr: economic_indicators.MORTGAGE_RATE_30YR_PCT
        data_type: NUMBER
      - name: MORTGAGE_RATE_15YR_PCT
        description: "15-year fixed mortgage rate, national average, percent (national only)"
        expr: economic_indicators.MORTGAGE_RATE_15YR_PCT
        data_type: NUMBER
      - name: UNEMPLOYMENT_RATE_PCT
        description: "Unemployment rate as percent (available national and by state)"
        expr: economic_indicators.UNEMPLOYMENT_RATE_PCT
        data_type: NUMBER
      - name: INCOME_INDEX
        description: "Average income per tax return, indexed to earliest available year = 100. Compare to CPI_INDEX to assess purchasing power. (available national and by state, annual grain)"
        expr: economic_indicators.INCOME_INDEX
        data_type: NUMBER
    metrics:
      - name: AVG_CPI_INDEX
        description: "Average Consumer Price Index"
        expr: AVG(economic_indicators.CPI_INDEX)
      - name: AVG_INFLATION_PCT
        description: "Average year-over-year inflation rate"
        expr: AVG(economic_indicators.INFLATION_PCT)
      - name: AVG_MORTGAGE_RATE_30YR
        description: "Average 30-year fixed mortgage rate"
        expr: AVG(economic_indicators.MORTGAGE_RATE_30YR_PCT)
      - name: AVG_UNEMPLOYMENT_RATE
        description: "Average unemployment rate"
        expr: AVG(economic_indicators.UNEMPLOYMENT_RATE_PCT)
      - name: AVG_INCOME_INDEX
        description: "Average income index"
        expr: AVG(economic_indicators.INCOME_INDEX)
$$
);

-- Verify
SHOW SEMANTIC VIEWS IN SCHEMA hol_db.public;
Cortex Agent
Now we wrap the Semantic View in a conversational interface.
A Cortex Agent takes a natural-language question and passes it to Cortex Analyst. Cortex Analyst uses the Semantic View to generate correct SQL, executes it, and returns a grounded answer with supporting data. We use Gemini as the reasoning model behind the agent.
The whole thing is defined in a single SQL statement — reproducible and version-controlled.
UI-Snowsight: AI & ML → Cortex Agents → + Create Agent.
- Name:
hol_economic_agent - Model: change to Gemini (default may be different).
- Tools: add Cortex Analyst tool → select
economic_semantic_view. - Instructions: describe what the agent does, e.g. "Answer questions about US economic indicators including inflation, mortgage rates, unemployment by state, and income trends."
- Warehouse:
hol_wh(for query execution). - Test the agent in the preview pane before saving.
In this lab we create it via SQL for reproducibility.
-- Create a Cortex Agent backed by the economic indicators semantic view
CREATE OR REPLACE AGENT hol_db.public.hol_economic_agent
  FROM SPECIFICATION $$
  tools:
    - tool_spec:
        type: cortex_analyst_text_to_sql
        name: economic_analyst
        description: "Answers questions about US economic indicators: CPI/inflation, mortgage interest rates (30-year, 15-year), unemployment rate (national and by state), and income index."

  tool_resources:
    economic_analyst:
      semantic_view: HOL_DB.PUBLIC.ECONOMIC_SEMANTIC_VIEW
      execution_environment:
        type: warehouse
        warehouse: HOL_WH
  $$;

-- Grant consumer role usage on the agent
GRANT USAGE ON AGENT hol_db.public.hol_economic_agent TO ROLE end_user_role;
GRANT SELECT ON SEMANTIC VIEW hol_db.public.economic_semantic_view TO ROLE end_user_role;
GRANT SELECT ON TABLE hol_db.public.economic_indicators TO ROLE end_user_role;

-- Verify
SHOW AGENTS IN SCHEMA hol_db.public;
CoWork
Snowflake CoWork is the chat surface for business users. No SQL knowledge needed, no SQL worksheet — just a conversation with the agent.
Let's switch to end_user_role to see what it looks like for someone who can only consume, not build.
UI-Snowsight: AI & ML → Open Snowflake CoWork.
- In CoWork, go to bottom left profile, click setting, and switch role to
end_user_role, warehouse:hol_wh. Done. - You should be able to see hol_economic_agent in the agent list (control buttons of the CoWork chat).
- Ask: "How has the 30-year mortgage rate changed relative to inflation since 2020?"
- Ask: "Tell the economic story of California vs Texas over the last 10 years using all available indicators."
- Ask: "What did the COVID shock look like in data — unemployment spike, rate crash, inflation surge — and how long did each phase last?"
Look at the responses — they include the generated SQL so you can see exactly what queries were executed. Same agent, same data, different role — a chat-based surface instead of SQL.
MCP
So far our agent lives inside Snowflake. But what if employees want to ask it questions from Gemini Enterprise, or from another AI tool?
That's where MCP comes in. Model Context Protocol is an open standard that gives AI applications a universal way to connect to data tools. We declare our agent as an MCP tool and add OAuth for secure access. Any MCP-compatible client can then connect — no custom connector per client.
MCP Server
Let's create the actual MCP server. We register our Cortex Agent as a callable tool inside a Snowflake-managed MCP server, then set up an OAuth security integration so external clients can authenticate securely. The output from this step gives us the credentials we'll register in Gemini Enterprise next.
-- MCP server exposing the Cortex Agent as a tool (requires schema ownership → hol_role)
USE ROLE hol_role;
USE WAREHOUSE hol_wh;
USE SCHEMA hol_db.public;

CREATE OR REPLACE MCP SERVER hol_db.public.hol_mcp
  FROM SPECIFICATION $$
  tools:
    - name: "hol-economic-agent"
      type: "CORTEX_AGENT_RUN"
      identifier: "HOL_DB.PUBLIC.HOL_ECONOMIC_AGENT"
      description: "US economic indicators agent — answers questions about inflation (CPI), mortgage rates, unemployment, and income."
      title: "Economic Indicators Agent"
  $$;

-- Grant MCP server usage to the consumer role (required for Gemini to discover tools)
-- ALLOWED_ROLES_LIST must include the role used in the OAuth scope, otherwise
-- Snowflake rejects it with "invalid role" even if the user has the role granted.
USE ROLE ACCOUNTADMIN;

GRANT USAGE ON MCP SERVER hol_db.public.hol_mcp TO ROLE end_user_role;

CREATE OR REPLACE SECURITY INTEGRATION hol_mcp_oauth
  TYPE = OAUTH
  OAUTH_CLIENT = CUSTOM
  OAUTH_CLIENT_TYPE = 'CONFIDENTIAL'
  OAUTH_REDIRECT_URI = 'https://vertexaisearch.cloud.google.com/oauth-redirect'
  ALLOWED_ROLES_LIST = ('END_USER_ROLE')
  ENABLED = TRUE;

-- Get MCP server metadata (database, schema, name)
DESCRIBE MCP SERVER hol_db.public.hol_mcp;
SET mcp_qid = LAST_QUERY_ID();

-- Get OAuth integration metadata (auth URL, token URL, client ID)
DESCRIBE SECURITY INTEGRATION hol_mcp_oauth;
SET int_qid = LAST_QUERY_ID();

USE ROLE hol_role;
USE WAREHOUSE hol_wh;
USE SCHEMA hol_db.public;

-- Retrieve all credentials for Gemini Enterprise MCP connection
-- Values derived from DESCRIBE metadata — nothing hardcoded
WITH mcp_meta AS (
  SELECT "database_name", "schema_name", "name"
  FROM TABLE(RESULT_SCAN($mcp_qid))
),
oauth_meta AS (
  SELECT
    MAX(CASE WHEN "property" = 'OAUTH_AUTHORIZATION_ENDPOINT' THEN "property_value" END) AS auth_endpoint,
    MAX(CASE WHEN "property" = 'OAUTH_TOKEN_ENDPOINT' THEN "property_value" END) AS token_endpoint,
    MAX(CASE WHEN "property" = 'OAUTH_CLIENT_ID' THEN "property_value" END) AS client_id
  FROM TABLE(RESULT_SCAN($int_qid))
),
secrets AS (
  SELECT PARSE_JSON(SYSTEM$SHOW_OAUTH_CLIENT_SECRETS('HOL_MCP_OAUTH')) AS s
),
account_base AS (
  -- Org-account URL format (required by Gemini Enterprise)
  SELECT 'https://' || CURRENT_ORGANIZATION_NAME() || '-' || CURRENT_ACCOUNT_NAME()
         || '.snowflakecomputing.com' AS url
)
SELECT field_name, value
FROM (
  SELECT 1 AS ord, 'MCP Server URL' AS field_name,
    ab.url || '/api/v2/databases/' || m."database_name" || '/schemas/' || m."schema_name" || '/mcp-servers/' || m."name" AS value
    FROM account_base ab, mcp_meta m
  UNION ALL
  SELECT 2, 'Auth URL', o.auth_endpoint FROM oauth_meta o
  UNION ALL
  SELECT 3, 'Auth URL Params', '' FROM oauth_meta o
  UNION ALL
  SELECT 4, 'Token URL', o.token_endpoint FROM oauth_meta o
  UNION ALL
  SELECT 5, 'Client ID', o.client_id FROM oauth_meta o
  UNION ALL
  SELECT 6, 'Client Secret', s.s:OAUTH_CLIENT_SECRET::STRING FROM secrets s
  UNION ALL
  SELECT 7, 'Scopes', 'session:role:end_user_role' FROM secrets s
  UNION ALL
  SELECT 8, 'MCP Server Description', 'Snowflake Cortex Agent for US economic indicators (CPI, mortgage rates, unemployment, income)' FROM secrets s
  UNION ALL
  SELECT 9, 'Agent Instructions', 'Use the hol-economic-agent tool to answer questions about US economic data including inflation, mortgage rates, unemployment by state, and income trends.' FROM secrets s
  UNION ALL
  SELECT 10, 'Data Connector Name', 'hol_cortex_gemini_economic_agent' FROM secrets s
)
ORDER BY ord;
Gemini Enterprise
Gemini Enterprise is Google Cloud's corporate AI assistant — the chat interface employees across the organization already use daily.
By registering our Snowflake MCP server as a data connector, the Cortex Agent becomes a tool that Gemini calls when it needs economic data. Employees ask questions in Gemini and get grounded answers from governed Iceberg data. They don't need to know anything about Snowflake or SQL underneath.
UI-GCP: Google Cloud Console → search "Gemini Enterprise" → Data stores → +Create data store → Add MCP Server.
- Fill in the fields using values from the MCP output above (server URL, client ID, client secret, scopes, etc.).
- Complete the OAuth authorization flow when prompted.
- Click Actions and then "Reload Custom Actions" and log in with your account.
- Select the tool "hol-economic-agent" and then "Enable Actions" and confirm.
Now open Gemini Enterprise chat and ask the same question:
"How has the 30-year mortgage rate changed relative to inflation since 2020?"
Same question we asked in Snowflake CoWork, same correct answer — just a different surface.
Troubleshooting
Network Policy — If Gemini can't reach Snowflake (OAuth errors, timeouts), a network policy may be blocking external IPs. Run the statement below to temporarily allow all connections.
-- Temporarily disable account network policy to allow Gemini Enterprise OAuth
USE ROLE ACCOUNTADMIN;
ALTER ACCOUNT UNSET NETWORK_POLICY;

-- To re-enable later:
-- ALTER ACCOUNT SET NETWORK_POLICY = <your_policy_name>;
Google Cloud Org Policy — If you see constraints/discoveryengine.managed.disableCustomMcpServerConnector:
UI-GCP: IAM & Admin → Organization Policies → search disableCustomMcpServerConnector → Enforcement: Off → Save. Retry connector setup.
Looker
The same Iceberg data that powers the AI agent also feeds traditional BI. Looker connects directly to the Snowflake table — no additional copies, no separate pipeline. One data product serves both governed dashboards and AI chat.
UI-Looker: Admin → Database → Connections → add Snowflake connection.
- Use lab credentials, point to
HOL_DB.PUBLIC. - Create LookML project on
ECONOMIC_INDICATORS. - Build Explore + Dashboard.
Please follow Looker instructions
We would like to:
- Log in to Looker (given account, username, password)
- Create a secure connection to your Snowflake account
- Create a project and database and explore Looker
- Get familiar with LookML (which defines the semantic model of your data)
- Talk to your Snowflake data
Conclusion And Resources
Let's step back and look at what we built.
One copy of data on open Iceberg in your GCS bucket. A Semantic View that teaches AI what the data means. A Cortex Agent powered by Gemini that turns questions into governed SQL. And we consume it from Snowflake CoWork, Gemini Enterprise, Looker, and any MCP client — all pointing at the same source of truth.
No data copies between systems. No custom integrations for each surface. No hallucination from ungrounded prompts. Build it once, consume it everywhere.
What You Learned
- How to create Snowflake-managed Iceberg tables on your own GCS bucket
- How to use Snowflake Marketplace for instant data access
- How to define business logic in a Semantic View
- How to build a Cortex Agent with Gemini as the reasoning model
- How to expose an agent via MCP with OAuth security
- How to connect Gemini Enterprise to Snowflake through MCP
- How to connect Looker to the same Iceberg data for BI dashboards
Related Resources
Cleanup
Run only when you're done with the lab.
USE ROLE ACCOUNTADMIN;

-- Drop every object the workshop roles own BEFORE dropping the roles themselves.
-- hol_role owns hol_gcs_vol, so dropping the roles first leaves the external
-- volume orphaned and the cleanup does not run clean on a copy-paste.

-- Drop database first (cascades all objects inside: tables, views, agents, MCP servers)
DROP DATABASE IF EXISTS hol_db;

-- The external volume can only be dropped after the Iceberg tables that reference it.
-- Dropping it means redoing the GCS bucket IAM binding if you run the lab again.
DROP EXTERNAL VOLUME IF EXISTS hol_gcs_vol;

DROP WAREHOUSE IF EXISTS hol_wh;
DROP INTEGRATION IF EXISTS hol_mcp_oauth;

-- Roles last, once nothing they own is left
DROP ROLE IF EXISTS hol_role;
DROP ROLE IF EXISTS end_user_role;

-- Re-enable network policy if it was disabled
-- ALTER ACCOUNT SET NETWORK_POLICY = ACCOUNT_VPN_POLICY_SE;

-- The Iceberg data/metadata files still sit in your GCS bucket.
-- Delete them in Google Cloud Console (Cloud Storage -> your bucket), or:
--   gcloud storage rm --recursive gs://<your-bucket>/**

SHOW ROLES LIKE '%HOL%';
This content is provided as is, and is not maintained on an ongoing basis. It may be out of date with current Snowflake instances
