How to Setup the Snowflake Auto-Grader
Overview
In this guide, you'll learn how to setup Snowflake's auto-grader.
The auto-grader runs in your Snowflake account and can be used to check successful completion of tasks within a Snowflake account.
What You’ll Learn
- How to setup the auto-grader
What You’ll Need
- A Snowflake account
Create the API integration
In your Snowflake account, open a new SQL worksheet and run the following code:
use role accountadmin;

create or replace api integration dora_api_integration
api_provider = aws_api_gateway
api_aws_role_arn = 'arn:aws:iam::321463406630:role/snowflakeLearnerAssumedRole'
enabled = true
api_allowed_prefixes = ('https://awy6hshxy4.execute-api.us-west-2.amazonaws.com/dev/edu_dora');
This code will create an API integration in your Snowflake account under the ACCOUNTADMIN role. To confirm that the integration was created, you can run the following:
show integrations;
If the integration was successfully created, you should see output similar to the following:
| name | type | category | enabled | comment | created_on |
|---|---|---|---|---|---|
| _API_INTEGRATION | EXTERNAL_API | API | true | 2023-02-03 12:36:22.470 -0700 |
Create the grader function
Next, create the grader function. This function will be used for validating the successful completion of lab steps in your account.
Run the following code in a new SQL worksheet:
use role accountadmin;

create database util_db;

create or replace external function util_db.public.grader(
 step varchar
 , passed boolean
 , actual integer
 , expected integer
 , description varchar)
 returns variant
 api_integration = dora_api_integration
 context_headers = (current_timestamp,current_account, current_statement, current_account_name)
 as 'https://awy6hshxy4.execute-api.us-west-2.amazonaws.com/dev/edu_dora/grader'
;
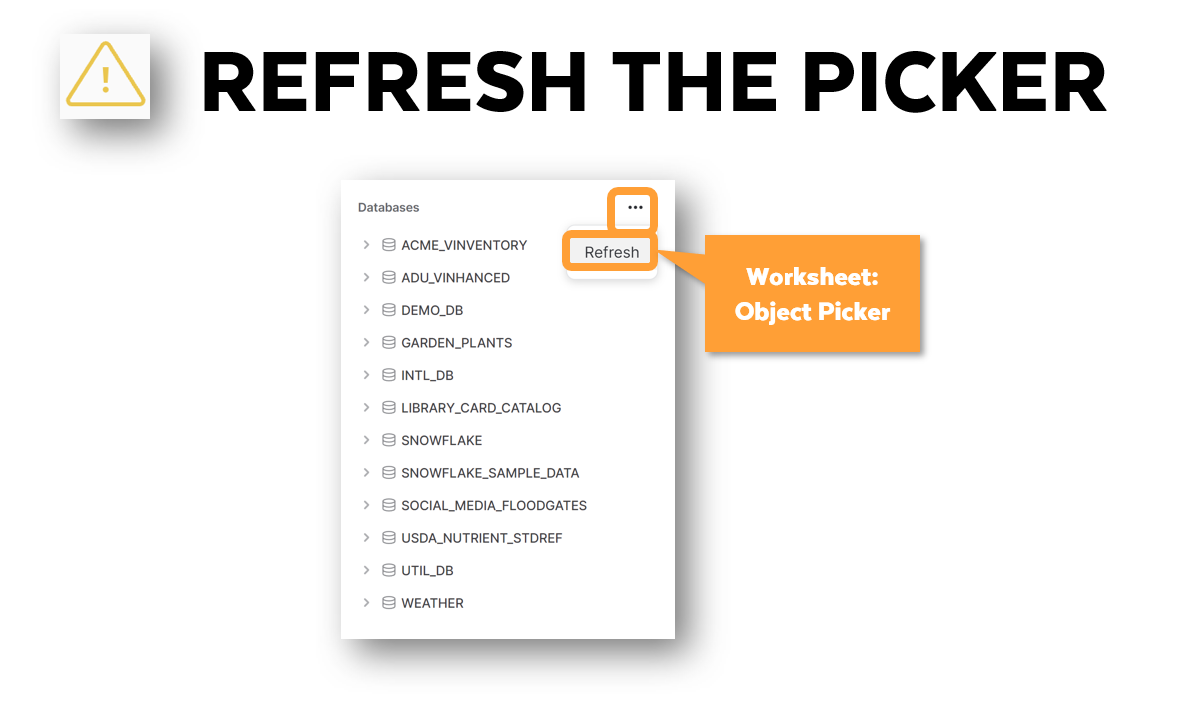
The grader function will be located in the UTIL_DB.PUBLIC schema in your account. If you don't see the function, refresh the objects in the Databases section of your account. In addition, ensure you are using the ACCOUNTADMIN role.
Confirm that the auto-grader is provisioned correctly
To confirm that the auto-grader is functioning as intended, open a new SQL worksheet and run the following code:
use role accountadmin;
use database util_db;
use schema public;

select grader(step, (actual = expected), actual, expected, description) as graded_results from (SELECT
 'AUTO_GRADER_IS_WORKING' as step
 ,(select 123) as actual
 ,123 as expected
 ,'The Snowflake auto-grader has been successfully set up in your account!' as description
);
If the auto-grader is correctly provisioned, you should see a GRADED_RESULTS column with several pieces of information, including a checkbox and a message "description": "The Snowflake auto-grader has been successfully set up in your account!".
Create the greeting function
Next, you'll create the greeting function. This function will link your Snowflake account to our badging system. If you don't complete this step, you'll risk not receiving your badge.
Run the following code in new SQL worksheet:
use role accountadmin;

use database util_db;

create or replace external function util_db.public.greeting(
      email varchar
    , firstname varchar
    , middlename varchar
    , lastname varchar)
returns variant
api_integration = dora_api_integration
context_headers = (current_timestamp, current_account, current_statement, current_account_name)
as 'https://awy6hshxy4.execute-api.us-west-2.amazonaws.com/dev/edu_dora/greeting'
;
The greeting function will be located in the UTIL_DB.PUBLIC schema in your account. If you don't see the function, please refresh the objects in the Databases section of your account. In addition, ensure you are using the ACCOUNTADMIN role.
Register your name and email
Next, you'll need to register your name and email. You'll do this by running the greeting function with your name and email. This information will be used to issue your badge. Here are some important rules to follow PRIOR to running the SQL below:
- Do not use all capital letters.
- Do not use all lowercase letters.
- Do not use CamelCase – put spaces between your words if there are spaces between the words in your name.
- You must enter both a first and last name. Middle names are optional. Single letters do not count as names.
- You can use accents or letters from any language.
- You can use as many words as you want. For example, you can have a 3-word first name, a 3-word middle name and a 3-word last name! But please ensure there are spaces between the words in your name.
Ensure that you follow these rules when running the SQL below in a new worksheet:
use role accountadmin;
use database util_db;

-- Replace <email> with your email address
-- Replace <first name> <middle name> <last name> with your names
select util_db.public.greeting(<email>, <first name>, <middle name>, <last name>);

-- select util_db.public.greeting('[email protected]', 'Snowflake', 'The', 'Bear');
Conclusion
That's it! You should now have the auto-grader correctly provisioned in your account.
Resources:
This content is provided as is, and is not maintained on an ongoing basis. It may be out of date with current Snowflake instances