Sharing Data and AI on the Snowflake Internal Marketplace
Overview
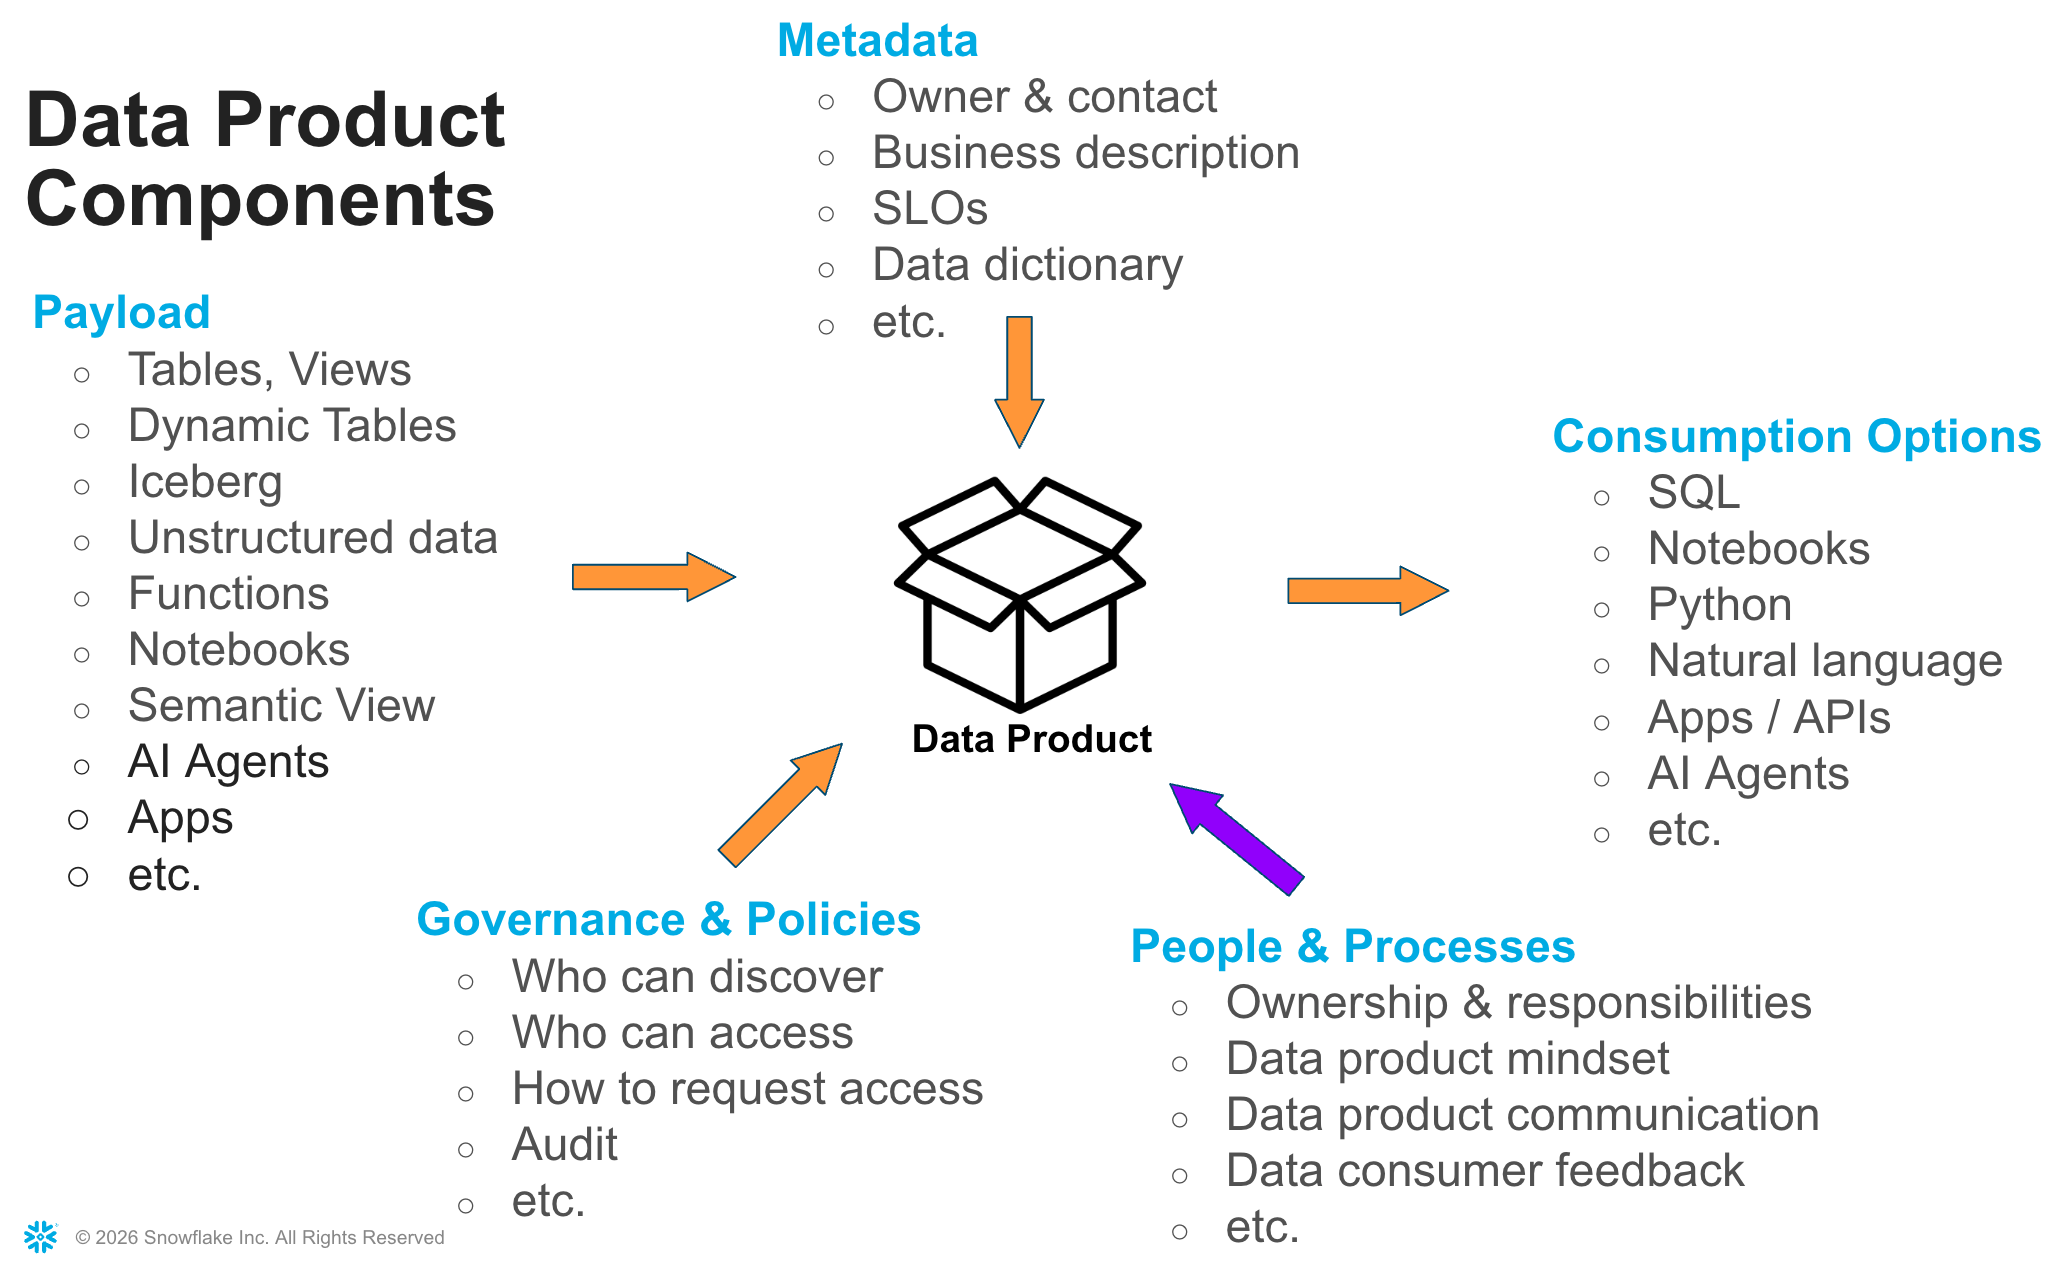
Sharing information between departments or business units ("domains") of a company is critical for success. Sharing and consuming data and AI assets is more successful if they are shared as a product. A data product is a collection of related data objects plus metadata, such as a business description, ownership and contact information, service level objectives, data dictionary, and more. In a Data Mesh, data products are typically also subject to various data management and organizational principles.
Snowflake Internal Marketplace enables companies to publish documented and governed data products, to make them discoverable and understandable for data consumers. A previous hands-on lab is available to exercise the internal marketplace and learn how governance policies can control access to data products. In this lab we briefly recap the basics and then focus on sharing AI assets such as agents, semantic views, and other new features.
Data Products consist of:
- A payload of objects to share
- Metadata to describe the product and its characteristics
- Access control specification and policies
- One or more output ports through which the product can be consumed
- Processes and guidelines that define data product operations and responsibilities
What You'll Learn
- How to publish, discover, and consume data products with the Snowflake Internal Marketplace
- How to leverage AI to help you create data products
- How to customize your data products with custom attributes
- How to manage access to data products, including request & approval workflows
- How to share and consume semantic views and AI agents
- How to generate semantic views and agents for existing data products
- How to manage and consume data products with Snowflake CoCo ("Coco")
What You'll Need
- Basic knowledge of SQL and database concepts
- A pre-configured Snowflake account (provided for this lab)
- Basic knowledge of the Snowflake UI
What You'll Build
- Data products based on simple TPC-H data
- Semantic views and AI agents
- Organizational Listings to share these objects
Review Your Lab Environment
Your Snowflake account has been pre-configured with a database, users roles, and organizational profiles you need for this lab. In this section you will review the environment before creating your first data product in the next section.
The lab environment consists of:
- One Snowflake account with two users and their roles:
providerwith theprovider_roleconsumerwith theconsumer_role
- A TPC-H database (
TPCH) with sample data in theSF1schema, including tables (customer, orders, lineitem, nation, region, part, partsupp, supplier), anORDER_SUMMARYview, and anORDERS_PER_CUSTOMERfunction - Twenty organizational profiles representing different business units when publishing a data product
- Several custom attributes that we have pre-defined for all lab participants for richer data product metadata
Review via the Snowsight UI
Log in to your account as the provider user.
-
Review the database: In the menu on the left, click on Catalog > Database Explorer. Open the
TPCHdatabase and navigate to theSF1schema. You should see the TPC-H tables, theORDER_SUMMARYview, and theORDERS_PER_CUSTOMERfunction. -
Review the Internal Marketplace: In the menu on the left, click on Catalog > Internal Marketplace. You will see 1 or more listings (data products) that we have pre-created. Open any one of them to examine their structure content.
-
Review the organizational profiles: While viewing the Internal Marketplace, use the Profile filter to see the available domain profiles. (At the start of the lab, filtering for a specific profile will likely return 0 data products.)
Review via SQL (Optional)
Open a new file in a workspace (or a worksheet) and run the following commands to confirm the lab setup:
-- Review as provider with the provider_role
USE ROLE provider_role;
USE WAREHOUSE compute_wh;

-- Review the database and schema
SHOW DATABASES LIKE 'TPCH';
USE DATABASE tpch;
SHOW TABLES IN SCHEMA tpch.sf1;
SHOW VIEWS IN SCHEMA tpch.sf1;
SHOW USER FUNCTIONS IN SCHEMA tpch.sf1;

-- Review organization profiles and custom attributes
show available organization profiles;
show available internal marketplace configs;

-- Review users and roles in this account
USE ROLE accountadmin;
SHOW USERS;
SHOW ROLES;

-- List existing listings in the internal marketplace
SHOW AVAILABLE LISTINGS IS_ORGANIZATION = TRUE;
You are now ready to begin the lab exercises!
Create / Publish Data Product
In this section you will create and publish your first organizational listing called Order Insights. This data product shares order and customer data from the TPC-H database with other business domains in your organization.
You will work as provider with the provider_role. The publishing flow in the Provider Studio consists of 5 steps.
Step 1 of 5: Decide on AI Generation and Select Data Objects
- Log in to your account as the
provideruser. - Navigate to Catalog > Internal Marketplace.
- Click the blue + Create Listing button in the top right.
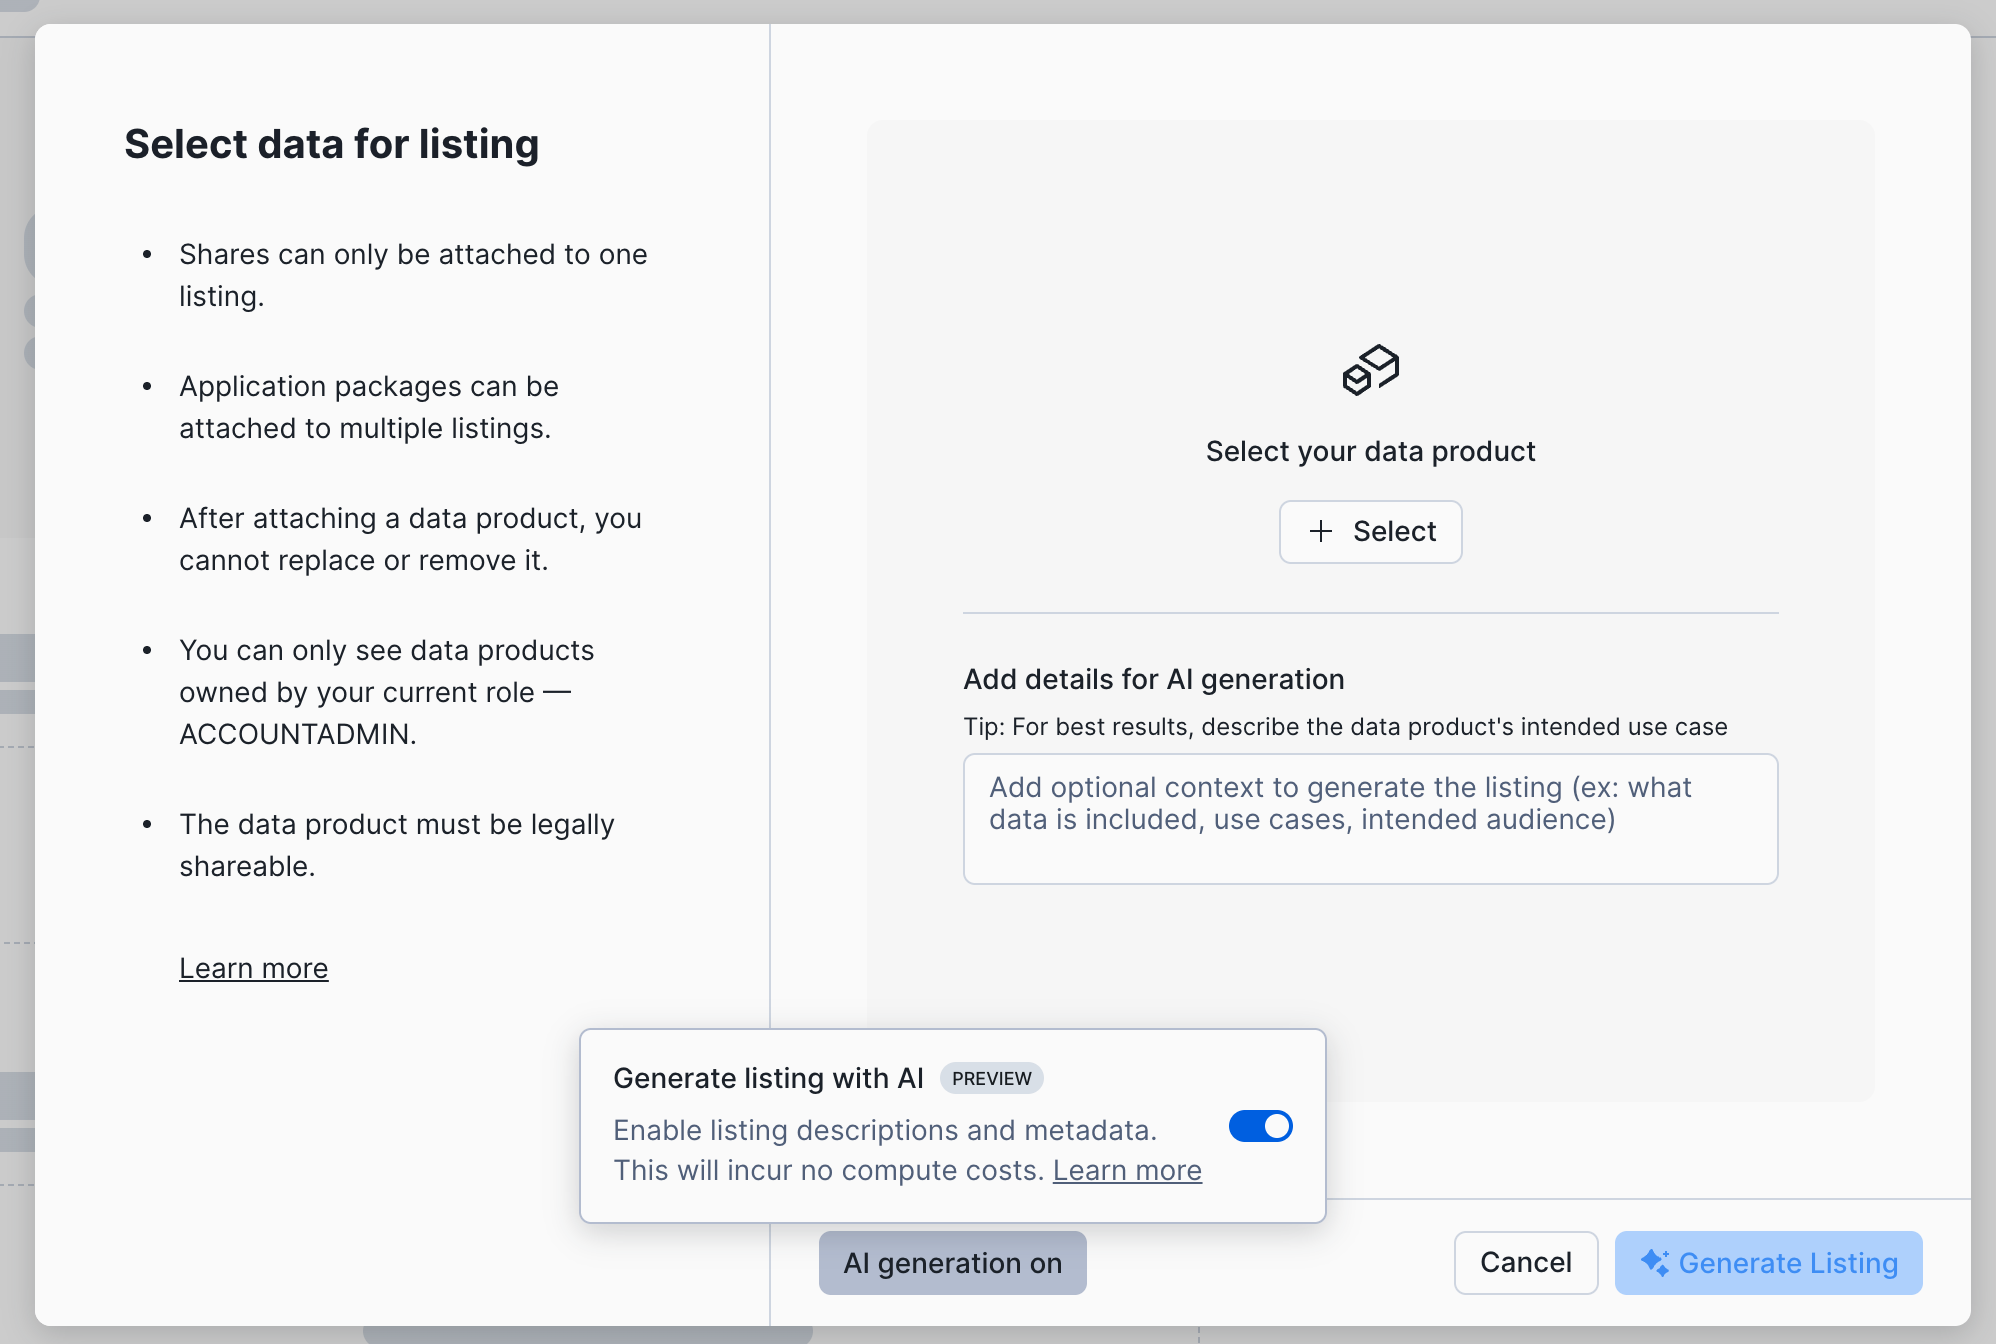
- Proceed with "AI generation on" or, optionally, turn it off. "AI generation on" will automatically populate some of the data product metadata for you.
- Click +Select to select the data objects to share
Step 2 of 5: Select Data Objects to Share
Now select the data objects for this data product.
- Navigate to the
TPCHdatabase >SF1schema, and select:- These 5 tables:
CUSTOMERLINEITEMORDERSREGIONSUPPLIER
- The
ORDER_SUMMARYsecure view - The
ORDERS_PER_CUSTOMERfunction
- These 5 tables:
- Click Done to proceed, then Generate Listing if you chose "AI generation on"

Step 3 of 5: Edit and Complete the Listing Metadata
- Review the AI-generated listing metadata
- Change the listing title to "Order Insights (<account locator>)"
- For disambiguation in this lab only, add your 7-character Snowflake account locator to the listing title. The locator is part of the URL in your browser address bar.
- Under title use the Select profile box to select the profile (domain) under which to publish this data product
- You're free to pick any profile from the list - there is no right or wrong in this lab.
- Among all the lab attendees we hope to see many different profiles being chosen!
- If desired, make changes to the listing description or other metadata fields.
- For example, in the Documentation field you could add any URL to supplementary documentation, e.g.
http://www.snowflake.com.
- For example, in the Documentation field you could add any URL to supplementary documentation, e.g.
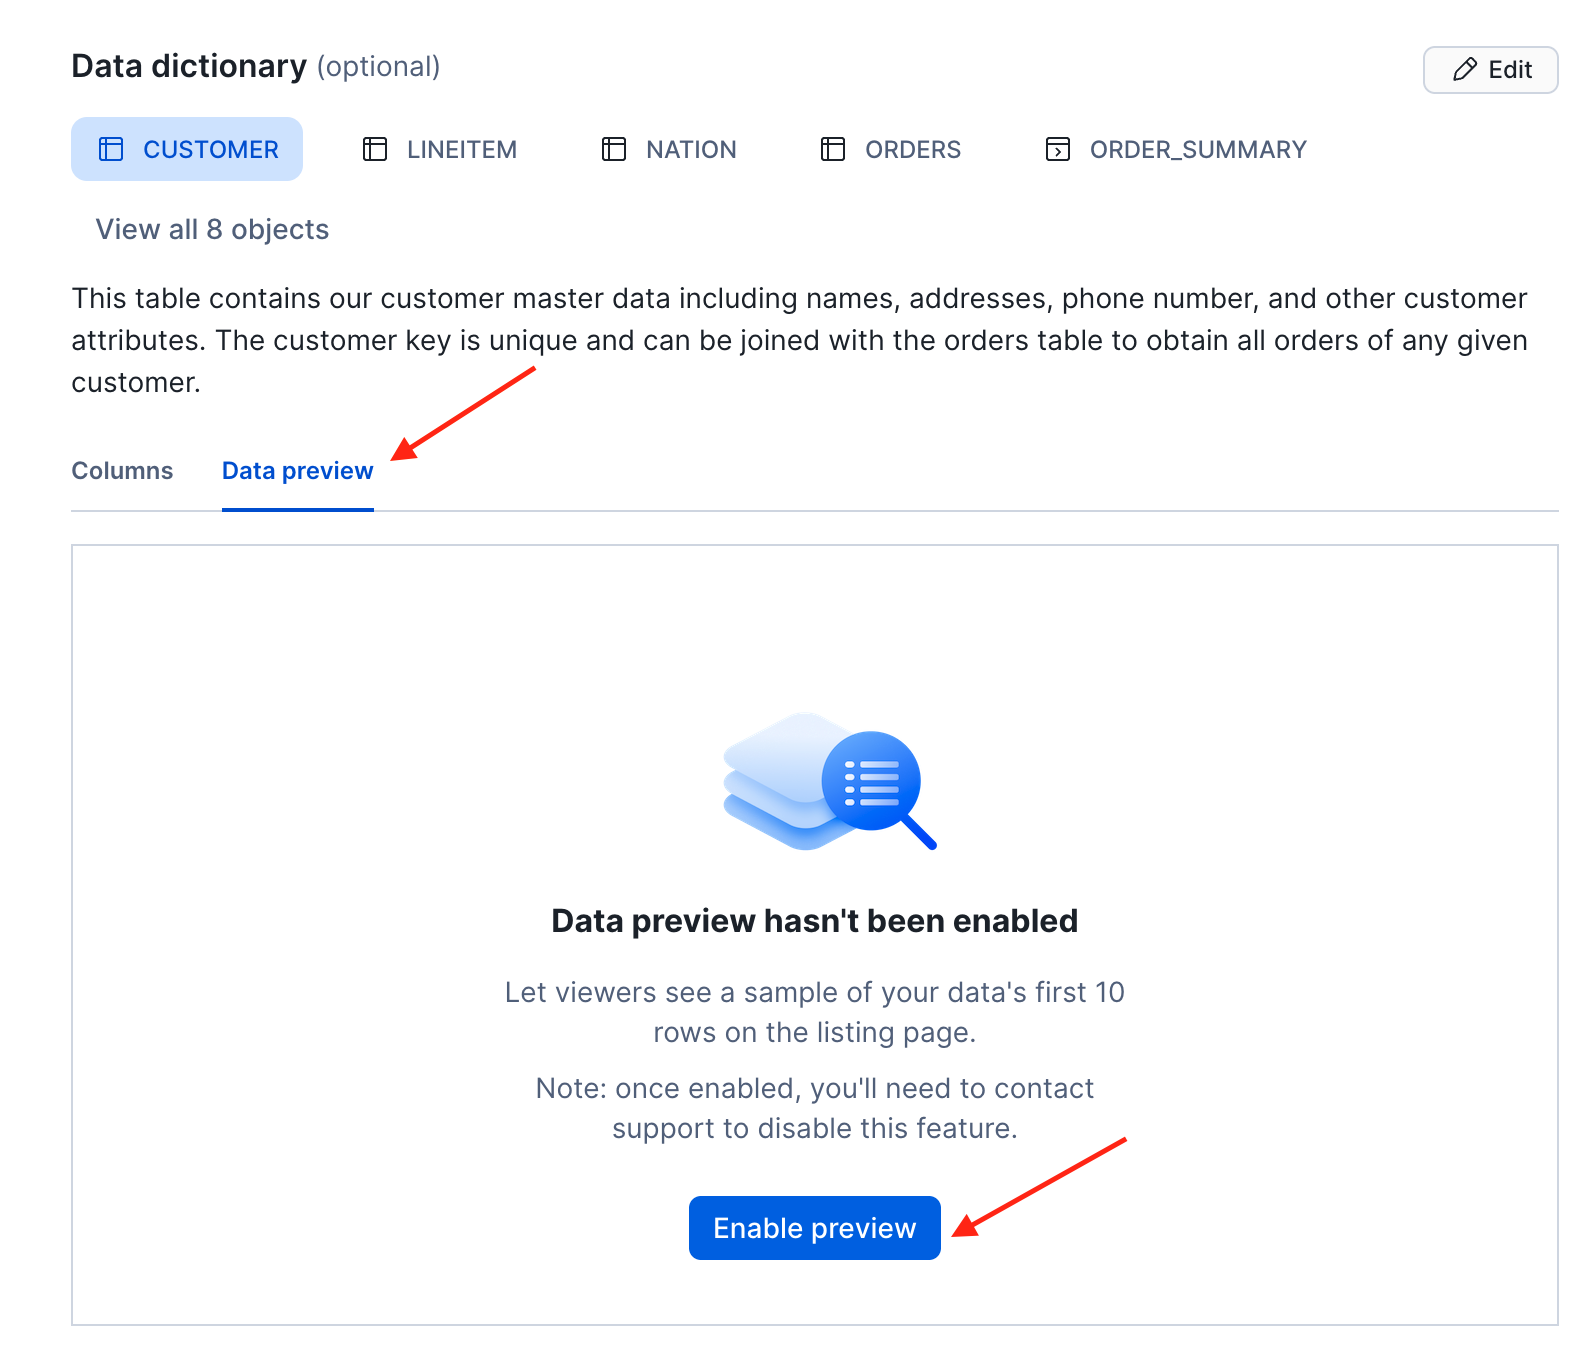
- Enable Data preview in the Data dictionary.
- Data preview is off by default for privacy reasons.
- Let's enable data preview as shown below.
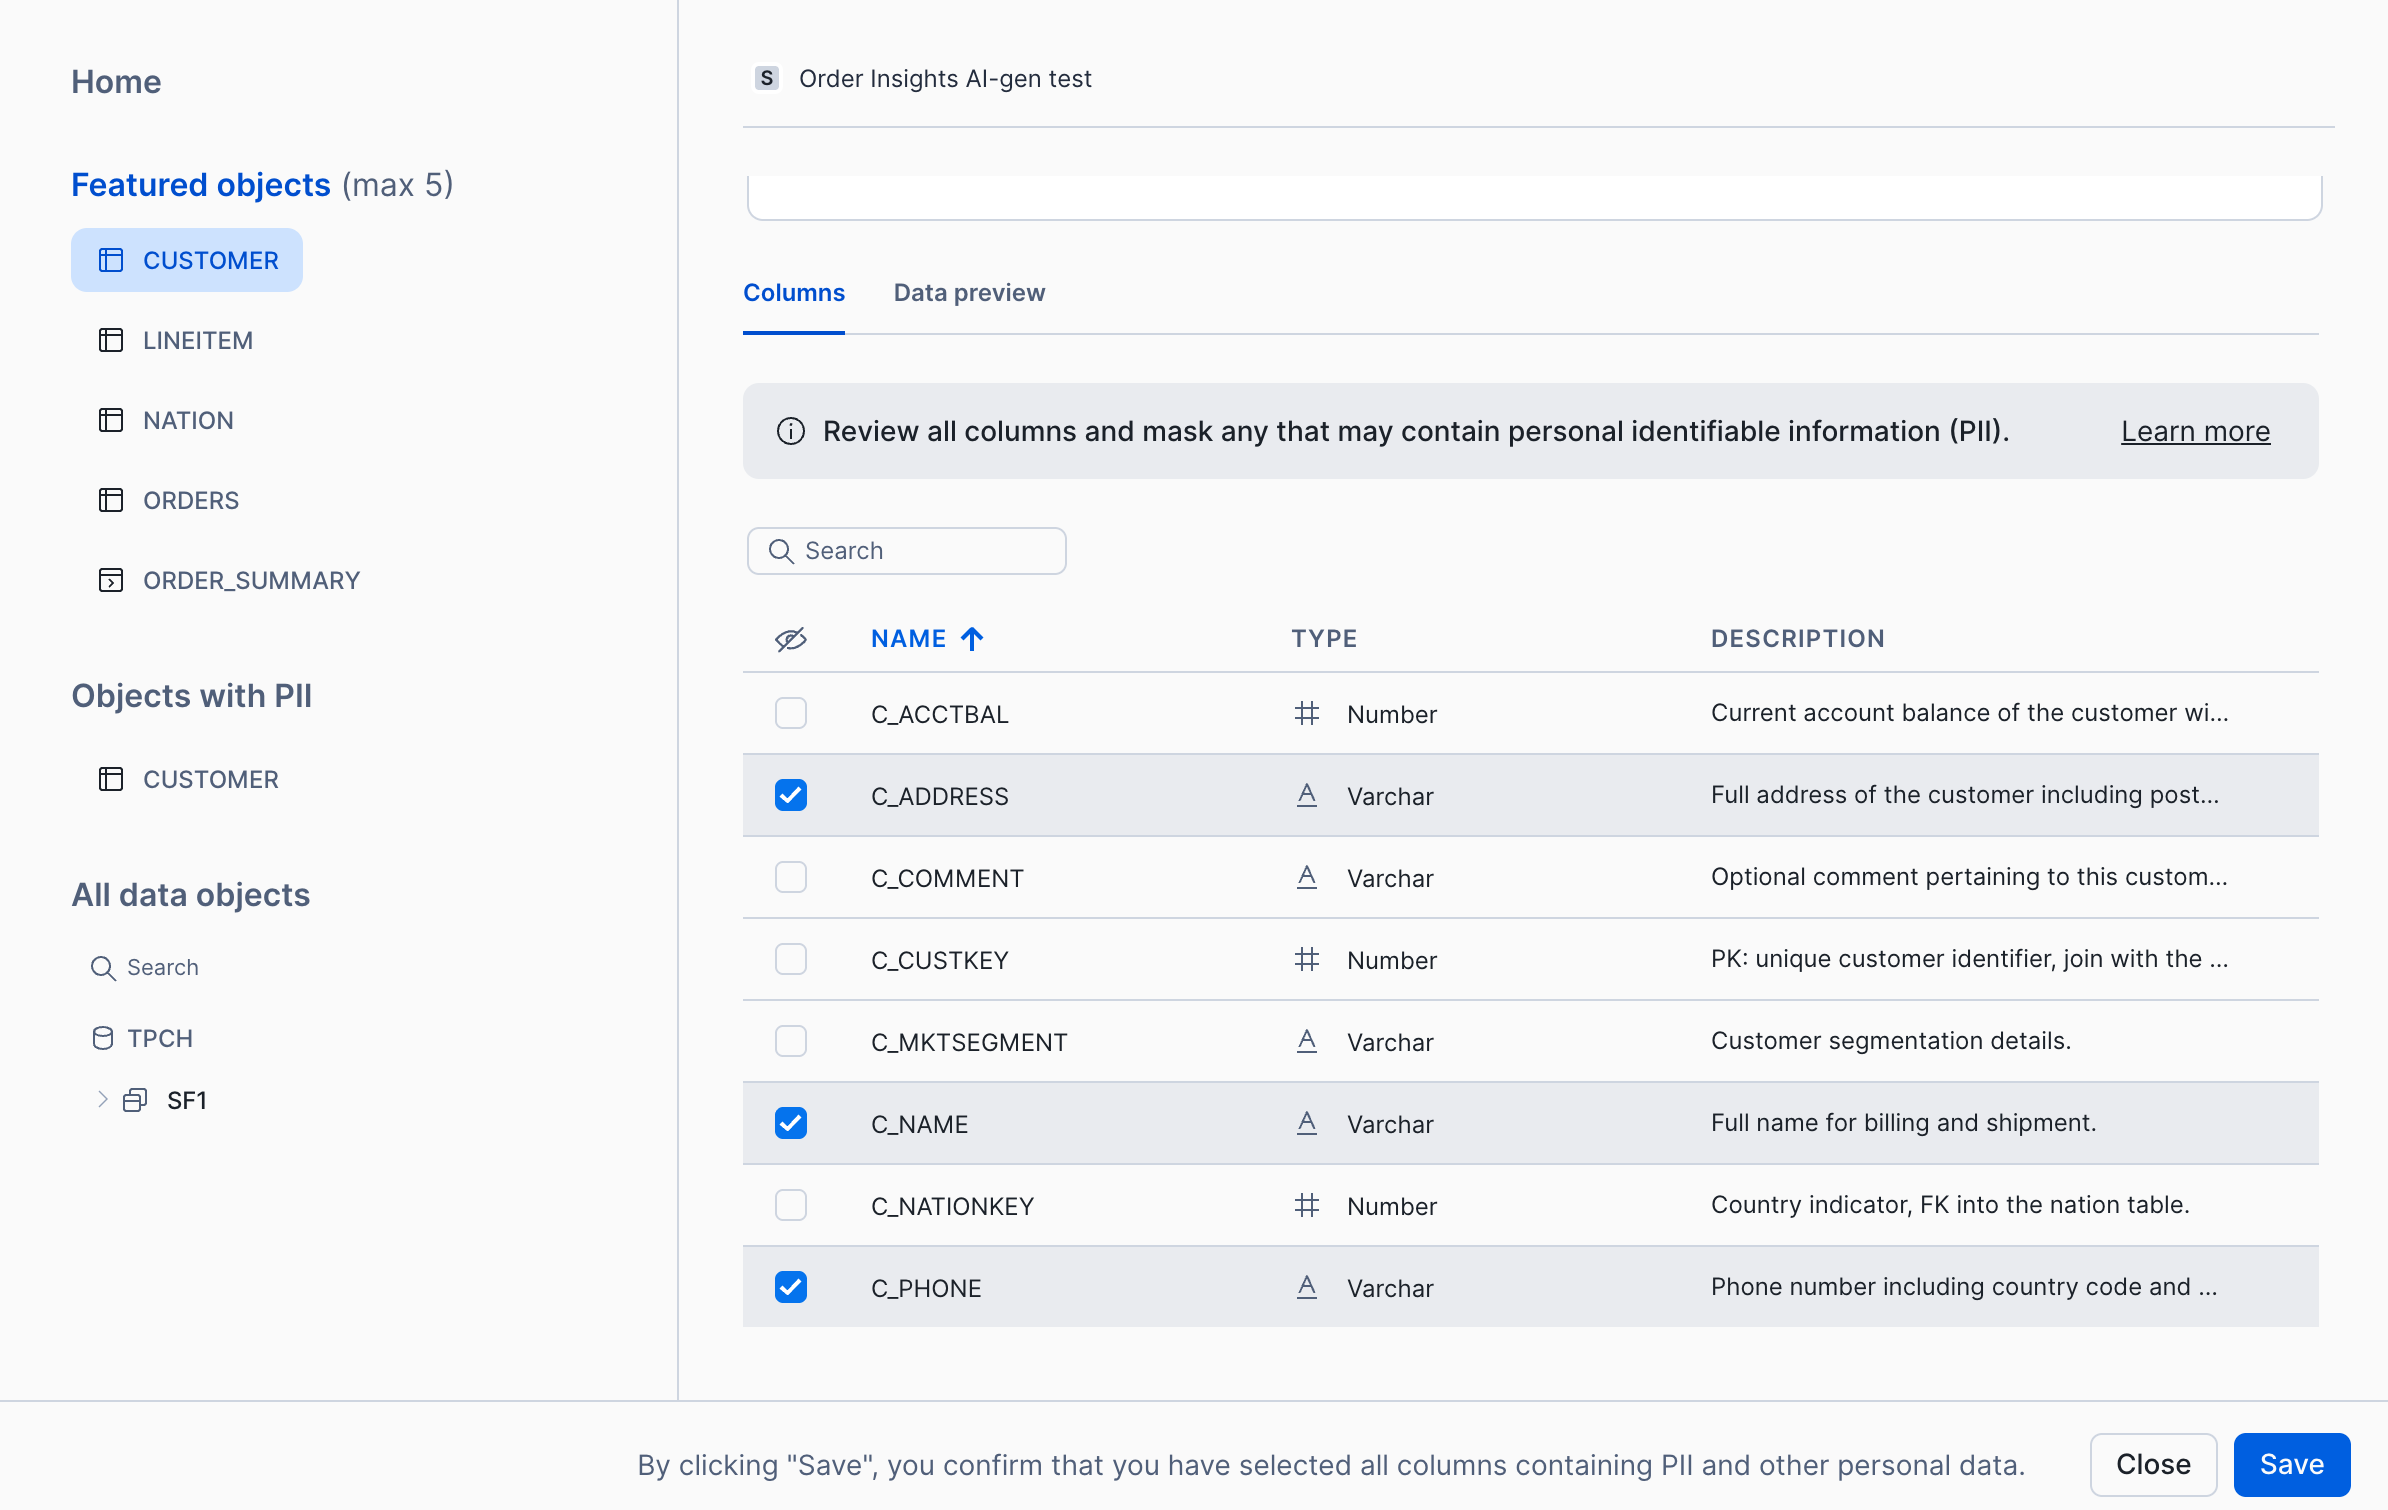
- Sensitive column masking in the data preview.
- Click the Edit button at the top right of the data dictionary.
- Select the customer table.
- Select the
c_address,c_name, and `c_phone columns for masking. Save.
- Note:
- It may take up to 2 hours before data consumers see the properly generated data preview.
- The selection of sensitive columns only affects the data preview in the internal marketplace. When data consumers are granted access to the data product, row- and column-level access policies must be in place to govern their access.
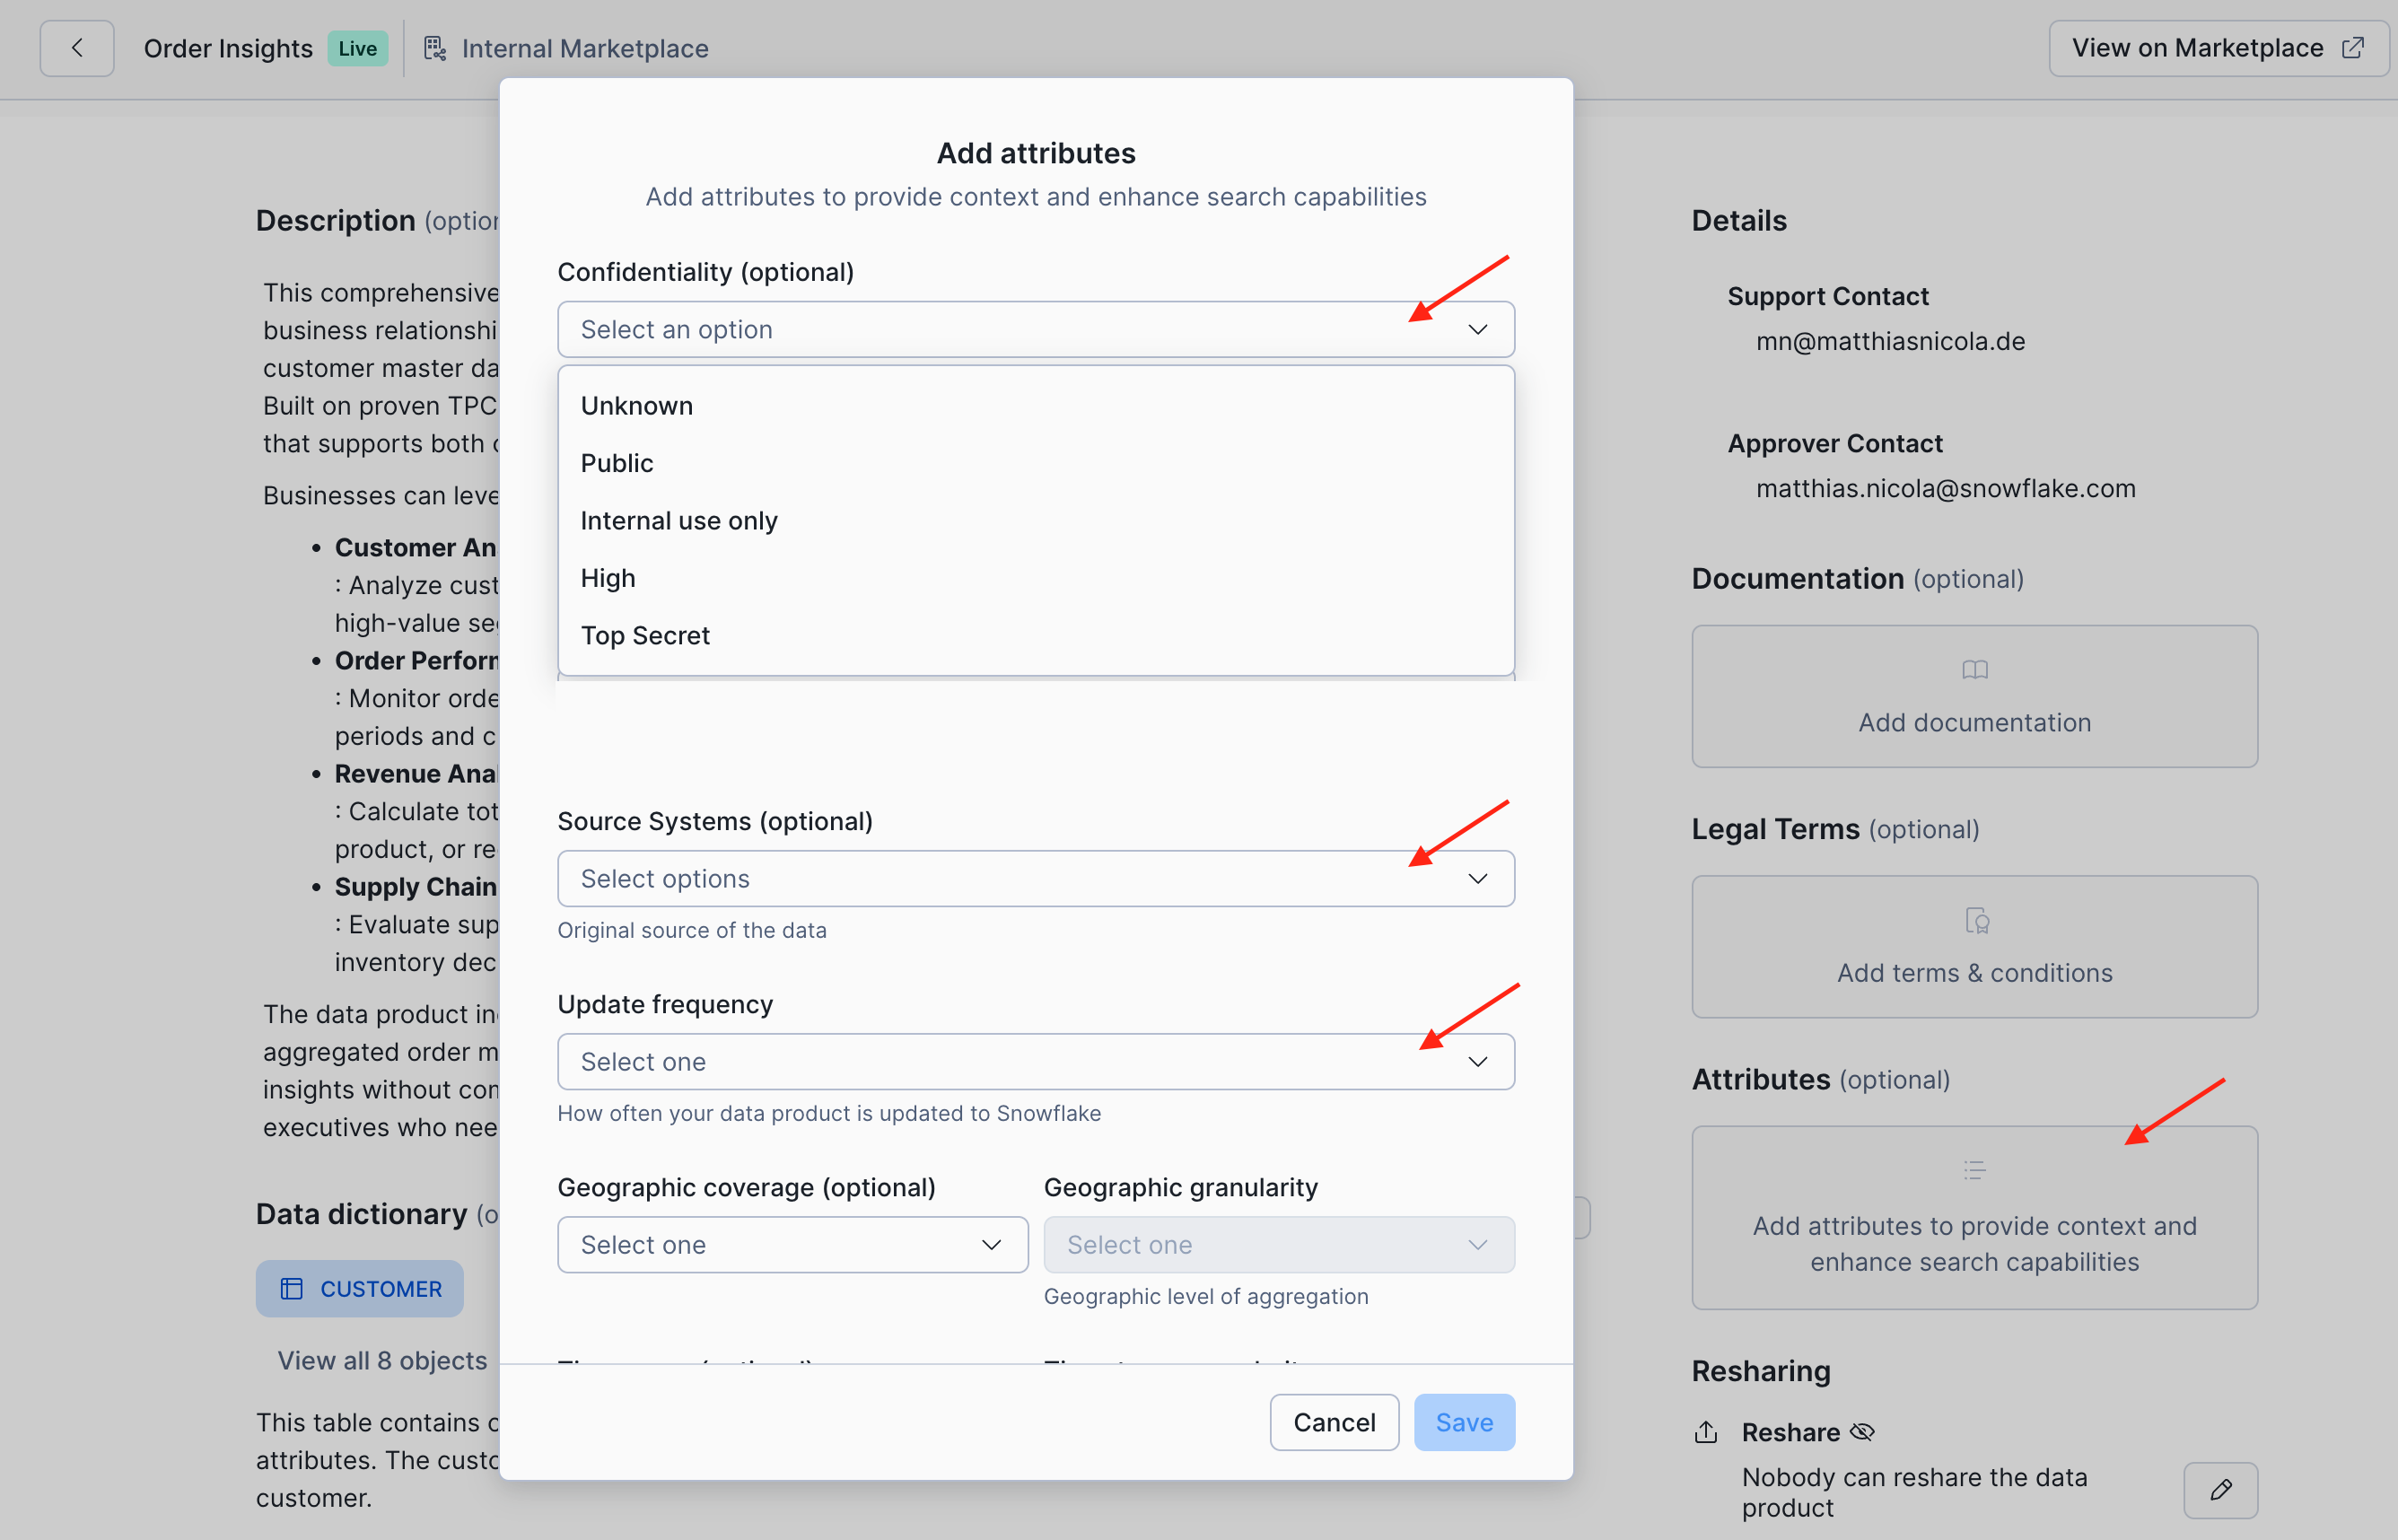
- Set custom attributes to any values you like:
- Click in the field "Attributes (optional)".
- Note that the attributes Confidentiality and Source Systems are examples of Custom Attributes that the internal marketplace admin can define for your company.
- The attribute Source Systems is multi-valued, i.e. you can assign mutiple values from the drop-down list.
- Custom attributes can also appear in the markeplace UI as filters.
- Update frequency is a standard attribute that you can set to indicate the intended service level objectve in terms of data product freshness.
Step 4 of 5: Configure Access Control and Approval
Click the ">" button next to "Discovery" to configure who can discover and access this listing.
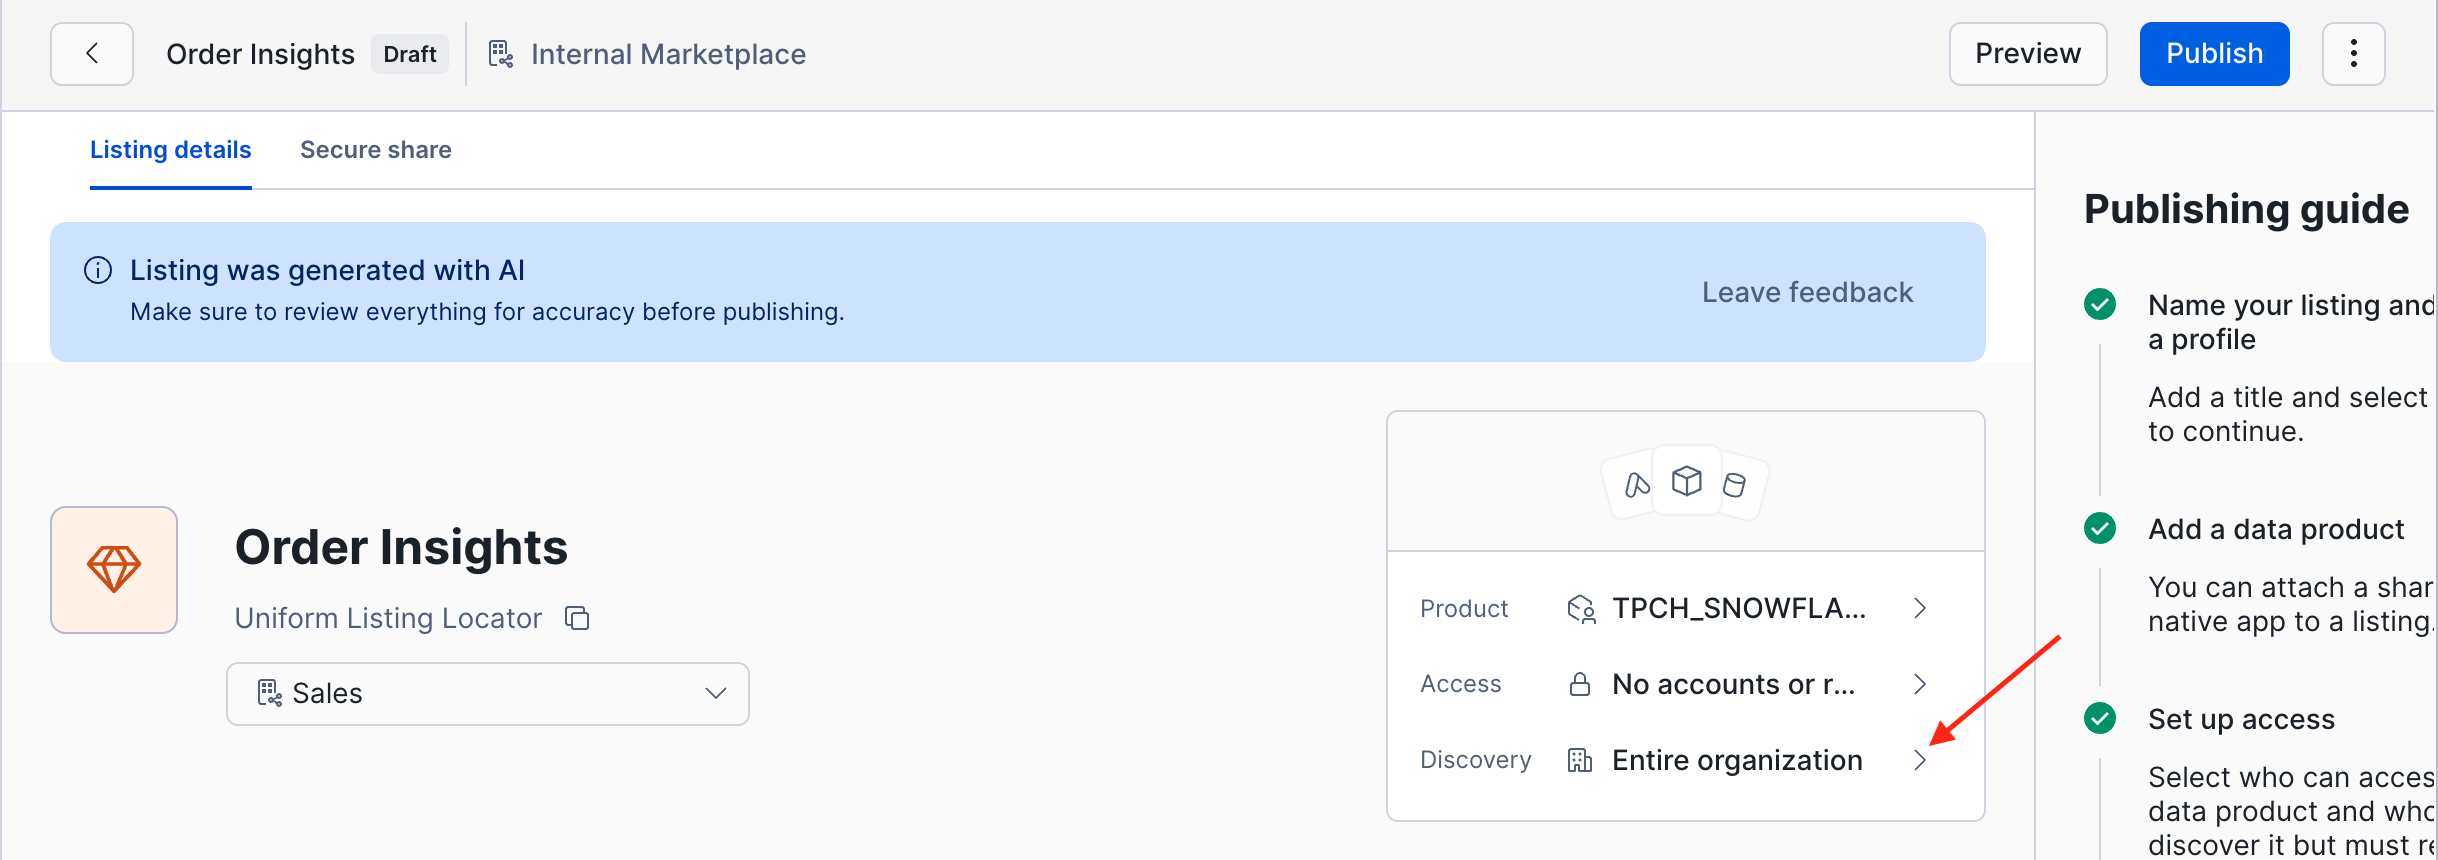
- Discovery determines who can see the listing and its metadata in the Internal Marketplace.
- Access determines who can discover the listing and query the shared data objects.
Configure this listing as follows:
- Grant Access: Leave the setting as "No accounts or roles are pre-aproved"
- Allow Discovery: change discovery from "Entire Organization" to your current account:
- Click on "Entire Organization"
- Choose "Selected accounts and roles"
- Select your current account, it should be the first in the list. Done.
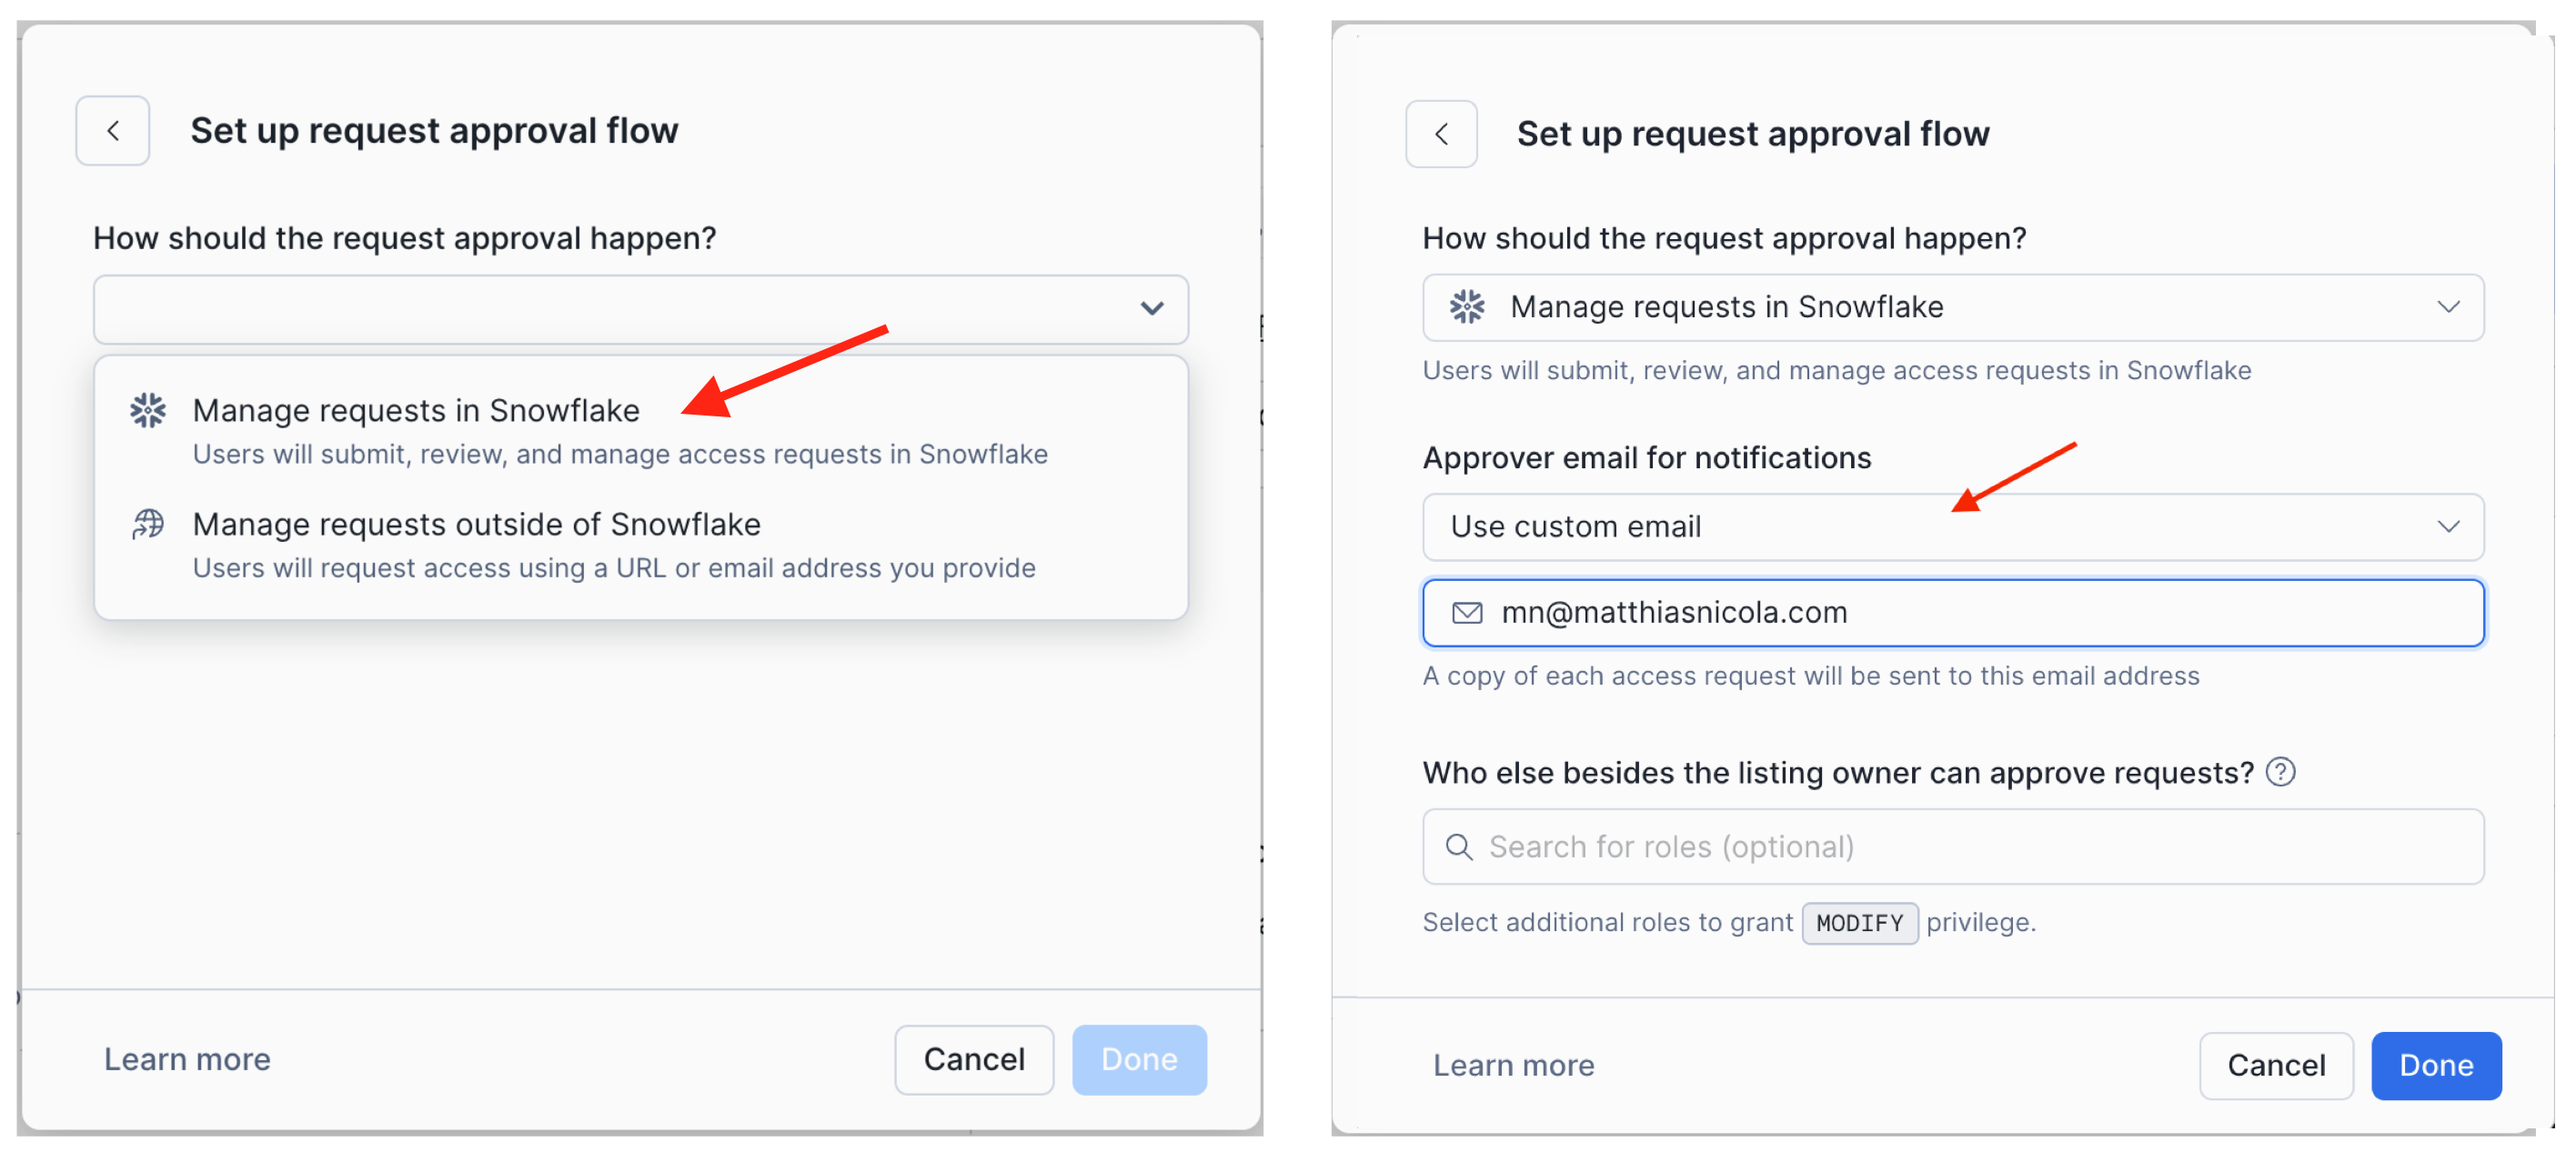
Click Set up request approval flow to proceed.

- Select Manage requests in Snowflake (rather than an external workflow engine).
- Change the Approver email from Use profile contact to Use custom email and enter your own email, e.g. the one you used to sign up for this lab.
- Click Done and Save
Step 5 of 5: Publish & Verify
Click the blue Publish button in the top right corner.
Your Order Insights data product is now live on the Internal Marketplace!
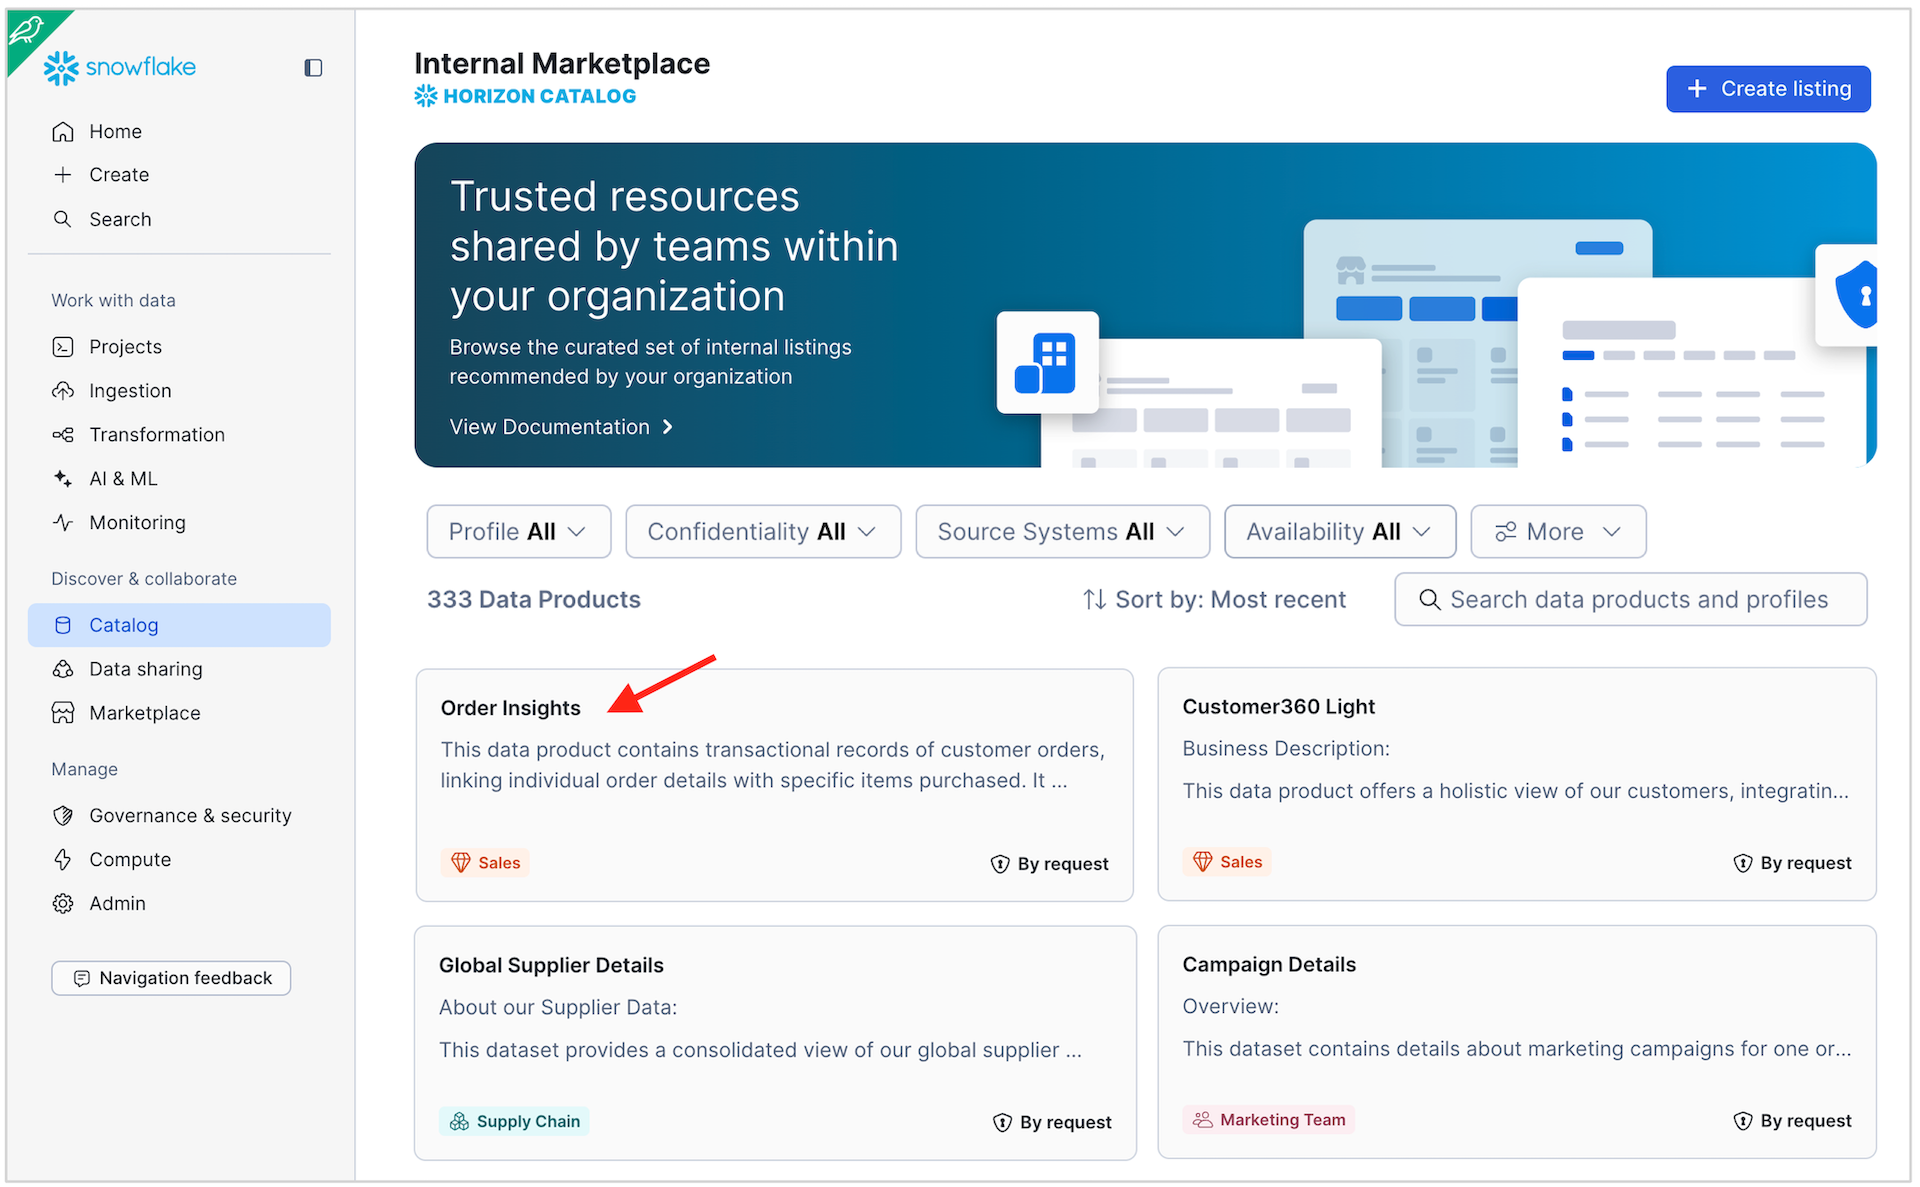
To verify, navigate to the Catalog > Internal Marketplace.
-
Set the Sort By to Most Recent or search for your account locator to find your listing.
-
Use the Profile filter to show listings for the profile (domain) that you selected for your data product.
-
You can also use the custom attribute filters to narrow down the visible data products.
-
In a workspace you can also run this query:
select *
from snowflake.information_schema.listings
where state = 'PUBLISHED';
Request and Grant Access
In this section:
- The Consumer user will request access to your Order Insights listing that you just published
- The Data Owner will review and approve the request.
Important: Since both users are in the same account, you will switch between users. We suggest using a separate Incognito or Private Browser window to log in as the consumer. Then you can switch windows to switch between the provider and consumer user, without unwanted side-effects.
Request Access as the Consumer User
- Log in to your account as the
consumeruser (e.g. in a new incognito browser window). - Navigate to Catalog > Internal Marketplace.
- You should see your Order Insights listing. Click on it.
- If needed, set the Sort By to Most Recent or search for your account locator.
- Click the blue Request Access button.
- If prompted to verify your email address, click on the user profile link in the dialog to complete verification.
- Verify the email sent to you. Then reload the browser tab.
- In the Request access dialog, enter a business justification such as:
- "We need this data for our current project xyz."
- Submit the request.
- After submitting, click the gray View request button to review your pending request. You can also withdraw and resubmit the request from here if needed.
Review and Grant Access as the Data Product Owner
- Log in to your account as the
provideruser (switch browser tabs/windows or log in again). - Navigate to the Data Sharing -> Internal Sharing .
- Open the Requests tab at the top of the Internal Sharing page.
- You should see the access request from
consumer. Click on it to review the details:- The requesting user and role
- The business justification
- The listing being requested
- Click the green Grant button to approve the request.
- Switch from Needs Review to Resolved to confirm the request is now listed as approved.
Verify Access
Switch back to the consumer user and navigate to the Order Insights listing in the Internal Marketplace. The blue Request Access button should now have changed to Query in Workspaces (reload the browser tab if needed). This confirms that access has been granted successfully.
Consume Org Listing
Now that access has been granted, let's consume the Order Insights data product as the consumer user with the consumer_role.
Query via the Internal Marketplace
- Log in to your account as the
consumeruser (or switch browser windows). - Navigate to Catalog > Internal Marketplace.
- Open the Order Insights listing. Reload the browser tab if you still see the "Request Access" button.
- Click Query in Workspaces. Snowflake opens a new worksheet pre-populated with the sample queries from the listing.
- Review and run the sample queries.
- Keep the worksheet open for the consumer side of the next (optional) exercise, to use the same
use databasecontext.
Live Data Sharing (Optional Excercise)
A key benefit of organizational listings is that data is shared live. When the data owner updates the underlying data, consumers see the changes instantly. Let's demonstrate this.
-
Switch to the
provideruser and run the following in a worksheet:USE ROLE provider_role; USE WAREHOUSE compute_wh; USE SCHEMA tpch.sf1; -- Check current country for customer 60001 SELECT customer_name, country, orderkey, orderdate, AMOUNT FROM TABLE(orders_per_customer(60001));Note the country for customer 60001 (Kenya).
-
Now update the customer's nation:
-- Customer 60001 moves from Kenya to Mozambique UPDATE customer SET c_nationkey = 16 WHERE c_custkey = 60001; -
Switch back to user
consumer(e.g. switch browser tabs) and re-run the same query:USE ROLE consumer_role; SELECT customer_name, country, orderkey, orderdate, AMOUNT FROM TABLE(SF1.ORDERS_PER_CUSTOMER(60001));The updated country (Mozambique) is instantly visible to the consumer -- no refresh, no sync, no delay.
Best practice: Inform your data consumers ahead of time about structural changes to a data product (e.g. adding/removing columns). For breaking changes, consider creating a new listing version and giving consumers time to migrate.
Share Data Products across the Org (using Coco)
Now let's make your data product visible to the entire organization! In this lab, the organization consists of the Snowflake accounts of all the other lab participants around you.
You can do this manually by going back to the "Step 4 of 5: Configure Access Control and Approval" that you performed above. But, let's use Coco to do it for you.
-
Log in to your account as the
provideruser (switch browser tabs/windows or log in again). -
Navigate to Data Sharing -> Internal Sharing .
-
Open the Listings tab at the top of the Internal Sharing page.
-
Select your live listing
-
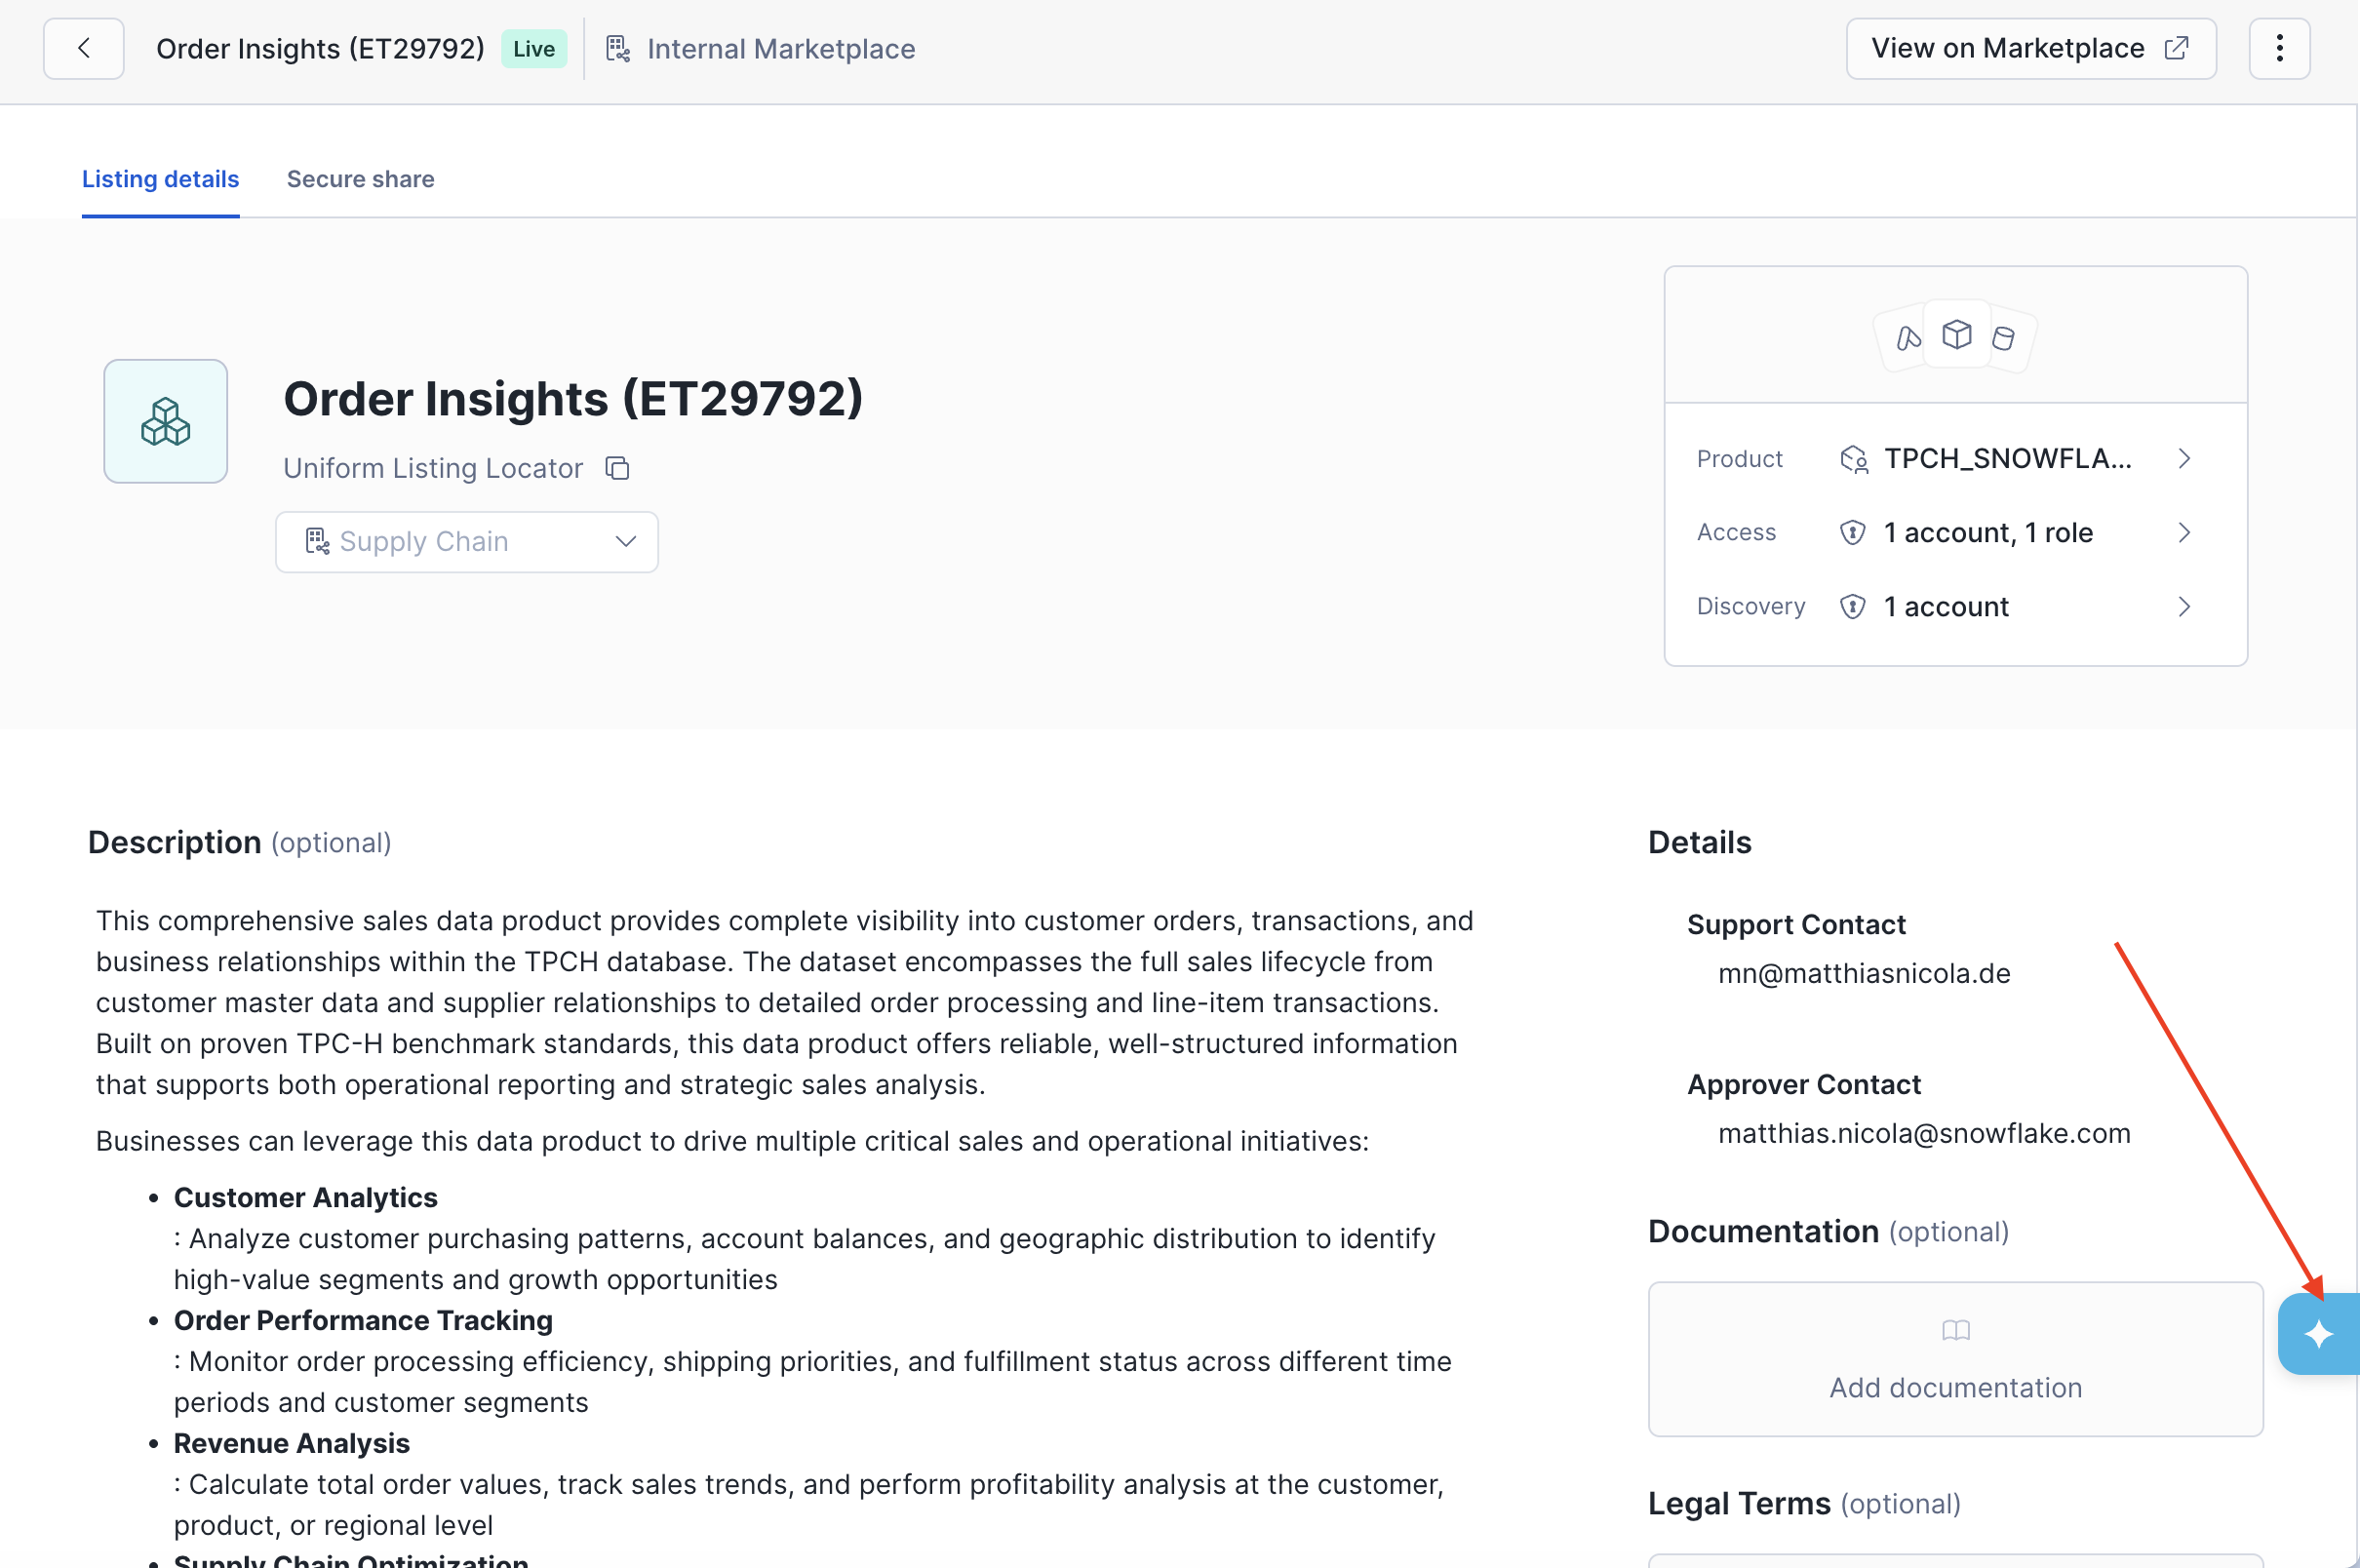
Invoke Coco by clicking on the blue AI icon at the bottom right:
-
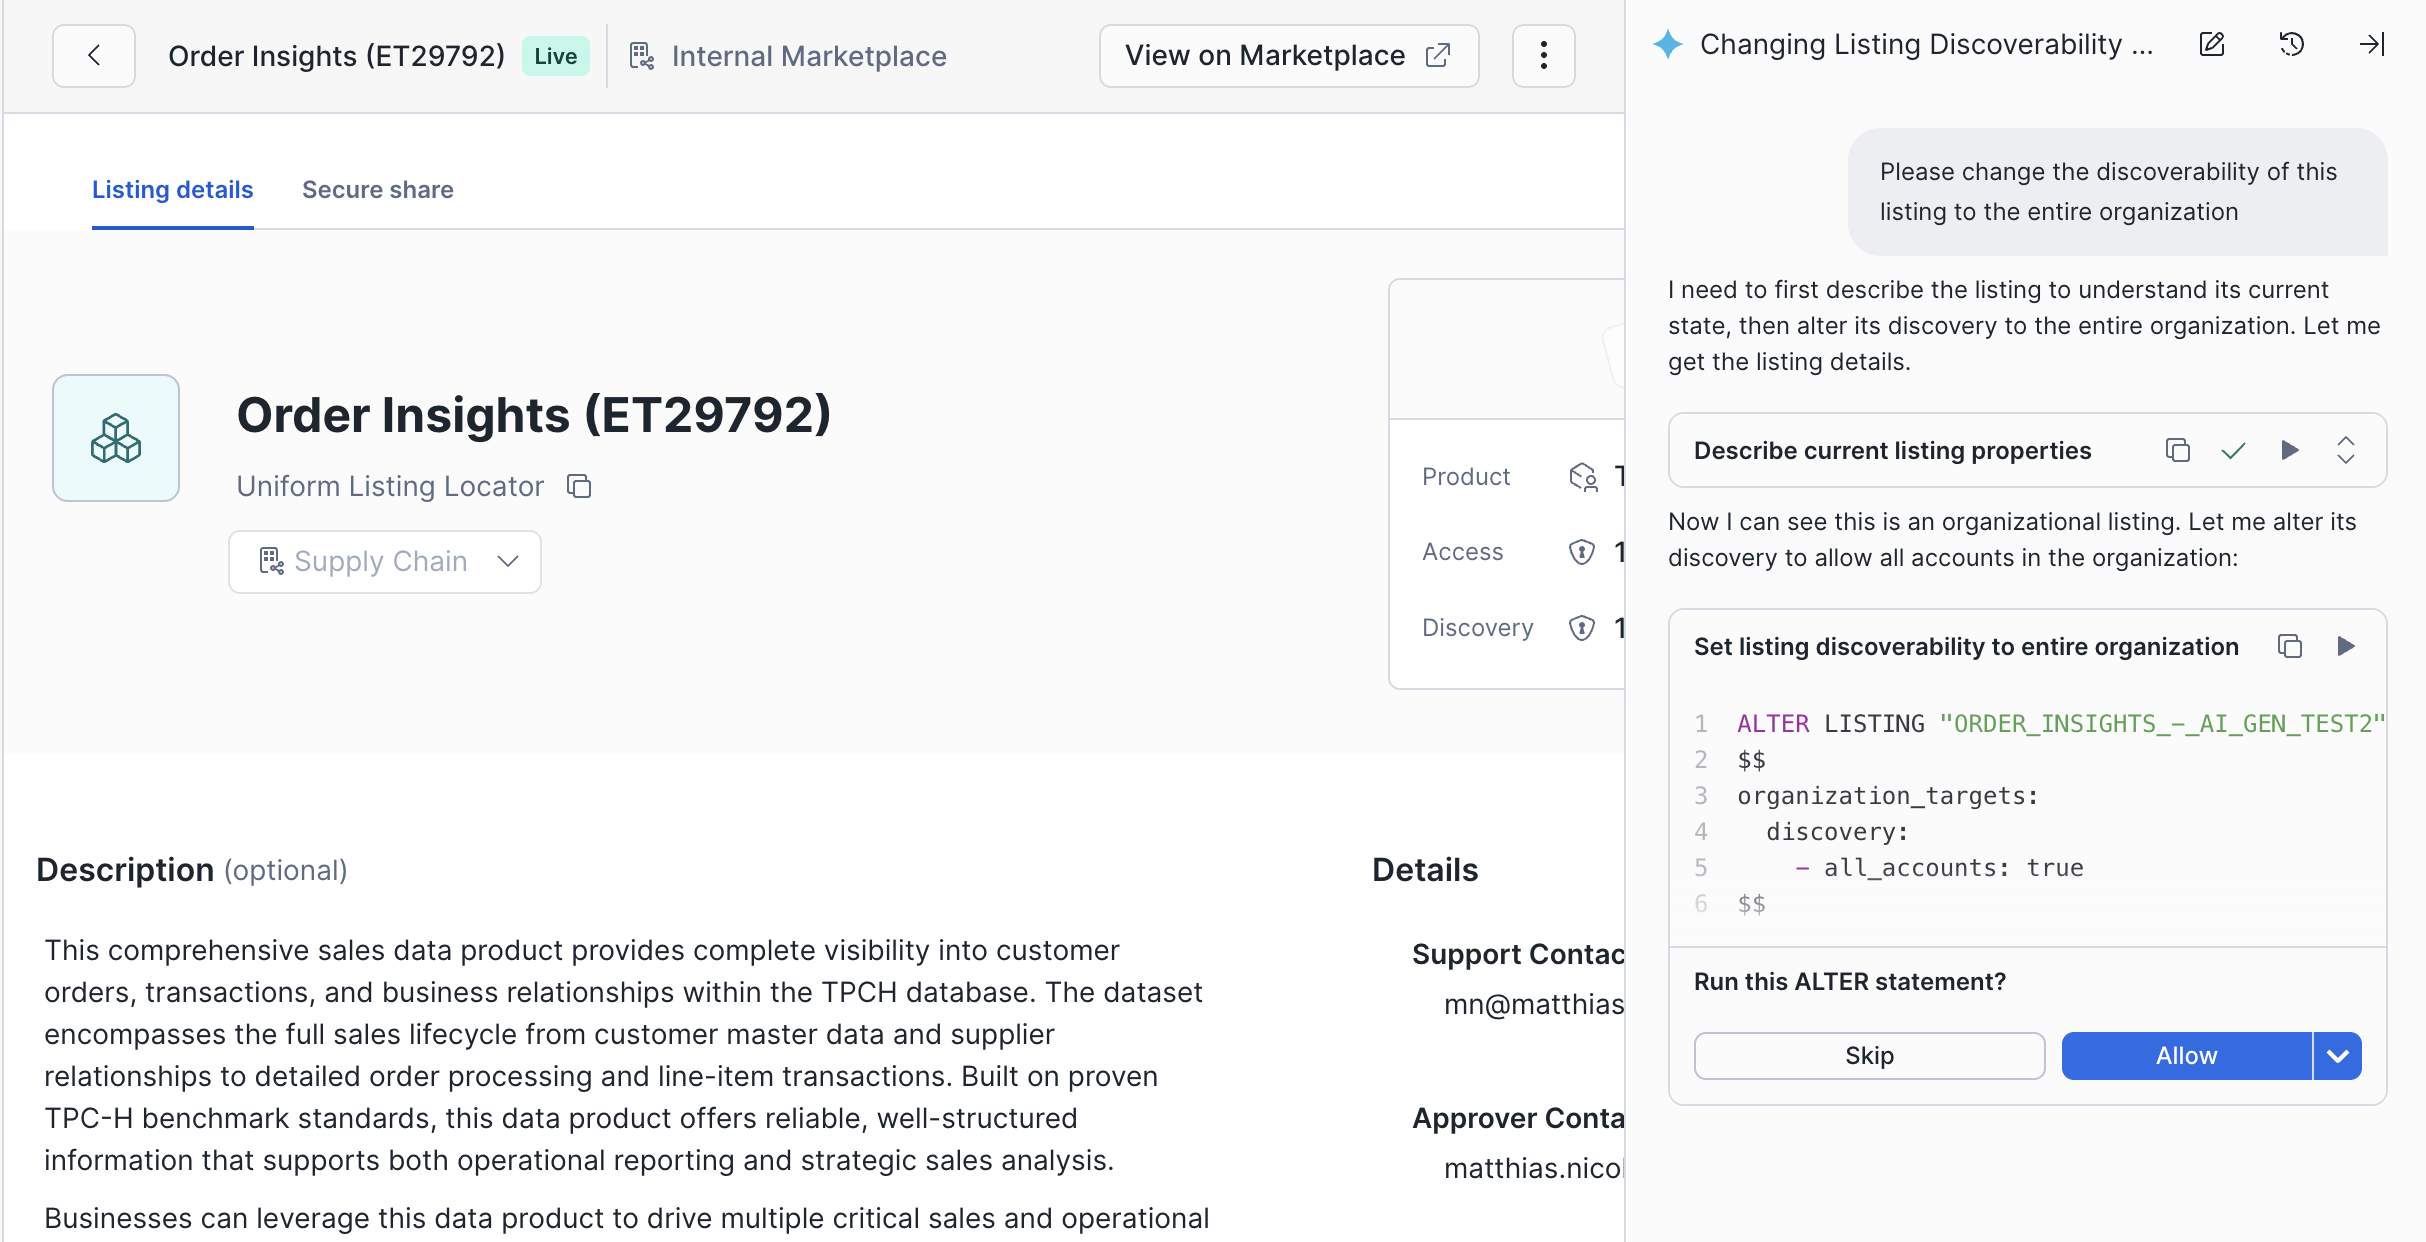
Prompt Coco to make the desired change for you:
Please change the discoverability of this listing to the entire organization.Then click Allow to confirm:
-
Hide Coco by clicking the ->| icon in the top right corner.
-
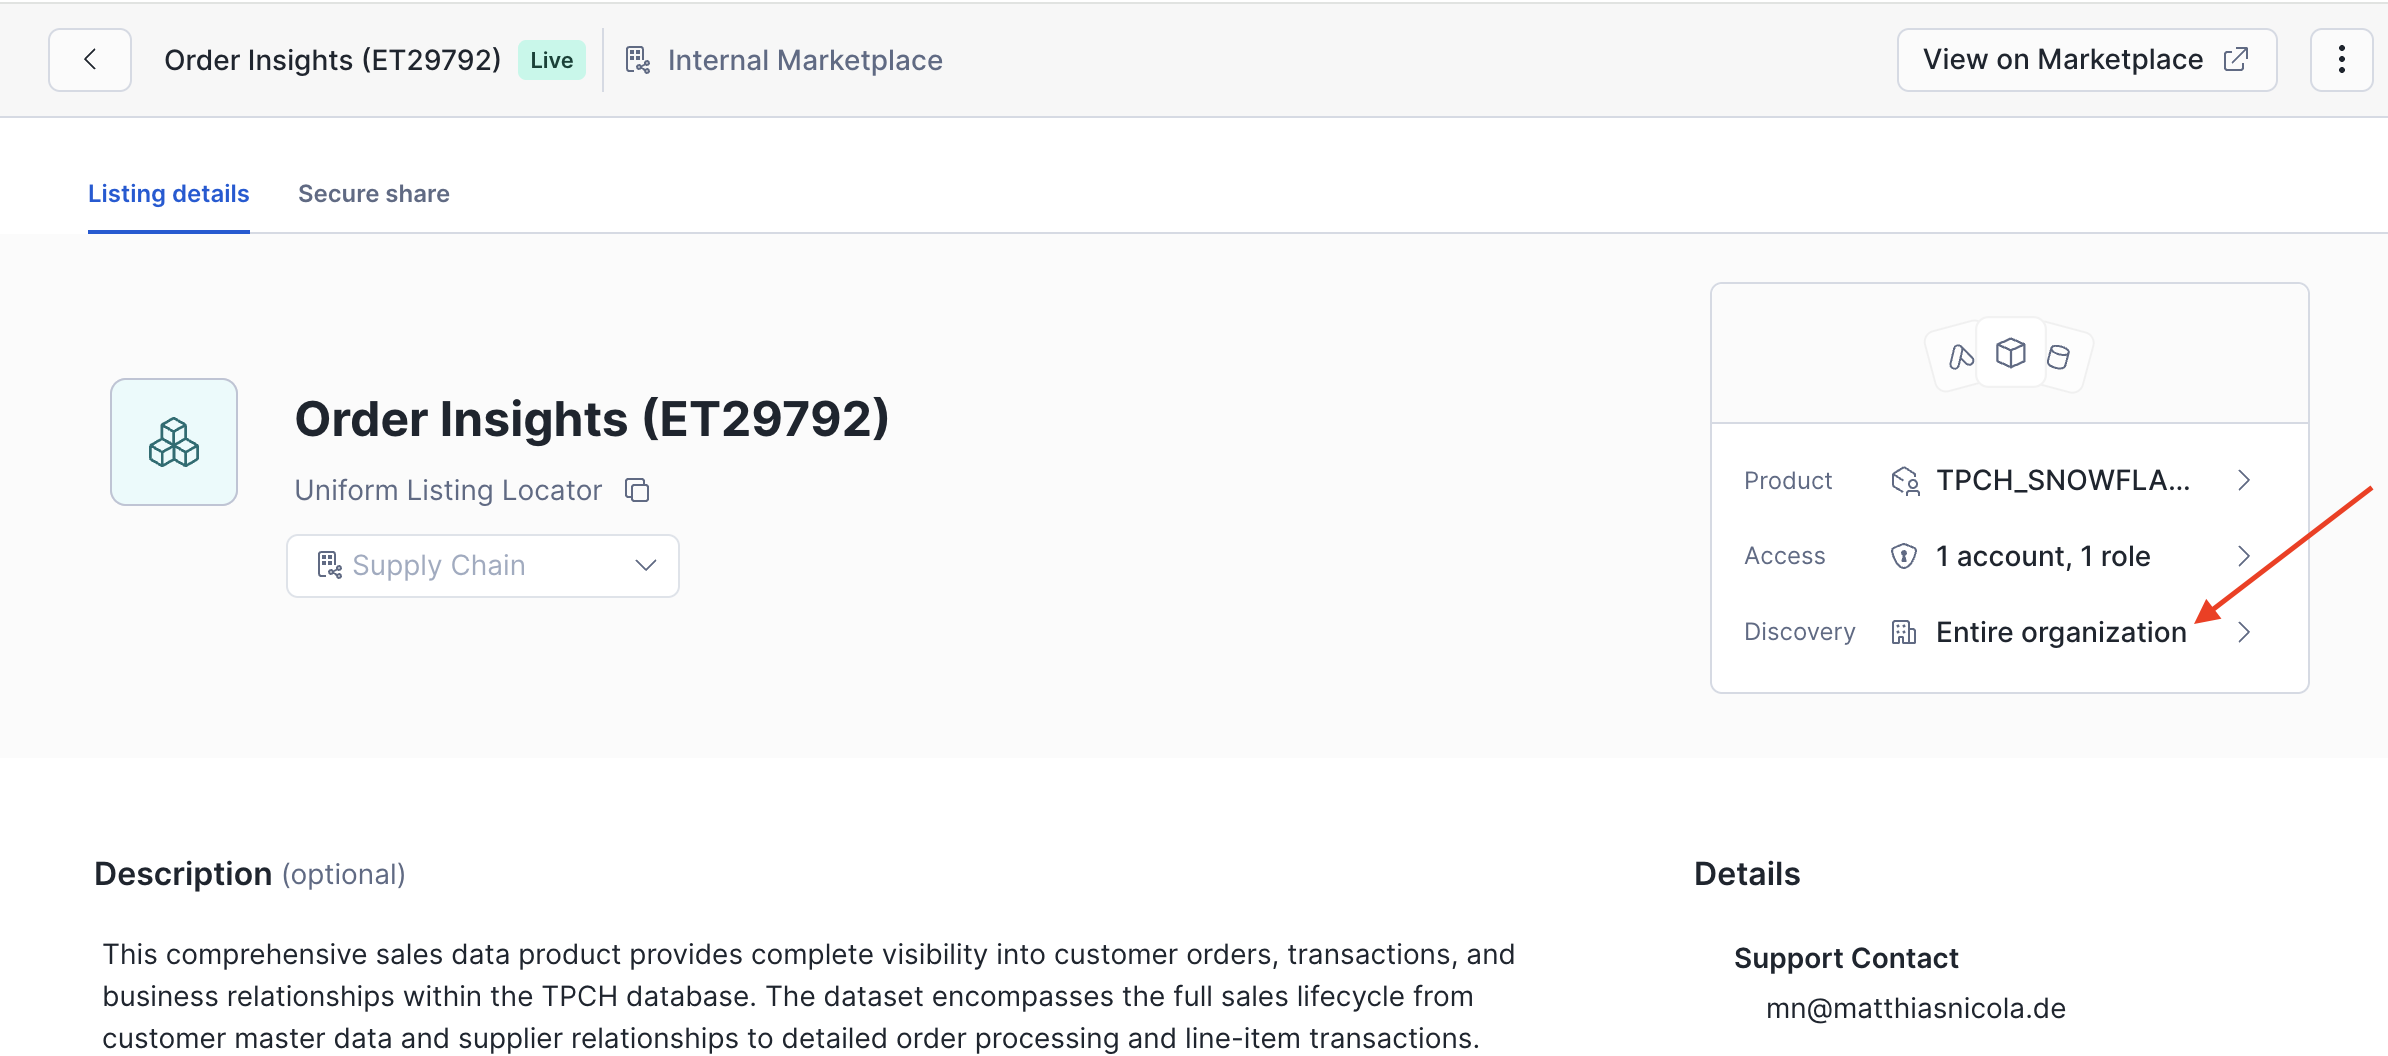
Reload the browser tab to validate the effect of Coco's ALTER statement in the UI:
Now let's look at the data products that others have published:
- Switch to your
consumeruser. - Navigate to Catalog > Internal Marketplace. More and more data products published by other lab participants will appear in the internal marketplace! (Reload your browser tab if needed.)
- Use the filters for Profile as well as for the custom attributes Confidentiality and Source Systems to display different subsets of data products.
- Open at least 2 or 3 data products other than your own and Request Access as you did before for your own data product.
- Navigate to the Data Sharing -> Internal Sharing -> Requests periodically to check if you have received any access requests from other lab participants. If so, approve them.
Share Semantic Views and Agents
Let's make your data product AI-ready by generating and adding a semantic model (semantic view) and an AI agent.
-
Log in to your account as the
provideruser (or switch browser tabs/windows ). -
Navigate to Data Sharing -> Internal Sharing .
-
Open the Listings tab at the top of the Internal Sharing page.
-
Select your listing.
-
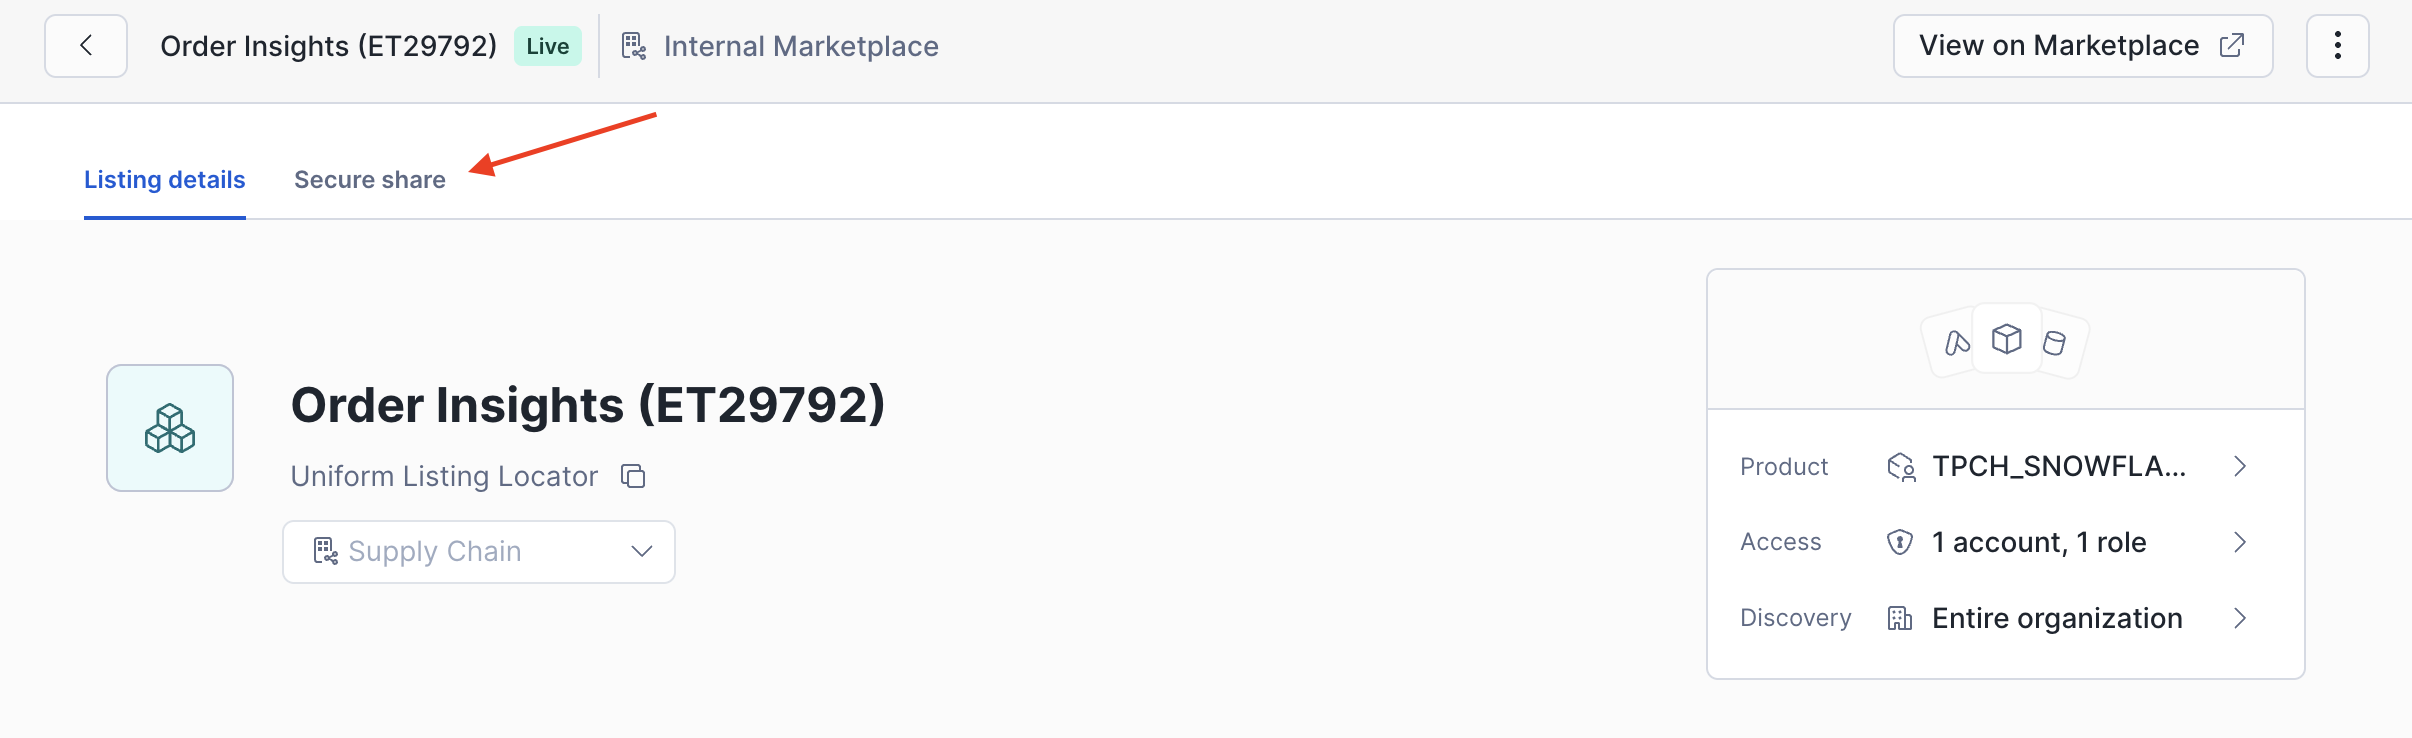
Click on Secure share at the top:
-
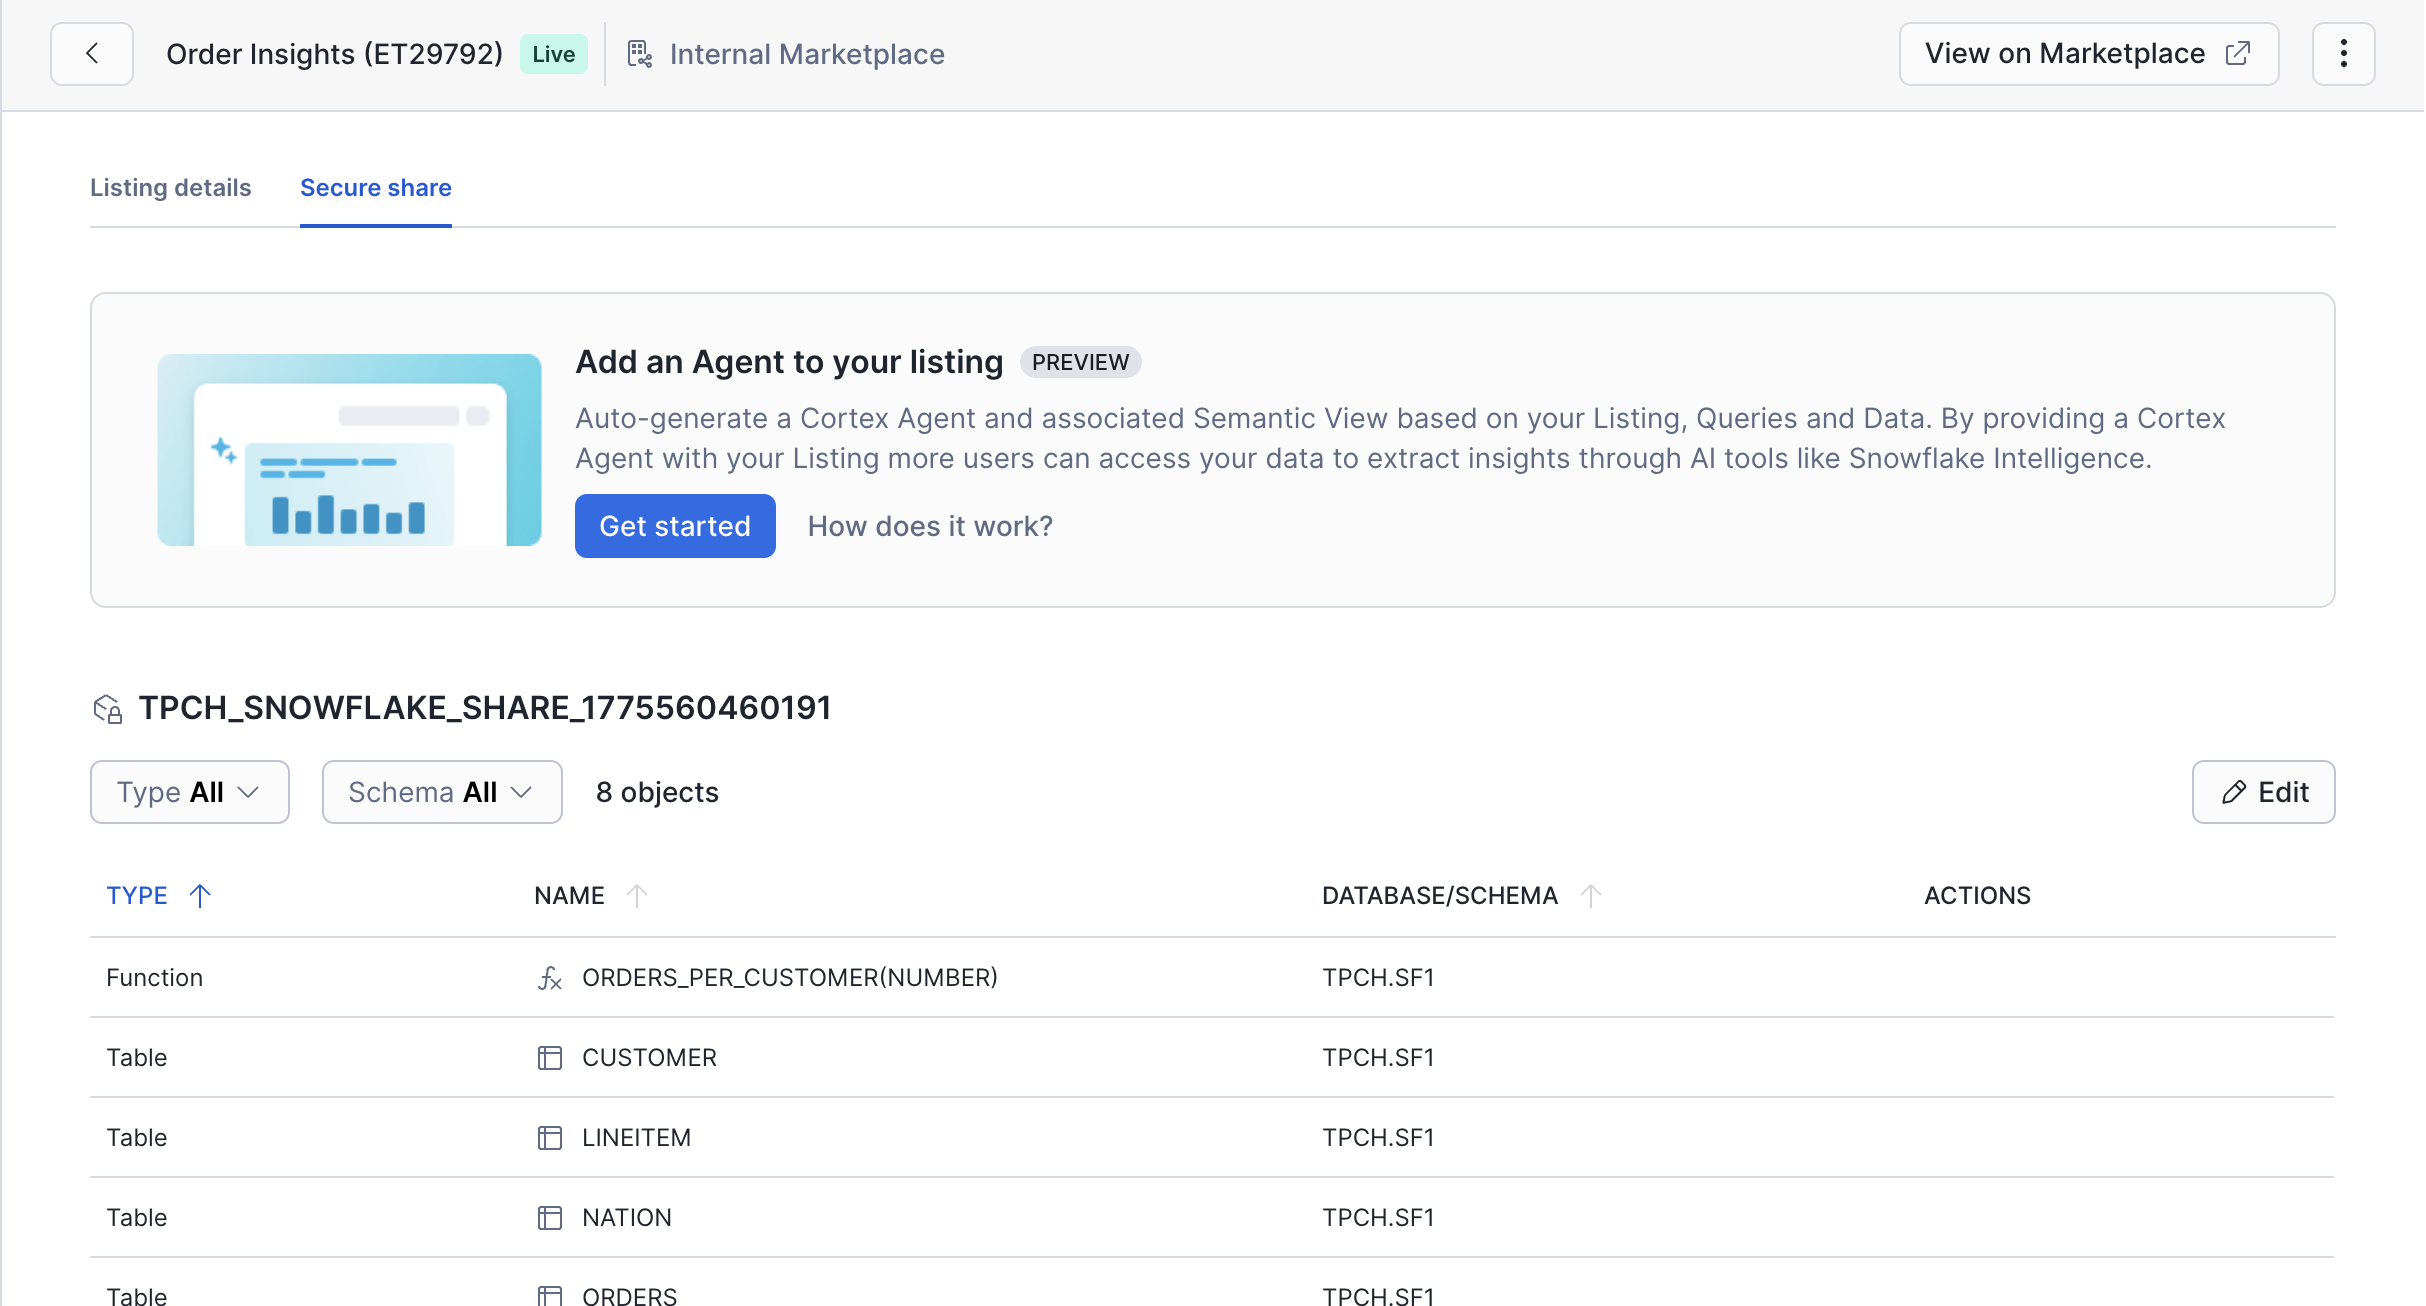
You see the list of objects currently shared by your listing. Snowflake offers to generate and add a semantic view and an agent. Click Get started. Then click Create.
-
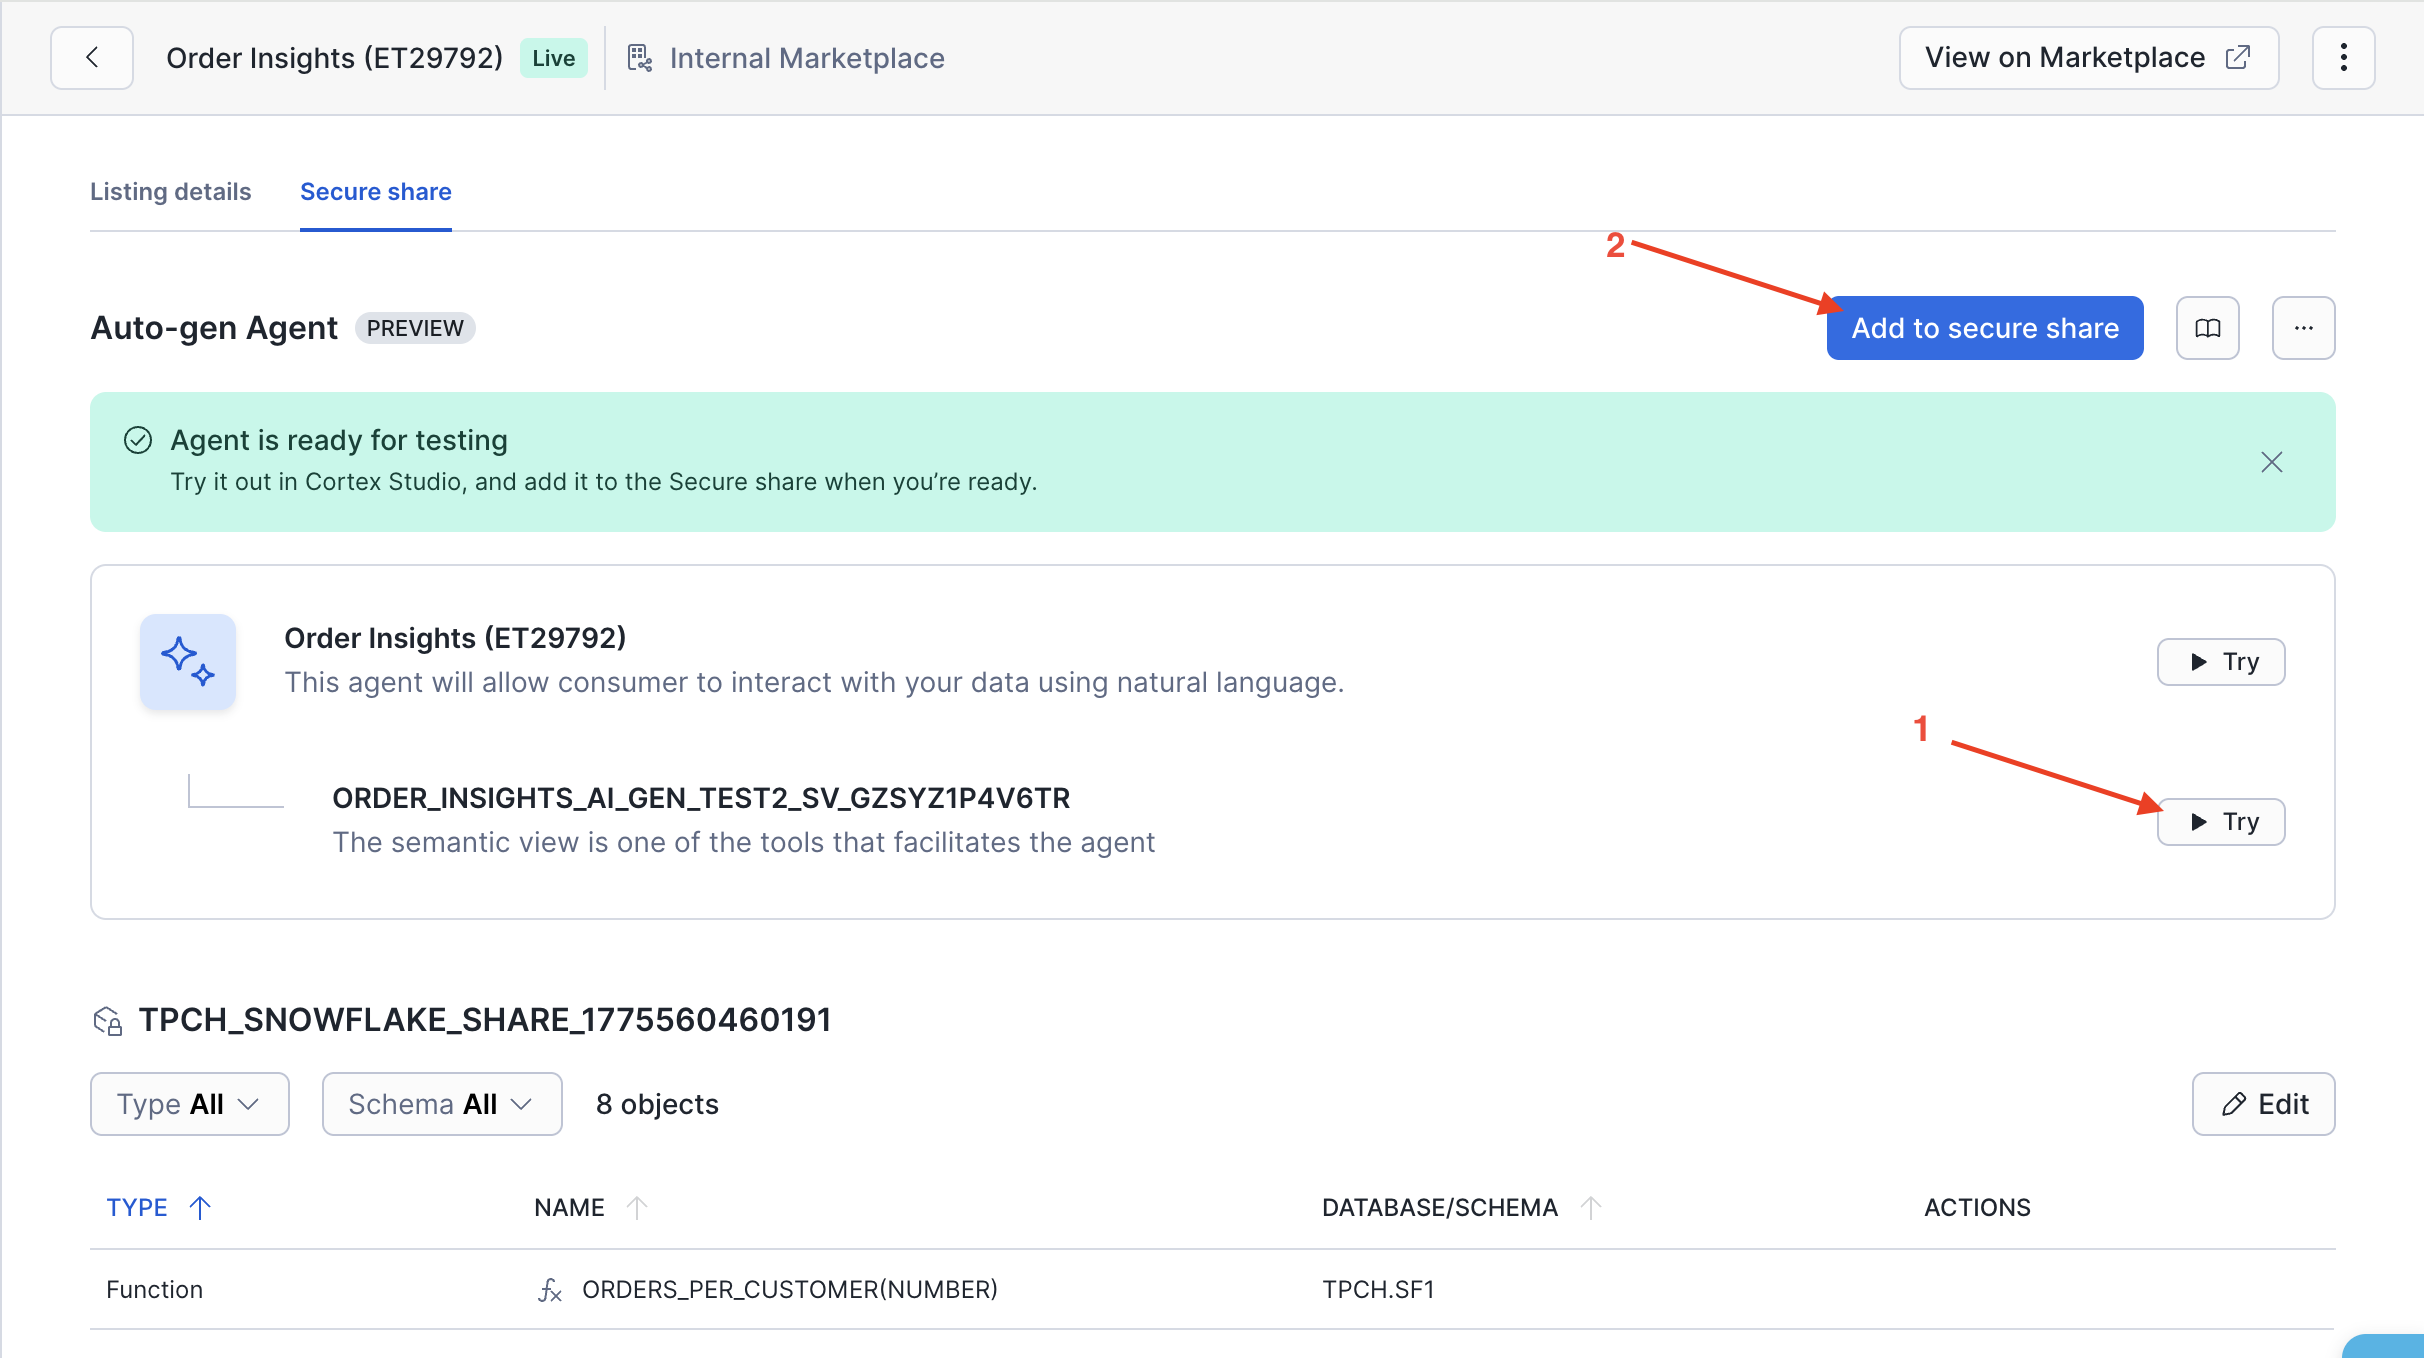
Click Try to test drive the semantic view with some natural language prompts. A new browser tab will open.
- Sample prompt: "What questions can you help me answer?"
-
Return to the browser tab with your listing and click Add to secure share and Done.
-
Your data product is now marked as Cortex AI Ready.
Talk to your Data Product in CoWork (fka Snowflake CoWork)
-
Log in to your account as the
consumeruser (or switch browser tab). -
Navigate to Catalog > Internal Marketplace.
-
Open your Order Insights listing.
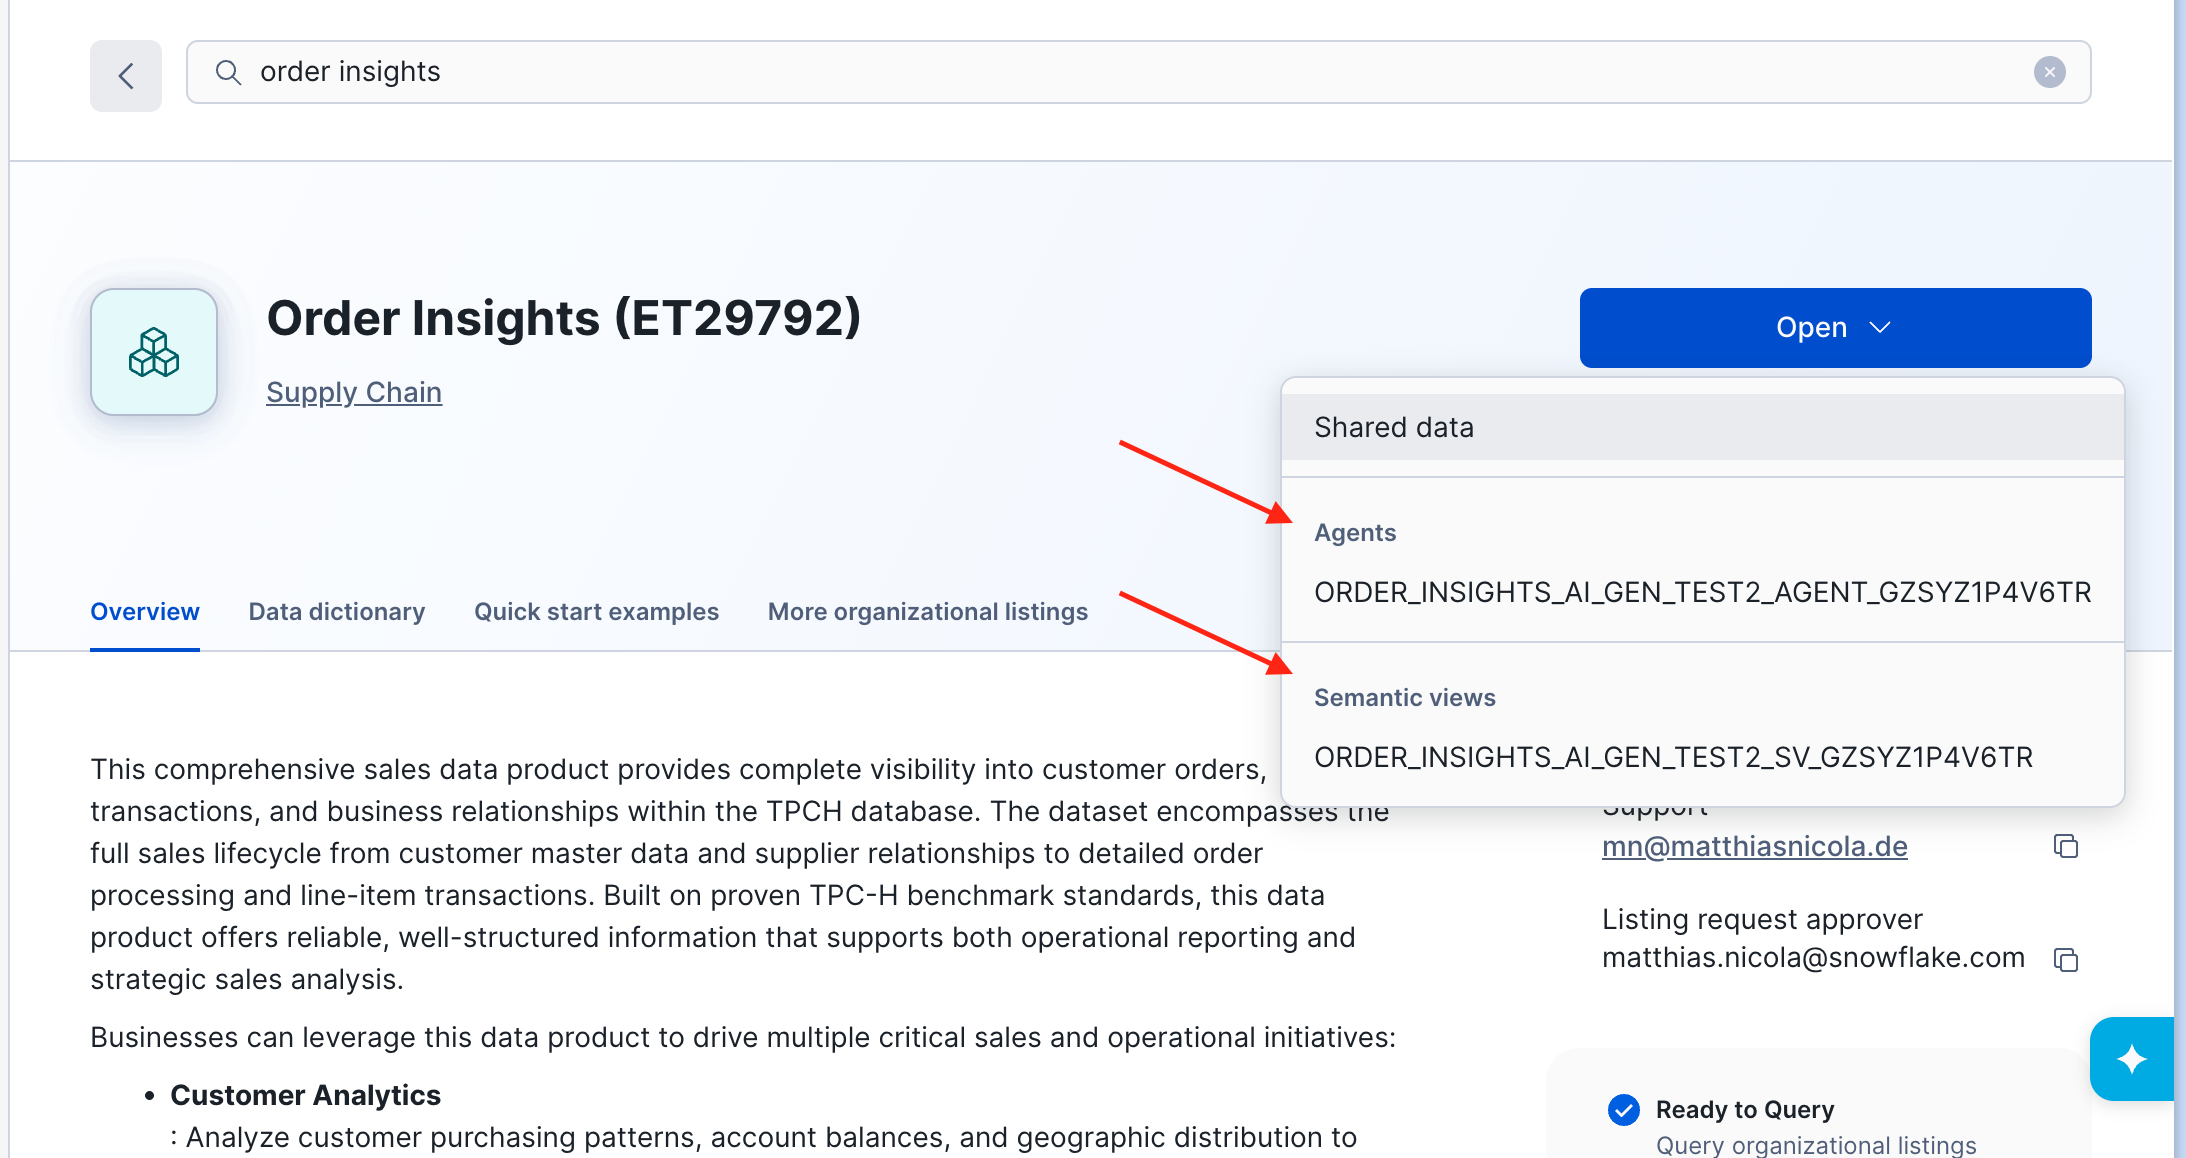
- Note that the blue "Open" button now provides multiple options
- You can access the shared data directly or open the semantice view or the agent instead
-
From the "Open" button open the agent.
-
Click on "Preview in Snowflake CoWork". A new tab opens and you may need to login in again as the data consumer.
-
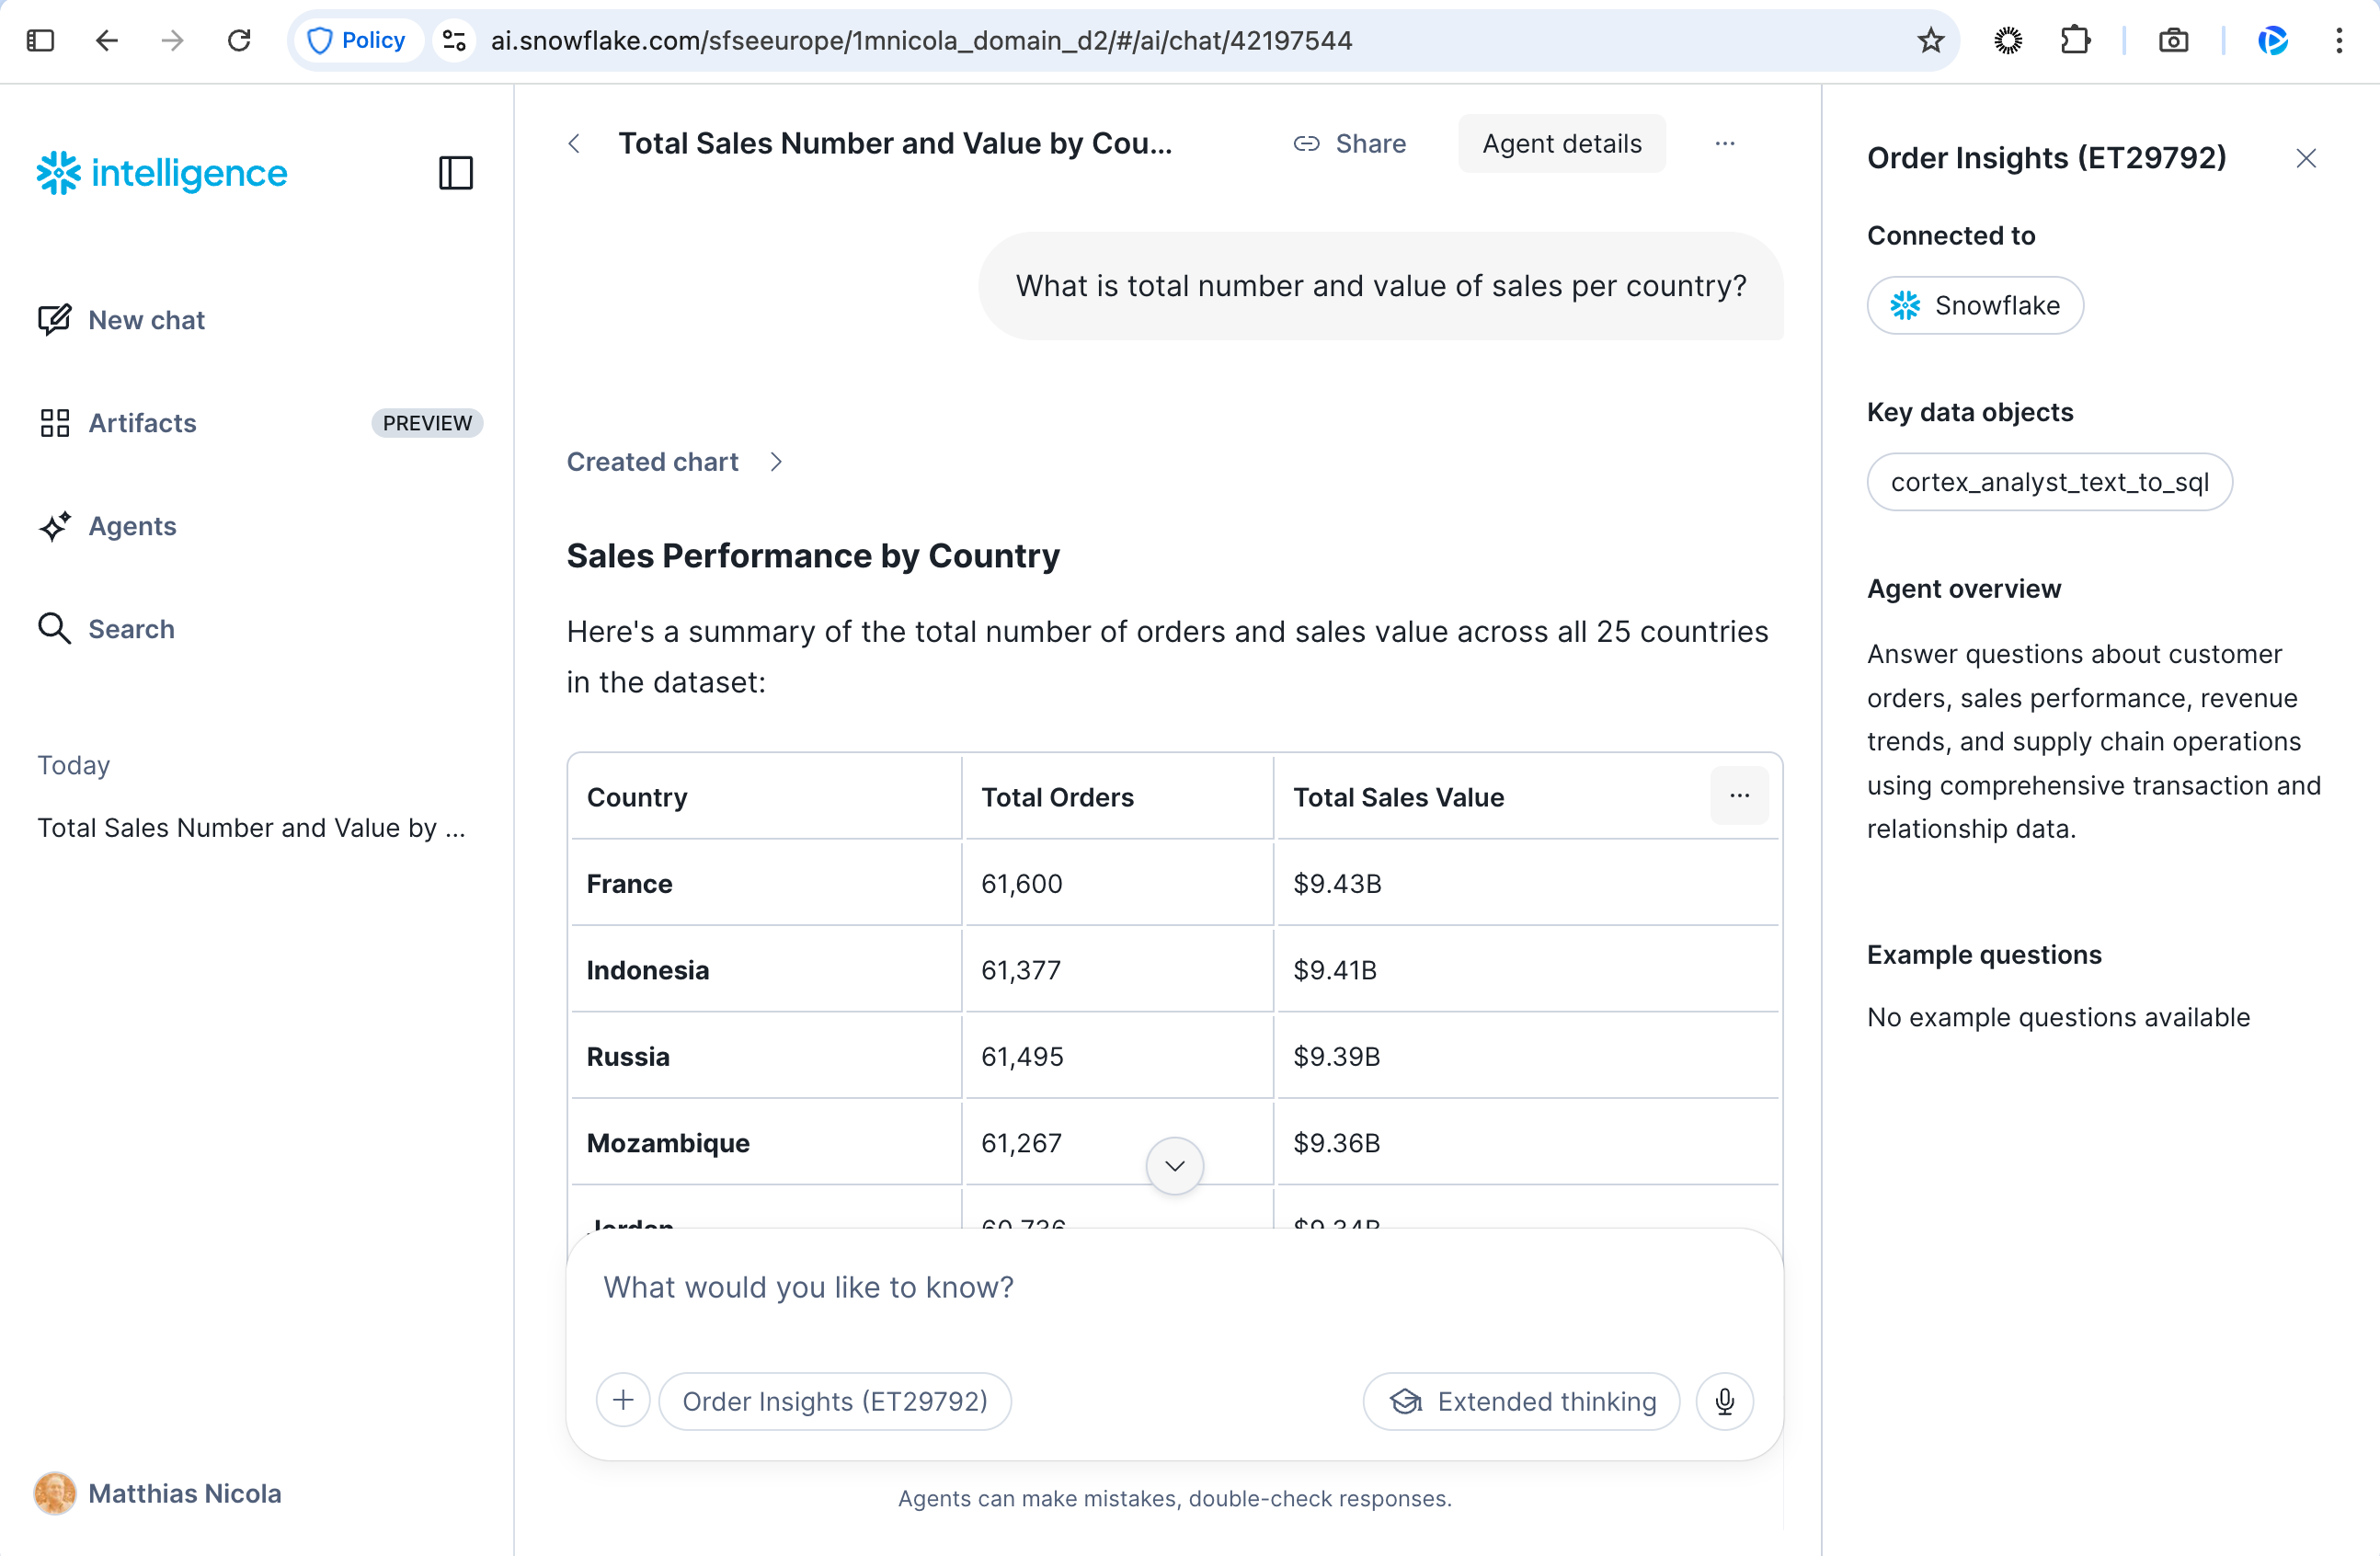
Issue one or more prompts to talk to your data, such as:
- What is the total number and value of sales per country?
- Are there any outliers or anomalies in this data that I should be aware of?
-
Examine the results, charts, and analysis provided by Snowflake CoWork.
Use Snowflake CoCo to Create and Govern a Listing
Let's use Coco to create and manage listings through prompts.
-
Log in to your account as the
provideruser (switch browser tabs/windows or log in again). -
Navigate to Catalog > Database Explorer and review the tables in the schema SF1 in the TPCH database.
-
In the lower right of the UI, click the blue AI icon to open Coco.
-
Then perform the following steps:
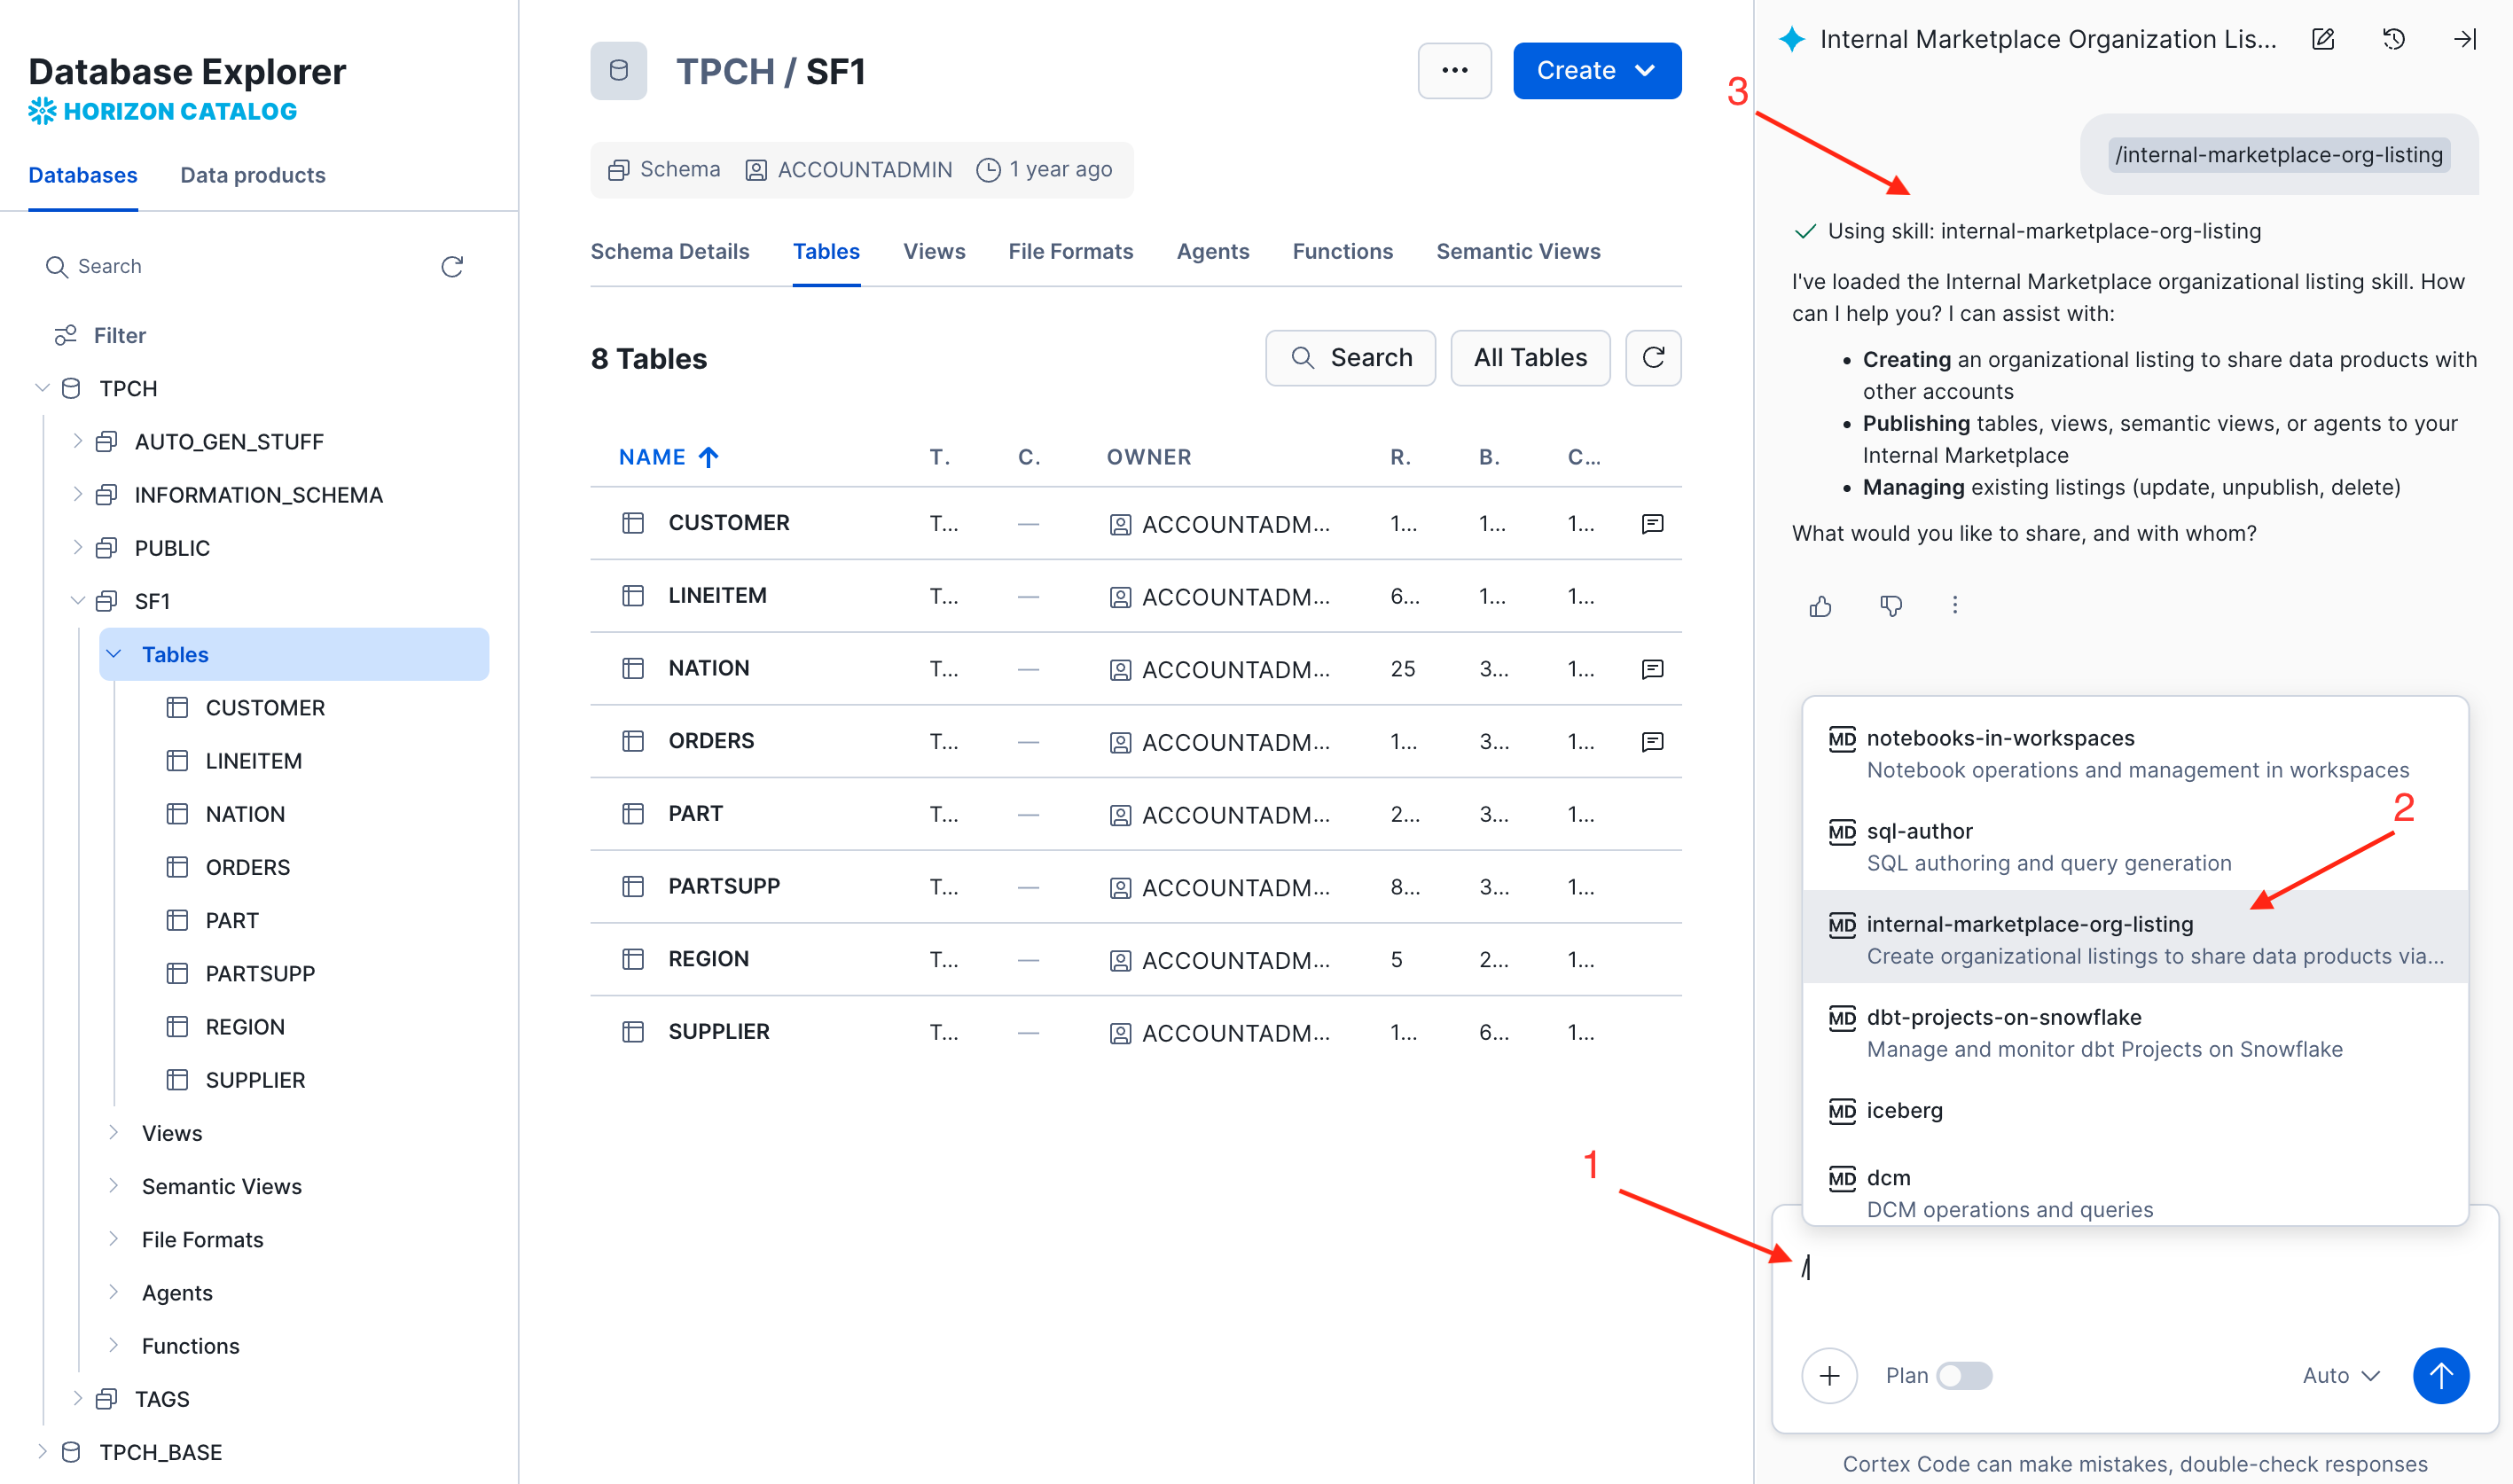
- Start a new chat by clicking on the pen at the top of the Coco panel.
- Enter the / (slash) character in the prompt field. This opens a list of skills.
- Select internal-marketplace-org-listing from the list of skills, hit ENTER.
- Note how Coco invokes the skills to offer specialized help
Next:
-
Issue the following prompt to create and publish a new data product:
Please publish the supplier, part, anad partsupp tables as a data product. Please generate suitable metadata to describe the data product, including a data dictionary with data preview for all tables. Also generate and include a semantic view. The new data product should be visible to the entire organization, but noone has access unless requested. Please append my account locator to the title of the listing. -
Respond to any questions that Coco will ask you to perform this request
-
Click Allow to permit Coco to create a semantic view and a share.
-
When asked to allow a GRANT, select "Allow GRANT in this chat" to allow all required grants for this data product
-
Coco may present a plan ask "Shall I proceed?". Respond with "Yes".
-
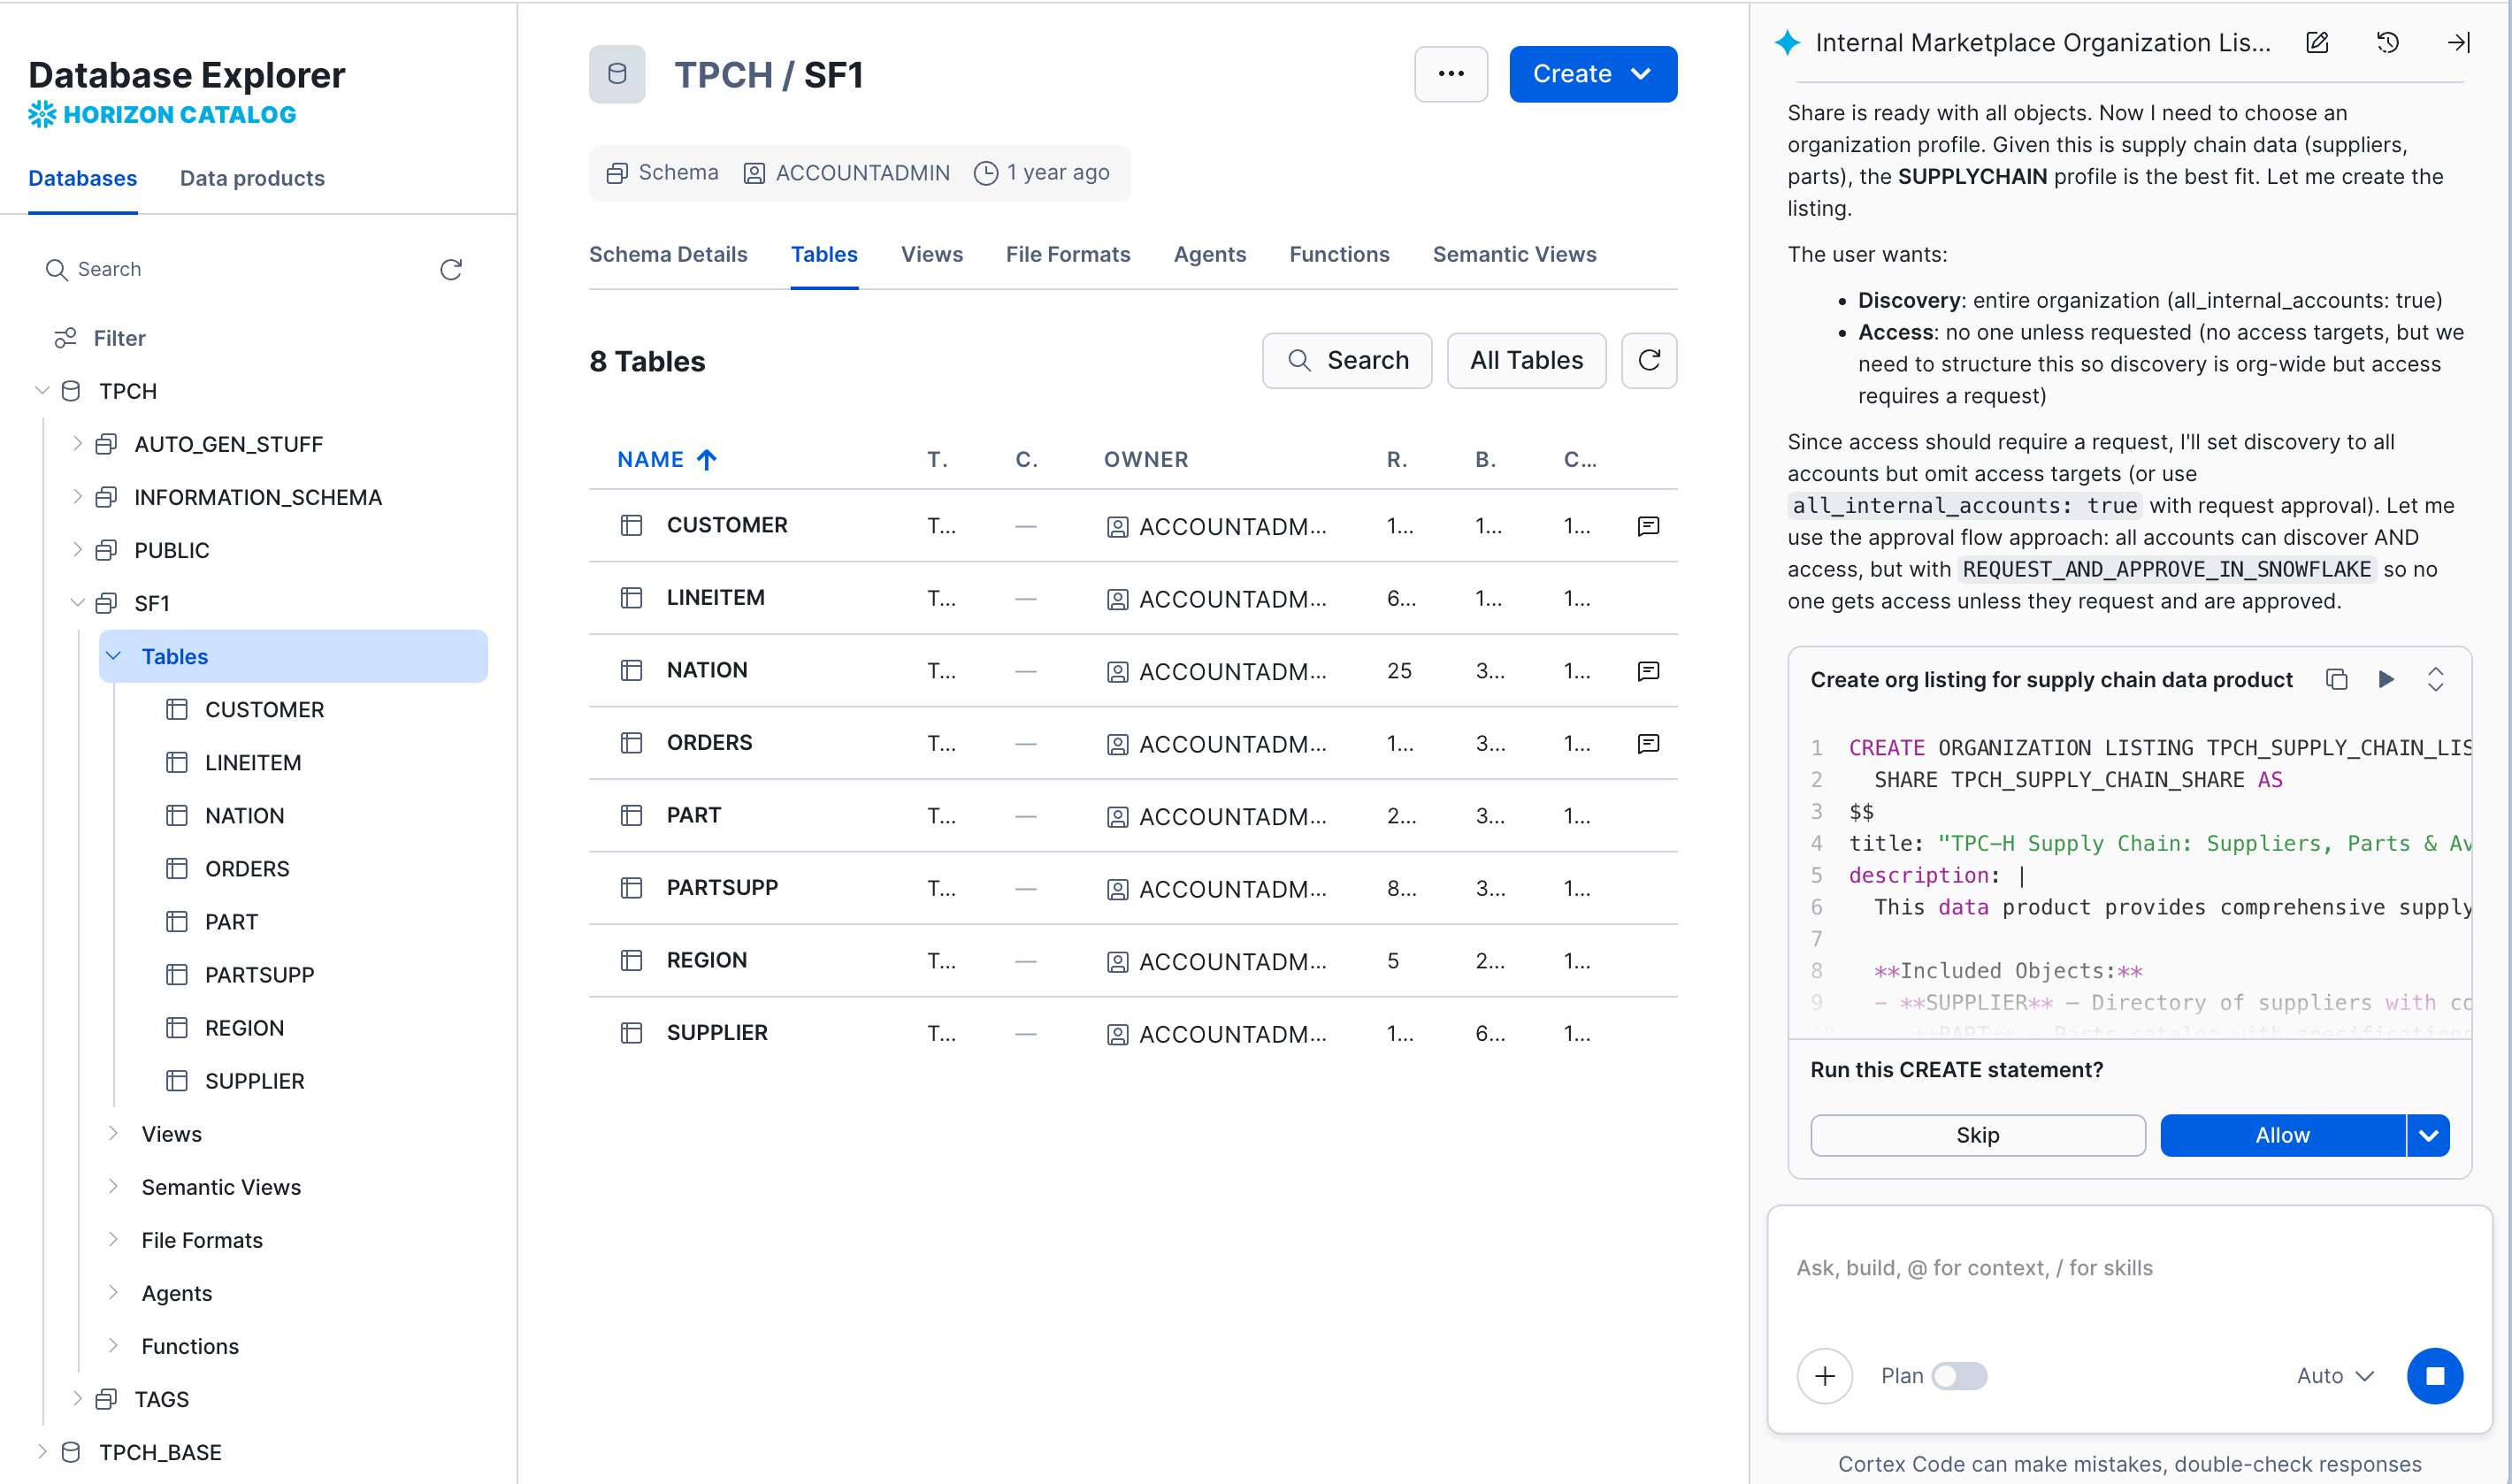
Finally, Allow Coco to create the organization listing:
-
Navigate to the internal marketplace to find and review the new listing, or click the direct link to the listing that Coco provides.
AI-assisted Governance
Next, let's ask Coco to implement a new governance requirement.
Issue the following prompt:
Please add a masking policy so that the supplier address and supplier phone is
only visible to the provider_role role within my account but not visible to the
consumer_role and not to any other accounts in this organization.
Coco may ask you a series of questions to get this done.
Once Coco has created the policy, switch to the consumer user to see the effect of the masking, e.g. by selecting rows from the SUPPLIER table in a worksheet:
SELECT * FROM supplier LIMIT 100;
Conclusion and Resources
Congratulations, you completed this Snowflake Internal Marketplace hands-on lab! You have learned how data products are authored, published, requested, and consumed. You have made data products AI-ready by adding semantic views and AI agents, and you analyzed the shared data using natural language in Snowflake CoWork. You also managed listings with Snowflake CoCo.
What you Learned
- How to create data products that consist of multiple data objects
- How to document a data product with metadata such as description, data dictionary, ownership, sample queries, and service-level objectives
- How to generate such metadata using AI
- How to request and approve or deny access to data products
- How to share semantic views and Cortex agents as part of a data product
- How to query data products using natural language
- How to share data products across your organization
- How to use Snowflake CoCo in Snowsight to manage listings using prompts
Related Resources
-
Organizational Listings
This content is provided as is, and is not maintained on an ongoing basis. It may be out of date with current Snowflake instances
