Getting Started with Snowpipe Streaming and Amazon MSK
Overview
Snowflake's Snowpipe streaming capabilities are designed for rowsets with variable arrival frequency. It focuses on lower latency and cost for smaller data sets. This helps data workers stream rows into Snowflake without requiring files with a more attractive cost/latency profile.
Here are some of the use cases that can benefit from Snowpipe streaming:
- IoT time-series data ingestion
- CDC streams from OLTP systems
- Log ingestion from SIEM systems
- Ingestion into ML feature stores
In our demo, we will use real-time commercial flight data over the San Francisco Bay Area from the Opensky Network to illustrate the solution using Snowflake's Snowpipe streaming and MSK (Amazon Managed Streaming for Apache Kafka).
Note that you can either stream the data into a regular Snowflake table or a Snowflake managed Apache Iceberg table depending on your use case.
The architecture diagram below shows the deployment. An MSK cluster and a Linux EC2 instance (jumphost) will be provisioned in private subnets of an AWS VPC. The Linux jumphost will host the Kafka producer and the Snowflake High Performance (HP) Kafka Connector (v4.x) via Kafka Connect. The HP connector uses a server-side architecture with a PIPE object in Snowflake that manages data processing and buffering, delivering up to 10 GB/s throughput per table with 5-10 second latency.
Note: This quickstart uses the Snowflake High Performance (HP) Kafka Connector (v4.x), which is currently in Public Preview.
The Kafka producer calls the data sources' REST API and receives time-series data in JSON format. This data is then ingested into the Kafka cluster before being picked up by the Kafka connector and delivered to a Snowflake table. The data in Snowflake table can be visualized in real-time with AMG (Amazon Managed Grafana) and Streamlit The historical data can also be analyzed by BI tools like Amazon Quicksight.


Prerequisites
- Familiarity with Snowflake, basic SQL knowledge, Snowsight UI and Snowflake objects
- Familiarity with AWS Services (e.g. EC2, MSK, etc), Networking and the Management Console
- Basic knowledge of Python and Linux shell scripting
What You'll Need Before the Lab
To participate in the virtual hands-on lab, attendees need the following resources.
- A Snowflake Enterprise Account on preferred AWS region with
ACCOUNTADMINaccess - An AWS Account with
Administrator Access - Create your own VPC and subnets (This is optional if you have an existing VPC with subnets you can leverage. Please refer
to this AWS document for the MSK networking topology)
- In the AWS account, create a VPC, preferrably in the same region as the Snowflake account
- In the VPC, create subnets and attach an internet gateway to allow egress traffic to the internet by using a routing table and security group for outbound traffic. Note that the subnets can be public or private, for private subnets, you will need to attach a NAT gateway to allow egress traffic to the internet. Public subnets are sufficient for this lab.
- Now if you have decided to create your own VPC/subnets, for your convenience, click here to deploy a VPC with a pair of public and private subnets, internet gateway and NAT gateway for you. Note that you must have network administrator permissions to deploy these resources.
What You'll Learn
- Using MSK (Amazon Managed Streaming for Apache Kafka)
- Connecting to EC2 instances with Amazon System Session Manager, this is an alternative to SSH if your instance is in a private subnet
- Using Snowflake to query tables populated with time-series data
What You'll Build
- Create a provisioned Kafka cluster
- Create Kafka producers and connectors
- Create topics in a Kafka cluster
- A Snowflake database for hosting real-time flight data
Create a provisioned Kafka cluster and a Linux jumphost in AWS
1. Create an MSK cluster and an EC2 instance
The MSK cluster is created in a VPC managed by Amazon. We will deploy our Kafka clients in our own VPC and use security groups to ensure the communications between the MSK cluster and clients are secure.
First, click here
to launch a provisioned MSK cluster. Note the default AWS region is us-west-2 (Oregon), feel free to select a region you prefer to deploy the environment.
Click Next at the Create stack page.
Set the Stack name or modify the default value to customize it to your identity. Leave the default Kafka version as is. For Subnet1 and Subnet2, in the drop-down menu, pick two different subnets respectively, they can be either public or private subnets depending on the network layout of your VPC. Please note that if
you plan to use Amazon MSK Connect later, you should choose private subnets here.
For MSKSecurityGroupId, we recommend
using the default security group in your VPC, if you do not have the default security group, create one on your own before moving forward. Leave TLSMutualAuthentication as false and the jumphost instance type and AMI id as default before clicking
Next.
See below sample screen capture for reference.

Leave everything as default in the Configure stack options page and click Next.
In the Review page, click Submit.
In about 10-30 minutes depending on your AWS region, the Cloudformation template provisions an MSK cluster with two brokers. It will also provision a Linux EC2 instance in the subnet you selected. We will then use it to run the Kafka connector with Snowpipe streaming SDK and the producer.
2. Configure the Linux session for timeout and default shell
In this step we need to connect to the EC2 instance in order to interact with the MSK cluster.
Go to the AWS Systems Manager console in the same region where you setup the MSK cluster,
Click Session Manager on the left pane.

Next, we will set the preferred shell as bash.
Preferences tab.

Edit button.

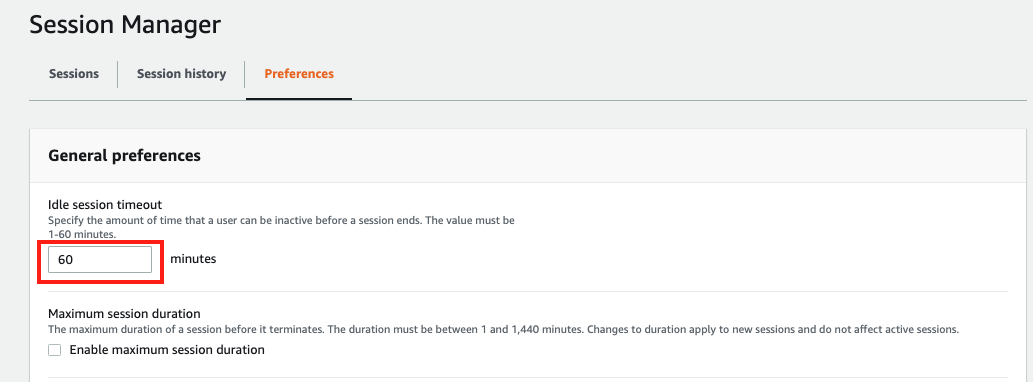
Go to General preferences section, type in 60 minutes for idle session timeout value.
Further scroll down to Linux shell profile section, and type in /bin/bash before clicking Save button.

3. Connect to the Linux EC2 instance console
Session tab and click the Start session button.

Now you should see the EC2 instance created by the Cloudformation template under Target instances.
Its name should be <Cloudformation stack name>-jumphost, select it and click Start session.

4. Create a key-pair to be used for authenticating with Snowflake
Create a key pair in AWS Session Manager console by executing the following commands. You will be prompted to give an encryption password, remember this phrase, you will need it later.
cd $HOME
openssl genrsa 2048 | openssl pkcs8 -topk8 -inform PEM -out rsa_key.p8
See below example screenshot:

Next we will create a public key by running following commands. You will be prompted to type in the phrase you used in above step.
openssl rsa -in rsa_key.p8 -pubout -out rsa_key.pub
see below example screenshot:

Next we will print out the public key string in a correct format that we can use for Snowflake.
grep -v KEY rsa_key.pub | tr -d '\n' | awk '{print $1}' > pub.Key
cat pub.Key
see below example screenshot:

5. Install the Kafka connector for Snowpipe streaming
Run the following command to install the Kafka connector and Snowpipe streaming SDK
passwd=changeit  # Use the default password for the Java keystore, you should change it after finishing the lab
directory=/home/ssm-user/snowpipe-streaming # Installation directory

cd $HOME
mkdir -p $directory
cd $directory
pwd=`pwd`
sudo yum clean all
sudo yum -y install openssl vim-common gzip tar jq python3-pip
sudo amazon-linux-extras install java-openjdk11 -y
wget https://archive.apache.org/dist/kafka/3.7.2/kafka_2.13-3.7.2.tgz
tar xvfz kafka_2.13-3.7.2.tgz -C $pwd
wget https://github.com/aws/aws-msk-iam-auth/releases/download/v1.1.1/aws-msk-iam-auth-1.1.1-all.jar -O $pwd/kafka_2.13-3.7.2/libs/aws-msk-iam-auth-1.1.1-all.jar
rm -rf $pwd/kafka_2.13-3.7.2.tgz
cd /tmp && cp $(find /usr/lib/jvm -name cacerts 2>/dev/null | head -1) kafka.client.truststore.jks
cd /tmp && keytool -genkey -keystore kafka.client.keystore.jks -validity 300 -storepass $passwd -keypass $passwd -dname "CN=snowflake.com" -alias snowflake -storetype pkcs12

#Snowflake High Performance (HP) Kafka connector v4.x (Public Preview) — uses server-side Snowpipe Streaming architecture
#v4.x is an uber-jar that bundles snowflake-ingest-sdk and snowflake-jdbc internally
wget https://repo1.maven.org/maven2/com/snowflake/snowflake-kafka-connector/4.0.0-rc8/snowflake-kafka-connector-4.0.0-rc8.jar -O $pwd/kafka_2.13-3.7.2/libs/snowflake-kafka-connector-4.0.0-rc8.jar

wget https://repo1.maven.org/maven2/org/bouncycastle/bc-fips/2.1.0/bc-fips-2.1.0.jar -O $pwd/kafka_2.13-3.7.2/libs/bc-fips-2.1.0.jar
wget https://repo1.maven.org/maven2/org/bouncycastle/bcpkix-fips/2.1.8/bcpkix-fips-2.1.8.jar -O $pwd/kafka_2.13-3.7.2/libs/bcpkix-fips-2.1.8.jar
Note that the version numbers for Kafka, the Snowflake Kafka connector, and the Snowpipe Streaming SDK are dynamic, as new versions are continually published. We are using the version numbers that have been validated to work.
6. Retrieve the broker string from the MSK cluster.
Go to the MSK console and click the newly created MSK cluster, it should have a substring MSKCluster in its name.

View client information

Private endpoint for TLS authentication type.

Now switch back to the Session Manager window and execute the following command by replacing <broker string> with
the copied values.
export BS=<broker string>
Now run the following command to add BS as an environment variable so it is recognized across the Linux sessions.
echo "export BS=$BS" >> ~/.bashrc
See the following example screen capture.

7. Create a configuration file connect-standalone.properties for the Kafka connector
Run the following commands to generate a configuration file connect-standalone.properties in directory /home/ssm-user/snowpipe-streaming/scripts for the client to authenticate
with the Kafka cluster.
dir=/home/ssm-user/snowpipe-streaming/scripts
mkdir -p $dir && cd $dir
cat << EOF > $dir/connect-standalone.properties
#************CREATING SNOWFLAKE Connector****************
bootstrap.servers=$BS

#************SNOWFLAKE VALUE CONVERSION****************
key.converter=org.apache.kafka.connect.storage.StringConverter
value.converter=org.apache.kafka.connect.json.JsonConverter
key.converter.schemas.enable=false
value.converter.schemas.enable=false
#************SNOWFLAKE ****************

offset.storage.file.filename=/tmp/connect.offsets
# Flush much faster than normal, which is useful for testing/debugging
offset.flush.interval.ms=10000

#*********** FOR SSL  ****************
security.protocol=SSL
ssl.truststore.location=/tmp/kafka.client.truststore.jks
ssl.truststore.password=changeit
ssl.enabled.protocols=TLSv1.1,TLSv1.2

consumer.security.protocol=SSL
consumer.ssl.truststore.location=/tmp/kafka.client.truststore.jks
consumer.ssl.truststore.password=changeit
consumer.ssl.enabled.protocols=TLSv1.1,TLSv1.2
EOF
A configuration file connect-standalone.properties is created in directory /home/ssm-user/snowpipe-streaming/scripts
8. Create a security client.properties configuration file for the producer
Run the following commands to create a security configuration file client.properties for the MSK cluster
dir=/home/ssm-user/snowpipe-streaming/scripts
cat << EOF > $dir/client.properties
security.protocol=SSL
ssl.truststore.location=/tmp/kafka.client.truststore.jks
ssl.truststore.password=changeit
ssl.enabled.protocols=TLSv1.1,TLSv1.2
EOF
A configuration file client.properties is created in directory /home/ssm-user/snowpipe-streaming/scripts
9. Create a streaming topic called “streaming” in the MSK cluster
Now we can run the following commands to create a Kafka topic on the MSK cluster to stream our data.
$HOME/snowpipe-streaming/kafka_2.13-3.7.2/bin/kafka-topics.sh --bootstrap-server $BS --command-config $HOME/snowpipe-streaming/scripts/client.properties --create --topic streaming --partitions 2 --replication-factor 2
You should see the response Created topic streaming if it is successful.
To describe the topic, run the following commands:
$HOME/snowpipe-streaming/kafka_2.13-3.7.2/bin/kafka-topics.sh --bootstrap-server $BS --command-config $HOME/snowpipe-streaming/scripts/client.properties --describe --topic streaming
streaming topic.
See below example screenshot:

Prepare the Snowflake account for streaming
1. Creating user, role, database, and schema
Login to your Snowflake account as a power user with ACCOUNTADMIN role. Then run the following SQL commands in a worksheet to create the dedicated streaming user, role, database, schema, and warehouse that we will use in the lab. The streaming user uses key-pair authentication only (no password).
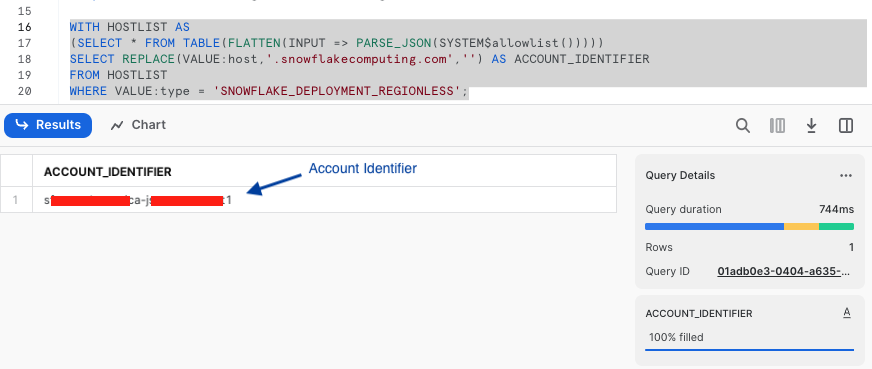
-- Set default value for multiple variables
-- For purpose of this workshop, it is recommended to use these defaults during the exercise to avoid errors
-- You should change them after the workshop
SET USER = 'STREAMING_USER';
SET DB = 'MSK_STREAMING_DB';
SET SCHEMA = 'MSK_STREAMING_SCHEMA';
SET WH = 'MSK_STREAMING_WH';
SET ROLE = 'MSK_STREAMING_RL';

USE ROLE ACCOUNTADMIN;

-- CREATE ROLE
CREATE OR REPLACE ROLE IDENTIFIER($ROLE);

-- CREATE USER (key-pair auth only, no password)
-- Uses IF NOT EXISTS so it won't fail if the user already exists.
-- The ALTER USER below ensures correct settings even for a pre-existing user.
CREATE USER IF NOT EXISTS IDENTIFIER($USER)
  DEFAULT_ROLE = $ROLE
  DEFAULT_WAREHOUSE = $WH
  COMMENT = 'Streaming connector user - key-pair auth only';

ALTER USER IF EXISTS IDENTIFIER($USER) SET
  DEFAULT_ROLE = $ROLE
  DEFAULT_WAREHOUSE = $WH
  DISABLED = FALSE;

-- CREATE DATABASE, SCHEMA AND WAREHOUSE
CREATE DATABASE IF NOT EXISTS IDENTIFIER($DB);
CREATE OR REPLACE SCHEMA IDENTIFIER($DB).IDENTIFIER($SCHEMA);
CREATE OR REPLACE WAREHOUSE IDENTIFIER($WH) WITH WAREHOUSE_SIZE = 'SMALL';

-- GRANTS
GRANT ROLE IDENTIFIER($ROLE) TO USER IDENTIFIER($USER);
GRANT OWNERSHIP ON DATABASE IDENTIFIER($DB) TO ROLE IDENTIFIER($ROLE) COPY CURRENT GRANTS;
GRANT OWNERSHIP ON SCHEMA IDENTIFIER($DB).IDENTIFIER($SCHEMA) TO ROLE IDENTIFIER($ROLE) COPY CURRENT GRANTS;
GRANT USAGE ON WAREHOUSE IDENTIFIER($WH) TO ROLE IDENTIFIER($ROLE);
GRANT CREATE TABLE ON SCHEMA IDENTIFIER($DB).IDENTIFIER($SCHEMA) TO ROLE IDENTIFIER($ROLE);
GRANT CREATE PIPE ON SCHEMA IDENTIFIER($DB).IDENTIFIER($SCHEMA) TO ROLE IDENTIFIER($ROLE);

-- RUN FOLLOWING COMMANDS TO FIND YOUR ACCOUNT IDENTIFIER, COPY IT DOWN FOR USE LATER
-- IT WILL BE SOMETHING LIKE <organization_name>-<account_name>
-- e.g. ykmxgak-wyb52636

WITH HOSTLIST AS
(SELECT * FROM TABLE(FLATTEN(INPUT => PARSE_JSON(SYSTEM$allowlist()))))
SELECT REPLACE(VALUE:host,'.snowflakecomputing.com','') AS ACCOUNT_IDENTIFIER
FROM HOSTLIST
WHERE VALUE:type = 'SNOWFLAKE_DEPLOYMENT_REGIONLESS';
Next we need to configure the public key for the streaming user to access Snowflake programmatically.
In the Snowflake worksheet, replace < pubKey > with the content of the file /home/ssm-user/pub.Key (see step 4 by clicking on section #2 Create a provisioned Kafka cluster and a Linux jumphost in AWS in the left pane) in the following SQL command and execute.
USE ROLE ACCOUNTADMIN;
ALTER USER STREAMING_USER SET RSA_PUBLIC_KEY='< pubKey >';
See below example screenshot:

At this point, the Snowflake setup is complete.
Configure Kafka connector for Snowpipe Streaming
1. Run the following commands to collect various connection parameters for the Kafka connector
cd $HOME
outf=/tmp/params
cat << EOF > /tmp/get_params
a=''
until [ ! -z \$a ]
do
 read -p "Input Snowflake account identifier: e.g. ylmxgak-wyb53646 ==> " a
done

echo export clstr_url=\$a.snowflakecomputing.com > $outf
export clstr_url=\$a.snowflakecomputing.com

read -p "Snowflake user name, default: streaming_user ==> " user
if [[ \$user == "" ]]
then
   user="streaming_user"
fi

echo export user=\$user >> $outf
export user=\$user

pass=''
until [ ! -z \$pass ]
do
  read -p "Private key passphrase ==> " pass
done

echo export key_pass=\$pass >> $outf
export key_pass=\$pass

read -p "Full path to your Snowflake private key file, default: /home/ssm-user/rsa_key.p8 ==> " p8
if [[ \$p8 == "" ]]
then
   p8="/home/ssm-user/rsa_key.p8"
fi

priv_key=\`cat \$p8 | grep -v PRIVATE | tr -d '\n'\`
echo export priv_key=\$priv_key  >> $outf
export priv_key=\$priv_key
cat $outf >> $HOME/.bashrc
EOF
. /tmp/get_params
See below example screen capture.

2. Run the following commands to create a Snowflake Kafka connect property configuration file:
Note that the High Performance (HP) connector (v4.x) will auto-create a default PIPE object named MSK_STREAMING_TBL-STREAMING in the target schema when the connector starts. This is why the GRANT CREATE PIPE was added earlier.
dir=/home/ssm-user/snowpipe-streaming/scripts
cat << EOF > $dir/snowflakeconnectorMSK.properties
name=snowpipeStreamingHP
connector.class=com.snowflake.kafka.connector.SnowflakeStreamingSinkConnector
tasks.max=4
topics=streaming
snowflake.private.key.passphrase=$key_pass
snowflake.database.name=MSK_STREAMING_DB
snowflake.schema.name=MSK_STREAMING_SCHEMA
snowflake.topic2table.map=streaming:MSK_STREAMING_TBL
snowflake.url.name=$clstr_url
snowflake.user.name=$user
snowflake.private.key=$priv_key
snowflake.role.name=MSK_STREAMING_RL
snowflake.ingestion.method=SNOWPIPE_STREAMING
snowflake.streaming.v2.enabled=true
snowflake.enable.schematization=TRUE
buffer.count.records=10000
buffer.flush.time=10
buffer.size.bytes=20000000
value.converter.schemas.enable=false
key.converter=org.apache.kafka.connect.storage.StringConverter
value.converter=org.apache.kafka.connect.json.JsonConverter
errors.tolerance=all
errors.log.enable=true
EOF
Putting it all together
Finally, we are ready to start ingesting data into the Snowflake table.
1. Start the Kafka Connector for Snowpipe streaming
Important: If your Snowflake account has a network policy enabled, make sure the EC2 instance's public IP (or NAT gateway IP for private subnets) is included in the allowed IP list. Otherwise, the connector will fail to connect to Snowflake with an IP access denied error.
Go back to the Linux console and execute the following commands to start the Kafka connector.
$HOME/snowpipe-streaming/kafka_2.13-3.7.2/bin/connect-standalone.sh $HOME/snowpipe-streaming/scripts/connect-standalone.properties $HOME/snowpipe-streaming/scripts/snowflakeconnectorMSK.properties
2. Start the producer that will ingest real-time data to the MSK cluster
Start a new Linux session in step 3 by clicking on section #2 Create a provisioned Kafka cluster and a Linux jumphost in AWS in the left pane.
curl --connect-timeout 5 http://ecs-alb-1504531980.us-west-2.elb.amazonaws.com:8502/opensky | \
jq -c '.[]' | \
$HOME/snowpipe-streaming/kafka_2.13-3.7.2/bin/kafka-console-producer.sh --broker-list $BS --producer.config $HOME/snowpipe-streaming/scripts/client.properties --topic streaming
You should see response similar to screen capture below if everything works well.

Note that in the script above, the producer queries a Rest API that provides real-time flight data over the San Francisco
Bay Area in JSON format. The API returns a JSON array, so we use jq -c '.[]' to break it into individual JSON objects — one per Kafka message. This is required because the HP connector with schematization enabled expects each message to be a flat JSON object whose keys map to table columns.
The data includes information such as timestamps, icao numbers, flight IDs, destination airport, longitude,
latitude, and altitude of the aircraft, etc. The data is ingested into the streaming topic on the MSK cluster and
then picked up by the Snowpipe streaming Kafka connector, which delivers it directly into a Snowflake
table msk_streaming_db.msk_streaming_schema.msk_streaming_tbl.

Query ingested data in Snowflake
Now, switch back to the Snowflake console and switch to the role MSK_STREAMING_RL.
The data should have been streamed into a table, ready for further processing.
1. Query the raw data
To verify that data has been streamed into Snowflake, execute the following SQL commands.
use msk_streaming_db;
use schema msk_streaming_schema;

-- Check the default pipe status (auto-created by HP connector)
SELECT SYSTEM$PIPE_STATUS('MSK_STREAMING_DB.MSK_STREAMING_SCHEMA."MSK_STREAMING_TBL-STREAMING"');

-- Show all pipes in the schema
SHOW PIPES IN SCHEMA MSK_STREAMING_DB.MSK_STREAMING_SCHEMA;
You should see the auto-created pipe MSK_STREAMING_TBL-STREAMING with executionState=RUNNING.
Note that, at this point, you should only see one batch of rows in the table, as we have only ingested data once. We will see new rows being added later as we continue to ingest more data.
Now run the following query on the table.
select * from msk_streaming_tbl;
With schematization enabled, the HP connector automatically creates columns from the JSON keys. You should see columns like RECORD_METADATA, ID, ICAO, LAT, LON, ALT, ORIG, DEST, and UTC — no manual flattening needed.

2. Create a view with derived columns
Now execute the following SQL commands to create a convenience view with timestamps and geohashes for visualization.
create or replace view flights_vw
  as select
    to_timestamp_ntz(utc) as ts_utc,
    CONVERT_TIMEZONE('UTC','America/Los_Angeles',ts_utc) as ts_pt,
    alt,
    dest,
    orig,
    id,
    icao,
    lat,
    lon,
    st_geohash(to_geography(ST_MAKEPOINT(lon, lat)),12) geohash,
    year(ts_pt) yr,
    month(ts_pt) mo,
    day(ts_pt) dd,
    hour(ts_pt) hr
FROM   msk_streaming_tbl;
The SQL commands create a view that converts the epoch timestamp to a proper timestamp, applies time zone conversion, and uses Snowflake's Geohash function to generate geohashes that can be used in time-series visualization tools like Grafana.
Let's query the view flights_vw now.
select * from flights_vw;

3. Stream real-time flight data continuously to Snowflake
We can now write a loop to stream the flight data continuously into Snowflake.
Go back to the Linux session and run the following script.
while true
do
  curl --connect-timeout 5 -k http://ecs-alb-1504531980.us-west-2.elb.amazonaws.com:8502/opensky | \
  jq -c '.[]' | \
  $HOME/snowpipe-streaming/kafka_2.13-3.7.2/bin/kafka-console-producer.sh --broker-list $BS --producer.config $HOME/snowpipe-streaming/scripts/client.properties --topic streaming
  sleep 10
done
You can now go back to the Snowflake worksheet to run a select count(1) from flights_vw query every 10 seconds to verify that the row counts is indeed increasing.
Configuring Kafka Connector with Apache Iceberg tables - Optional
Iceberg table ingestion requires version 3.0.0 or later of the Kafka connector and is only supported with Snowpipe Streaming. The HP connector (v4.x) natively supports Iceberg tables with the same configuration used for native tables. The only additional steps are creating an external volume, pre-creating the Iceberg table, and updating the topic-to-table mapping.
1. Create an External Volume in Snowflake
Before you create an Iceberg table, you must have an external volume. An external volume is a Snowflake object that stores information about your cloud storage locations and identity and access management (IAM) entities (for example, IAM roles). Snowflake uses an external volume to establish a connection with your cloud storage in order to access Iceberg metadata and Parquet data.
To create an external volume in S3, follow the steps mentioned in this document.
Below is an example to create External Volume below: When creating the external volume, be sure to use the ACCOUNTADMIN role.
use role accountadmin;
use schema msk_streaming_schema;
CREATE OR REPLACE EXTERNAL VOLUME iceberg_lab_vol
   STORAGE_LOCATIONS =
      (
         (
            NAME = 'my-s3-us-west-2'
            STORAGE_PROVIDER = 'S3'
            STORAGE_BASE_URL = 's3://<my s3 bucket name>/'
            STORAGE_AWS_ROLE_ARN = '<arn:aws:iam::123456789012:role//myrole>'
            STORAGE_AWS_EXTERNAL_ID = 'iceberg_table_external_id'
         )
      );
After the external volume is created, use the ACCOUNTADMIN role to grant usage to the role.
GRANT ALL ON EXTERNAL VOLUME iceberg_lab_vol TO ROLE IDENTIFIER($ROLE) WITH GRANT OPTION;
2.Pre-create a Snowflake-managed Iceberg Table for Streaming
Note that if you are using a regular table to store the streaming data, Snowpipe streaming will automatically create it for you if it doesn't exist already. But for Iceberg table, you will need to pre-create an Iceberg table referencing the external volume you just created. You can specify BASE_LOCATION to instruct Snowflake where to write table data and metadata, or leave empty to write data and metadata to the location specified in the external volume definition.
Sharing an example of the SQL to create External volumne below:
CREATE OR REPLACE ICEBERG TABLE MSK_STREAMING_ICEBERG_TBL (
    record_metadata OBJECT()
  )
  EXTERNAL_VOLUME = 'iceberg_lab_vol'
  CATALOG = 'SNOWFLAKE'
  BASE_LOCATION = 'MSK_STREAMING_ICEBERG_TBL';
Since the BASE_LOCATION is specified, it will create a folder based on the value in the STORAGE_BASE_URL of the External Volume.

Since the Scehmatization is enabled in the Kafka Connector, followig privileges are set properly on the table.
GRANT EVOLVE SCHEMA ON TABLE msk_streaming_db.msk_streaming_schema.MSK_STREAMING_ICEBERG_TBL TO ROLE MSK_STREAMING_RL;

ALTER ICEBERG TABLE msk_streaming_db.msk_streaming_schema.MSK_STREAMING_ICEBERG_TBL set enable_schema_evolution=true;
3. Modify the Snowpipe streaming properties file
Modify the two lines in $HOME/snowpipe-streaming/scripts/snowflakeconnectorMSK.properties
topics=streaming-iceberg
snowflake.topic2table.map=streaming-iceberg:MSK_STREAMING_ICEBERG_TBL
Save the properties file. Note that snowflake.enable.schematization=TRUE is already enabled in the HP connector properties, and the HP connector (v4.x) natively supports Iceberg tables without any additional properties.
4. Create a new topic in MSK
We now need to create a new topic streaming-iceberg in MSK cluster by running the following command:
$HOME/snowpipe-streaming/kafka_2.13-3.7.2/bin/kafka-topics.sh --bootstrap-server $BS --command-config $HOME/snowpipe-streaming/scripts/client.properties --create --topic streaming-iceberg --partitions 2 --replication-factor 2
5. Restart the consumer
Restart the consumer by issuing the following shell command in a new Session Manager console.
kill -9 `ps -ef | grep java | grep -v grep | awk '{print $2}'`
$HOME/snowpipe-streaming/kafka_2.13-3.7.2/bin/connect-standalone.sh $HOME/snowpipe-streaming/scripts/connect-standalone.properties $HOME/snowpipe-streaming/scripts/snowflakeconnectorMSK.properties
6. Ingest data
Now ingest some data into the newly created topic by running the following command in a new Session Manager console.
curl --connect-timeout 5 http://ecs-alb-1504531980.us-west-2.elb.amazonaws.com:8502/opensky | \
jq -c '.[]' | \
while read i ; \
do \
echo $i | \
$HOME/snowpipe-streaming/kafka_2.13-3.7.2/bin/kafka-console-producer.sh --broker-list $BS --producer.config $HOME/snowpipe-streaming/scripts/client.properties --topic streaming-iceberg ; \
echo $i ; \
done
7. Query ingested data in Snowflake
Now, switch back to the Snowflake console and switch to the role MSK_STREAMING_RL.
The data should have been streamed into a table, ready for further processing.
To verify that data has been streamed into Snowflake, execute the following SQL commands.
select * from MSK_STREAMING_DB.MSK_STREAMING_SCHEMA.MSK_STREAMING_ICEBERG_TBL;
You should see that the table contains the keys in json records as column names with values and RECORD_METADATA columns are populated.

Use MSK Connect (MSKC) - Optional
So far we have been hosting the Kafka connector for Snowpipe Streaming on the EC2 instance. You can also use Amazon MSK Connect to manage the connector.
*Note that in order to use MSKC, it is suggested to run your MSK cluster in a private subnet with egress to the internet via the NAT gateway for it to work. See this AWS documentation for more information.
1. Create a S3 bucket to store the custom plugins
Follow this AWS documentation to create a S3 bucket.
2. Upload the libraries to the S3 bucket
On your EC2 session, run the following commands to compress the libraries into a zipped file.
cd $HOME/snowpipe-streaming/kafka_2.13-3.7.2/libs
zip -9 /tmp/snowpipeStreaming-mskc-plugins.zip *
aws s3 cp /tmp/snowpipeStreaming-mskc-plugins.zip s3://<your s3 bucket name>/snowpipeStreaming-mskc-plugins.zip
3. Create a custom plugin in MSK
Custom plugins on the left pane.
Click Create Custom plugin.

Fill in the s3 path to your uploaded zip file, e.g. s3://my-mskc-bucket/snowpipeStreaming-mskc-plugins.zip
Give the custom plugin a name, e.g. my-mskc-plugin, click Create custom plugin.

4. Create a connector
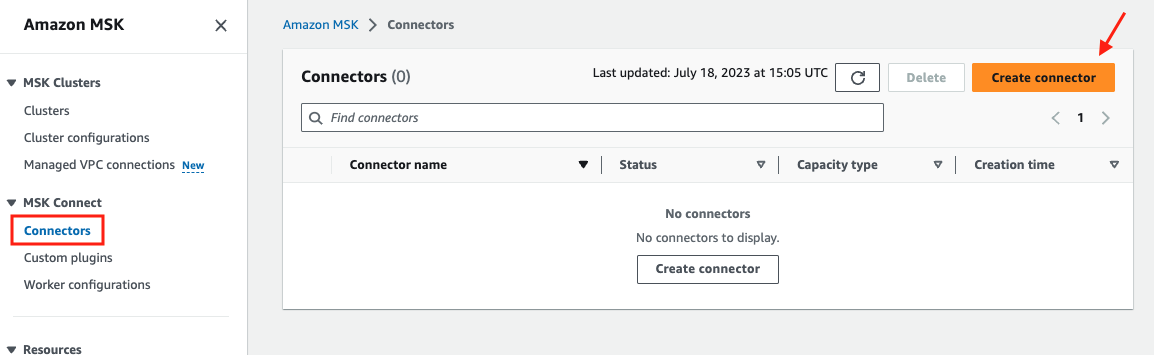
Connectors on the left pane, then click Create connector.
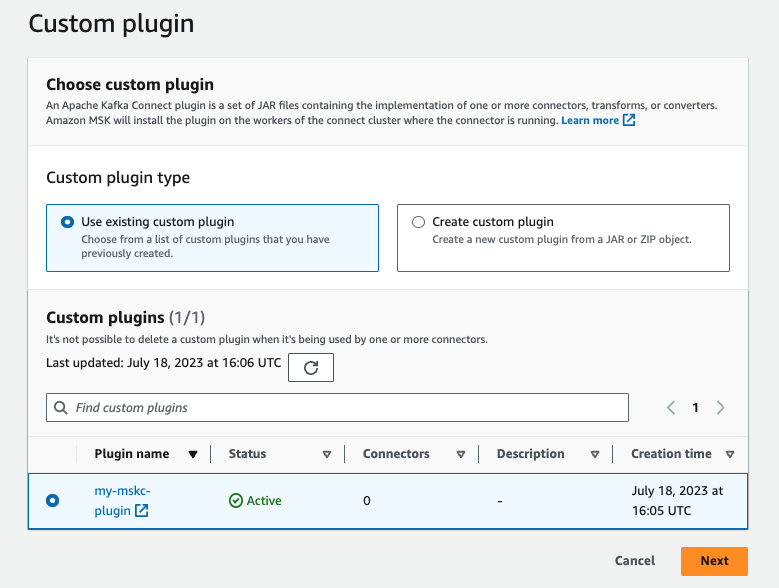
Use existing custom plugin button.
Select the custom plugin you just created, click Next.
snowpipeStreaming in the Basic information section.

Configuration settings, copy and paste
the content from the configuration file: $HOME/snowpipe-streaming/scripts/snowflakeconnectorMSK.properties in the EC2 instance.

Leave all other settings as default, further scroll down to Access permissions. In the Choose service role drop-down menu, select
the role created by the Cloudformation template in the beginning of this quickstarts. The role name should look something like this
<CFT stack name>-MSKConnectRole-<random characters>. Click Next.

Security page, leave everything as default, click Next.
Skip the Logs page as it is optional, click Next.
Review the configurations and click Create connector. The connector will be created in about 5-10 minutes.

At this point, the Kafka connector for Snowpipestreaming has been configured, it is running and managed by MSKC, all you need to do is to run the source connector to ingest live data continuously as shown in Step 3 of Section 6.
Cleanup
When you are done with the demo, to tear down the AWS resources, simply go to the Cloudformation console.
Select the Cloudformation template you used to deploy the MSK cluster at the start of the demo, then click the Delete tab. All the resources that were deployed previously, such as EC2 instances, MSK clusters, roles, etc., will be cleaned up.
See example screen capture below.

After the deletion of the MSK cluster, you will also need to delete the Cloudformation template for VPC if you created your own at the very beginning of the lab.
For Snowflake cleanup, execute the following SQL commands.
USE ROLE ACCOUNTADMIN;

-- Drop the auto-created default pipe (HP connector)
DROP PIPE IF EXISTS MSK_STREAMING_DB.MSK_STREAMING_SCHEMA."MSK_STREAMING_TBL-STREAMING";

DROP DATABASE MSK_STREAMING_DB;
DROP WAREHOUSE MSK_STREAMING_WH;
DROP ROLE MSK_STREAMING_RL;
DROP USER IF EXISTS STREAMING_USER;
Conclusion and Resources
In this lab, we built a demo to show how to ingest time-series data using Snowpipe streaming and Kafka with low latency. We demonstrated this using a self-managed Kafka connector on an EC2 instance. However, for a production environment, we recommend using Amazon MSK Connect, which offers scalability and resilience through the AWS infrastructure. Alternatively, if you have infrastructure supported by either Amazon EKS or Amazon ECS, you can use them to host your containerized Kafka connectors as well.
Related Resources
This content is provided as is, and is not maintained on an ongoing basis. It may be out of date with current Snowflake instances