Build Supportable Data Pipelines with AI in Coalesce
Overview
This Hands-On Lab exercise is designed to help you master building data pipelines using AI within Coalesce. Coalesce data pipelines open up the power and functionality of the Snowflake platform by leveraging standardized building blocks for AI to generate repeatable, supportable code extremely rapidly. Coalesce uses an MCP and UI optimized for data engineers to Generate, Build, Review and Refine their data pipelines. In this lab, you’ll explore the Coalesce interface, learn how to easily transform and model your data with natural language prompts, understand how to read and support your pipelines, and play with rich column level metadata.
What You’ll Learn
- How to navigate the Coalesce interface
- How and when to use AI
- How to add data sources
- How to prepare your data
- How to build out a Data Mart
- How to make changes to your data and propagate changes across pipelines
- How to commit into GIT
- How to add a Semantic View
By completing the steps we’ve outlined in this guide, you’ll have mastered the basics of Coalesce and can venture into our more advanced features.
What You’ll Need
-
Basic knowledge of SQL, database concepts, and objects
What You’ll Build
- A Directed Acyclic Graph (DAG) representing a data pipeline leveraging AI and advanced Snowflake features.
- For this Hands on Lab we will start at section 3
Step 1 (Optional): Create a Snowflake Trial Account
-
Fill out the Snowflake trial account form here. Use an email address that is not associated with an existing Snowflake account.
-
When signing up for your Snowflake account, select the region that is physically closest to you and choose Enterprise as your Snowflake edition. Please note that the Snowflake edition, cloud provider, and region used when following this guide do not matter.
-
After registering, you will receive an email from Snowflake with an activation link and URL for accessing your trial account. Finish setting up your account following the instructions in the email.
Step 2: (Optional) Create a Coalesce Trial Account
Once you are logged into your Snowflake account, sign up for a free Coalesce trial account using Snowflake Partner Connect. Check your Snowflake account profile to make sure that it contains your fist and last name.
Once you are logged into your Snowflake account, sign up for a free Coalesce trial account using Snowflake Partner Connect. Check your Snowflake account profile to make sure that it contains your fist and last name.
-
Select Data Products > Partner Connect in the navigation bar on the left hand side of your screen and search for Coalesce in the search bar.
-
Review the connection information and then click Connect.
-
When prompted, click Activate to activate your account. You can also activate your account later using the activation link emailed to your address.
-
Once you’ve activated your account, fill in your information to complete the activation process.
Congratulations! You’ve successfully created your Coalesce trial account.
Step 3 Login to Coalesce Transform
-
Enter the Coalesce URL in your browser: https://app.coalescesoftware.io
-
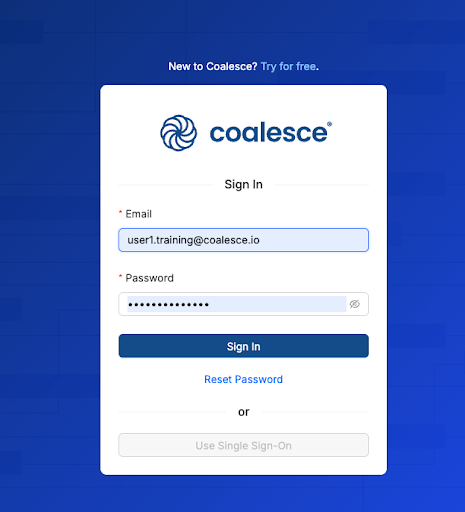
Enter your Login details provided in the course and press Sign In:
-
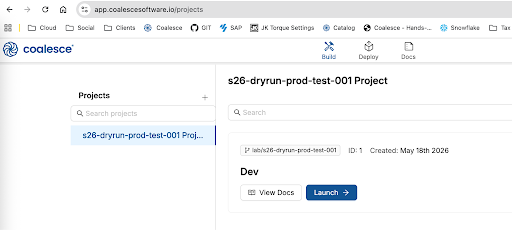
Once signed in – find your User’s workspace in the Default Project Workspaces and press the Launch -> button:
-
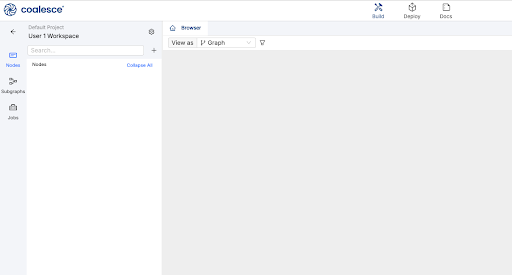
This will open your primary development and review interface. Feel free to orient yourself in the Build interface – primarily the + button, the (DAG) Browser, the Node List:
Step 4 Adding Data Sources
We are going to connect to Snowflake, identify source data and load its definition into Coalesce as Source Nodes. This is the start of building a data pipeline - identify source data.
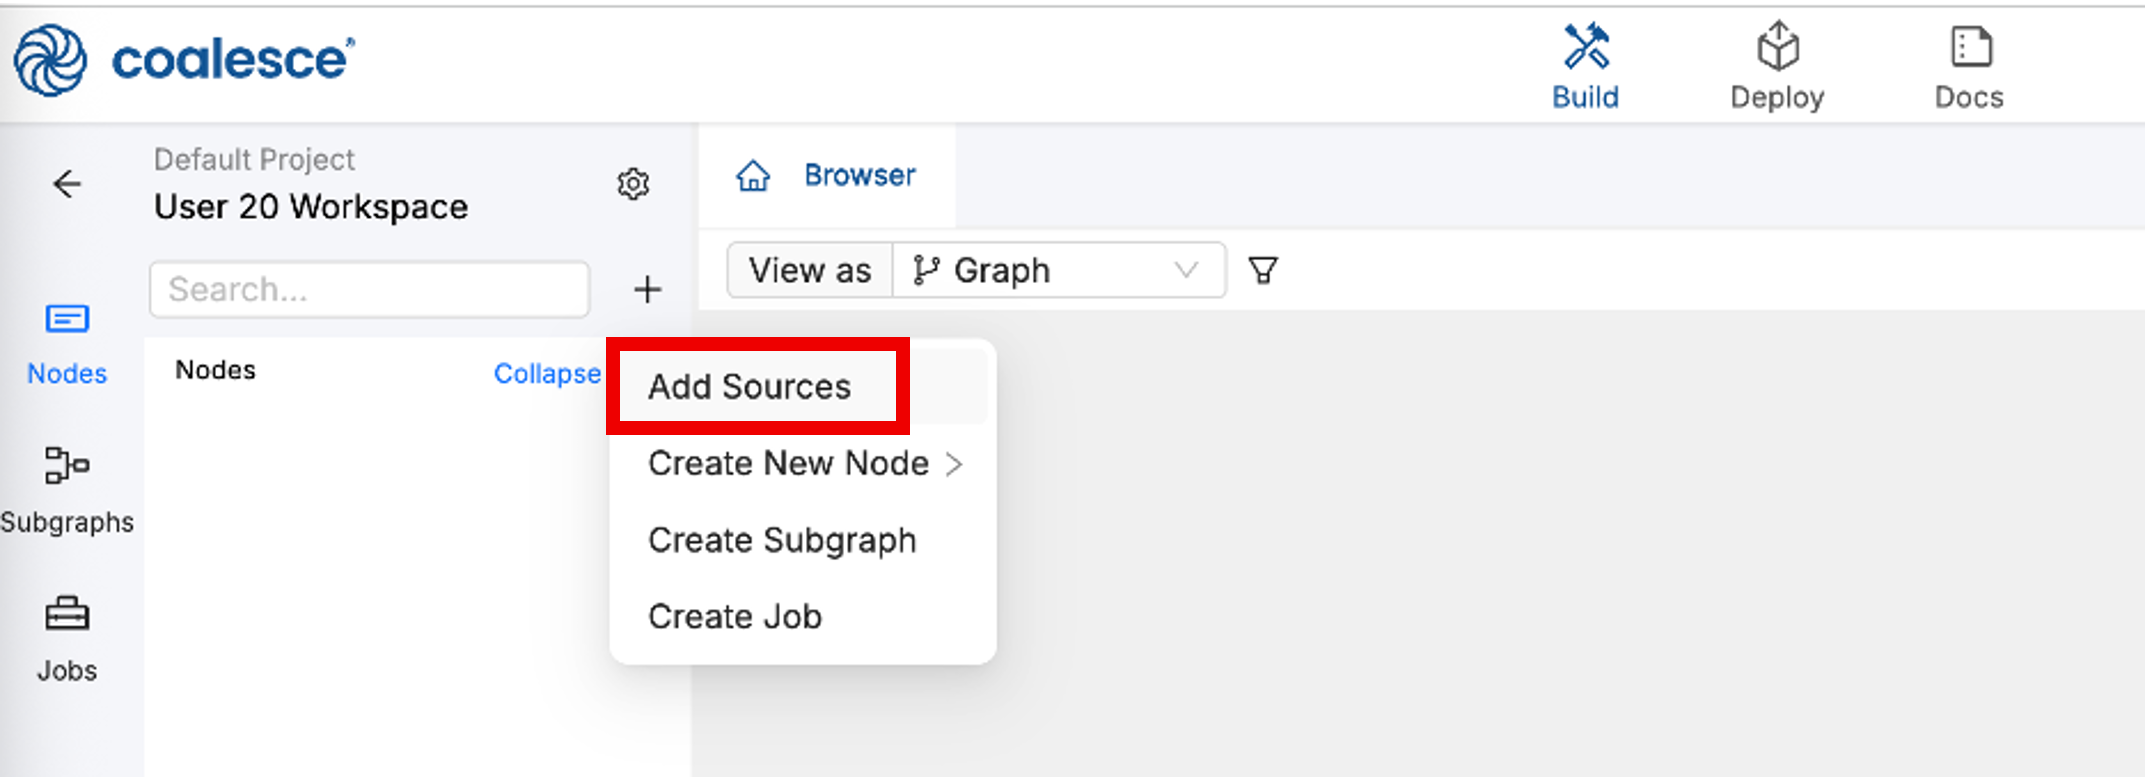
- Press the + button above the Node List, and select Add Sources:
-
Select the Storage Location LAND to select all tables in that Schema in Snowflake and Press the Add 6 Sources button at the bottom.
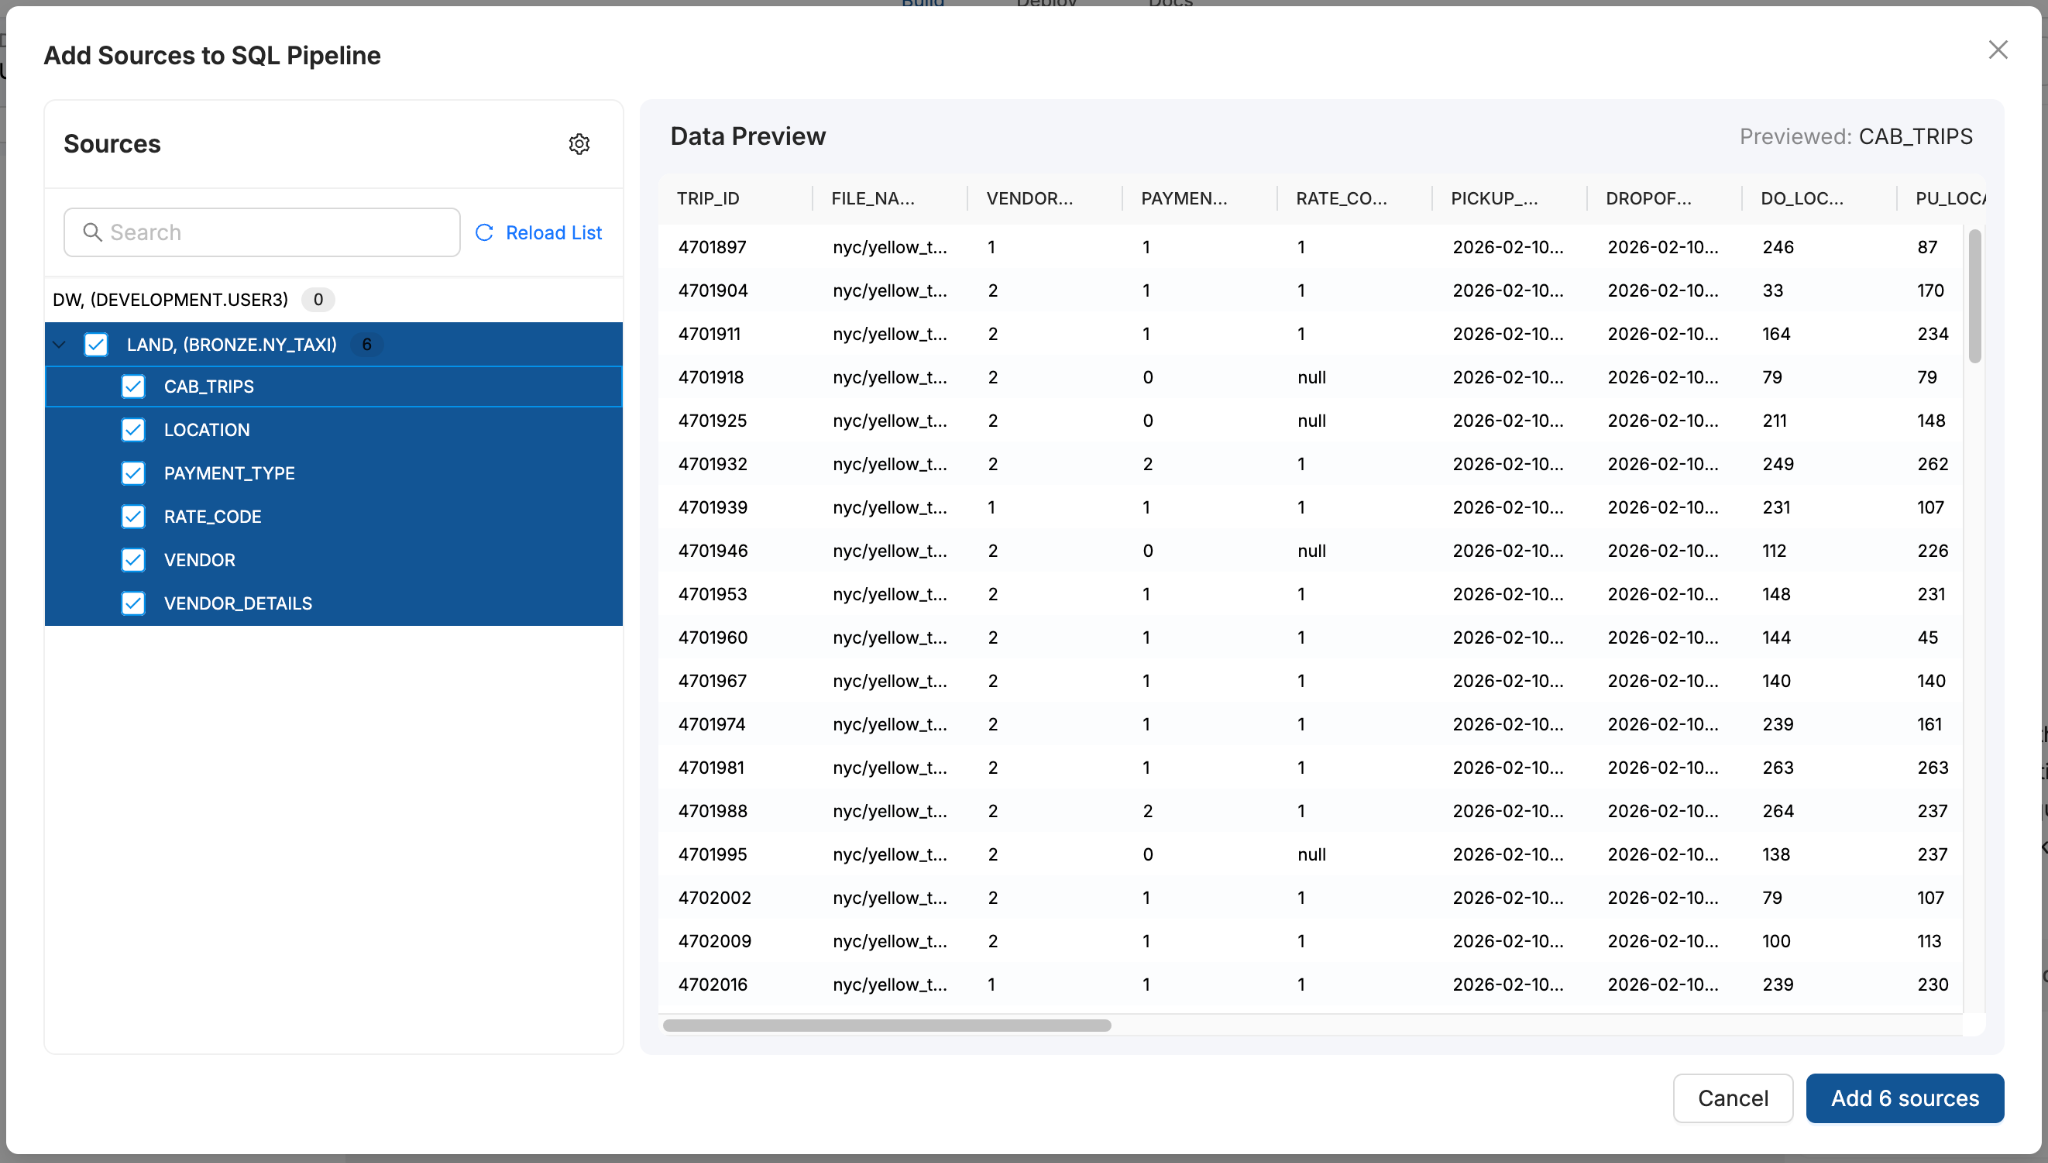
-
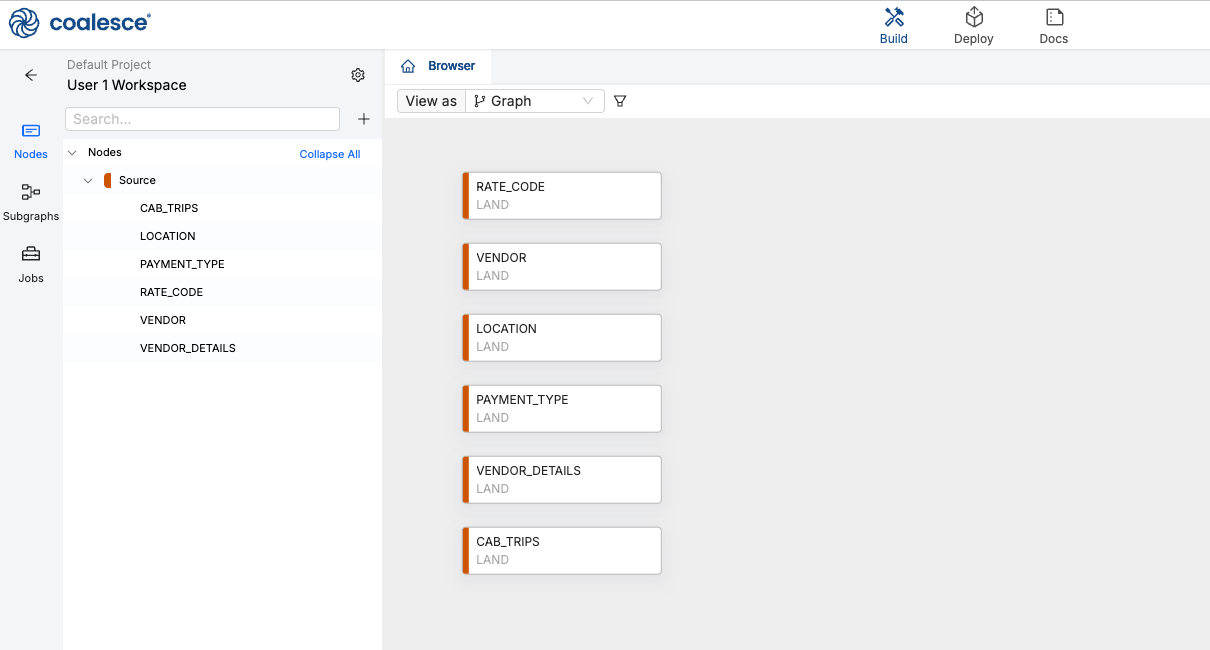
Now you should see the Source nodes in your Graph:
Step 5 – Build a Transformation Layer using Coalesce AI
-
Open the Coalesce AI assistant by pressing thebutton at the top right of the Browser:

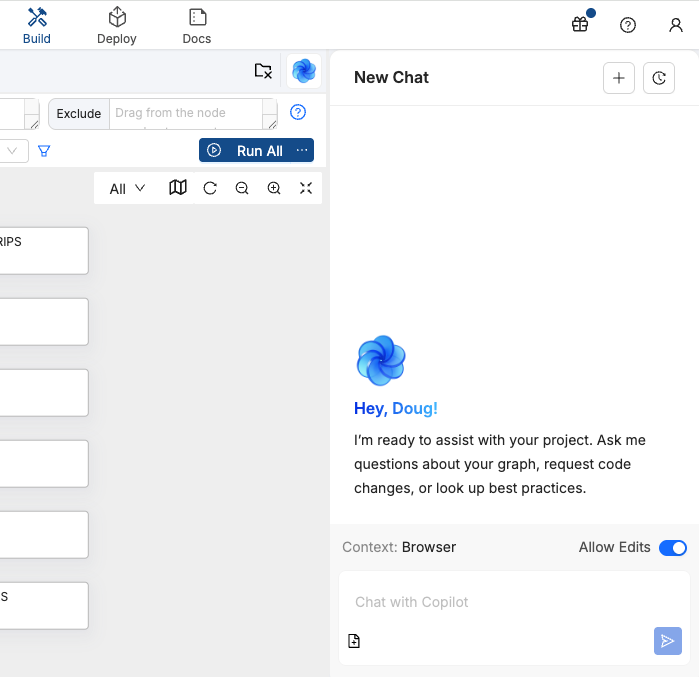
Note: the Coalesce AI Context is showing Browser and Allow Edits is switched on.
-
In the Chat with Coalesce AI box type in the text:
Add a staging layer over Source nodesand press the(send) button.
-
Check the end result looks like this:
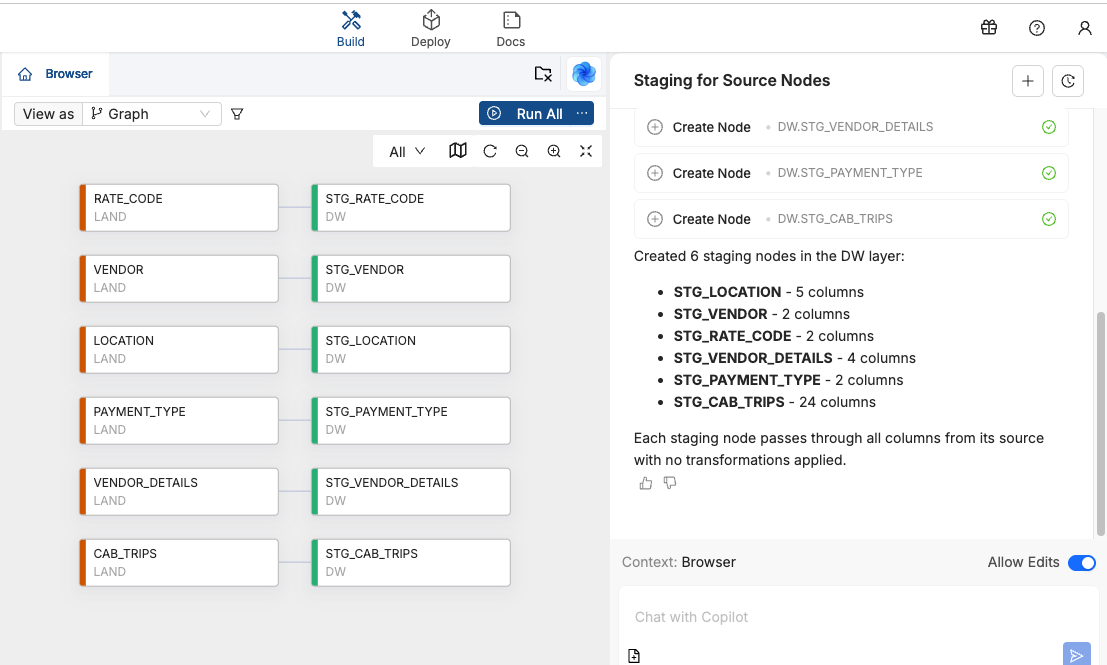
-
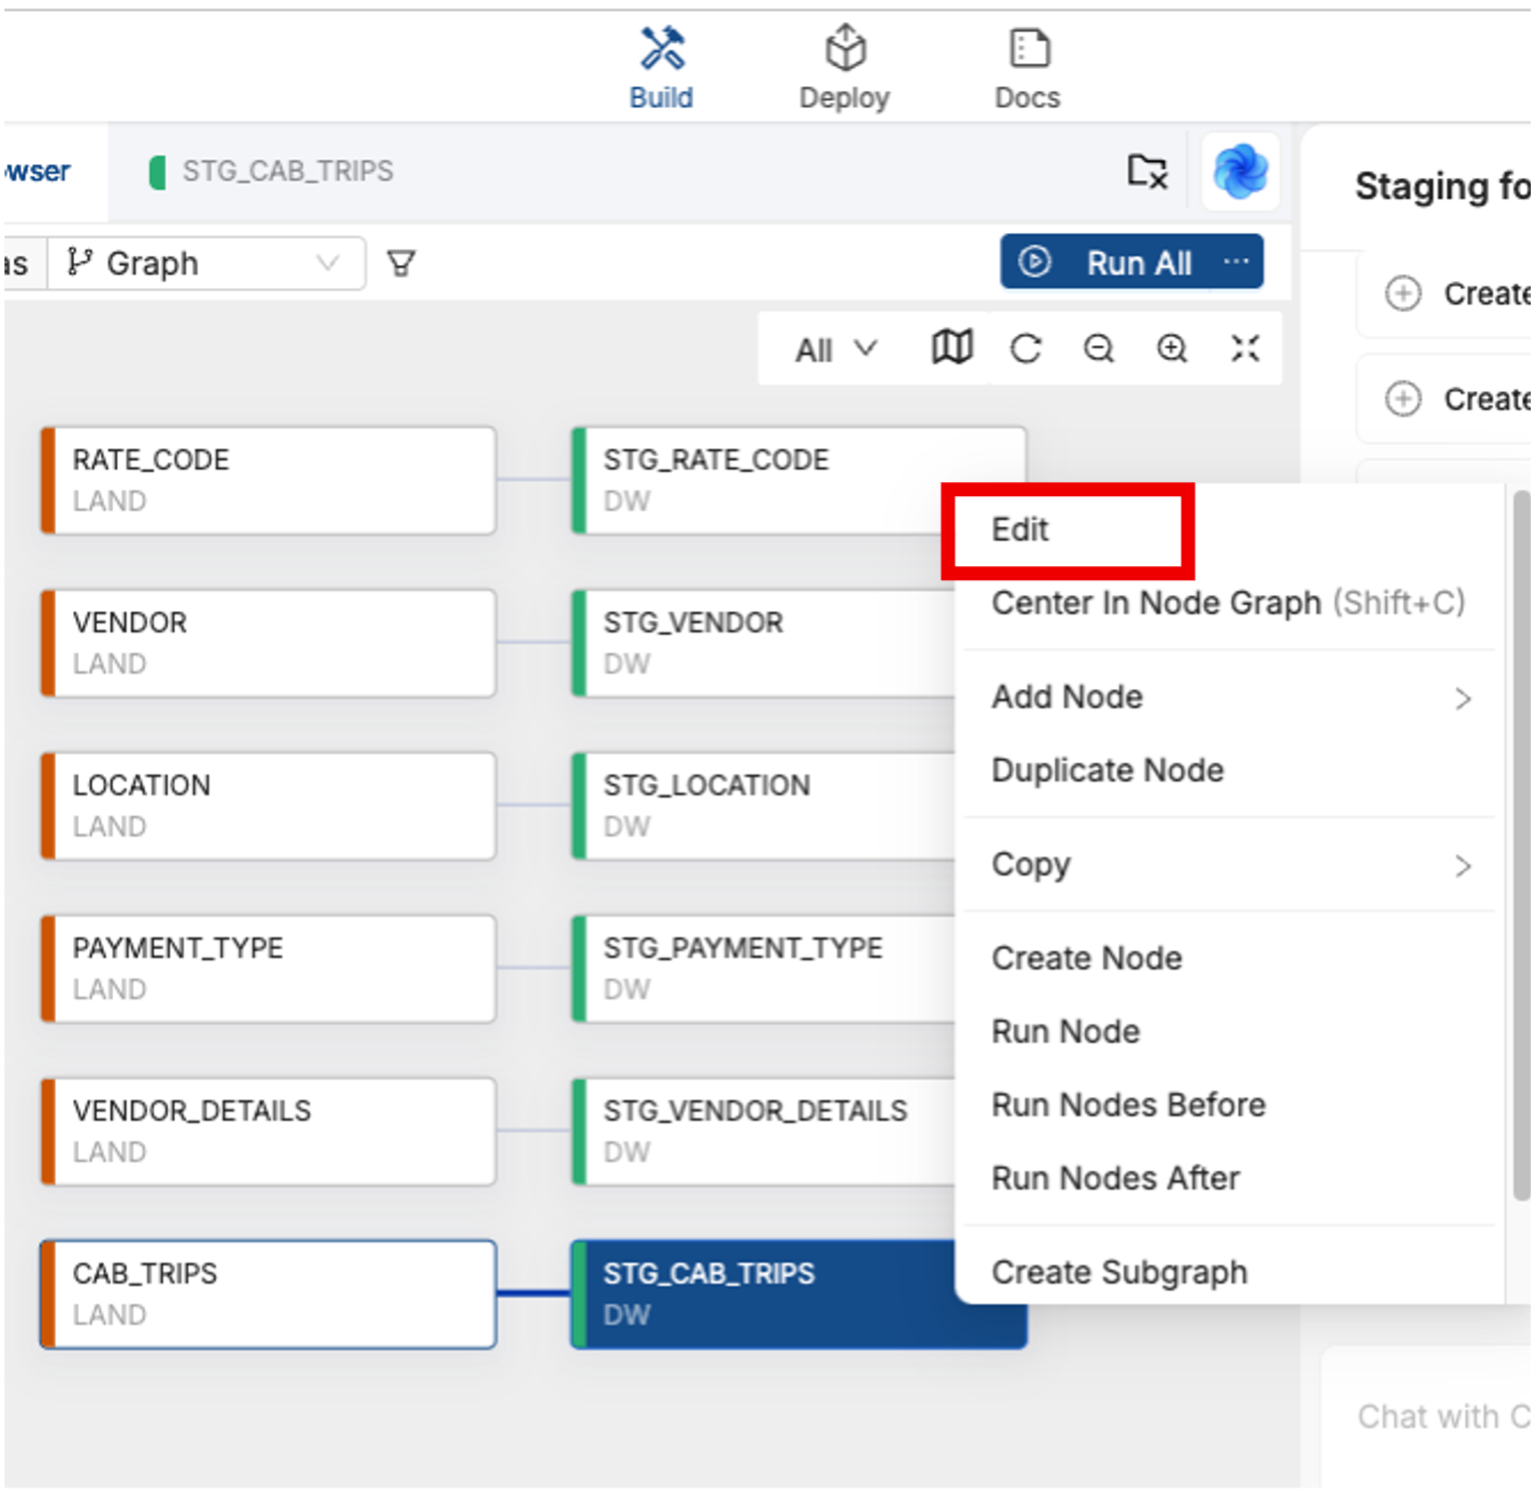
Now edit the Node called STG_CAB_TRIPS by right clicking on the Node and choosing Edit:
-
You should see the tables’s columns and the Coalesce AI context should change to STG_CAB_TRIPS:
-
Add a prompt to Coalesce AI:
add columns to calculate trip duration and average speed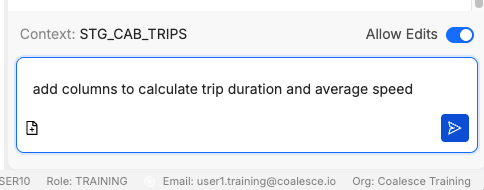
-
To review the generated SQL find the 2 new columns that Coalesce AI added by scrolling to the bottom of the Column list in the Center pane – and double click on the SQL in the Transform column:
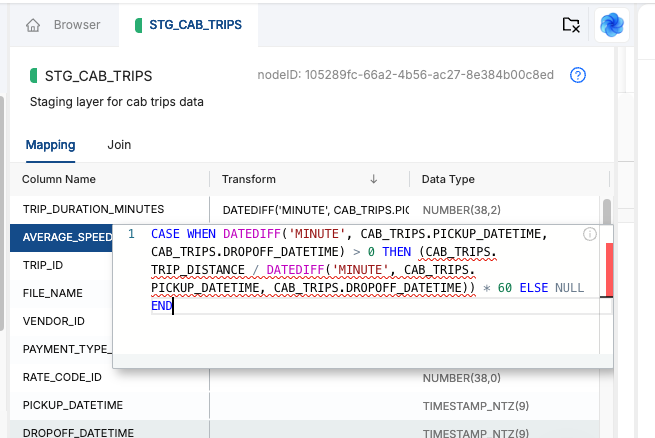
Note: you can write or rewrite this SQL yourself if you wanted to.
-
Select the Create and then the Run button – it should show a data preview pane at the bottom of the screen if successful.
-
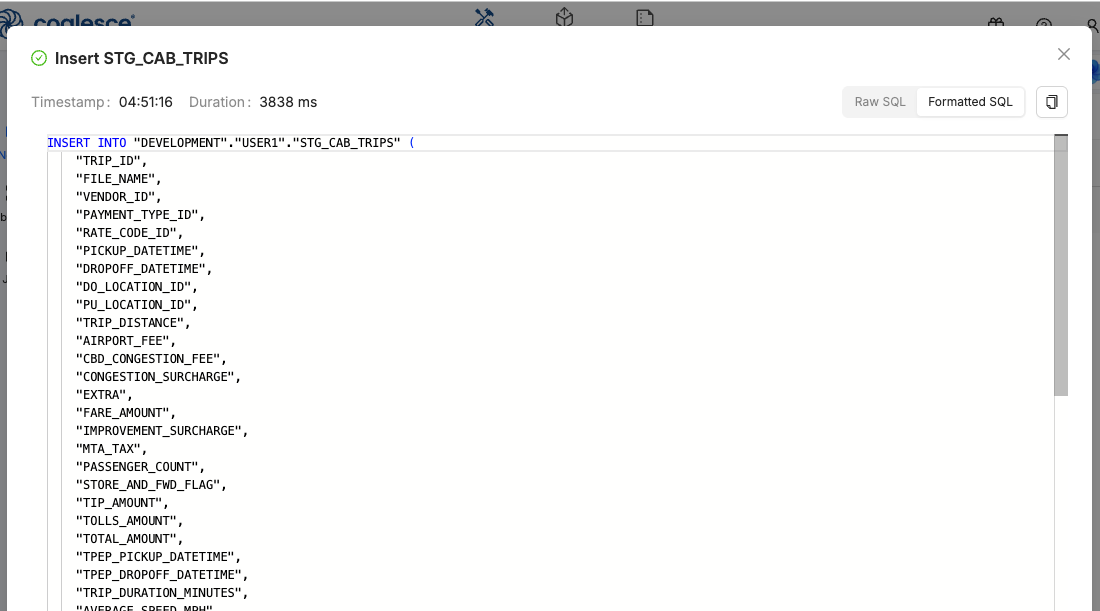
You can review the generated code in the Code pane down below:
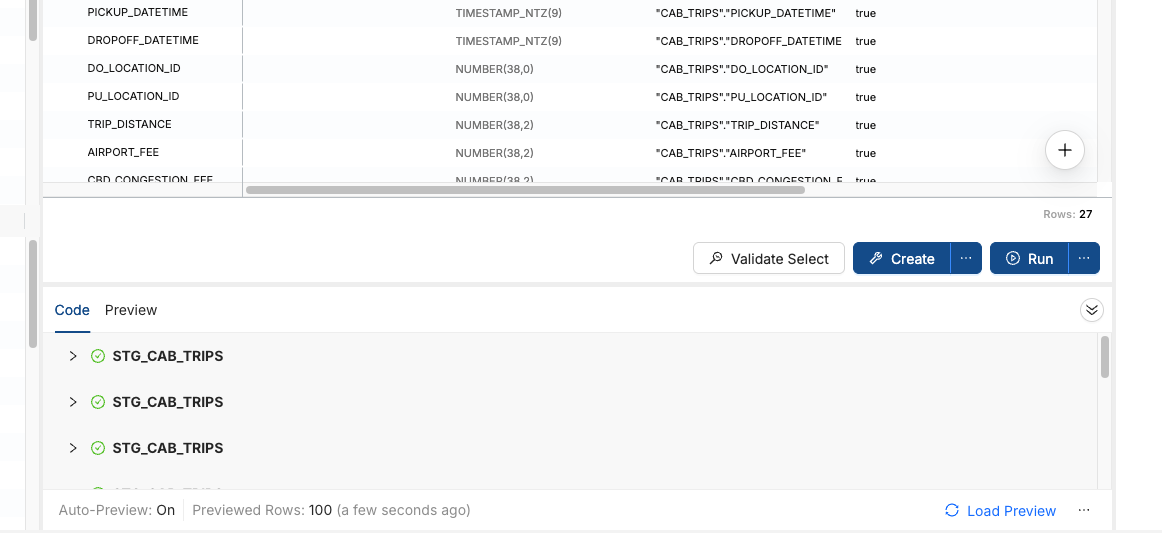

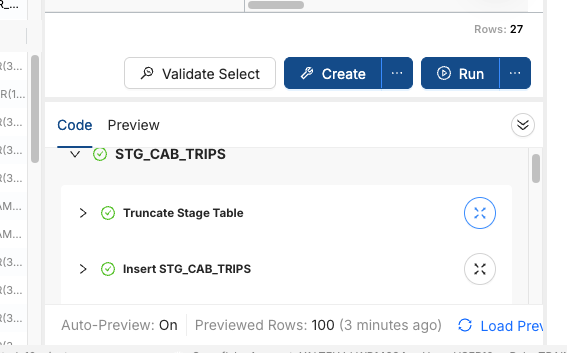
This will open the Code Viewer:
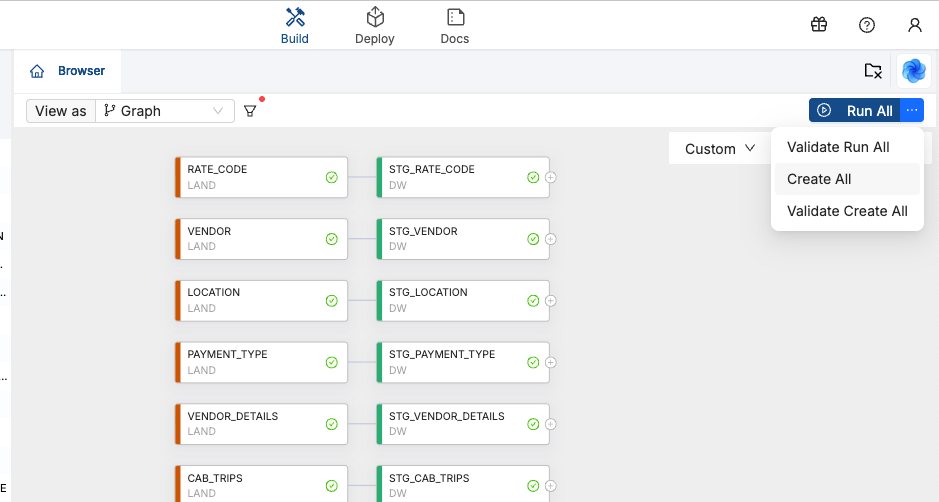
- Now you can create and populate all the tables we have defined. On the Browser choose the Create All option and once finished just press the Run All button at the top right:
Step 5.5 – Build more Transformations
In the VENDOR_DETAILS table we can see there is JSON data stored in a variant column in the HQ_ADDRESS_DETAILS column. As part of our Transform layer we want to shred the JSON documents into a structured schema.
-
Right click and Edit the STG_VENDOR_DETAILS table in the Browser:
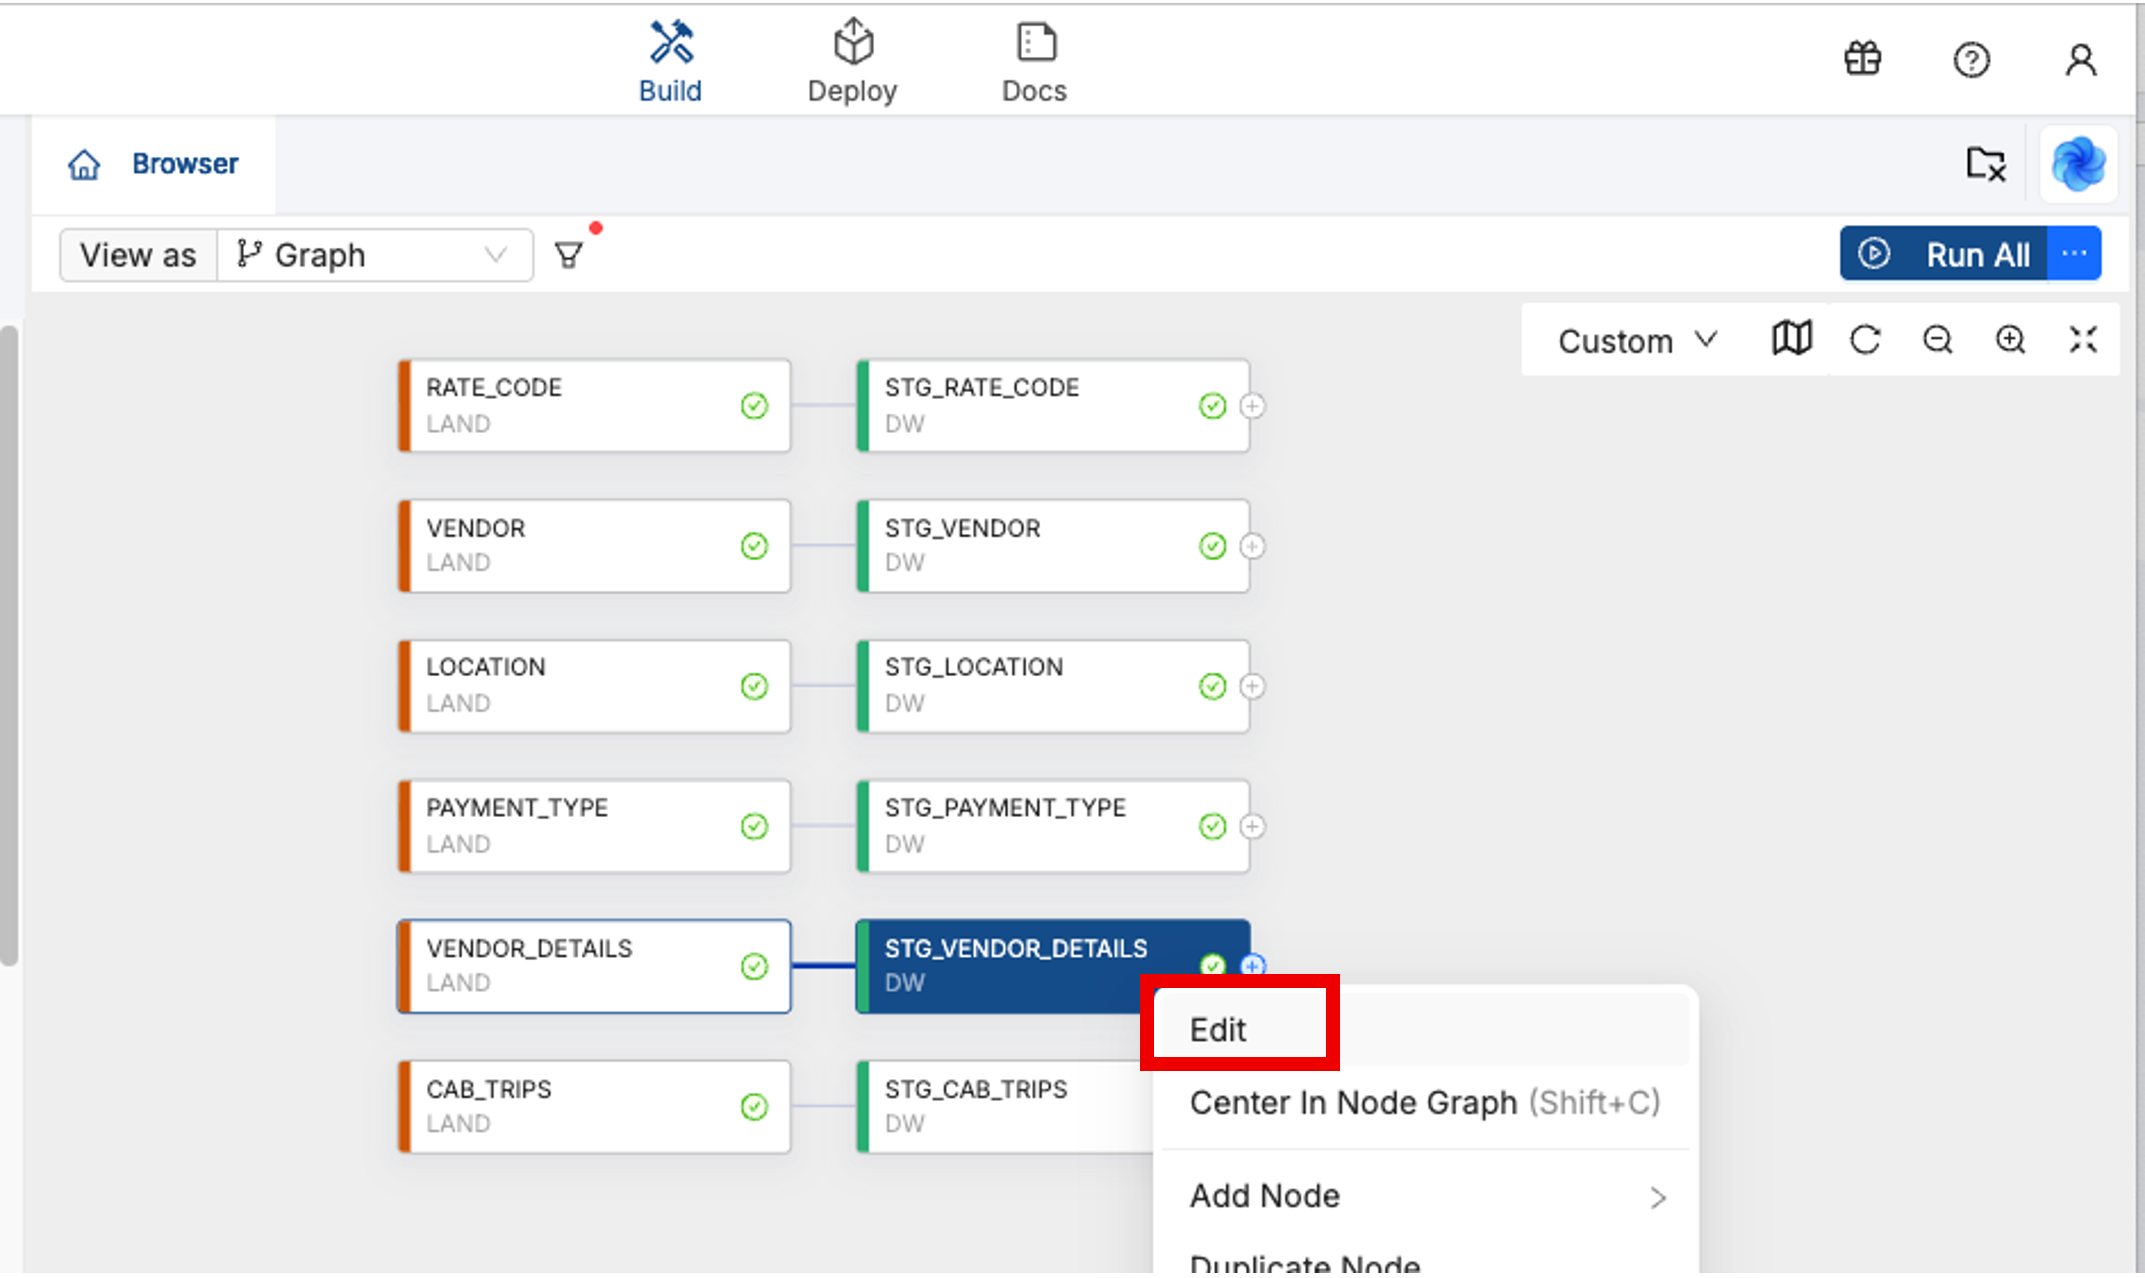
-
You can see the data in in the Preview pane below (if not click on):

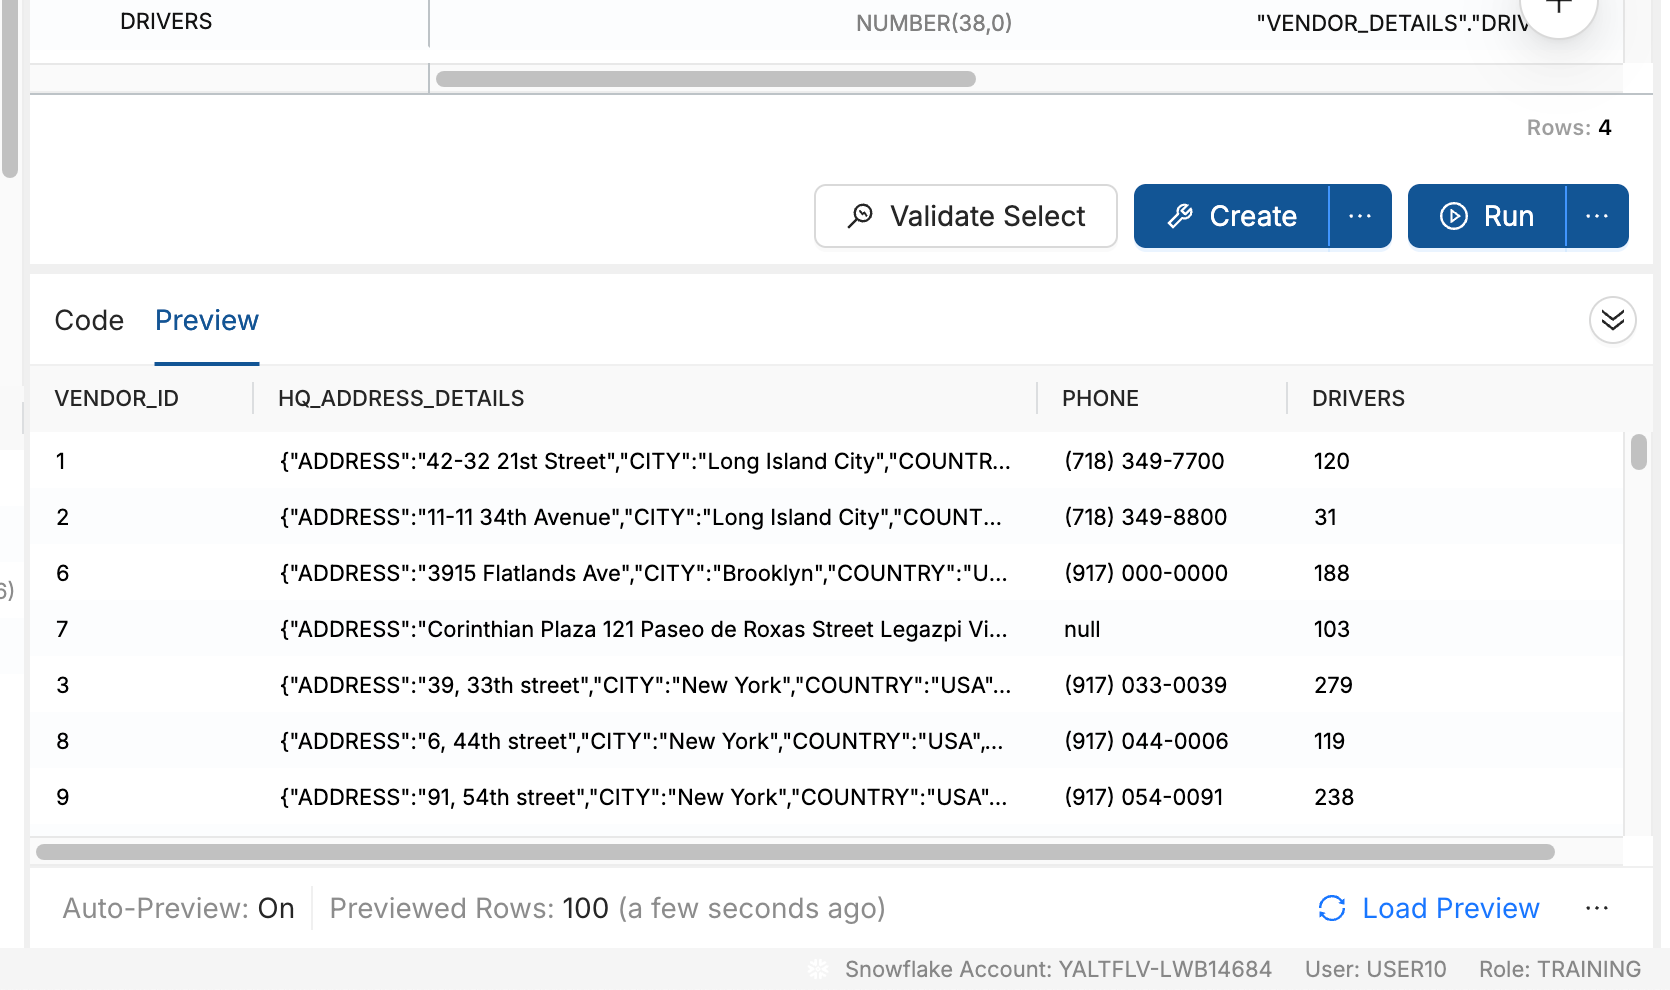
Note: you can see a JSON document in the HQ_ADDRESS_DETAILS field containing Vendors’ address details. We want to turn this into columns (and rows) to make the address data more easily readable.
-
Select the HQ_ADDRESS_DETAILS column and choose Derive Mappings / From JSON:
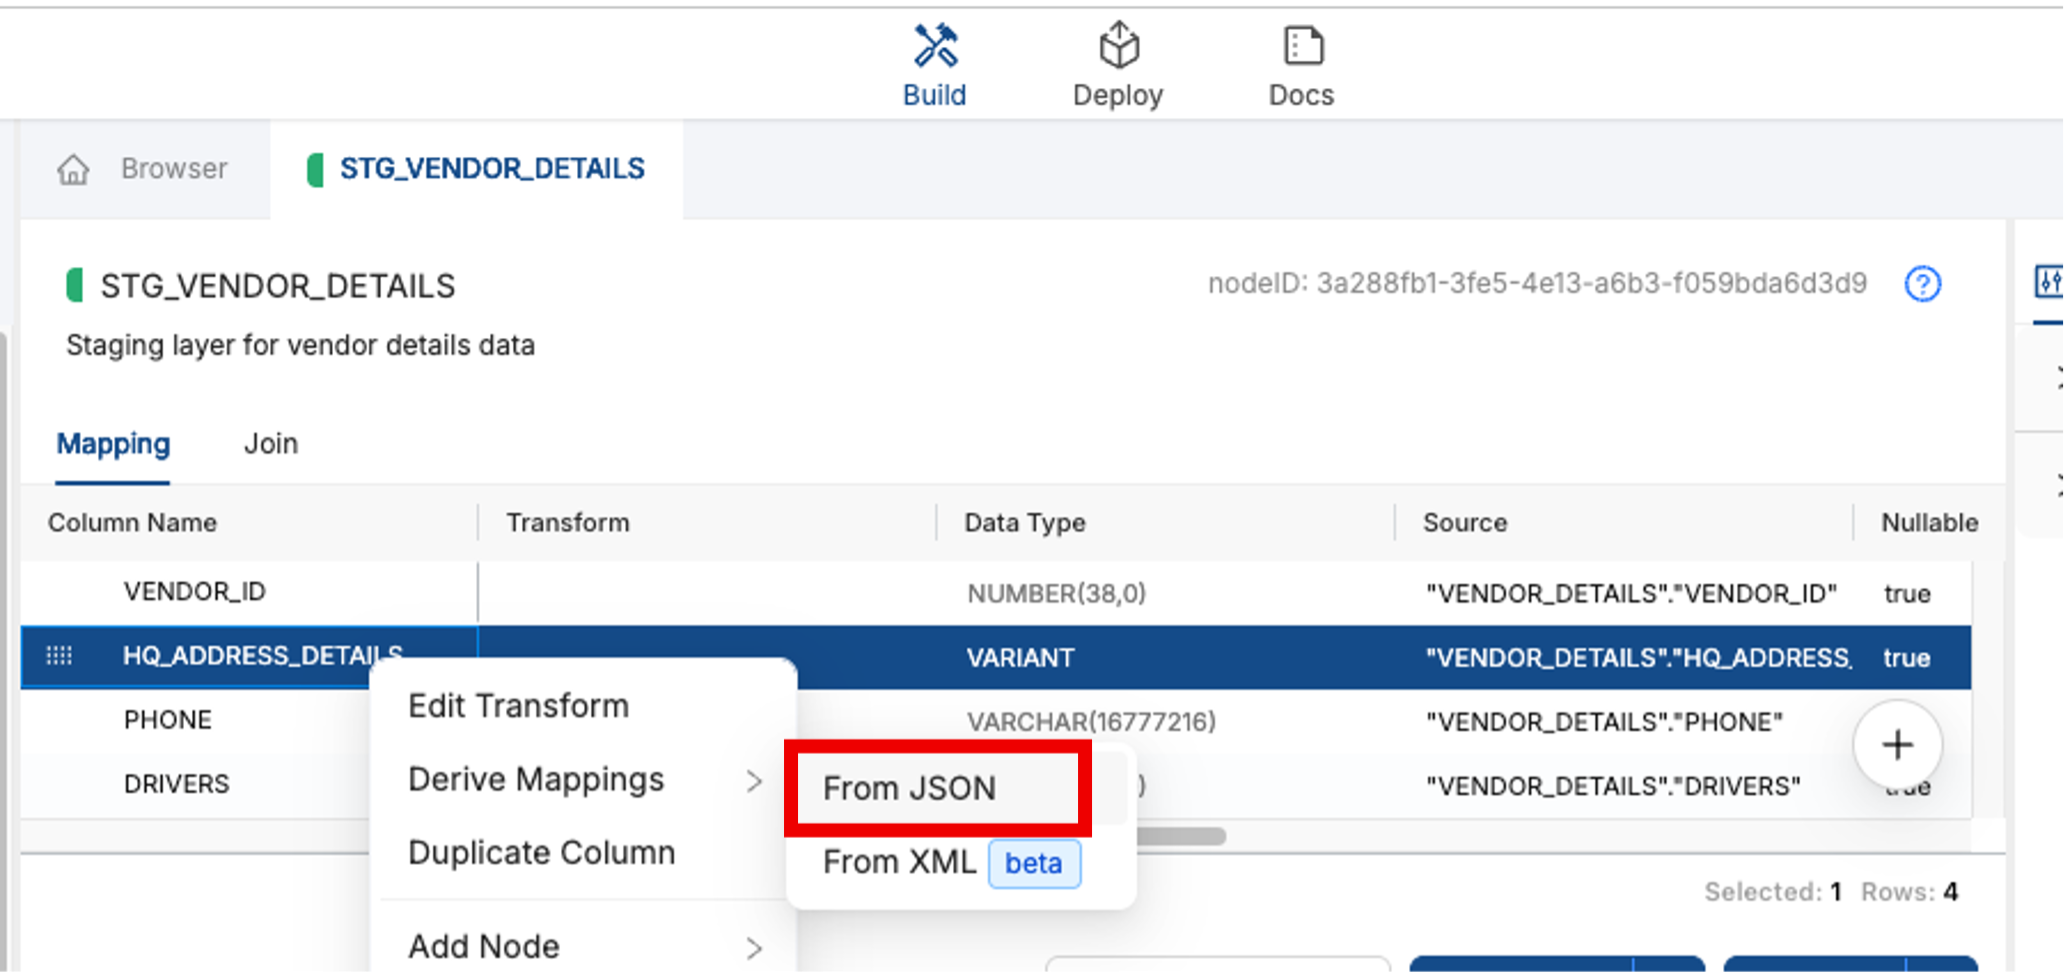
This will sample the JSON structure and identify the elements / nesting in the JSON and create columns and mappings to extract the data. In this case we will pull the Address components stored in the JSON into their own ADDRESS / CITY / STATE etc columns.
-
Press the Create and Run buttons and review the data in the new columns.
-
Now we have split apart the Vendors address we can use another staging node to combine the STG_VENDOR details and the STG_VENDOR_DETAILS tables. To do this we will use a SQL Work node type (note: we could use the standard Stage node type if we wanted).
Multi-select (control-click) the STG_VENDOR and STG_VENDOR_DETAILS tables and choose the Join Nodes and choose the SQL Work node: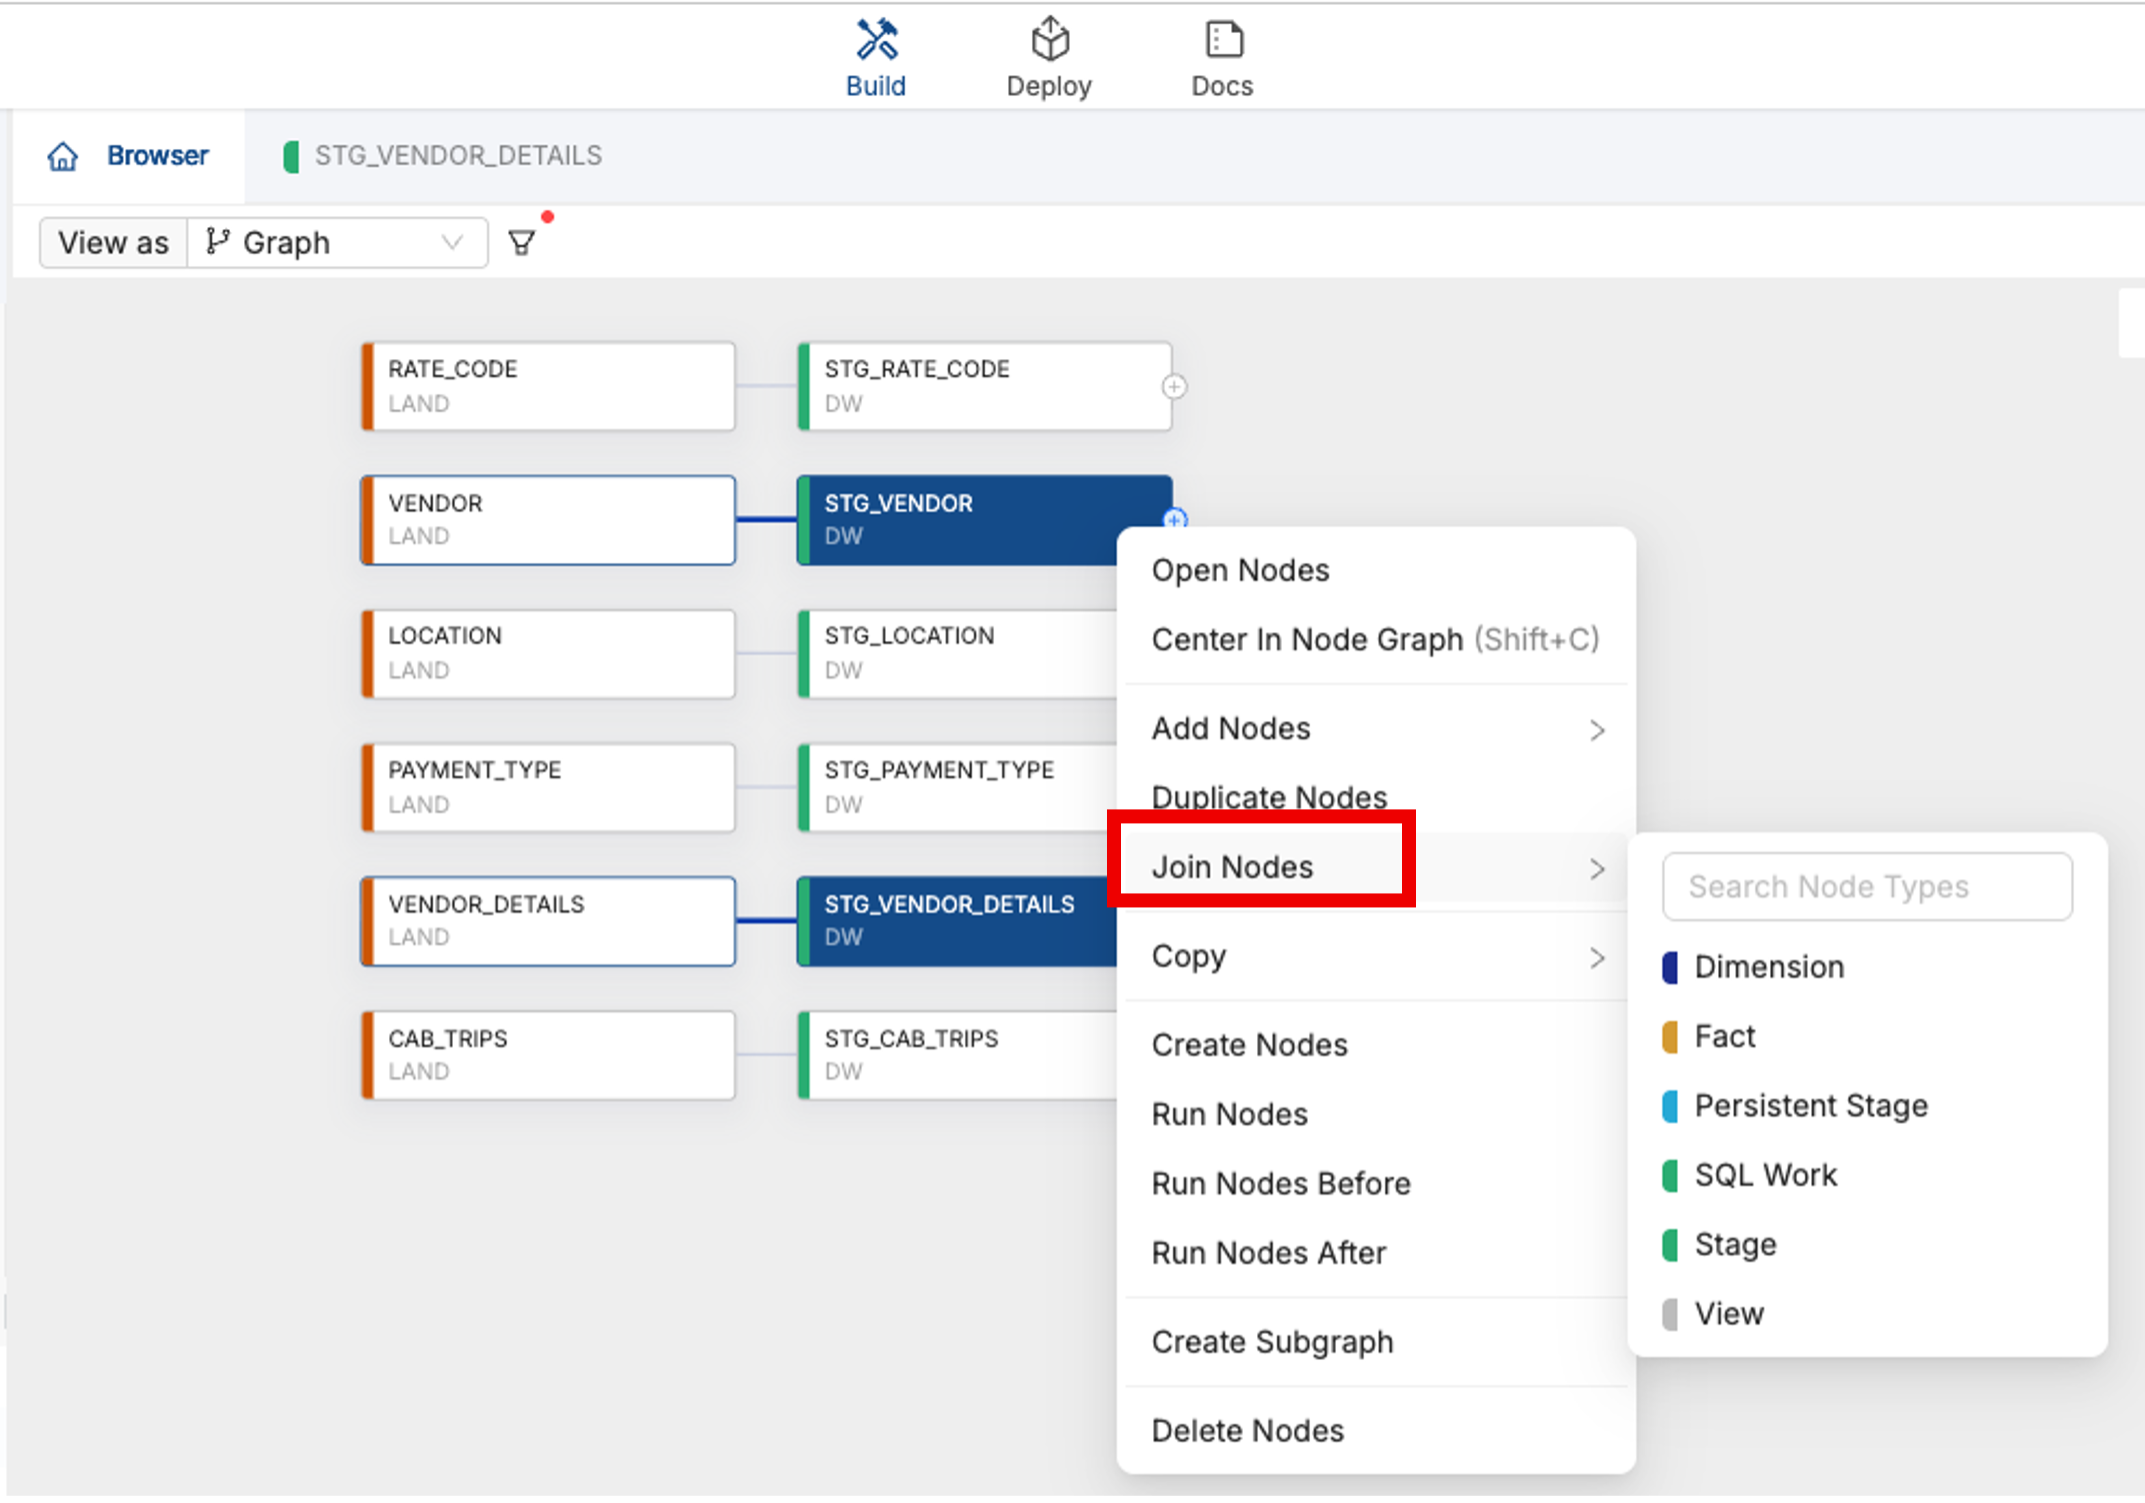
-
This will open a SQL editor – where we can write (or generate SQL) to transform the data. This SQL is annotated with table details
- Note: leave the top 2 lines alone as they contain node level annotations (id and node type)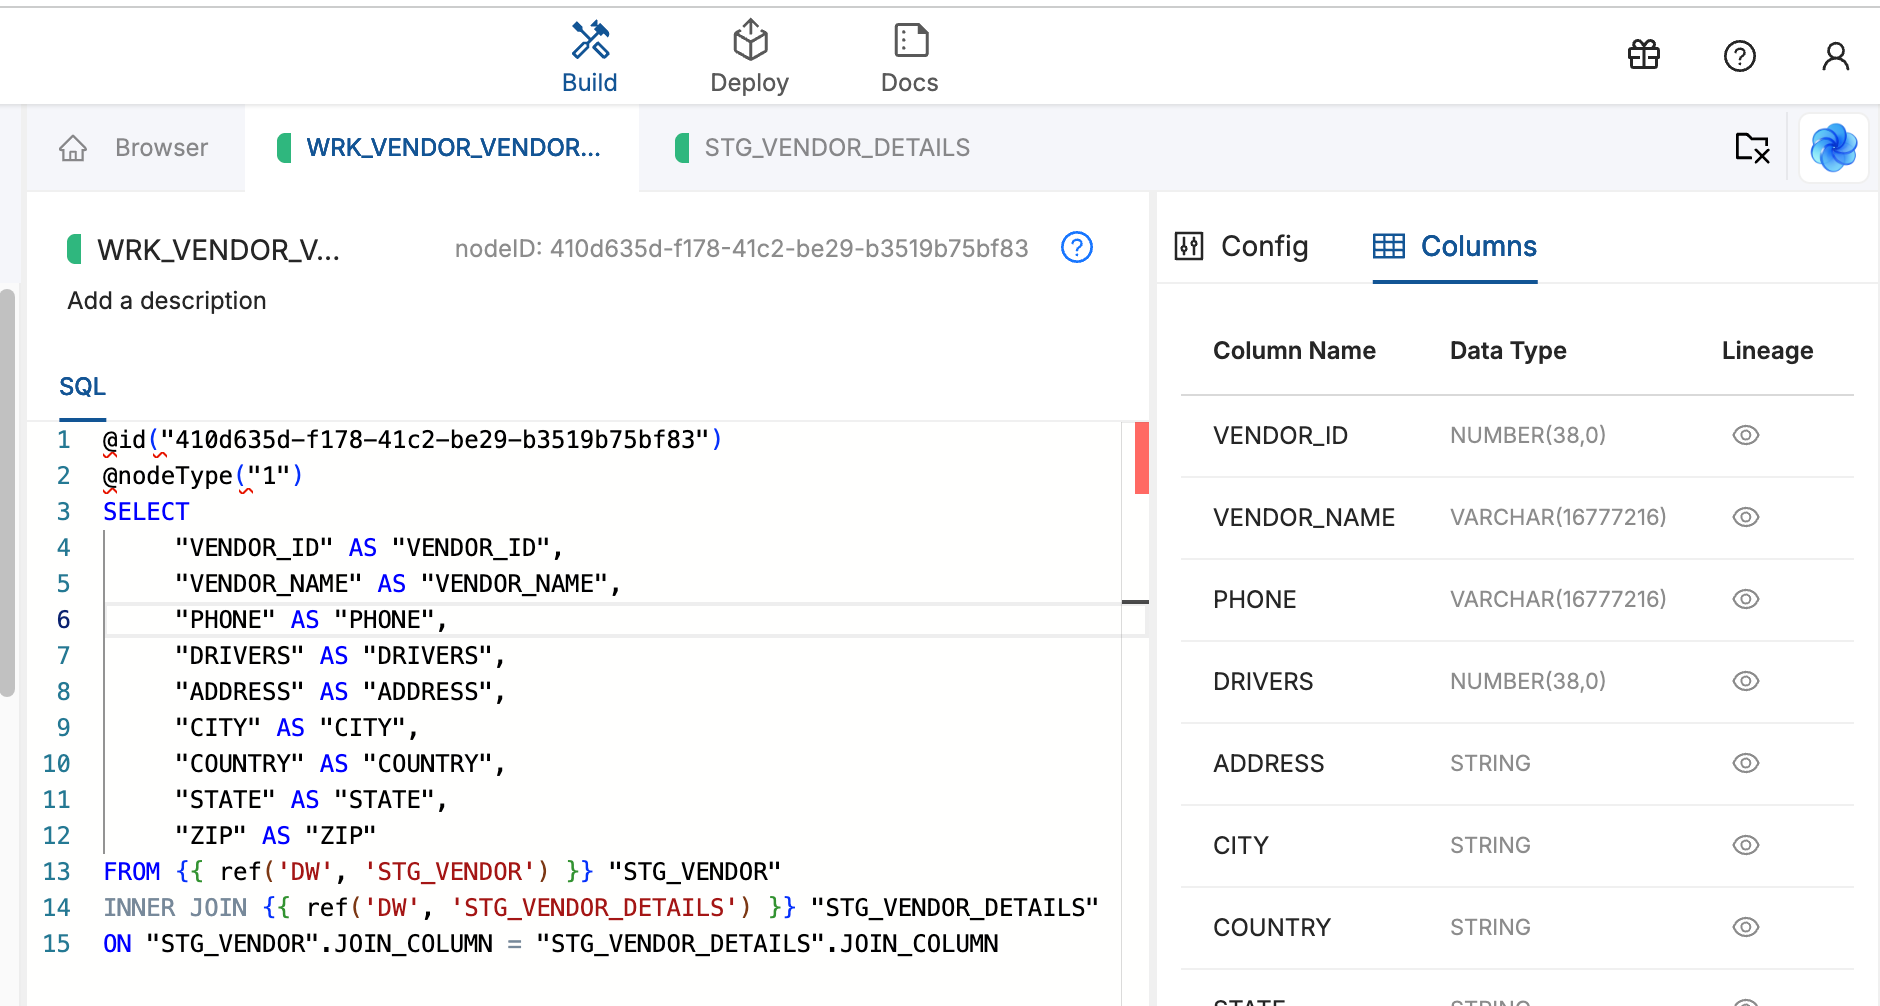
We could just type SQL in this editor – in this case only really the join clause needs fixing. Note: This SQL is parsed into the Column list on the right hand side when the SQL is valid.
-
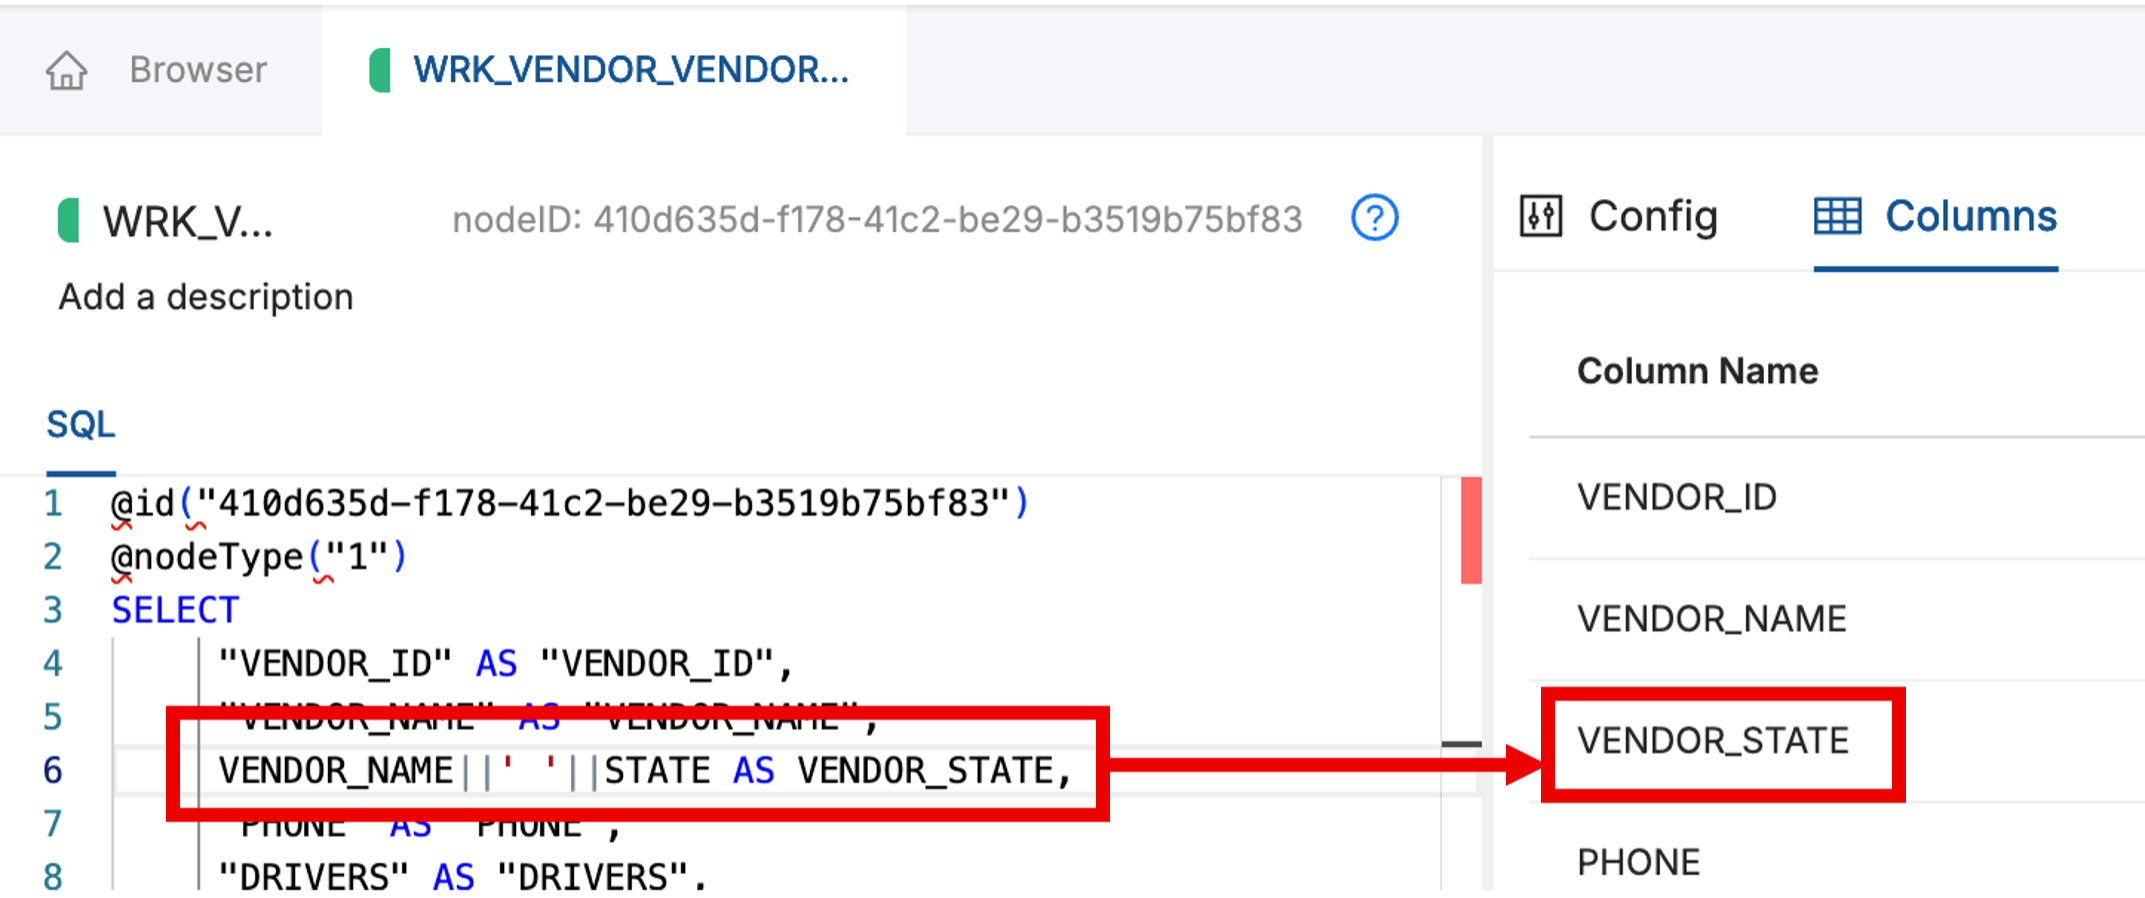
Add a line after the VENDOR_NAME (LINE 5 ABOVE) - and type the following SQL:
VENDOR_NAME||' '||STATE AS VENDOR_STATE,And check that this column is automatically added in the Column list on the right.
-
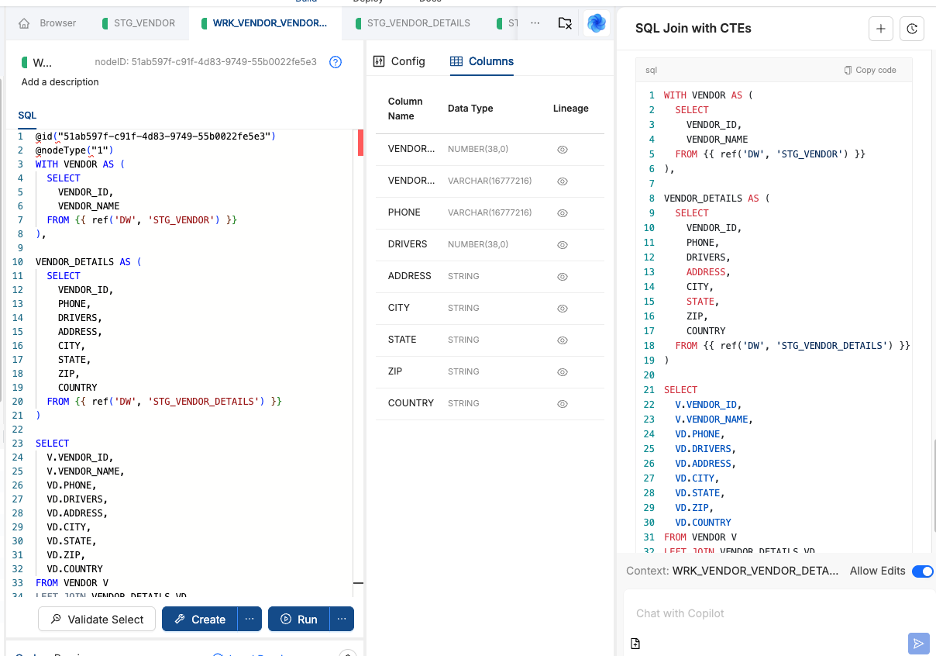
Rather than type SQL lets get the Coalesce AI to generate SQL using the prompt:
build sql that joins stage tables STG_VENDOR and STG_VENDOR_DETAILS using ctes. remove duplicate columnsIf the SQL looks good copy using the Copy Code option and paste it (leaving the top 2 annotation lines alone):
-
Press the Create and Run buttons and review the data in the Preview Pane.
Step 6 - Build and populate Datamart
Lets build some dimensions and facts.
-
Open the Browser and check Coalesce AI context is Browser and use prompt:
What dimensions and facts would you create over these stage and work tables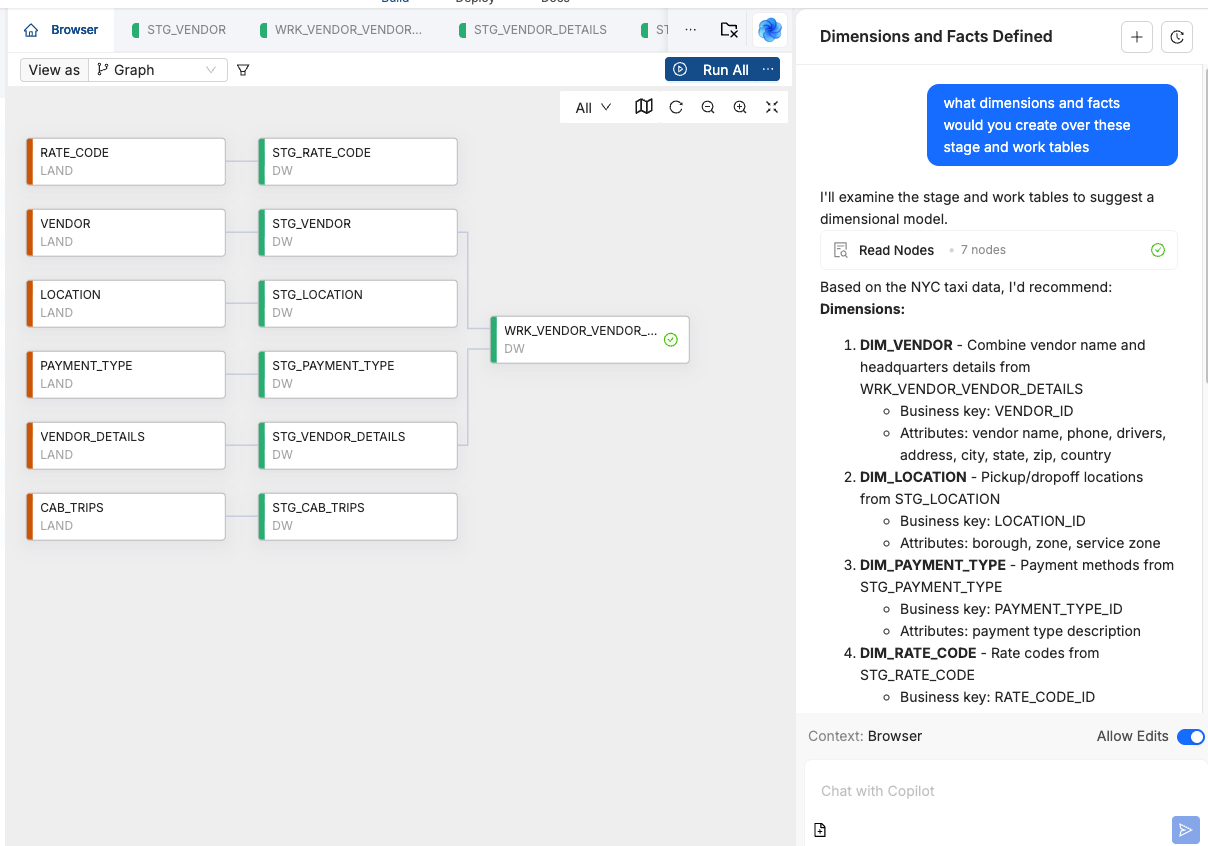
-
If that plan looks sensible (it should) then tell Coalesce AI to go ahead and create them
create them please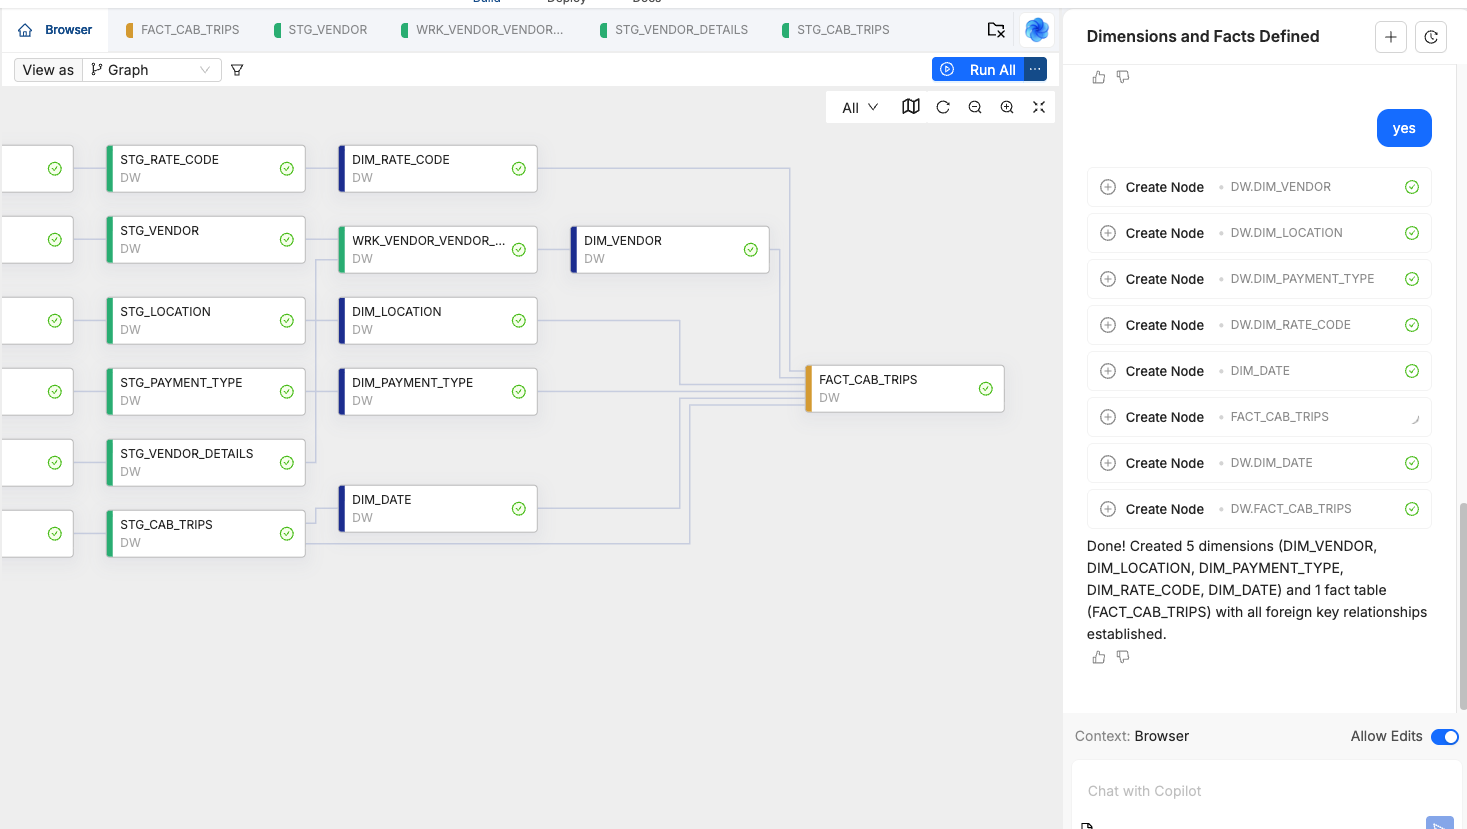
-
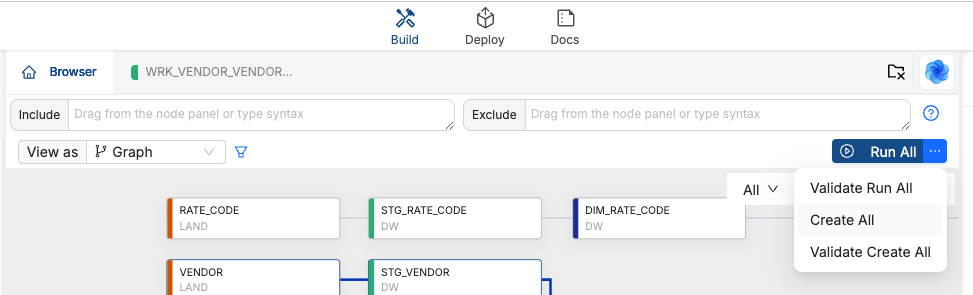
Select to Create All and Run All in the Browser to create the tables on Snowflake and populate them.
-
Now we will commit all your hard work to GIT to keep it safe by clicking on the Git button at the bottom Left of the screen:
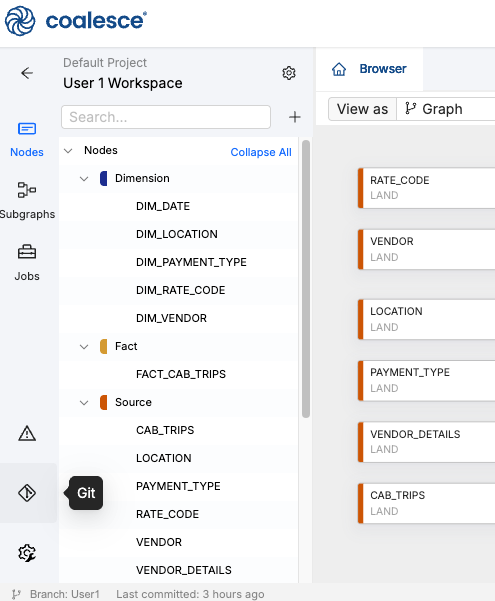
This will open a GIT dialog that shows changes to your User GIT Branch and will show changes since the last commit:
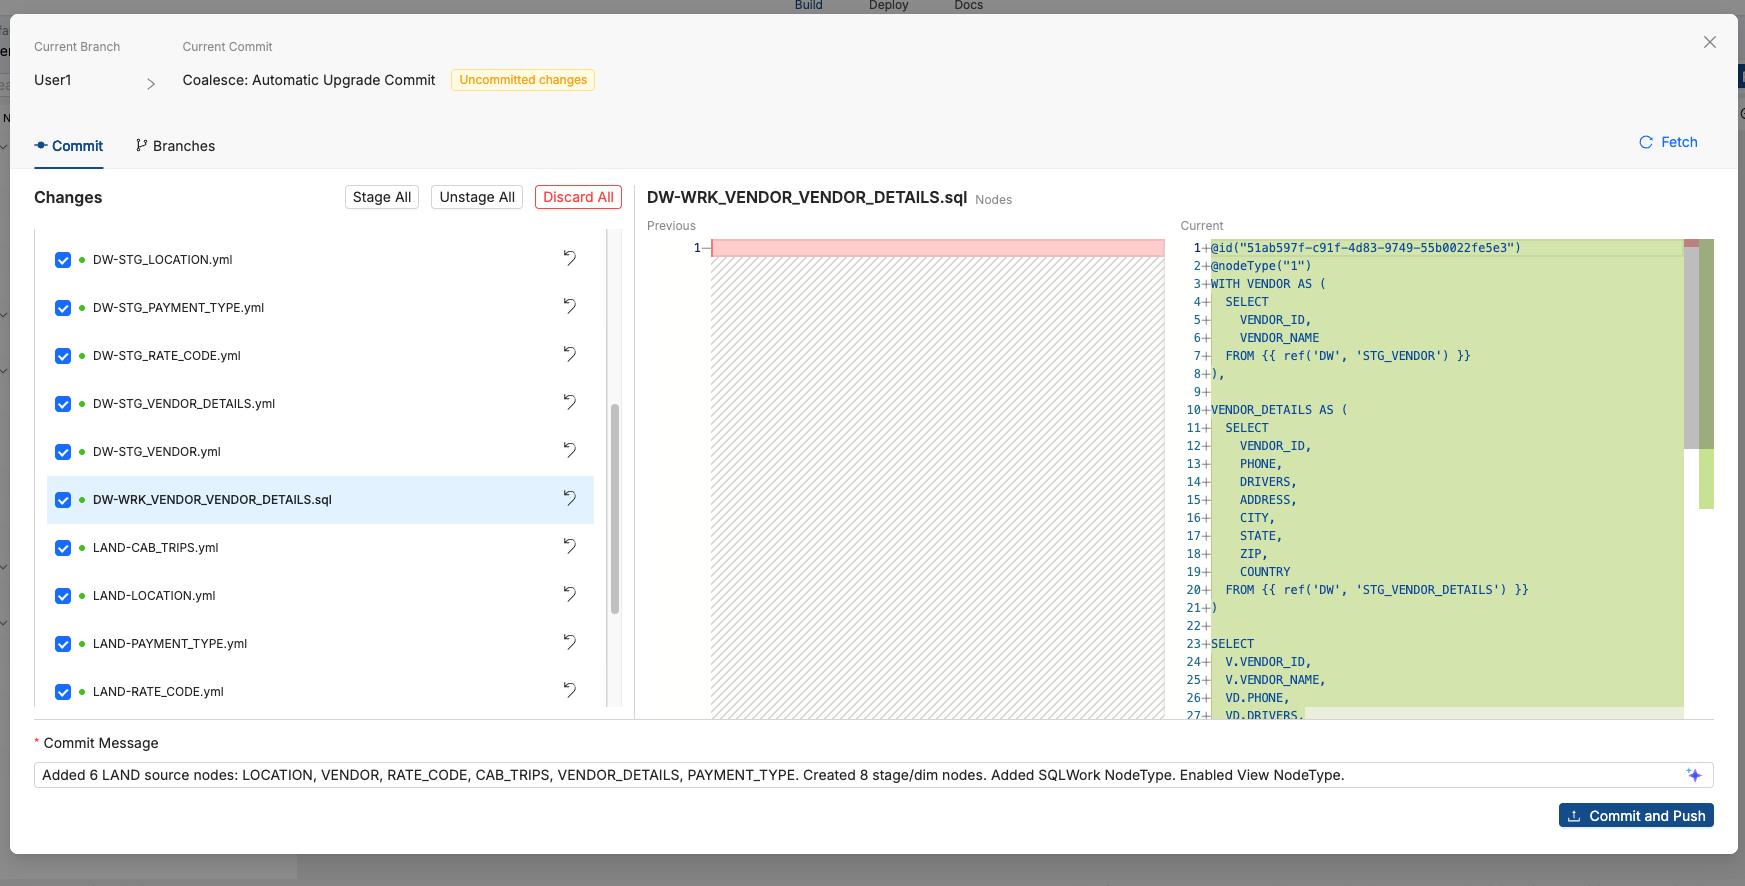

Note: this Dialog also has the ability to show other branches, checkout, create branches and merge branches.
Step 7 - Review and Refine the Data Mart
We can see what we have built - and make changes in the UI. We are going to add propagate a column using column lineage, add documentation and then re-commit to GIT.
-
Open and review DIM_VENDOR by selecting Edit on the DIM_VENDOR table and view sampled data in the Preview pane at the bottom of the screen.
-
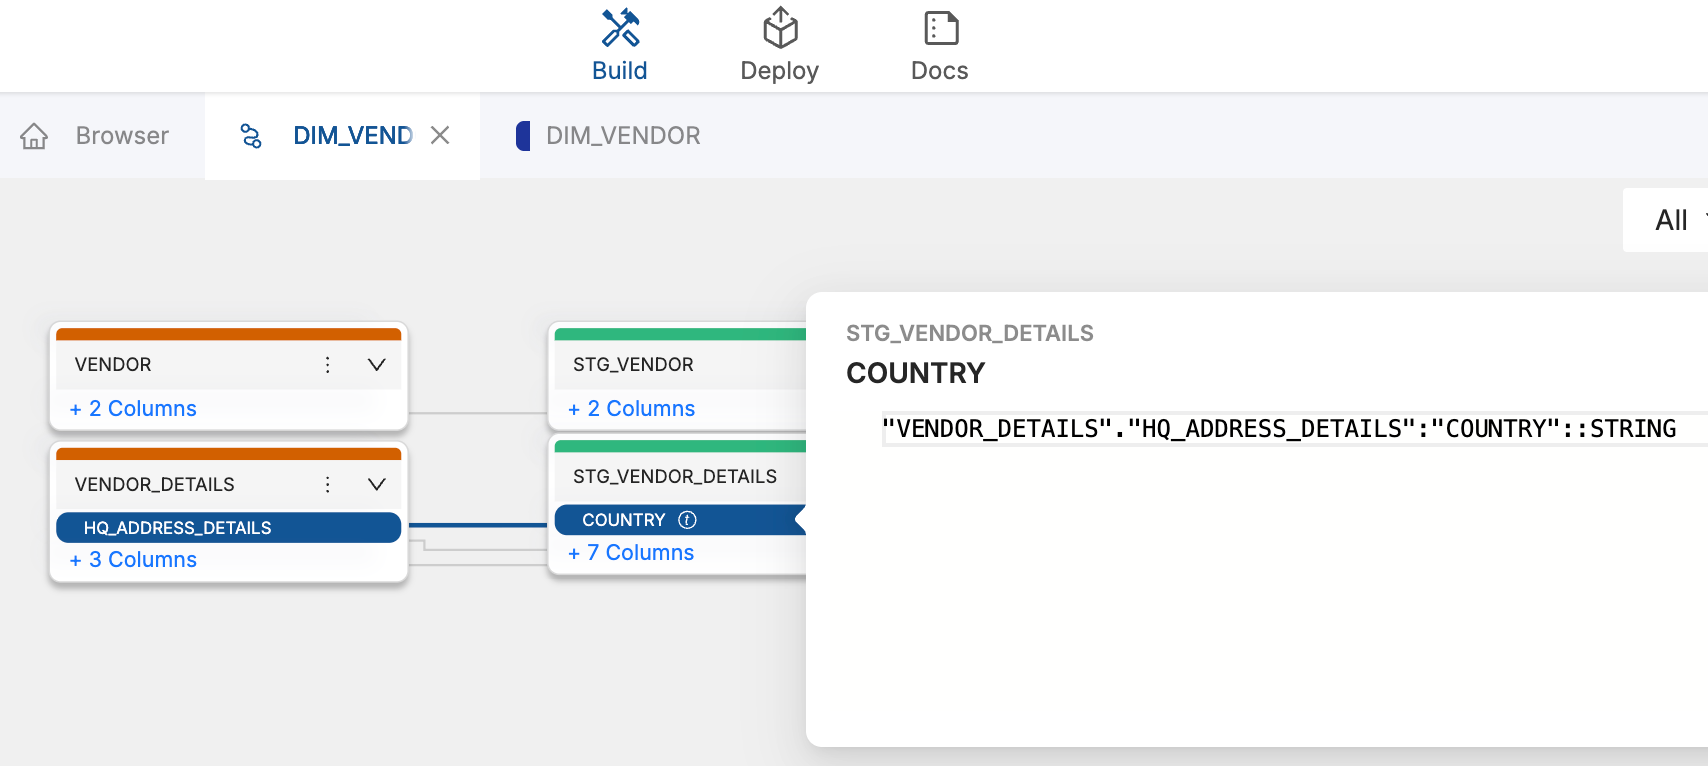
Right click on COUNTRY column (or any column if COUNTRY is not there) and choose View Column Lineage to see graphical lineage.
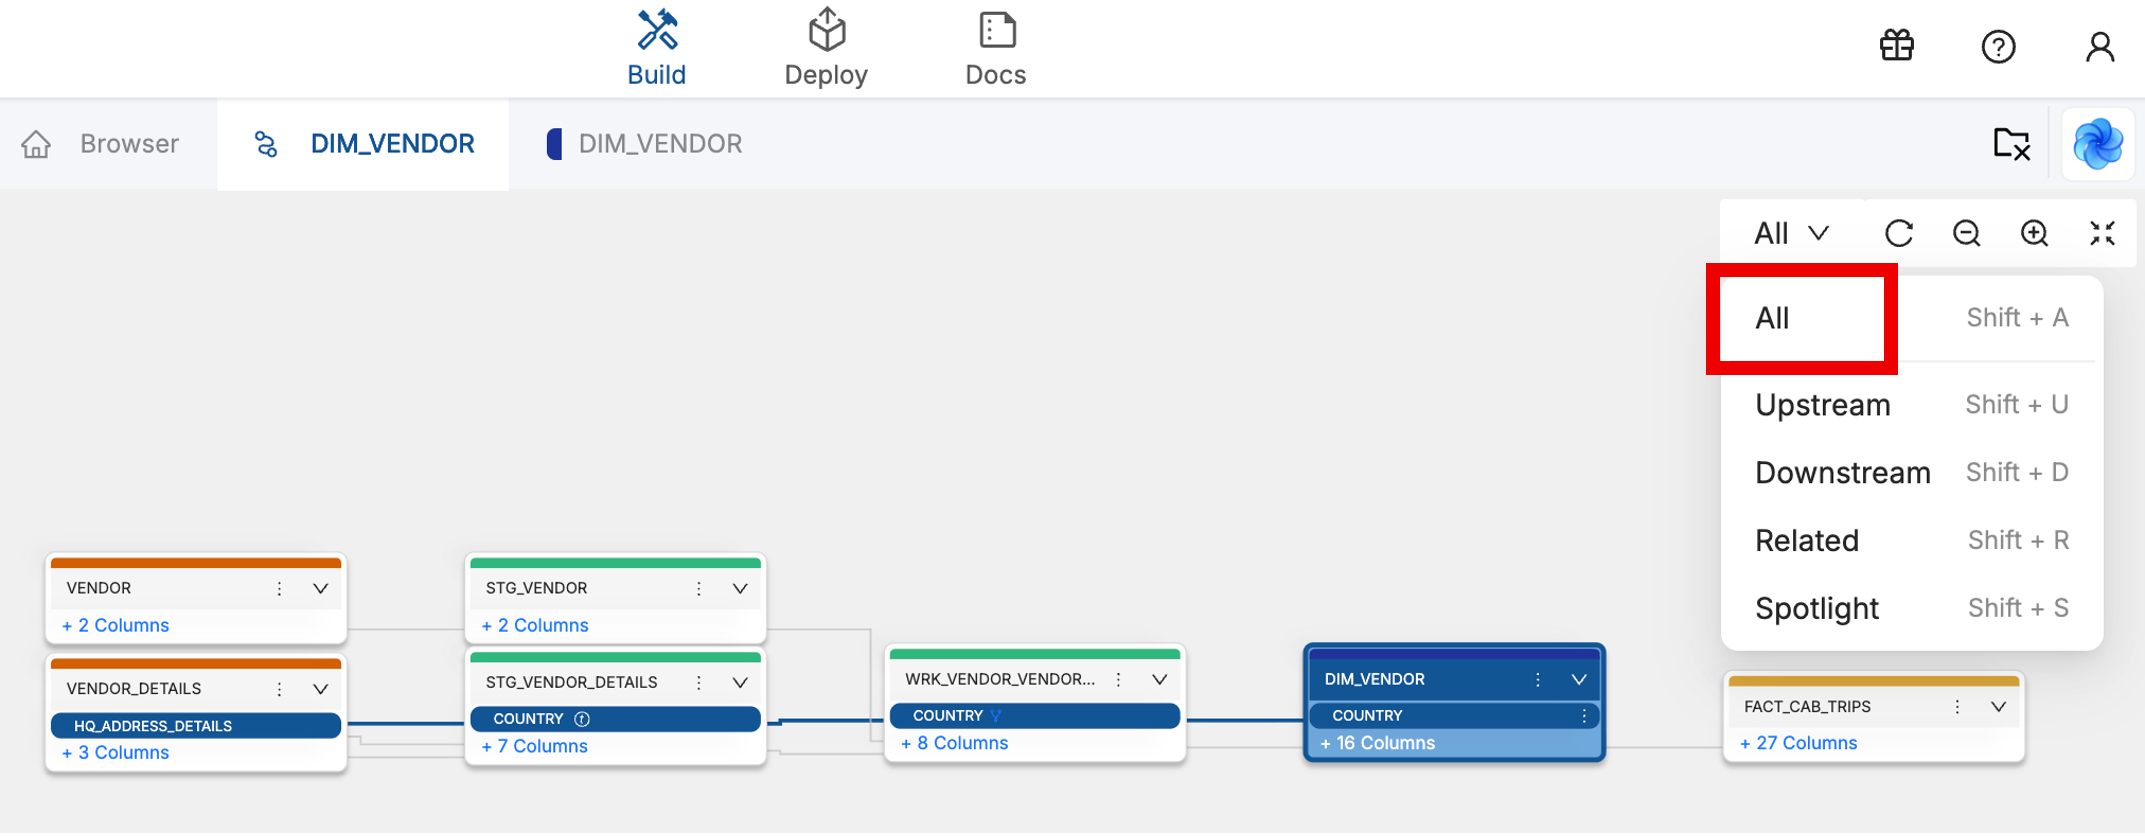
At the top right select Related -> All to see all tables related by lineage.

-
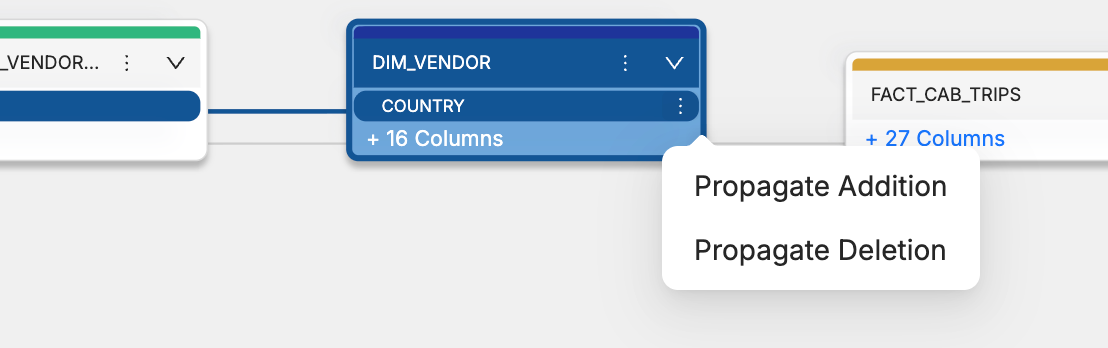
Now lets refine the model by propagating and degenerating the COUNTRY column into the downstream FACT. Click on the Ellipsis next to the COUNTRY column and choose Propagate Addition:
-
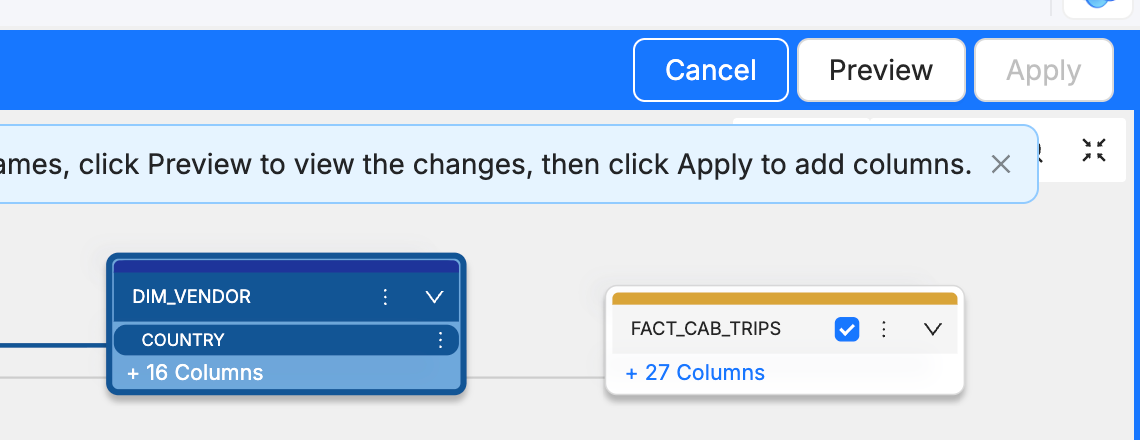
Check the checkbox at the top of the FACT_CAB_TRIPS table to choose to propagate the column into the FACT table, press the Preview and Apply buttons:
-
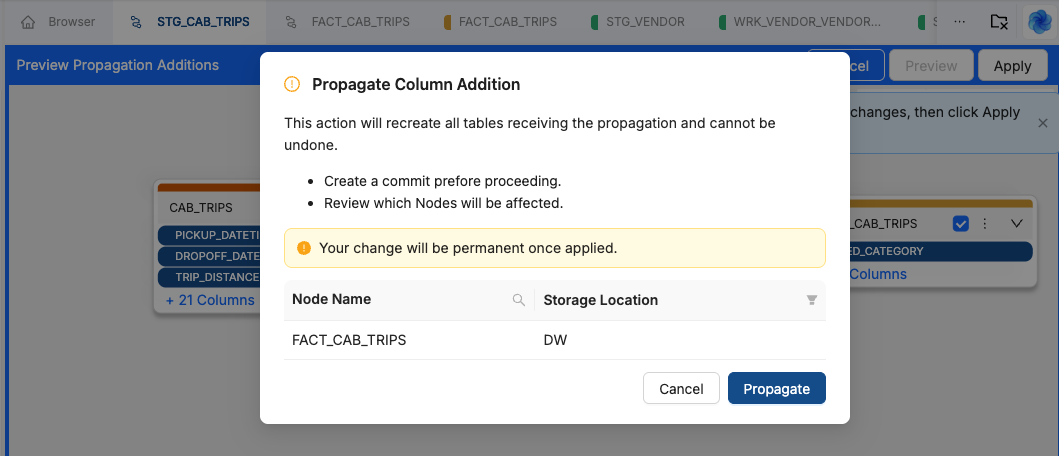
Then press Propagate. This will alter the structure and mapping for the FACT table
-
Finally we should add (AI generated) documentation over the columns in the FACT table. Edit the FACT table, and find the Description column in the table headings:
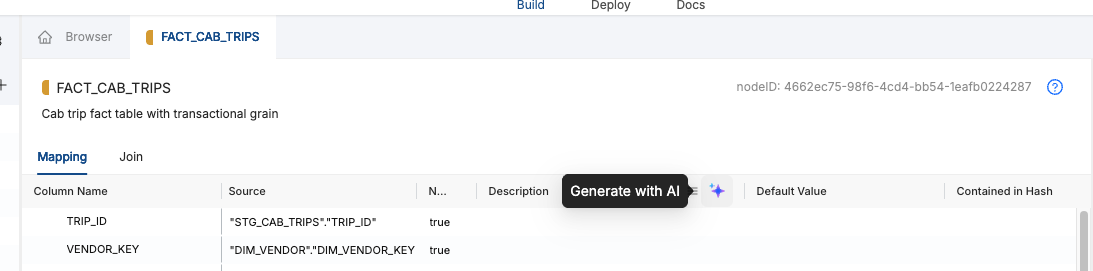
This will use metadata context to generate column descriptions that can be surfaced in Documentation and any tools that point at the database
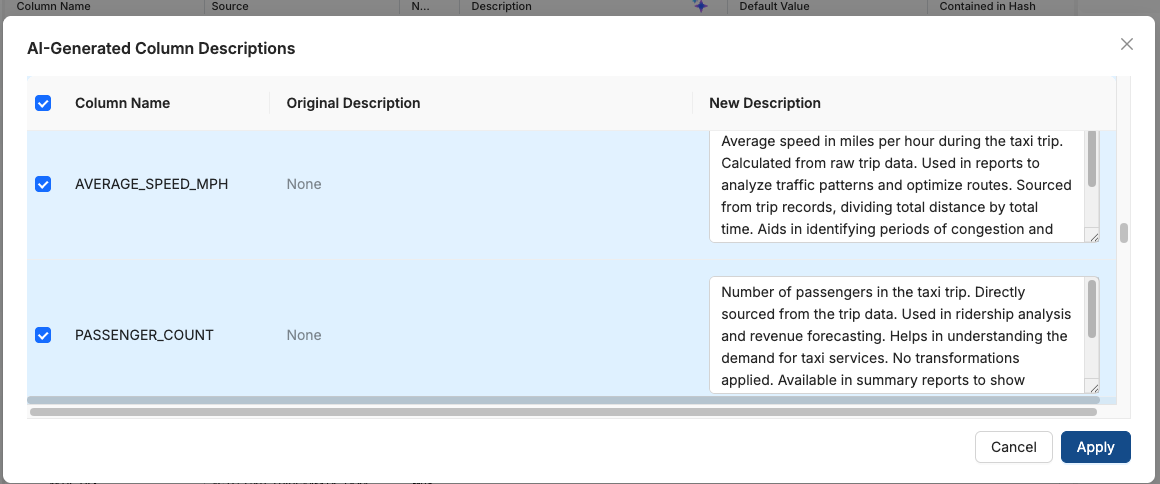
-
Select the header checkbox to select all the descriptions and press Apply:
-
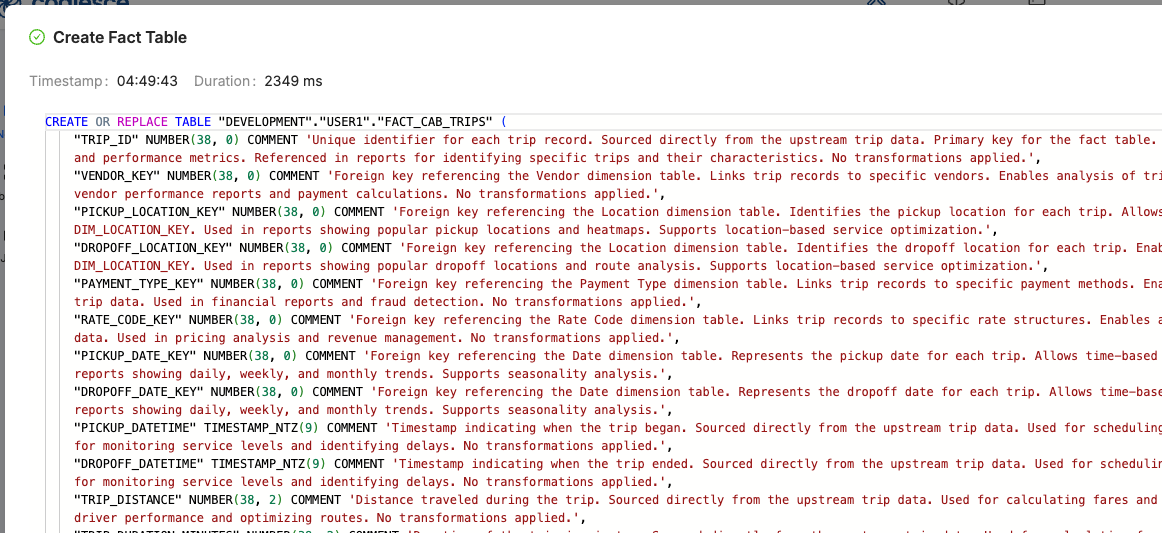
Press the Create button and review the generated DDL – you will see the descriptions are pushed down to Snowflake so that any other data tools can use this documentation.
-
Lets commit your changes to GIT like we did at the end of Chapter 6.
Step 8 (Optional) – Install a Semantic View node type
We can use the Coalesce Node Marketplace to install more node types into your environment. We have over 80 node types that embody Snowflake best practises and standards built in. We are going to install a Semantic view node.
-
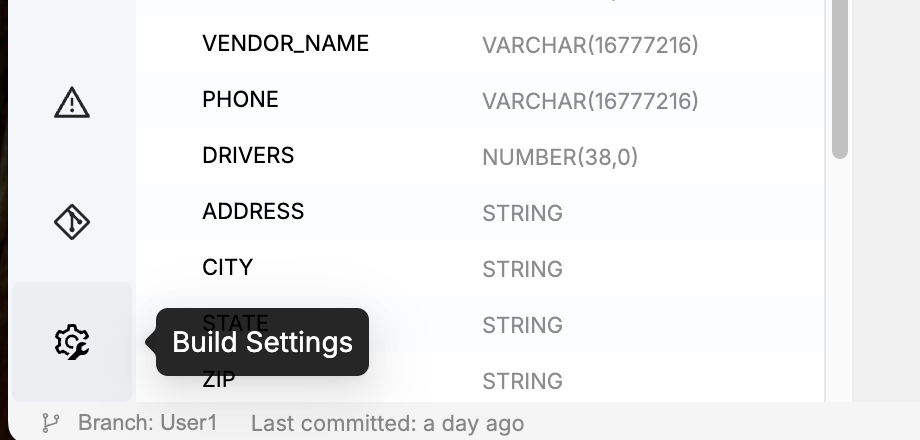
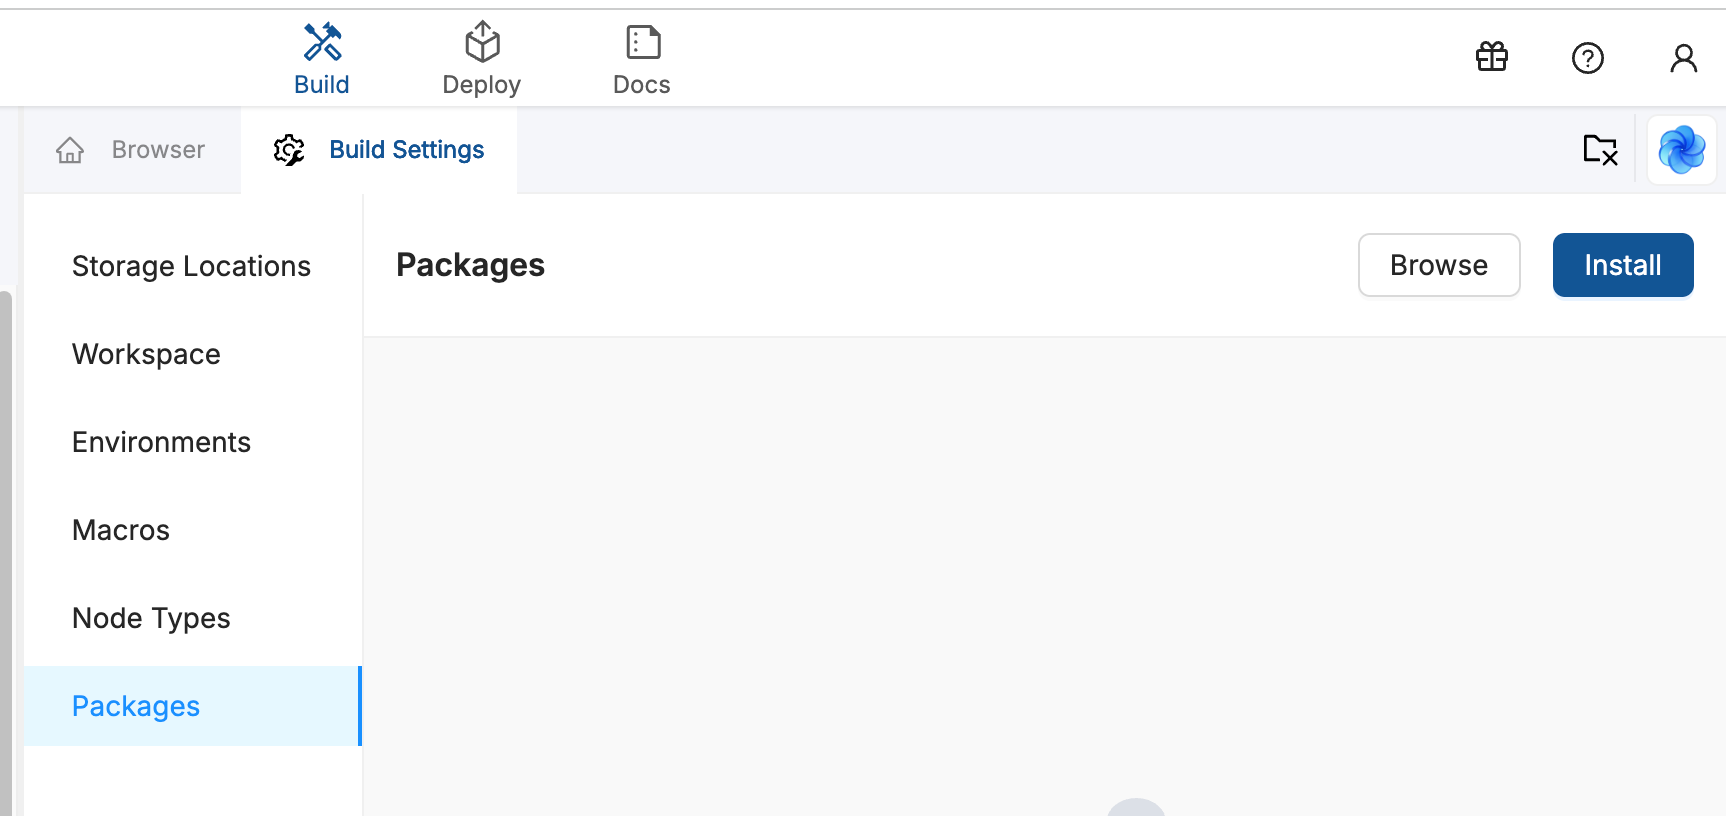
Open the Build Settings at the bottom left of your screen:
-
Select Packages and press the Browse button (in the middle or top right)
-
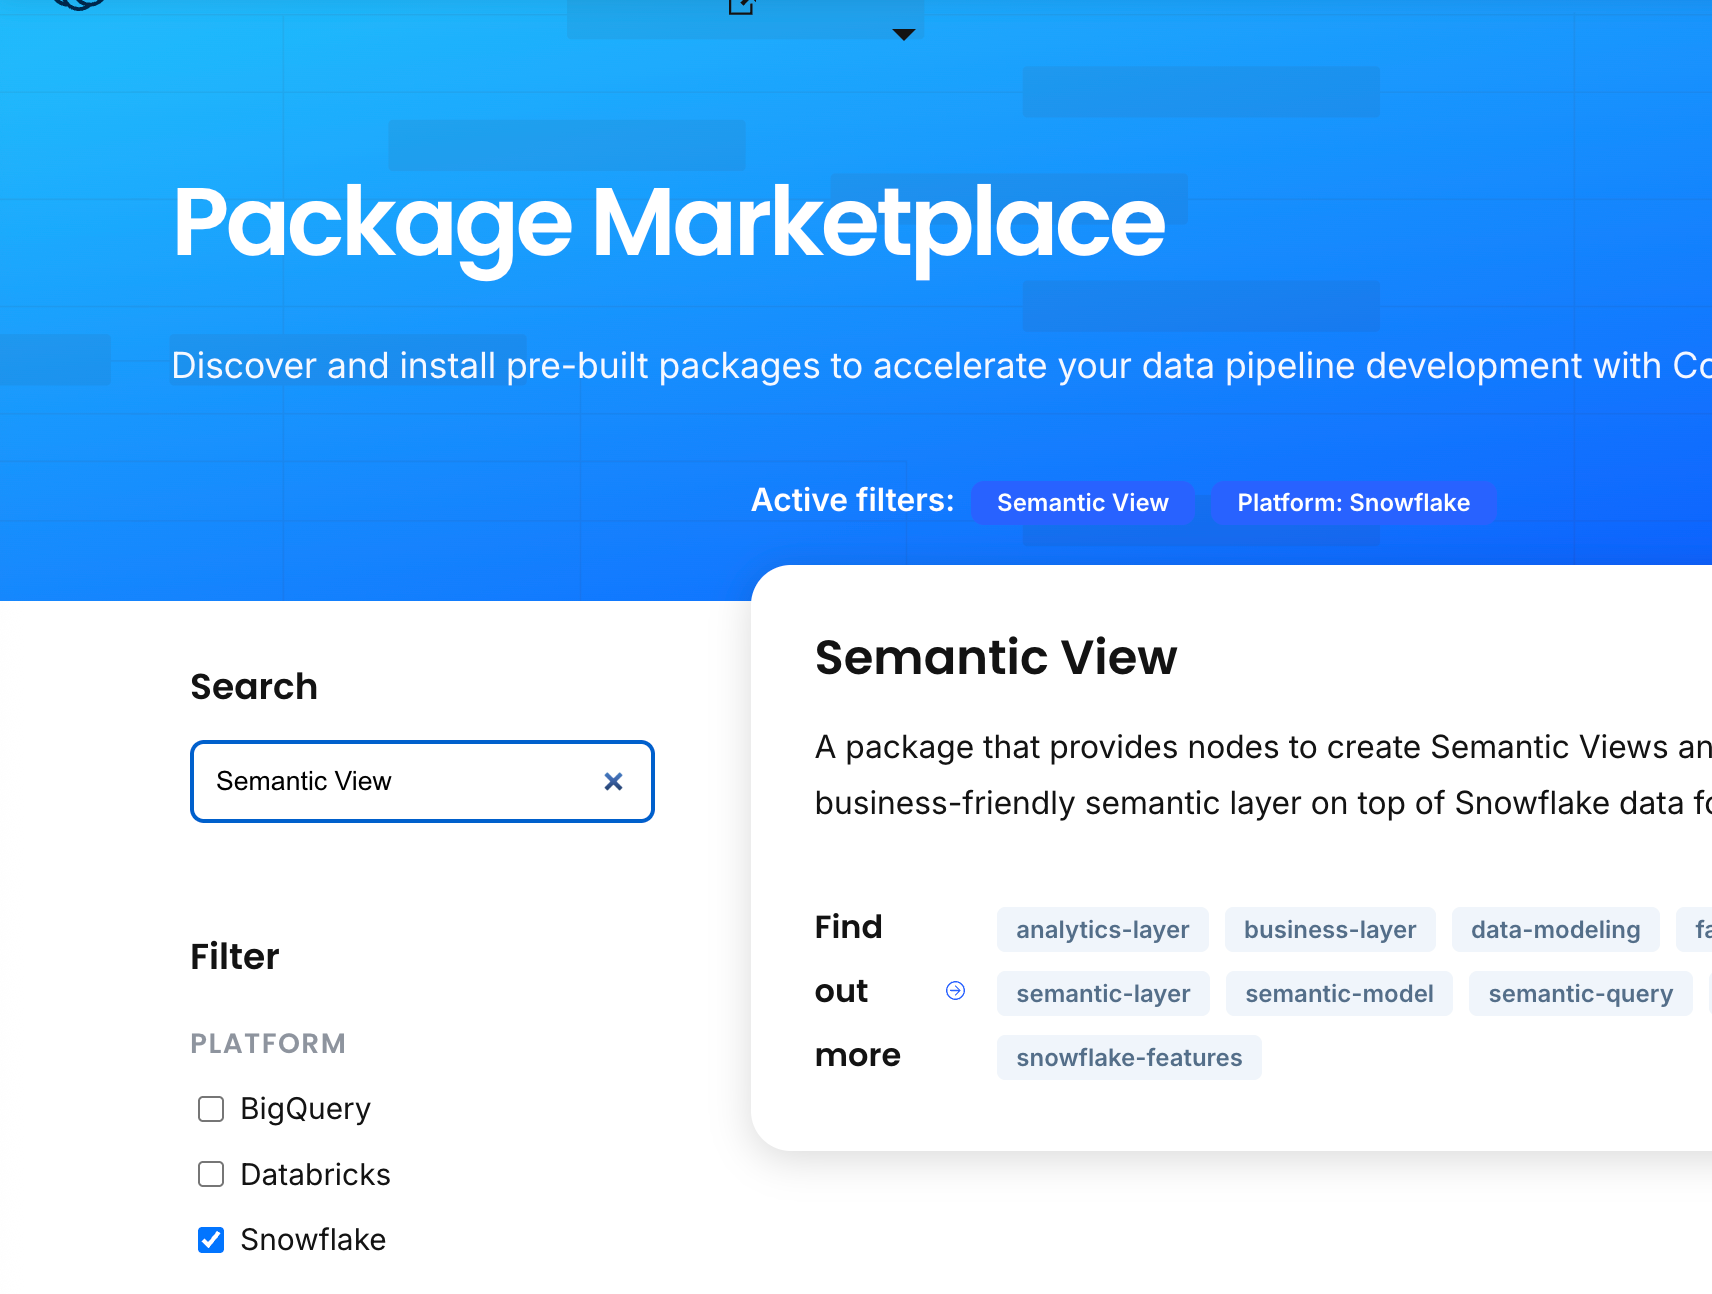
Feel free to scroll through the list of available Node type packages available - these are provided at no charge. In the Search enter Semantic View and click to view the details.
-
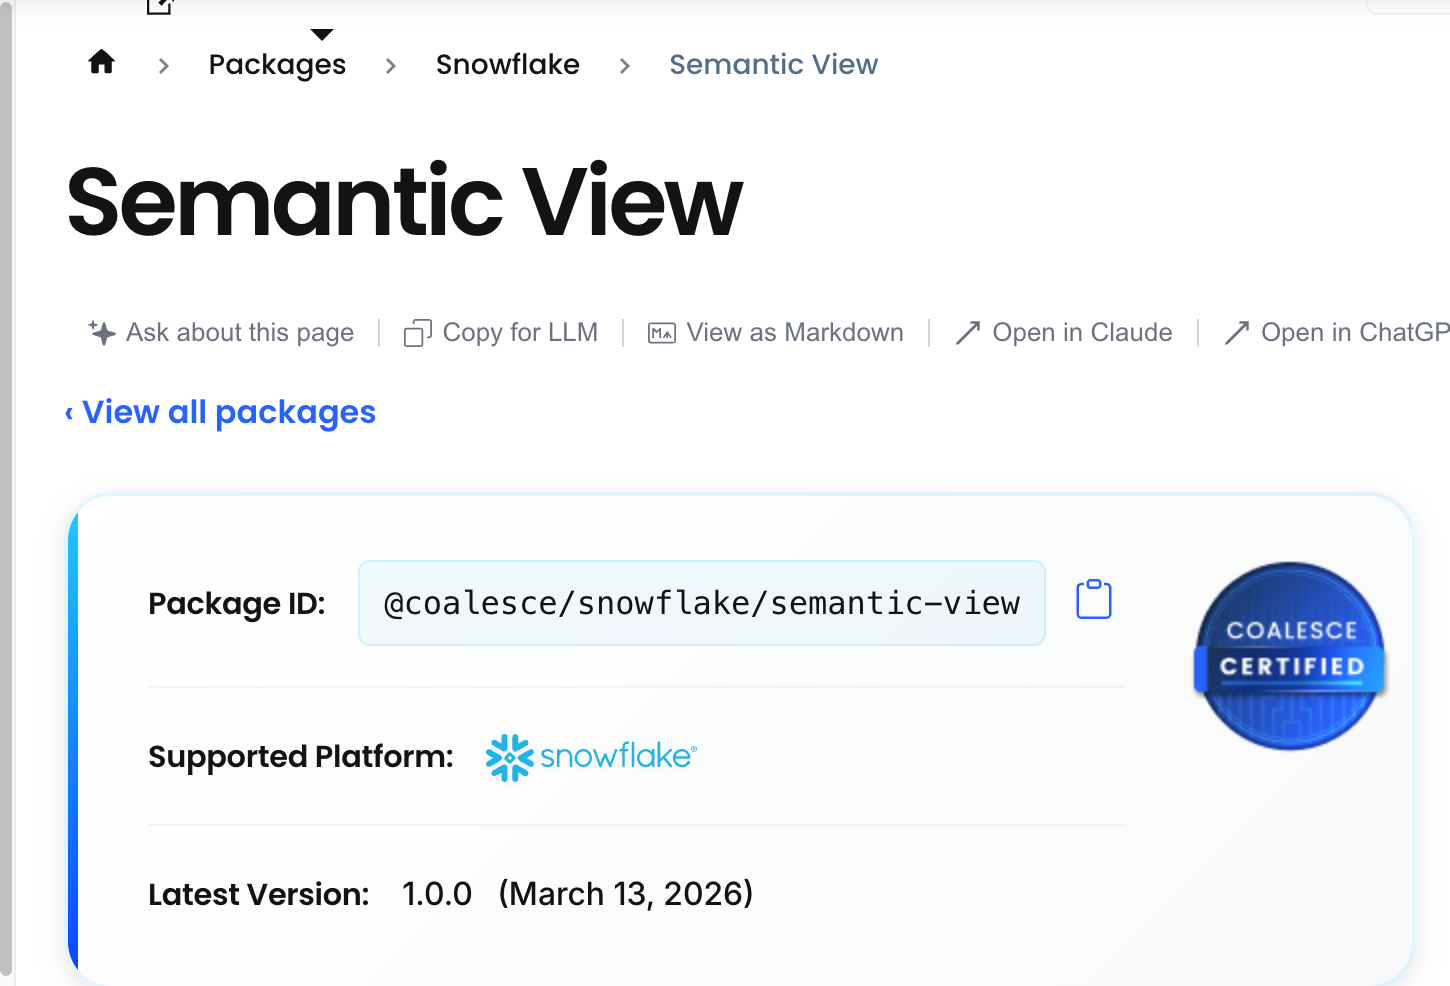
Copy the Package ID:
-
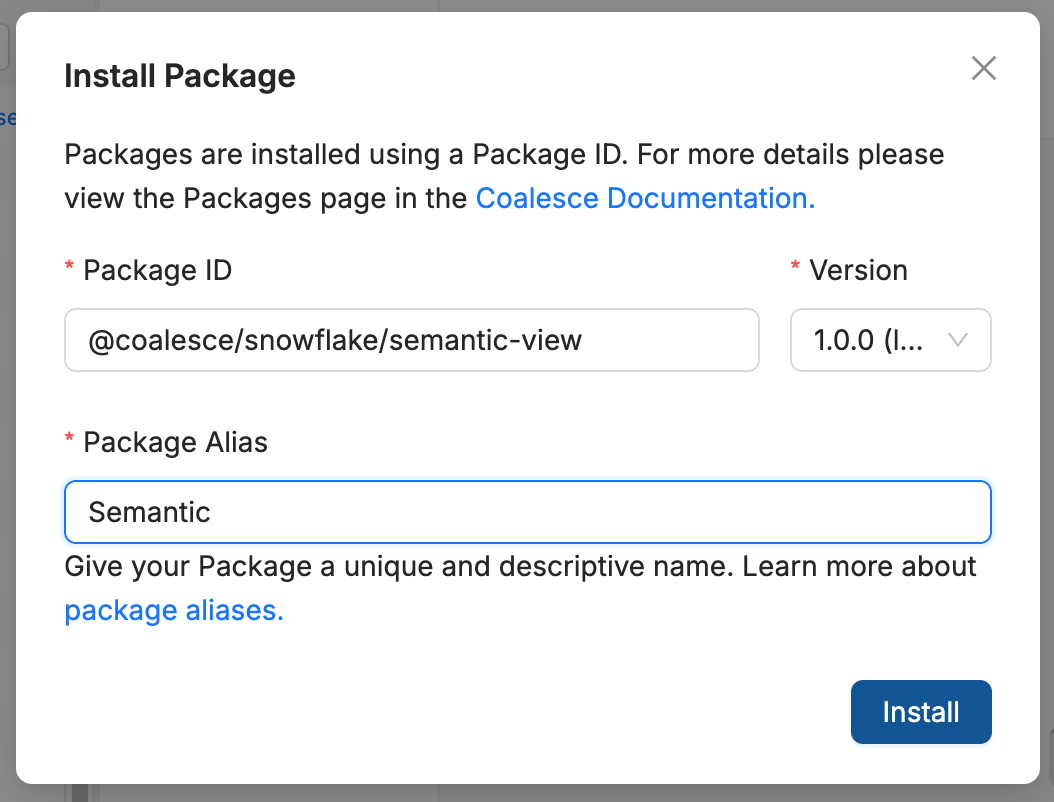
Back in Coalesce / Build Settings, press the Install button and paste in the Package ID. The version should default to the latest. And use Semantic for the Alias, then press Install.:
-
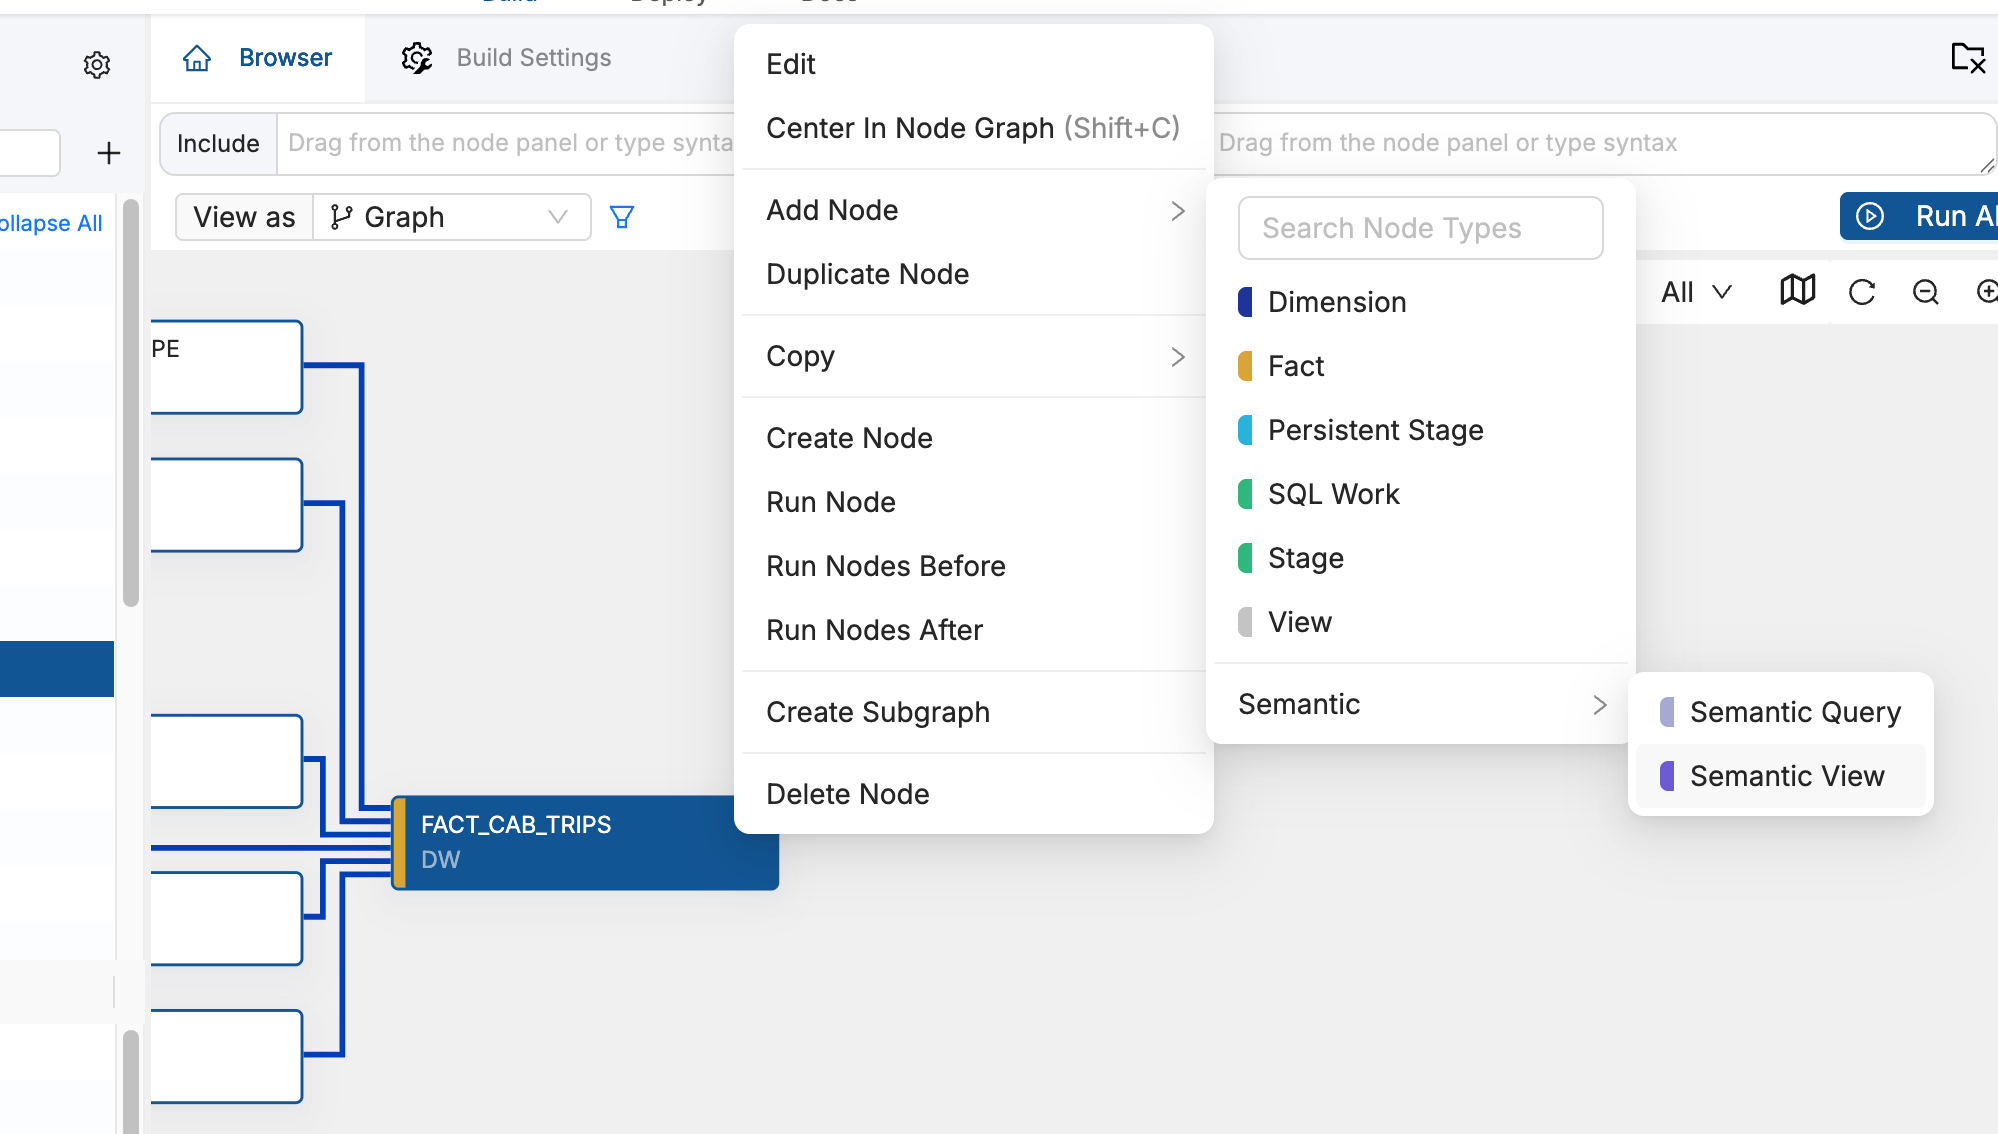
In the Browser - you can now create a node of type Semantic View. Select the FACT_CAB_TRIPS right-click and choose Add Node / Semantic / Semantic View:
-
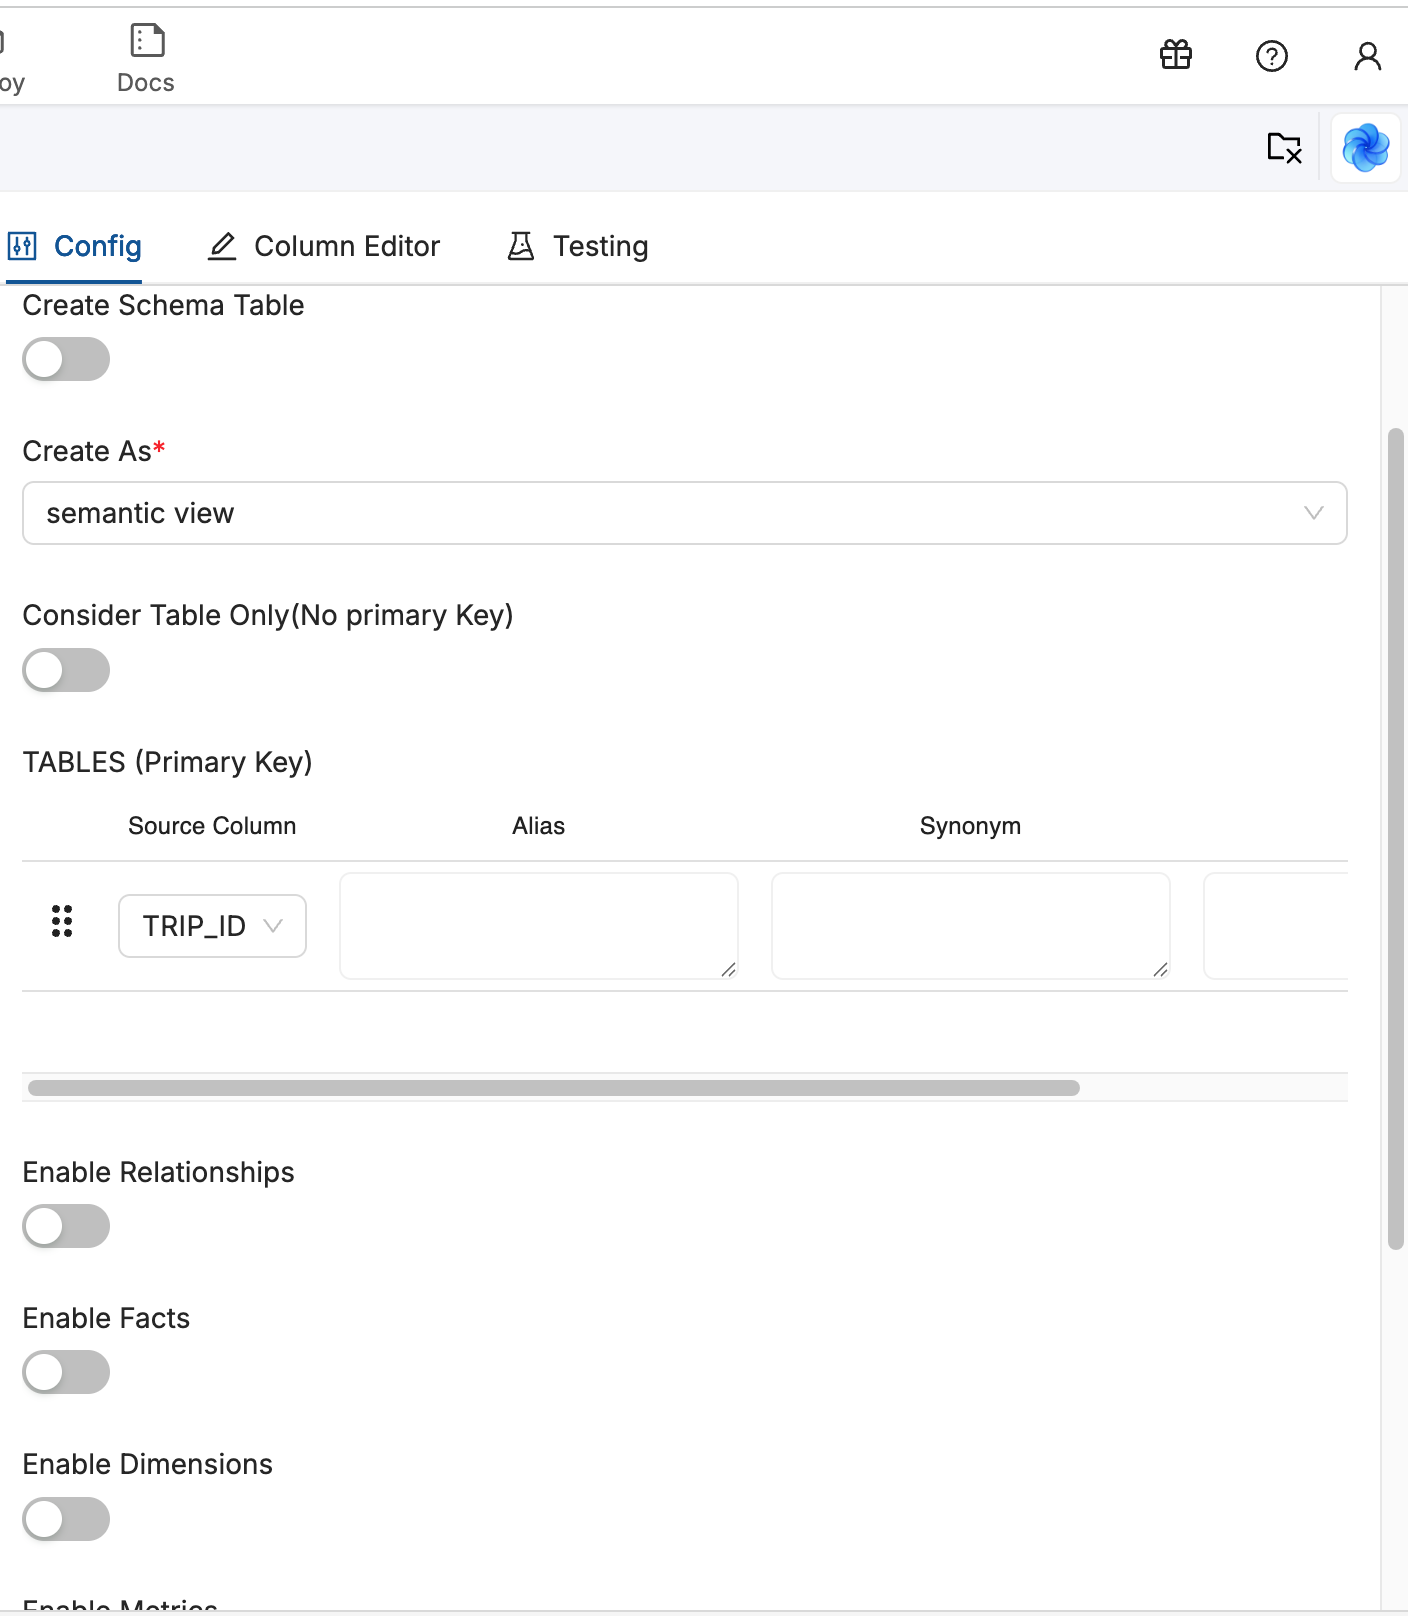
Choose the simplest options to start with:
- Dont Create Schema Table
- For Primary Key choose TRIP_ID
- Dont Enable Relationships
- Dont Enable Facts
- Dont Enable Dimensions
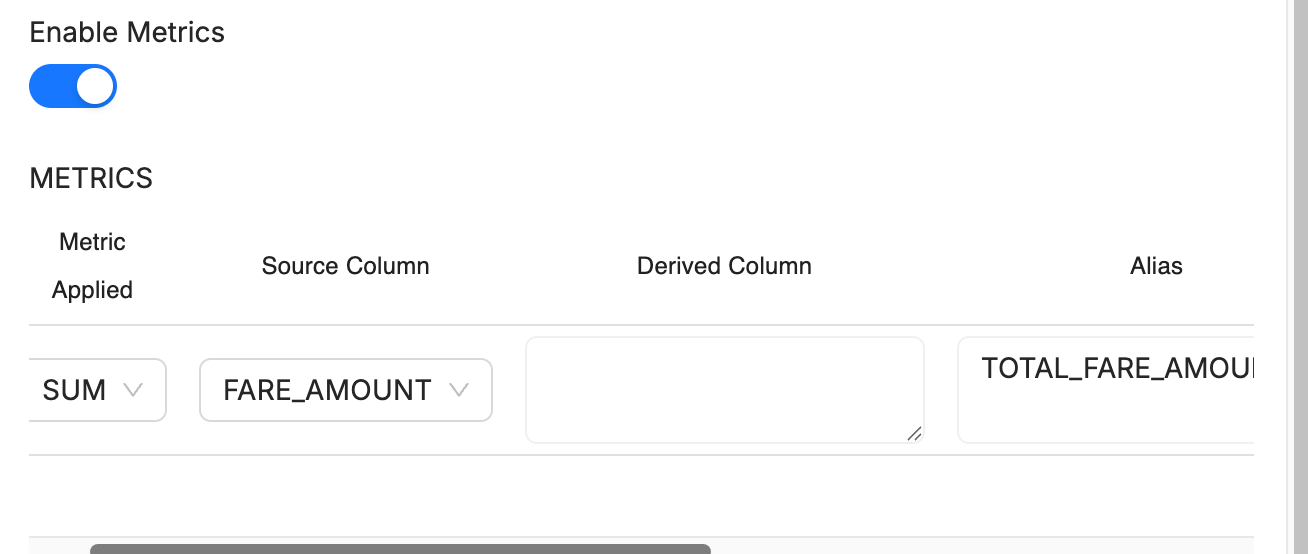
- Enable Metrics:
- Choose to SUM - FARE_AMOUNT with an Alias of TOTAL_FARE_AMOUNT
Feel free to read the documentation to understand the other options. But for now press Create
Conclusion And Resources
Congratulations on completing your lab. You've mastered working with AI, Coalesce Transform and the Coalesce Marketplace. Be sure to reference this exercise if you ever need a refresher.
We encourage you to continue working with Coalesce Transform by using it with your own data and use cases and by using some of the more advanced capabilities not covered in this lab.
What You Learned
-
How to navigate the Coalesce interface
-
How to leverage AI to build repeatable / supportable data pipelines.
-
How to add data sources to your graph
-
How to prepare your data for transformations with Stage nodes
-
How to leverage GIT for Version Control and Branching
-
How to extend the Node Types from the Coalesce Marketplace with other Snowflake objects such as Dynamic tables or Semantic Views
Related Resources
Reach out to our sales team at coalesce.io or by emailing sales@coalesce.io to learn more.
This content is provided as is, and is not maintained on an ongoing basis. It may be out of date with current Snowflake instances
