
Continuous flow, streaming, near real-time and data replication. These are all terms used to identify a business’s need for quick access to data. It’s a common request, especially if the requestor knows that the technology exists to make it happen. Snowflake, the data warehouse built for the cloud, can connect to just about anything in order to load or unload data. When I first started at Snowflake, I immediately thought about Oracle GoldenGate (OGG) as a means for streaming near real-time data from Oracle into Snowflake. There currently is no direct connector built for OGG to Snowflake. But, GoldenGate for Big Data can load files into Amazon S3, and Snowflake’s continuous ingestion service, Snowpipe, can grab those files and suck them into the database. All of this happens within seconds and is what I’ll focus on in this post.
Installing and configuring OGG
Let’s get started. Now, this won’t be a complete tutorial on how to install and configure Oracle GoldenGate. There are plenty of online resources to help you get through that part. I’ll focus on the need to know bits for the configuration and how it all fits together, without diving into all of the gory details.
After installing and configuring Oracle GoldenGate for Oracle (or any other source database, for that matter), we’ll setup an extract process which uses a parameter file called hr.prm. This is setup to extract from a single table, hr.employee.
EXTRACT hr
USERIDALIAS ogg
LOGALLSUPCOLS
UPDATERECORDFORMAT COMPACT

EXTTRAIL /gghome/ogg/dirdat/hr

SOURCECATALOG orcl
TABLE hr.employee;
Next, we need to install and configure Oracle GoldenGate for Big Data. Since both the extract and replicat processes are running on a single VM, they need to be installed in separate directories and must use a unique OGG_HOME environment variable for each. For this example, the extract process is setup under /gghome/ogg and the replicat process at /gghome/oggd.
GoldenGate for Big Data can load data replication transactions into a number of targets, including HDFS, Amazon S3 and others that require a file to be written into some type of directory or object store. The File Writer Handler provides the connection between the GoldenGate trail file, essentially a transaction log in GoldenGate proprietary format, and the target output format, such as CSV, JSON, Parquet, ORC, etc. When loading into a big data target, the setup of the replicat not only requires a replicat parameter file, but also a properties configuration file that provides GoldenGate with the specific handler types and settings necessary to load that target. Within these handler properties, we specify the eventhandler, which lets the process know what type of target location the file will be loaded into. In this case, I’m using the S3 Event Handler, which allows me to specify a S3 bucket and credentials for access using the AWS access key and secret key.
Below is the entire hraws.properties file used in my example. I’ll highlight just a few of the properties that you’ll want to be sure to set properly.
gg.handlerlist=filewriter
gg.handler.filewriter.type=filewriter
gg.handler.filewriter.fileRollInterval=10s
gg.handler.filewriter.fileNameMappingTemplate=${tableName}_${currentTimestamp}.json
gg.handler.filewriter.pathMappingTemplate=ogg-load
gg.handler.filewriter.stateFileDirectory=ogg-load-state
gg.handler.filewriter.format=json
gg.handler.filewriter.finalizeAction=rename
gg.handler.filewriter.fileRenameMappingTemplate=${tableName}_${currentTimestamp}.json
gg.handler.filewriter.eventHandler=s3
goldengate.userexit.writers=javawriter

gg.eventhandler.s3.type=s3
gg.eventhandler.s3.region=us-west-2
gg.eventhandler.s3.bucketMappingTemplate=meroggload
gg.eventhandler.s3.pathMappingTemplate=${tableName}_${currentTimestamp}
gg.classpath=/gghome/oggd/dirprm/:/home/oracle/aws-java-sdk-
1.11.395/lib/aws-java-sdk-1.11.395.jar:/home/oracle/aws-java-sdk-1.11.395/lib/*:/home/oracle/aws-java-sdk-1.11.395/third-
party/lib/*:/u01/userhome/oracle/aws-java-sdk-1.11.395/third-
party/lib/jackson-annotations-2.6.0.jar
gg.log=log4j
gg.log.level=DEBUG
javawriter.bootoptions=-Xmx512m -Xms32m -
Djava.class.path=.:ggjava/ggjava.jar -
Daws.accessKeyId=my_access_key_id -Daws.secretKey=my_secret_key
The first important bit is the file format gg.handler.filewriter.format=json. We’ll load the files as JSON to give me a number of options on how to query the data once it’s loaded into Snowflake.
Within the file writer handler, specify S3 as the event handler. We can then configure the event handler properties, such as the bucketMappingTemplate (bucket name), pathMappingTemplate (file name pattern) and the specific classpath for the required AWS S3 SDK drivers. This is also where the AWS access key and secret key are added to allow GoldenGate to access the S3 bucket. Be sure the user that provides this information has the appropriate permissions in S3, such as the ability to list and create buckets.
There were a couple of gotchas that I ran into during the setup that led me to seek out help from my friend Bobby Curtis, GoldenGate Product Manager and all around great guy. With help from the GoldenGate team (thanks Tom!), I was able to get past a couple of documentation mishaps that had me pulling my hair out.
First, after the file handler properties, this must be added goldengate.userexit.writers=javawriter. According to the OGG product team, “that needs to be there to cross reference the bootoptions and make them visible”. Without this, the javawriter.bootoptions can’t be read by the process. But, even when this was set properly, I continued to have issues. The documentation shows the bootoptions with hard returns after each line.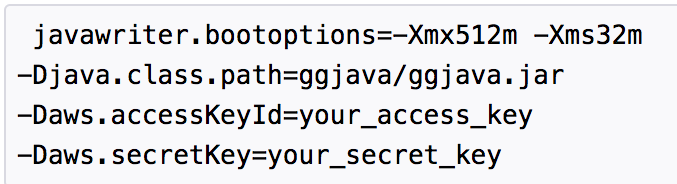
Unfortunately, this doesn’t work. The entire parameter must be on a single line, with only spaces in between. Thanks again to the Oracle GoldenGate product team for the help resolving these issues and keeping my test moving. As of the writing of this post, the documentation still incorrectly shows the javawriter.bootoptions on multiple lines.
After setting up the properties file, we can add the replicat and get everything started on the GoldenGate side.
REPLICAT hraws
SETENV(GGS_JAVAUSEREXIT_CONF = 'dirprm/hraws.properties')
getEnv (JAVA_HOME)
SETENV(LD_LIBRARY_PATH =
'/home/oracle/java/jdk1.8.0_131/jre/lib/amd64/server:/u01/app/oracle/
product/12.2/db_1/lib:/u01/app/oracle/product/12.2/db_1/jdk/jre/lib/
amd64/server/:/gghome/oggd')

TARGETDB LIBFILE libggjava.so SET property=dirprm/hraws.properties

GROUPTRANSOPS 1000
MAP orcl.hr.*, TARGET *.*;
Ingesting streaming data with Snowpipe
Once the files have been loaded into S3, it’s time for Snowpipe to jump into action and ingest the files into a Snowflake database table. There’s a great video that shows the process for Automatically Ingesting Streaming Data with Snowpipe, but we’ll still go through the setup details here.
The first step is to create a stage object in Snowflake that points to the S3 directory where the GoldenGate produced files will land. The stage object allows the Snowflake data ingestion command, COPY INTO, to access data stored in the S3 bucket.
--create external stage. pass in aws key / secret as credentials
create or replace stage public.oggstage
url='s3://meroggload/'
credentials = (AWS_KEY_ID = 'AKEYYOUWILLNOTKNOW'
               AWS_SECRET_KEY = 'THIS34IS8/A8akdjSECRET8/AS8WELL');
We can then create a table that will capture the data loaded via Snowpipe. The table is simple, with a VARIANT data type column to capture the JSON. The VARIANT data type in Snowflake can be queried directly without requiring the data to be loaded into a more relational structure. As a best practice, we will also add a TIMESTAMP column to capture the date and time when the data was micro-batch loaded into the table by Snowpipe.
Finally, we’ll create the PIPE object to copy data into the Snowflake table from the stage location. Here we could perform minor data transformations or data quality checks, or even flatten the JSON into a relational structure, if needed. Setting the option auto_ingest=true will allow Snowpipe to listen for event notifications from AWS Simple Queue Service (SQS), kicking off the ingest process each time an event is detected.
--create table with variant column to store JSON and timestamp
--to track each micro batch load.
create or replace table public.oggtarget
(
    oggdata variant,
    batch_ts timestamp_ltz(9)

);

--create snowpipe, loading table from stage with auto ingest.
create or replace pipe public.snowpipe auto_ingest=true as
    copy into public.oggtarget

    from (select x.*, current_timestamp()
          from @public.oggstage x)
    file_format = (type = 'JSON');
Setting up SQS notifications
To setup the SQS notifications, we first need to capture the AWS Amazon Resource Name (ARN) value from the notification_channel column in the stage metadata. This value identifies the S3 bucket, essentially linking the Snowflake stage object to the bucket. Run the show stages; command in Snowflake to find this value.
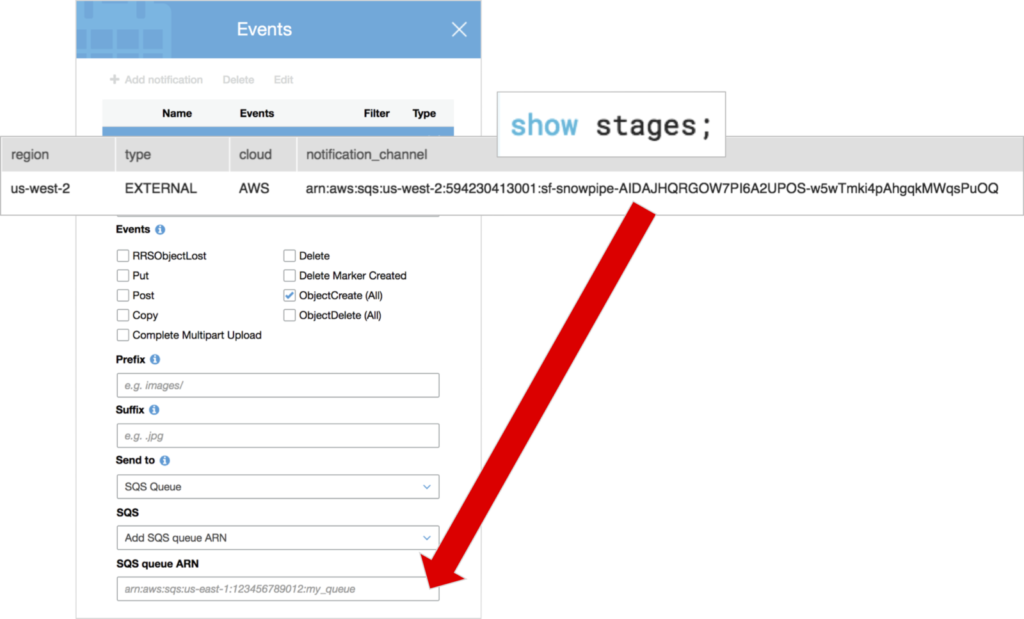
Over in the S3 bucket, click on Properties, then Events. Add a new event notification, check the ObjectCreate (All) button to capture the event for all new objects added to the bucket, and enter the ARN value from the Snowflake stage metadata. Now we’re ready to start GoldenGate extract and replicat and begin the continuous load of data into Snowflake.
As transactions are captured on the source Oracle database, GoldenGate extracts them to the source trail file, then the replicat picks those transactions up and shoots them over to S3 in JSON format. Finally, the SQS event notification triggers Snowpipe to copy the new JSON files into the Snowflake table. All of this occurs within a matter of seconds, ensuring a continuous replication of data transactions from Oracle to Snowflake.
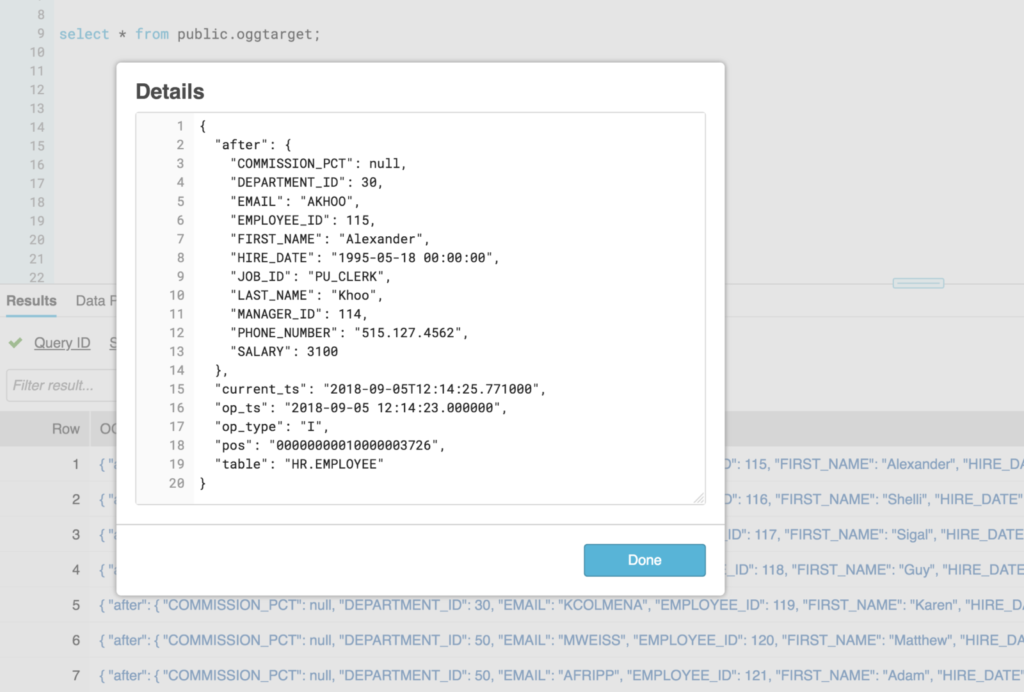
Based on how I have setup the PIPE object, each transaction is loaded into the Snowflake VARIANT column as JSON, capturing the source transaction data, operation (insert, update, delete), transaction timestamp, transaction position, and other metadata. The GoldenGate for Big Data output to S3 in JSON is similar to using the INSERTALLRECORDS parameter when replicating to an Oracle target, essentially inserting all transactions as they occurred and keeping a transaction log, if you will.
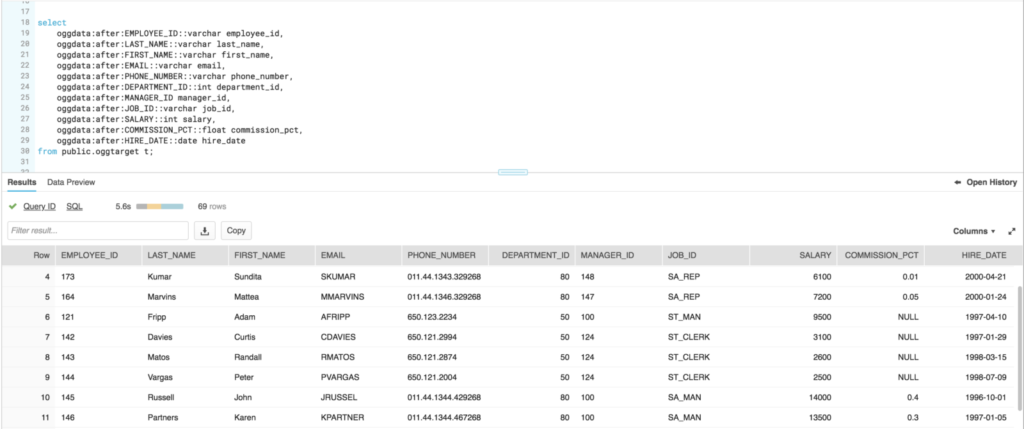
Now that the data is in Snowflake, we can work with the transactional nature of the data as needed using an incremental update process. We’ll save the details on this one for another post. However, the great thing about the VARIANT data type in Snowflake is the ability to query the data directly from the semi-structured format without any transformations. Using the JSON structure as a path to the column, it’s easy to flatten the data into a tabular format. The column data type can even be cast to ensure the data format is correct on output.
Data Replication Conclusion
There are many different use cases for this type of continuous load of data into Snowflake, including storing all transactional history in a data lake, loading the source for a dimensional model in the data warehouse, or even replicating data to keep it in-sync during migration to Snowflake. All of these scenarios can take advantage of a data replication technology such as Oracle GoldenGate. I hope to preview a few more of these types of tools in the future — such as HVR, DBVisit, Attunity, and more. Up next, we’ll have a look at how to make use of the data loaded as JSON into Snowflake tables.