
In the third part of this series, we learned how to connect Sagemaker to Snowflake using the Python connector. In this fourth and final post, we’ll cover how to connect Sagemaker to Snowflake with the Spark connector. If you haven’t already downloaded the Jupyter Notebooks, you can find them here.
You can review the entire blog series here: Part One > Part Two > Part Three > Part Four.
Spark Connector – local Spark
We’ll start with building a notebook that uses a local Spark instance. The Snowflake jdbc driver and the Spark connector must both be installed on your local machine. Installation of the drivers happens automatically in the Jupyter Notebook, so there’s no need for you to manually download the files. However, as a reference, the drivers can be can be downloaded here.
First, let’s review the installation process. The step outlined below handles downloading all of the necessary files plus the installation and configuration. You can initiate this step by performing the following actions:
- Create a directory for the snowflake jar files
- Define the drivers to be downloaded
- Identify the latest version of the driver
- Download the driver
%bash
SFC_DIR=/home/ec2-user/snowflake
[ ! -d "$SFC_DIR" ] && mkdir $SFC_DIR
cd $SFC_DIR
PRODUCTS='snowflake-jdbc spark-snowflake_2.11'
for PRODUCT in $PRODUCTS
do
   wget "https://repo1.maven.org/maven2/net/snowflake/$PRODUCT/maven-metadata.xml" 2> /dev/null
   VERSION=$(grep latest maven-metadata.xml | awk -F">" '{ print $2 }' | awk -F"<" '{ print $1 }')
   DRIVER=$PRODUCT-$VERSION.jar
   if [[ ! -e $DRIVER ]]
   then
      rm $PRODUCT* 2>/dev/null
      wget "https://repo1.maven.org/maven2/net/snowflake/$PRODUCT/$VERSION/$DRIVER" 2> /dev/null
   fi
   [ -e maven-metadata.xml ] && rm maven-metadata.xml
done
After both jdbc drivers are installed, you’re ready to create the SparkContext. But first, let’s review how the step below accomplishes this task.
To successfully build the SparkContext, you must add the newly installed libraries to the CLASSPATH. You can start by running a shell command to list the content of the installation directory, as well as for adding the result to the CLASSPATH. With the Spark configuration pointing to all of the required libraries, you’re now ready to build both the Spark and SQL context.
from pyspark import SparkContext, SparkConf
from pyspark.sql import SQLContext,SparkSession
from pyspark.sql.types import *
from sagemaker_pyspark import IAMRole, classpath_jars
from sagemaker_pyspark.algorithms import KMeansSageMakerEstimator

sfc_jars=!ls -d /home/ec2-user/snowflake/*.jar

conf = (SparkConf()
        .set("spark.driver.extraClassPath", (":".join(classpath_jars())+":"+":".join(sfc_jars)))
        .setMaster('local')
        .setAppName('local-spark-test'))
sc=SparkContext(conf=conf)

spark = SQLContext(sc)
sc

With the SparkContext now created, you’re ready to load your credentials. You can complete this step following the same instructions covered in part three of this series.
import boto3

params=['/SNOWFLAKE/URL','/SNOWFLAKE/ACCOUNT_ID'
        ,'/SNOWFLAKE/USER_ID','/SNOWFLAKE/PASSWORD'
        ,'/SNOWFLAKE/DATABASE','/SNOWFLAKE/SCHEMA'
        ,'/SNOWFLAKE/WAREHOUSE','/SNOWFLAKE/BUCKET'
        ,'/SNOWFLAKE/PREFIX']

region='us-east-1'

def get_credentials(params):
   ssm = boto3.client('ssm',region)
   response = ssm.get_parameters(
      Names=params,
      WithDecryption=True
   )
   #Build dict of credentials
   param_values={k['Name']:k['Value'] for k in  response['Parameters']}
   return param_values

param_values=get_credentials(params)
After the SparkContext is up and running, you’re ready to begin reading data from Snowflake through the spark.read method. For this example, we’ll be reading 50 million rows.
sfOptions = {
  "sfURL" : param_values['/SNOWFLAKE/URL'],
  "sfAccount" : param_values['/SNOWFLAKE/ACCOUNT_ID'],
  "sfUser" : param_values['/SNOWFLAKE/USER_ID'],
  "sfPassword" : param_values['/SNOWFLAKE/PASSWORD'],
  "sfDatabase" : param_values['/SNOWFLAKE/DATABASE'],
  "sfSchema" : param_values['/SNOWFLAKE/SCHEMA'],
  "sfWarehouse" : param_values['/SNOWFLAKE/WAREHOUSE'],
}

SNOWFLAKE_SOURCE_NAME = "net.snowflake.spark.snowflake"

df = spark.read.format(SNOWFLAKE_SOURCE_NAME)
  .options(**sfOptions)
  .option("query",
"select (V:main.temp_max - 273.15) * 1.8000 + 32.00 as temp_max_far, " +
"       (V:main.temp_min - 273.15) * 1.8000 + 32.00 as temp_min_far, " +
"       cast(V:time as timestamp) time, " +
"       V:city.coord.lat lat, " +
"       V:city.coord.lon lon " +
"from snowflake_sample_data.weather.weather_14_total limit 5000000").load()
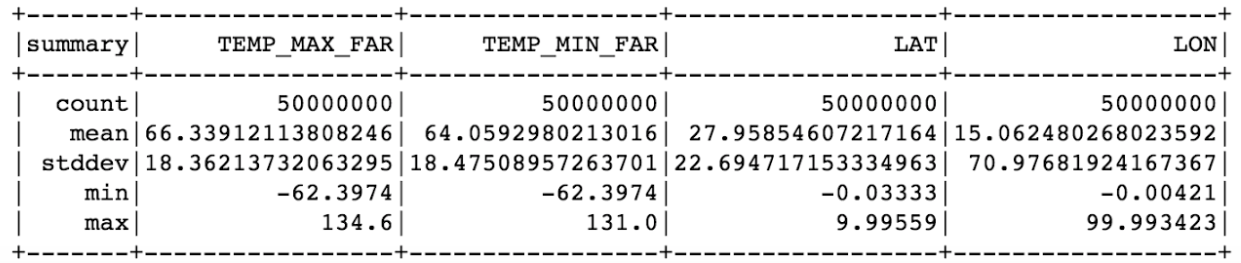
Here, you’ll see that I’m running a Spark instance on a single machine (i.e., the notebook instance server). On my notebook instance, it took about 2 minutes to first read 50 million rows from Snowflake and compute the statistical information.
Reading the full dataset (225 million rows) can render the notebook instance unresponsive. This is likely due to running out of memory. To mitigate this issue, you can either build a bigger notebook instance by choosing a different instance type or by running Spark on an EMR cluster. The first option is usually referred to as scaling up, while the latter is called scaling out. Scaling out is more complex, but it also provides you with more flexibility. As such, we’ll review how to run the notebook instance against a Spark cluster.
Using the Spark Connector to create an EMR cluster
Harnessing the power of Spark requires connecting to a Spark cluster rather than a local Spark instance. Building a Spark cluster that is accessible by the Sagemaker Jupyter Notebook requires the following steps:
- The Sagemaker server needs to be built in a VPC and therefore within a subnet
- Build a new security group to allow incoming requests from the Sagemaker subnet via Port 8998 (Livy API) and SSH (Port 22) from you own machine (Note: This is for test purposes)
- Advanced Options
- Use the Advanced options link to configure all of necessary options
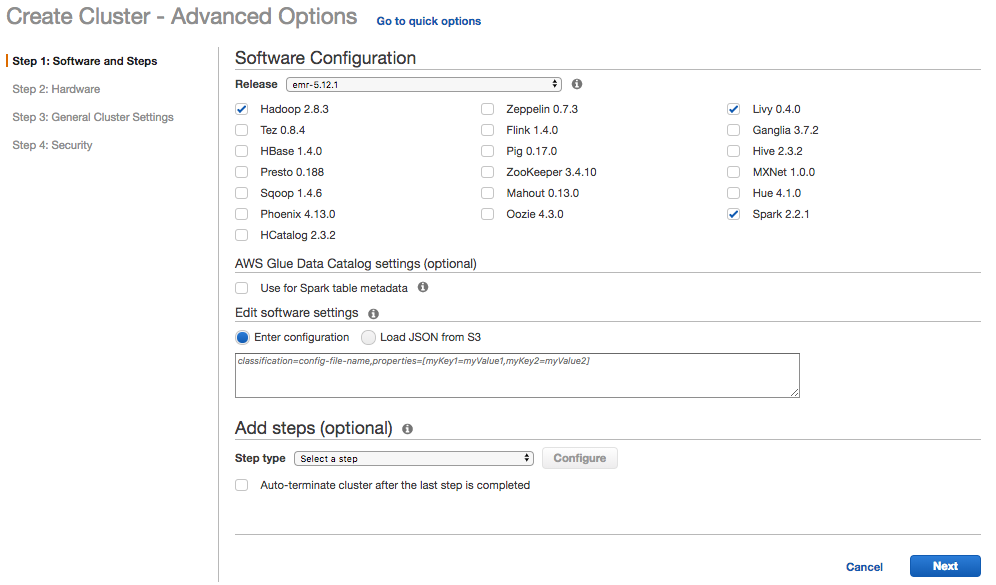
- Software and Steps
- Pick Hadoop and Spark
- Optionally, you can select Zeppelin and Ganglia
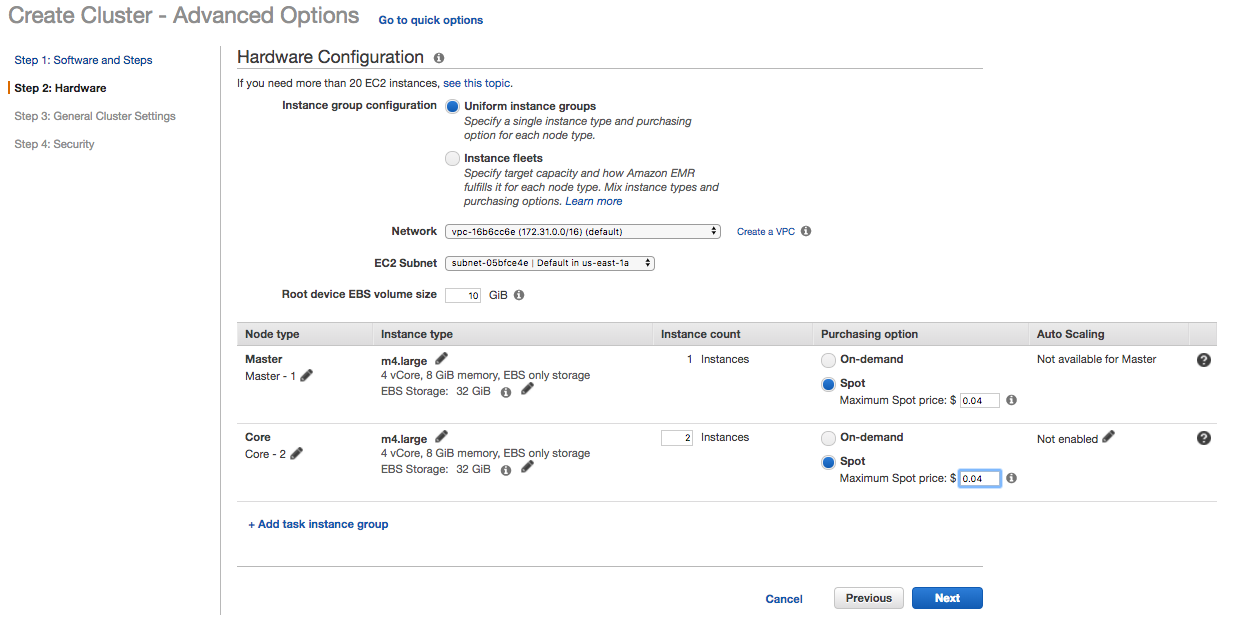
- Hardware
- Validate the VPC (Network). Note: The Sagemaker host needs to be created in the same VPC as the EMR cluster
- Optionally, you can also change the instance types and indicate whether or not to use spot pricing
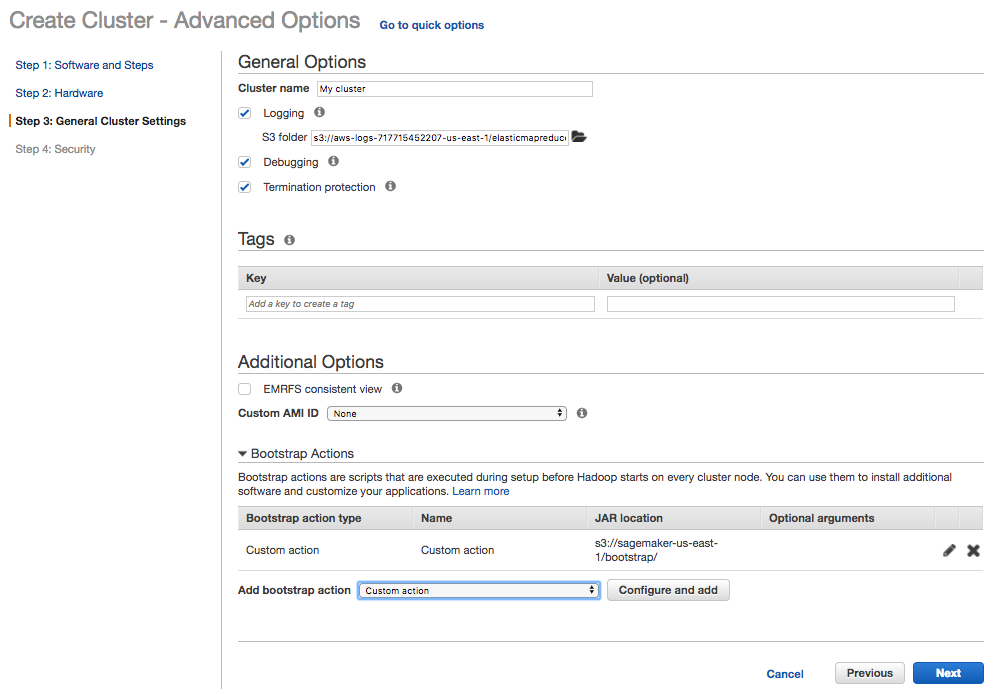
- General Cluster Settings
- Set the cluster name
- Keep Logging for troubleshooting problems
- Security
- Pick an EC2 key pair (create one if you don’t have one already). Without the key pair, you won’t be able to access the master node via ssh to finalize the setup.
- Create and additional security group to enable access via SSH and Livy
- On the EMR master node, install pip packages sagemaker_pyspark, boto3 and sagemaker for python 2.7 and 3.4
- Install the Snowflake Spark & JDBC driver
- Update Driver & Executor extra Class Path to include Snowflake driver jar files
Let’s walk through this next process step-by-step. In the AWS console, find the EMR service, click “Create Cluster” then click “Advanced Options”
Creating a Spark cluster is a four-step process. Step one requires selecting the software configuration for your EMR cluster. (Note: Uncheck all other packages, then check Hadoop, Livy, and Spark only).
Step two specifies the hardware (i.e., the types of virtual machines you want to provision). For a test EMR cluster, I usually select spot pricing. As of the writing of this post, an on-demand M4.LARGE EC2 instance costs $0.10 per hour. I can typically get the same machine for $0.04, which includes a 32 GB SSD drive.
Step three defines the general cluster settings. Be sure to check “Logging” so you can troubleshoot if your Spark cluster doesn’t start. Next, configure a custom bootstrap action (You can download the file here).
The script performs the following steps:
- Installation of the python packages sagemaker_pyspark, boto3, and sagemaker for python 2.7 and 3.4
- Installation of the Snowflake JDBC and Spark drivers. As of writing this post, the newest versions are 3.5.3 (jdbc) and 2.3.1 (spark 2.11)
- Creation of a script to update the extraClassPath for the properties spark.driver and spark.executor
- Creation of a start a script to call the script listed above
Step D may not look familiar to some of you; however, it’s necessary because when AWS creates the EMR servers, it also starts the bootstrap action. At this stage, the Spark configuration files aren’t yet installed; therefore the extra CLASSPATH properties can’t be updated. Step D starts a script that will wait until the EMR build is complete, then run the script necessary for updating the configuration.
The last step required for creating the Spark cluster focuses on security.
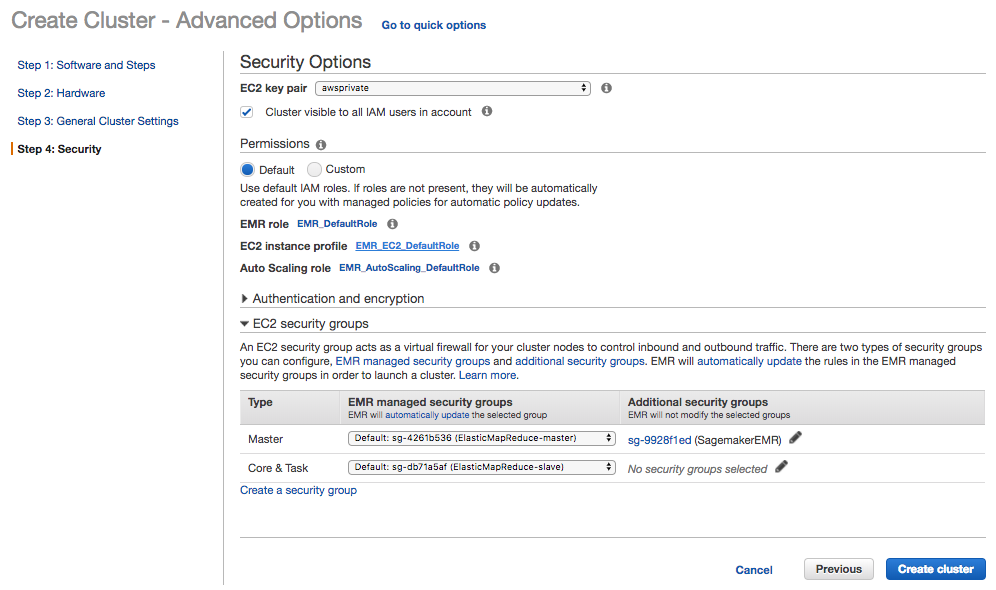
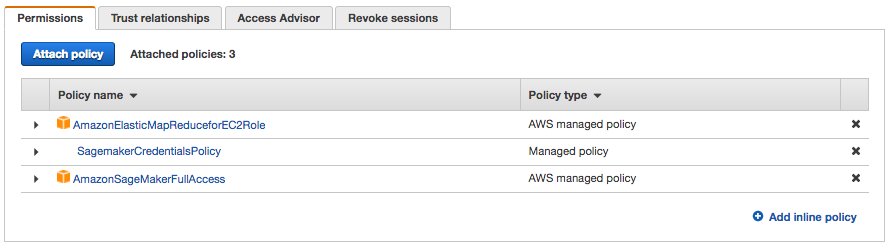
To enable the permissions necessary to decrypt the credentials configured in the Jupyter Notebook, you must first grant the EMR nodes access to the Systems Manager. In part 3 of this blog series, decryption of the credentials was managed by a process running with your account context, whereas here, in part 4, decryption is managed by a process running under the EMR context. As such, the EMR process context needs the same system manager permissions granted by the policy created in part 3, which is the SagemakerCredentialsPolicy.
Next, click on “EMR_EC2_DefaultRole” and “Attach policy,” then, find the SagemakerCredentialsPolicy.
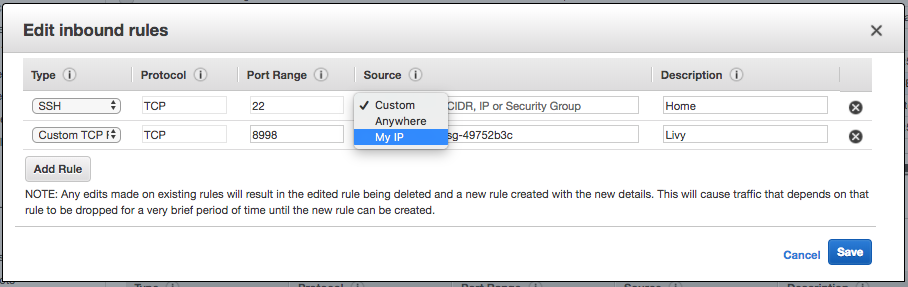
At this stage, you must grant the Sagemaker Notebook instance permissions so it can communicate with the EMR cluster. Start by creating a new security group. (I named mine SagemakerEMR). Within the SagemakerEMR security group, you also need to create two inbound rules.
The first rule (SSH) enables you to establish a SSH session from the client machine (e.g. your laptop) to the EMR master. While this step isn’t necessary, it makes troubleshooting much easier.
The second rule (Custom TCP) is for port 8998, which is the Livy API. This rule enables the Sagemaker Notebook instance to communicate with the EMR cluster through the Livy API. The easiest way to accomplish this is to create the Sagemaker Notebook instance in the default VPC, then select the default VPC security group as a source for inbound traffic through port 8998.
After you’ve created the new security group, select it as an “Additional Security Group” for the EMR Master.
Next, click “Create Cluster” to launch the roughly 10-minute process. When the cluster is ready, it will display as “waiting.”
You now have your EMR cluster. Now, you need to find the local IP for the EMR Master node because the EMR master node hosts the Livy API, which is, in turn, used by the Sagemaker Notebook instance to communicate with the Spark cluster. To find the local API, select your cluster, the hardware tab and your EMR Master. Next, scroll down to the find the private IP and make note of it as you will need it for the Sagemaker configuration.
Build the Sagemaker Notebook instance
To utilize the EMR cluster, you first need to create a new Sagemaker Notebook instance in a VPC. To minimize the inter-AZ network, I usually co-locate the notebook instance on the same subnet I use for the EMR cluster. Finally, choose the VPCs default security group as the security group for the Sagemaker Notebook instance (Note: For security reasons, direct internet access should be disabled).
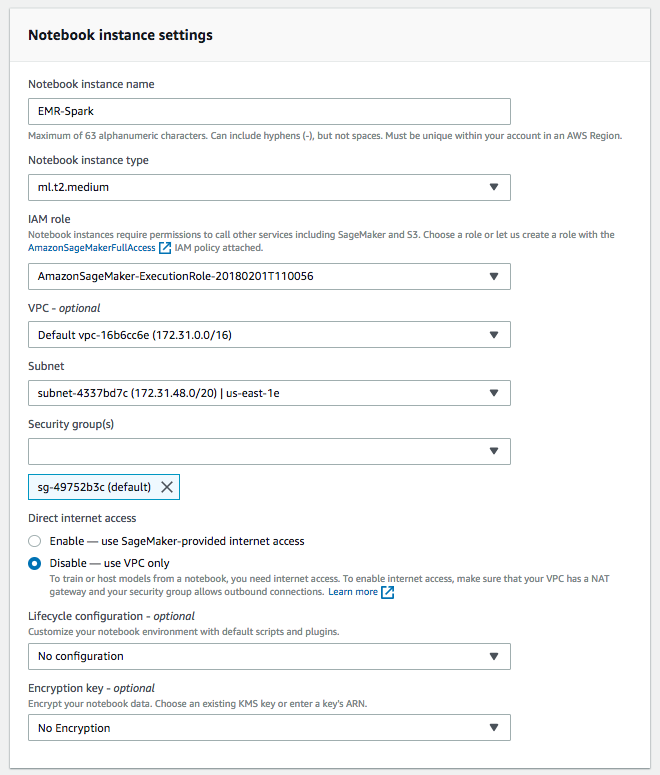
When the build process for the Sagemaker Notebook instance is complete, download the Jupyter Spark-EMR-Snowflake Notebook to your local machine, then upload it to your Sagemaker Notebook instance.
Next, review the first task in the Sagemaker Notebook and update the environment variable EMR_MASTER_INTERNAL_IP with the internal IP from the EMR cluster and run the step (Note: In the example above, it appears as ip-172-31-61-244.ec2.internal).
If the Sparkmagic configuration file doesn’t exist, this step will automatically download the Sparkmagic configuration file, then update it so that it points to the EMR cluster rather than the localhost. To affect the change, restart the kernel.
%bash
EMR_MASTER_INTERNAL_IP=ip-172-31-58-190.ec2.internal
CONF=/home/ec2-user/.sparkmagic/config.json
if [[ ! -e $CONF.bk ]]
then
   wget "https://raw.githubusercontent.com/jupyter-incubator/sparkmagic/master/sparkmagic/example_config.json"
-P /home/ec2-user/.sparkmagic -O /home/ec2-user/.sparkmagic/config.json.bk 2>/dev/null
fi
cat $CONF.bk | sed "s/localhost/$EMR_MASTER_INTERNAL_IP/" > $CONF.new
if [[ $(diff $CONF.new $CONF) ]]
then
   echo "Configuration has changed; Restart Kernel"
fi
cp $CONF.new $CONF
After restarting the kernel, the following step checks the configuration to ensure that it is pointing to the correct EMR master. If it is correct, the process moves on without updating the configuration.
Upon running the first step on the Spark cluster, the Pyspark kernel automatically starts a SparkContext.
import boto3

params=['/SNOWFLAKE/URL','/SNOWFLAKE/ACCOUNT_ID'
        ,'/SNOWFLAKE/USER_ID','/SNOWFLAKE/PASSWORD'
        ,'/SNOWFLAKE/DATABASE','/SNOWFLAKE/SCHEMA'
        ,'/SNOWFLAKE/WAREHOUSE','/SNOWFLAKE/BUCKET'
        ,'/SNOWFLAKE/PREFIX']

region='us-east-1'

def get_credentials(params):
   ssm = boto3.client('ssm',region)
   response = ssm.get_parameters(
      Names=params,
      WithDecryption=True
   )
   #Build dict of credentials
   param_values={k['Name']:k['Value'] for k in  response['Parameters']}
   return param_values

param_values=get_credentials(params)

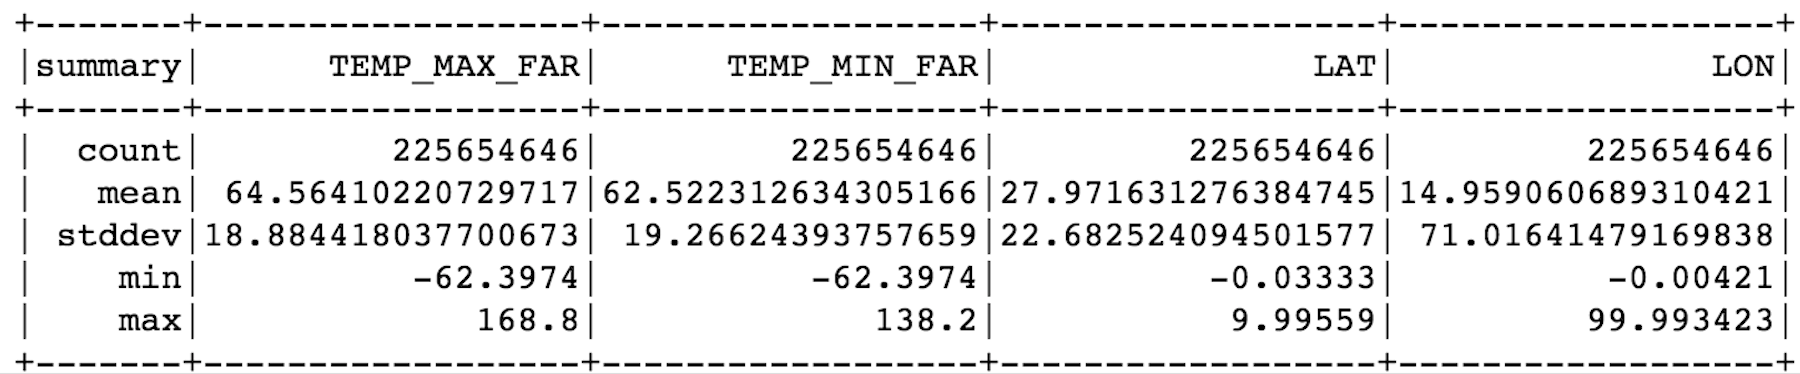
Congratulations! You have now successfully configured Sagemaker and EMR. You’re now ready for reading the dataset from Snowflake. This time, however, there’s no need to limit the number or results and, as you will see, you’ve now ingested 225 million rows.
sfOptions = {
  "sfURL" : param_values['/SNOWFLAKE/URL'],
  "sfAccount" : param_values['/SNOWFLAKE/ACCOUNT_ID'],
  "sfUser" : param_values['/SNOWFLAKE/USER_ID'],
  "sfPassword" : param_values['/SNOWFLAKE/PASSWORD'],
  "sfDatabase" : param_values['/SNOWFLAKE/DATABASE'],
  "sfSchema" : param_values['/SNOWFLAKE/SCHEMA'],
  "sfWarehouse" : param_values['/SNOWFLAKE/WAREHOUSE'],
}

SNOWFLAKE_SOURCE_NAME = "net.snowflake.spark.snowflake"

df = spark.read.format(SNOWFLAKE_SOURCE_NAME)
  .options(**sfOptions)
  .option("query",
"select (V:main.temp_max - 273.15) * 1.8000 + 32.00 as temp_max_far, " +
"       (V:main.temp_min - 273.15) * 1.8000 + 32.00 as temp_min_far, " +
"       cast(V:time as timestamp) time, " +
"       V:city.coord.lat lat, " +
"       V:city.coord.lon lon " +
"from snowflake_sample_data.weather.weather_14_total").load()
df.describe().show()
Conclusion
Cloud-based SaaS solutions have greatly simplified the build-out and setup of end-to-end machine learning (ML) solutions and have made ML available to even the smallest companies. What once took a significant amount of time, money and effort can now be accomplished with a fraction of the resources.
For more information on working with Spark, please review the excellent two-part post from Torsten Grabs and Edward Ma. The first part, Why Spark, explains benefits of using Spark and how to use the Spark shell against an EMR cluster to process data in Snowflake. The second part, Pushing Spark Query Processing to Snowflake, provides an excellent explanation of how Spark with query pushdown provides a significant performance boost over regular Spark processing.
A Sagemaker / Snowflake setup makes ML available to even the smallest budget. That leaves only one question. What will you do with your data?
You can review the entire blog series here: Part One > Part Two > Part Three > Part Four.